Salient Features of India constitution especially power and functions
Shape chef introduction
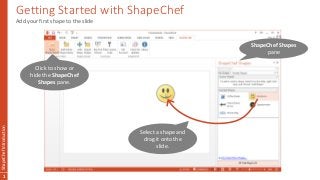
1. Getting Started with ShapeChef
ShapeChefIntroduction
1
Add your first shape to the slide
Click to show or
hide the ShapeChef
Shapes pane.
ShapeChef Shapes
pane
Select a shape and
drag it onto the
slide.
2. Adding Shapes to the Library
ShapeChefIntroduction
2
Create your own custom shapes
1. Select a shape (or group of shapes) on the
slide.
2. Right-click on the ShapeChef Shapes pane
where you want to add the shape.
3. Select Add Shape from the context menu.
4. Enter a name for the new shape, and hit
the return key.
4. Working with Categories
ShapeChefIntroduction
4
Organize your shapes into categories and sub categories
Right-click on the
category header and
select Add Root
Category or Add Sub
Category to create a
new category.
Select Category
Settings to configure
the size of the icons.
5. Downloading Shapes
ShapeChefIntroduction
5
Get access to ready-to-use shape collections
Click the Download
More Shapes link at
the bottom of the
My Shapes page.
Select an item from
the list, and click on
Download Now.
6. Creating an Online Shape Library
ShapeChefIntroduction
6
Create a shape library that “lives” on the ShapeChef servers and can be accessed by multiple users
Enter your email
address to create a
new online shape
library.
Switch to the Shared
Shapes tab …
… or click the
+ button.
• The system will check if there’s already an account
for your email address. If no account exists, you can
create a new one by entering your name and a
password.
• Once the new online shape library is created, it can
be used just like a local shape library. The only
exception is that changes are automatically
uploaded to the server.
7. Adding Users
ShapeChefIntroduction
7
Invite other users to your online shape library
Right-click the shape
library tab, and select
Add/invite user.
• Enter the user’s name and email address, and choose the
user’s access rights for the shape library.
• The user will receive an email with instructions on how to
access the shape library.
• You can also manage your shape library settings online in
your web browser at https://www.shapechef.com/account.
8. Importing/Exporting Shapes
ShapeChefIntroduction
8
Export a category (including all contained shapes and sub categories) to a single .scshapes file
Right-click on the
category’s header, and
select Export Category.
Save the category to a
.scshapes file.
Import
9. Getting the Full Version
• The trial version of ShapeChef is fully functional and will run for 30 days. After the trial
period expires, you will need to purchase a license from the ShapeChef website:
http://www.shapechef.com/order
• As soon as your payment is received, you will be sent a license name and code that can
be used to unlock the full version of ShapeChef:
1. Start PowerPoint.
2. Select the ShapeChef Ribbon tab.
3. Click on Enter License Code.
ShapeChefIntroduction
9
Purchase a license
10. Troubleshooting
• Check the Frequently Asked Questions section on the ShapeChef website:
http://www.shapechef.com/support/faq
• Ensure you have the latest version of ShapeChef installed:
• If you see an error message in the status bar, hover over it with the mouse to view
additional details:
• Contact us at support@shapechef.com.
• Attach the log files from the My DocumentsShapeChefLogs directory.
• Include a screenshot if applicable.
ShapeChefIntroduction
10
Get help with a problem