Site-to-Site IPSEC VPN Between Cisco ASA and Pfsense
•
4 recomendaciones•4,676 vistas

Configuration tutorial for a site to site IPSEC VPN between a Cisco ASA firewall and pfsense firewall.

Recomendados
Más contenido relacionado
La actualidad más candente
La actualidad más candente (20)
Destacado
Destacado (18)
Similar a Site-to-Site IPSEC VPN Between Cisco ASA and Pfsense
Similar a Site-to-Site IPSEC VPN Between Cisco ASA and Pfsense (20)
Último
Último (20)
Site-to-Site IPSEC VPN Between Cisco ASA and Pfsense
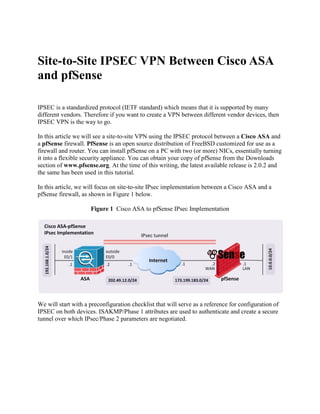
- 1. Site-to-Site IPSEC VPN Between Cisco ASA and pfSense IPSEC is a standardized protocol (IETF standard) which means that it is supported by many different vendors. Therefore if you want to create a VPN between different vendor devices, then IPSEC VPN is the way to go. In this article we will see a site-to-site VPN using the IPSEC protocol between a Cisco ASA and a pfSense firewall. PfSense is an open source distribution of FreeBSD customized for use as a firewall and router. You can install pfSense on a PC with two (or more) NICs, essentially turning it into a flexible security appliance. You can obtain your copy of pfSense from the Downloads section of www.pfsense.org. At the time of this writing, the latest available release is 2.0.2 and the same has been used in this tutorial. In this article, we will focus on site-to-site IPsec implementation between a Cisco ASA and a pfSense firewall, as shown in Figure 1 below. Figure 1 Cisco ASA to pfSense IPsec Implementation We will start with a preconfiguration checklist that will serve as a reference for configuration of IPSEC on both devices. ISAKMP/Phase 1 attributes are used to authenticate and create a secure tunnel over which IPsec/Phase 2 parameters are negotiated.
- 2. Table 1 Preconfiguration Checklist: ISAKMP/Phase-1 Attributes Attribute Value Encryption AES 128-bit Hashing SHA-1 Authentication method Preshared keys DH group Group 2 1024-bit field Lifetime 86,400 seconds We will use main mode rather than aggressive mode for negotiation. IPsec Phase 2 attributes are used to encrypt and decrypt the actual data traffic. Table 2 Preconfiguration Checklist: IPsec/Phase-2 Attributes Attribute Value Encryption AES 128-bit Hashing SHA-1 Lifetime 28,800 seconds4,608,000 kB Mode Tunnel PFS group None Now that we have determined what Phase 1 and Phase 2 attributes to use, we’re ready to configure IPsec. We assume that all IP addresses are already configured and basic connectivity exists between Cisco ASA and pfSense firewall.
- 3. ASA Configuration Let’s start with configuring the ASA (Using ASA 8.4(2) in this example): ! IPsec ISAKMP Phase 1 crypto ikev1 policy 1 authentication pre-share encryption aes hash sha group 2 lifetime 86400 exit ! crypto ikev1 enable outside tunnel-group 173.199.183.2 type ipsec-l2l tunnel-group 173.199.183.2 ipsec-attributes ikev1 pre-shared-key Cisc0 ! IPsec Phase 2 crypto ipsec ikev1 transform-set pfSense-AES128SHA esp-aes esp-sha-hmac ! access-list outside_cryptomap_10 remark ACL to encrypt traffic from ASA to pfSense access-list outside_cryptomap_10 extended permit ip 192.168.1.0 255.255.255.0 10.0.0.0 255.255.255.0 ! crypto map outside_map 10 match address outside_cryptomap_10 crypto map outside_map 10 set peer 173.199.183.2 crypto map outside_map 10 set ikev1 transform-set pfSense-AES128SHA crypto map outside_map interface outside
- 4. PfSense Configuration We open the URL http://173.199.183.2 in a Web browser to access the pfSense firewall and enter the default username/password of admin/pfsense. You may have noticed that 173.199.183.2 is the WAN IP address of the pfSense firewall that indicates we are accessing it from the Internet. After successfully logging in you reach the Status page which reports the summary state of your pfSense firewall. Go to VPN > IPsec using the menu and click add phase1 entry on the Tunnels tab. Configure ISAKMP/Phase 1 parameters as given in Table 1 and shown in the following screenshot.
- 6. Click the Save button to save the configuration and go back to the Tunnels tab. Click add phase 2 entry to configure IPsec/Phase 2 parameters as given in Table 2 and shown in the following screenshot. Click the Save button to save changes and go back to the Tunnels tab where you can view a summary of your Phase 1 and Phase 2 configuration. Check the Enable IPsec checkbox and press the Save button. In the end, press the Apply changes button to finalize your configuration, as shown in the following screenshot.
- 7. Our IPsec configuration is now complete on both devices. We can generate some traffic from a host in subnet 192.168.1.0/24 connected to Cisco ASA to a host in subnet 10.0.0.2/24 connected to pfSense, using the ping utility. If ping is successful between the two subnets, an IPsec tunnel is likely to have established successfully. The same can be verified using command show crypto ipsec stats on Cisco ASA. In order to check IPsec tunnel status on the pfSense firewall, go to Status > IPsec. If you see a tiny green icon in the Status column, IPsec tunnel is successfully established as shown in the following screenshot.
- 8. About the Author Harris Andrea is a Cisco Certified Professional with more than 18 years of experience working with Cisco network technologies. He is the author of two Cisco Books (“Cisco ASA Firewall Fundamentals” and “Cisco VPN Configuration Guide”) which have been embraced by thousands of Cisco professionals all over the world. You can find more Cisco configuration guides and tutorials on his blog here: http://www.networkstraining.com