Instruction Manual | IOR Crusader 5.8-40x56 | Optics Trade
•
0 recomendaciones•316 vistas

https://www.optics-trade.eu/en/ior-crusader-5-8-40x56.html

Recomendados
Recomendados
Más contenido relacionado
Similar a Instruction Manual | IOR Crusader 5.8-40x56 | Optics Trade
Similar a Instruction Manual | IOR Crusader 5.8-40x56 | Optics Trade (20)
Más de Optics-Trade
Más de Optics-Trade (20)
Último
Último (20)
Instruction Manual | IOR Crusader 5.8-40x56 | Optics Trade
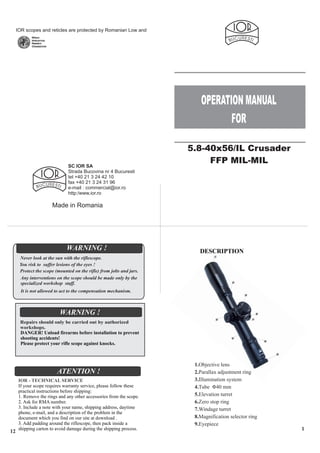
- 1. DANGER! Unload firearms before installation to prevent shooting accidents! Please protect your rifle scope against knocks. Repairs should only be carried out by authorized workshops. WARNING ! IOR - TECHNICAL SERVICE If your scope requires warranty service, please follow these practical instructions before shipping: 1. Remove the rings and any other accessories from the scope. 2. Ask for RMA number. 3. Include a note with your name, shipping address, daytime phone, e-mail, and a description of the problem in the document which you find on our site at download . 3. Add padding around the riflescope, then pack inside a shipping carton to avoid damage during the shipping process. ATENTION ! Any interventions on the scope should be made only by the specialized workshop staff. Protect the scope (mounted on the rifle) from jolts and jars. It is not allowed to act to the compensation mechanism. WARNING ! Never look at the sun with the riflescope. You risk to suffer lesions of the eyes ! SC IOR SA Strada Bucovina nr 4 Bucuresti tel +40 21 3 24 42 10 fax +40 21 3 24 31 96 e-mail : commercial@ior.ro http:/www.ior.ro 1 12 5.8-40x56/IL Crusader FFP MIL-MIL OPERATION MANUAL FOR Made in Romania IOR scopes and reticles are protected by Romanian Low and DESCRIPTION 1.Objective lens 2.Parallax adjustment ring 3.Illumination system 4.Tube Φ40 mm 5.Elevation turret 6.Zero stop ring 7.Windage turret 8.Magnification selector ring 9.Eyepiece
- 2. 11 11 13 CAUTION Dusty or sandy areas Operation in dusty or sandy areas can cause pitting and scratching of optical elements and damage to mechanical components. The general precautions are: - avoid pointing the scopes into the wind unless necessary for operation - insure that all dust and sand is removed from the scope after operation. Salt water areas Operation in salt water areas can cause corrosion of the scope. The general precautions are: - after expose to salt water clean with fresh water. - dry all parts completely (do NOT disassemble), use lense paper to clean the objective and eyepiece lens. Rainy or humid conditions Operation in rainy or humid conditions can cause corrosion and deterioration of scope. The general precautions are: - dry all parts after exposure to rain or high humidity. - Do NOT store scope in a wet carrying case or wet storage case. Technical Data 2 ·Magnification: 5,8 - 40 x · Objective diameter: 56 mm ·Field of view: angular: 3.9° - 0.57° linear: 6,8 - 1,0 m/100m ·Exit pupil diameter: 6,7 - 1.4 mm ·Dioptric copensation: ± 3 dpt ·Adjustment range: elevation 100 MOA windage ± 25 MOA ·Click value: ·Parallax correction: 7m - infinity ·Reticle: MIL / FFP / illuminated · Battery type: 3V CR 2032 ·Tube diameter: 40 mm ·Length: 410 mm ·Weight: 1270 g Accessories: Sun shade ……………….…. …………….. ………….. ……….. ………… … … …………………… 0.1 mrad …………… ……… …………………… …………………… ………………………… …………………………… ………………………… MAINTENANCE The riflescope does not require a special maintenance. However the owner must ensure a general maintenance, following these steps: § The lenses should be cleaned very carefully using a soft bristle and an optics-quality lens brush (for large particles removing), lens paper or cotton swabs and specials cleaning materials (liquid or non-liquid) for the final cleaning; § The main tube should be wipped with a soft, clean and dry cloth; § The moving parts should be cleaned to remove dust and other particles, using a soft bristle brush. WARRANTY AND REPAIR PROCESS ØThe warranty does not include damages caused by improper handling, installation, and unauthorized interventions in the riflescope. ØIn case of malfunction, return the scope to your dealer! WARNING ØFollow the instructions outlined in this technical book, to avoid damage or destructions of the riflescope and its accessories or bodily injury. ØYou should not look through the optic directly at the sun or laser light devices, to avoid severe and /or permanent eye damage. ØAlways check that the firearm is unloaded before undertaking any work upon it. CONTENTS Description 1 Technical characteristics 2 Install recommendations ………… ..….... 3 Basic operations ……………….……. Eyepiece adjustment ………………….… 4 Magnification selection 4 Parallax correction …………………….… 5 Elevation and windage adjustments 6 BDC rings 7 Illuminated reticle ………………..…….....8-9 Illumination system ……………………... 10 Maintenance …………………………… ..11 Warranty and repair process …..……..… . 11 Attention 12 Caution 13
- 3. 10 8 5 3 INSTALL RECOMMENDATIONS ·Very important: ensure that the rifle is unloaded and the bolt is removed from the action; ·Use only the proper tools, to not damage the riflescope, the rings and the base; ·Ensure mounts and a set of high-quality 40 mm rings, that are right for the application; ·Use the lowest possible ring height, for a stable firing position; ·Be sure that your scope contact only the mount rings and not interfere with firearm operations, when installed; ·Position your scope for an optimal eye relief; ·Check that the vertical line of the reticle is aligned with the vertical axis of the firearm; ·Tighten the ring screws evenly and securely, using the proper wrench: -first tighten the ring cap screw, alternating sides until the screws are hand tight; -ensure that there is an equal amount of space between the two halves of the rings; -finish tightening the ring cap screws using a 15 in-lbf torque wrench. PARALLAX CORRECTION ·The parallax free range of the scope is from 7 m to infinity! ·Parallax is the apparent displacement between the reticle and the target image, when you move the eye away from the center point of the exit pupil. This occurs when the target image and the reticle are not in the same optical plane. ·Target shooting demand extreme accuracy and need a parallax adjustment for precise shooting at various ranges. ·The parallax ring is located behind the objective lens, in front of the 40mm diameter tube. ·A lens is moved within the scope, causing the superposition of the image plane on the reticle engraved surface. ·To remove the parallax first adjust the eyepiece, for a sharp image of the reticle. ·Then move slightly your eye, from left to right or up and down, looking for any displacement of the target against the reticle. ·Turn the parallax adjustment ring until no apparent movement is observed. The aiming point should remain in exactly the same position against the target. ·Depending on atmospheric conditions and individual capabilities, minor setting differences may occur. ·It is no need to lubricate this adjustment. ILLUMINATED RETICLE ·The riflescope 5.8-40x56 is equiped with a reticle positioned in the first focal plane (FFP). ·The reticle has an illuminated central point and a scale with MIL divisions. ILLUMINATION SYSTEM ·The illumination system ensures 11 levels. ·To start the illumination set to any of the 11 positiones. ·To stop the illumination set to OFF position. ·For the battery changing remove the cap. Reticle SHX1-94
- 4. 4 9 6 7 - BASIC OPERATIONS EYEPIECE ADJUSTMENT ·The eyepiece lens is adjustable, for dioptric compensation. ·Look through the riflescope and rotate the eyepiece, in or out, until the reticle image is sharp. ·An internal lock ring prevent the eyepiece detachment from the scope. ·It is no need to lubricate this adjustment. MAGNIFICATION SELECTION ·Turn the selector ring to set the desired magnification. ·It is no need to lubricate this adjustment. ELEVATION AND WINDAGE ADJUSTMENTS ·Any deviation of the bullet impact point can be easily and precisely corrected, by adjusting the elevation and windage knobs. ·Elevation and windage adjustments allows the alinement of the scope to the rifle and gun aim point corrections. ·The elevation travel has 100 MOA and the windage travel has ± 25 MOA, equally to the right and to the left. ·The elevation and windage knobs (located on the right side and on the top of the turret housing) have for each increment a value of 0.1 mrad. · A click for each adjustment division can be heard and felt, so that the shouter can make adjustments without looking at the dials. ·The elevation knob has an arrow pointing at ”UP” for up and the windage knob has an arrow pointing at “R” for right. These symbols refer to the direction that the impact point of the bullet is moved. ·On the elevation turret is fixed a zero stop setting ring. ·It is no need to lubricate this adjustments. By request the 5.8-40x56 riflescope can be delivered with one of the two BDC rings below, instead of the regular one: For correct targeting the colors must be matched between the figures engraved on the ring and lines on the elevation knob body. BDC RINGS 0.338 Lapua 0.50 BMG - distance between big lines 1 MIL - distance between middle lines 0.5 MIL - distance between small lines 0.25 MIL - big line 0.75 MIL - middle line 0.4 MIL - small line 0.2 MIL - central dot 0.1 MIL - distance between gross lines 30 MIL - gross line 0.3 MIL