Primary Arms 4-14x44 FFP | ACSS HUD DMR 5.56 Reticle
•
0 recomendaciones•542 vistas

https://www.optics-trade.eu/en/primary-arms-4-14x44-ffp-53494.html
![1
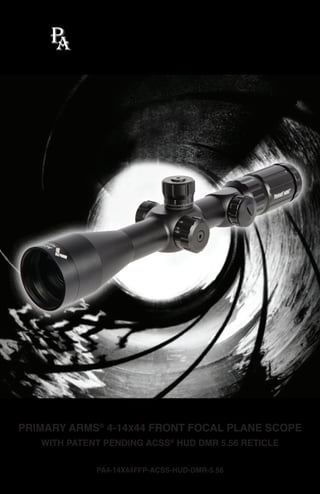
INTRODUCING THE 4-14X44 FFP ACSS®
HUD DMR 5.56
The ACSS®
HUD DMR 5.56 is a revolutionary DMR reticle designed to solve the
problems faced when engaging targets of opportunity and limited exposure, at
unknown ranges. Sometimes, there is no time to do the math or look at a data book.
Years of research resulted in the most advanced DMR reticle to date, increasing
first hit ratio and improving time on target. The ACSS®
HUD DMR 5.56 solves real
world shooting problems from fast, on-the-fly shots to complete firing solutions at
extended ranges. It is very fast at 4x magnification and extremely accurate at 14x
magnification, remaining true at all magnifications.
Elevation Turret
Parallax Adjust
Battery Cap
Illumination Knob
Windage Turret
Power Ring
Diopter Ring
ACHIEVING A CLEAR RETICLE PICTURE
Your 4-14x44 FFP ACSS®
HUD DMR 5.56 scope comes with an adjustable diopter
ring that must be set to match your eye. Located at the rear of the eyepiece, it is
marked simply [+ 0 -]. The diopter ring changes the focus of the reticle as you see it
inside the scope. It does not change the focus of objects that you look at through the
scope. Setting the diopter is the critical first step to successful precision shooting.
You can set the diopter before you have even mounted the scope in its rings.](data:image/gif;base64,R0lGODlhAQABAIAAAAAAAP///yH5BAEAAAAALAAAAAABAAEAAAIBRAA7)
Recomendados
Recomendados
Más contenido relacionado
La actualidad más candente
La actualidad más candente (20)
Similar a Primary Arms 4-14x44 FFP | ACSS HUD DMR 5.56 Reticle
Similar a Primary Arms 4-14x44 FFP | ACSS HUD DMR 5.56 Reticle (20)
Más de Optics-Trade
Más de Optics-Trade (20)
Último
Último (20)
Primary Arms 4-14x44 FFP | ACSS HUD DMR 5.56 Reticle
- 1. PRIMARY ARMS® 4-14X44 FRONT FOCAL PLANE SCOPE WITH PATENT PENDING ACSS® HUD DMR 5.56 RETICLE PA4-14X44FFP-ACSS-HUD-DMR-5.56
- 2. 1 INTRODUCING THE 4-14X44 FFP ACSS® HUD DMR 5.56 The ACSS® HUD DMR 5.56 is a revolutionary DMR reticle designed to solve the problems faced when engaging targets of opportunity and limited exposure, at unknown ranges. Sometimes, there is no time to do the math or look at a data book. Years of research resulted in the most advanced DMR reticle to date, increasing first hit ratio and improving time on target. The ACSS® HUD DMR 5.56 solves real world shooting problems from fast, on-the-fly shots to complete firing solutions at extended ranges. It is very fast at 4x magnification and extremely accurate at 14x magnification, remaining true at all magnifications. Elevation Turret Parallax Adjust Battery Cap Illumination Knob Windage Turret Power Ring Diopter Ring ACHIEVING A CLEAR RETICLE PICTURE Your 4-14x44 FFP ACSS® HUD DMR 5.56 scope comes with an adjustable diopter ring that must be set to match your eye. Located at the rear of the eyepiece, it is marked simply [+ 0 -]. The diopter ring changes the focus of the reticle as you see it inside the scope. It does not change the focus of objects that you look at through the scope. Setting the diopter is the critical first step to successful precision shooting. You can set the diopter before you have even mounted the scope in its rings.
- 3. 32 1. Turn the Power Ring to its highest setting, 14x, and point the scope at a bright, featureless background such as blue sky or a blank white wall. 2. Turn the Parallax Adjust Knob to infinity [∞]. 3. With your head in position behind the scope, look at the wall or sky instead. If you look through prescription glasses when shooting, wear them now too. After 5 or 6 seconds, close your eyes. 4. Now open your eye, glance through the scope and immediately see if the reticle is sharp or blurry. If you notice that the reticle seems blurry at first and then suddenly sharpens, your eyes have focused on the reticle itself instead of looking through the scope. You must adjust the diopter ring and try again. 5. If the reticle was blurry, turn the diopter ring a little and repeat the process again. The process will take multiple adjustments. Each time you repeat the process, ask yourself if the reticle was sharper or more blurry than before. The final adjustments may be very fine. If your eyes get watery or tired, walk away for a bit and come back to this later. 6. Once the reticle appears sharp as soon as you glance through the scope, the diopter is set for your eyes. Everyone’s eyes are slightly different, so the ideal adjustment changes from person to person. Many shooters will mark their correct diopter position with a little dab of paint or fingernail polish next to the 0 mark, in case the ring gets turned accidentally later on. Others will apply electrical tape around the diameter of the ring to hold it in place. ADJUSTING PARALLAX The Parallax Adjust knob is located on the left side of the scope, marked with ranges from 10 yards to infinity. Although it is often referred to as a “side focus” knob, parallax and focus are not the same thing. Parallax error occurs when the target’s image and the reticle are not aligned on the same focal plane inside the scope. Think of a mechanical car speedometer that seems to indicate a slightly different speed when you look at it from the passenger seat. Because the needle is positioned between you and the dial numbers, moving your head around changes where it seems to point. This creates an inconsistent picture depending on your point of view. Adjusting the Parallax Adjust knob eliminates parallax error at different ranges by bringing the reticle into the same focal plane as the target, like a digital speedometer displayed on a flat screen. Parallax error is most noticeable at high magnifications. Adjustment is much easier with your rifle secured by sandbags or a bipod. 1. Turn the Parallax Adjust knob until the target appears to be in focus. This will get you close to the correct adjustment. 2. Looking through the scope at the target, move your head just slightly from side to side. If you lose the sight picture you are moving too much. Go slowly, and see if the reticle appears to move relative to your target. A target that appears to be floating around the reticle as you move your head indicates parallax error. 3. If the target appears to move in the opposite direction of your head, turn the Side Focus Knob counterclockwise. If the target appears to move in the same direction as your head, turn the Side Focus Knob clockwise. These adjustments are very small. Move the Side Focus Knob just a little bit at a time and re-check. 4. Once the reticle and target hold their positions as you move your head from side to side, parallax error is eliminated for targets at this range. Normally this adjustment will also keep the target nicely in focus. However, to gain the most consistent hits on target, it is more important to eliminate parallax error than to have the target perfectly in focus. RETICLE ILLUMINATION The Reticle Illumination knob on the left side of the scope is marked with numbers of increasing brightness from 1 to 6. Between each number is an OFF setting. The cap unscrews counter-clockwise, holding a CR2032 battery with the positive (+) side facing towards the cap. Reticle illumination at the lower settings is useful in low light situations like sunrise and sunset. At the higher settings reticle illumination provides a quick aiming point even in daylight, especially at low magnification. UNDERSTANDING THE ACSS HUD DMR RETICLE Establishing Zero, or Dialing In Your Scope Use the horseshoe for fast target acquisition and the chevron tip for precision. Depending on type of ammunition, barrel length and weather conditions, the point of impact will vary. This chart is based on a 100 yard zero. HOW TO USE THE ZERO CHART • Starting on the left, locate your 5.56 NATO loading • Adjust zero depending on your bullet velocity/barrel length and dial in +/- in inches at 100 yards.
- 4. Bullet Drop Compensation and Auto-Range The bullet drop compensation is correlated with Auto Range. Simply range and engage. This feature further increases effectiveness by reducing time on target. No need to run data and turn turrets. Wrong range estimation is the number one reason shots are missed! The Auto-Range scale 54 The Auto-Wind scale Wind is always a factor in any long range shot, and it is the number two reason shots are missed. The ACSS® H.U.D. DMR 5.56 Reticle includes 5-10 mph wind holds at each range, improving time on target. Moving Target Auto Leads A revolutionary feature, ranging and leading moving targets! The proper range, lead, and bullet drop compensation have been pre-calculated! Fit the target’s head inside the proper circle to range and lead simultaneously. M193 55gr 3000-3050 fps zero in ½ inch high at 100 yards (14.5” barreled guns or .223 plinking ammo) 3100-3150 fps zero in at 100 yards (16” barrels) 3200-3250 fps zero in ¼” low at 100 yards (18-20” barrels) M855 62gr 2850-2900 fps zero ¼” high at 100 yards( 14’5” barrels or 62 plinking ammo) 2950-3000 fps zero in at 100 yards (16” barrels) 3050-3100 fps zero in 1/4” low at 100 yards ( 18-20” barrels) MK-262 77gr OTM 2500-2550 fps zero at 200 yards or 2” high at 100 yards (16”-18” barrels) 2700 fps zero 1 inch high at 100 yards (20” barrels) 2750 fps zero ½” inch high at 100 yards (22” barrels) 2800 fps zero at 100 yards (24” barrels) AUTO RANGE 4 6 8 0 6 4 8 0 AUTO RANGE CORRELATED WITH BDC. DESIGNED TO RANGE AND ENGAGE TARGETS USING THE SAME AIMING POINT. IDEAL FOR TARGETS PRONE OR FACING YOUR DIRECTLY. 400 500 600 700 800 900 1000 AUTO RANGE 18” AVG CENTER MASS RANGE FROM SHOULDER TO SHOULDER 200 300 18” 18” 36” 400 500 600 700 800 900 1000AUTO RANGE AVG TORSO START RANGING BELOW BELT LINE TO TOP OF HEAD. AUTO RANGE ALLOWS YOU TO RANGE TARGETS NOT FACING YOU OR MOVING FROM 400-1000 YARDS. AUTO RANGE ALLOWS YOU TO RANGE TARGETS FROM 400-1000 YARDS. AUTO RANGE AUTO RANGE AVG TORSO 36" 400 500 600 700 800 900 1000 200 300 400 500 600 700 800 900 1000 START RANGING BELOW BELT LINE TO TOP OF HEAD. AUTO RANGE CORRELATED WITH BDC. DESIGNED TO RANGE AND ENGAGE TARGETS USING THE SAME AIMING POINT. IDEAL FOR TARGETS PRONE OR FACING YOU DIRECTLY. AUTO RANGE 18" AVG CENTER MASS RANGE FROM SHOULDER TO SHOULDER 18" 18" WIND HOLDS4 6 8 0 0 8 6 4 6 4 8 0 5/10 mph full value wind 400-1000 yards WIND WILL OFF SET THE PATH OF THE BULLET. THE WIND HOLDS REPRESENT 5/10 MPH WIND HOLDS AT THE GIVEN RANGE 400 500 600 700 800 900 1000
- 5. 76 The Mil System Mils are seamlessly incorporated. Data can be run and dialed in for precision shooting. The chart below depicts bullet drop in Mils and Minutes of Angle (MOA) at the ranges specified by the BDC. Resetting Turret Position You can reset your turret positions to read “zero” after sighting in your rifle. Using the supplied 3mm Allen head wrench, turn the locking screw counter clockwise and remove it. Carefully pull the outer turret straight away from the scope tube until it comes completely off. Line up the 0 mark with the center line underneath, and press the outer turret straight towards the scope tube to reinstall. Finger pressure is all that is needed. With the outer turret reinstalled, hold it still with one hand while tightening the locking screw with the other hand. Do not over torque the locking screw. ACCESSORIES AND MORE INFORMATION The Primary Arms sun shade (PA4-14SS) is a useful addition to your 4-14x44 FFP ACSS® HUD DMR 5.56 scope. The sun shade can prevent glare when shooting in bright sunlight at certain angles, and can keep water away from the objective lens in the rain. The sun shade easily screws into the objective bell of the scope with no tools needed. For faster manipulation of the scope’s magnification function, 3 Gun Stuff offers a “Cat Tail” scope lever (GS-440), which attaches securely to the power ring. For more information on the 4-14x44 FFP ACSS® HUD DMR 5.56 and how to use the ACSS® HUD DMR 5.56 reticle, please check out our YouTube videos at https://www.youtube.com/watch?v=r0oLPFNWCLE. Please type in the link exactly, it is case sensitive.
- 6. 98 SPECIFICATIONS & FEATURES • Tube Size: 30mm • Magnification 4-14x • Lens Covers Included • Matte black finish • Main Material: Aluminum • Length: 330mm/13in. • Weight: 690g/24oz. • First Focal Plane • Nitrogen Purged • Fully Multicoated • Partial Reticle Illumination in Red • 6 Brightness Settings • Uses One CR2032 Battery (Included) • 3 Year Warranty • Waterproof: 11˚ C/52˚ F, 0.25m/10in., 3 min • Shockproof Rating: 1000g, 20 Times • Click Value 0.1 Mil • Exit Pupil: 11.2mm to 3.3mm • Eye Relief: 80mm to 82mm • Field of View: 27.2 to 7.85 feet at 100 Yards
- 7. WARRANTY: Your new scope has a three-year warranty against manufacturer defects. If you have any questions, please email or call. Email: info@primaryarms.com 713-344-9600 www.primaryarms.com