1. 1
All in One Solar Street Light User’s Manual
Introduction
Congratulations on being the proud owner of one of the best integrated Solar Street Light available
in India. Systellar is the first brand manufacturing All in One solar street light in India. This light uses
indigenous components including Solar Panel, Li-ion battery, LED Lamp & Microcontroller based
solar charge controller with PIR motion sensor.
Features
1. All in one solar street light comes with Built in passive infrared PIR motion sensor which
automatically detects human/traffic presence and adjusts LED brightness accordingly. If
motion sensor detects no motion for more than 1 minute, the controller reduces the
brightness of LED Lamp by one third. On detecting any movement in the range of 12-15m,
the light will automatically glow at full power. This provided required illumination only when
needed and helps in increasing battery backup time.
2. Microcontroller based design enables intelligent and efficient working
3. Totally off-grid design with very easy installation. Perfect for areas without Mains Supply
4. Lithium-ion battery technology provides longer product life and is completely maintenance
free.
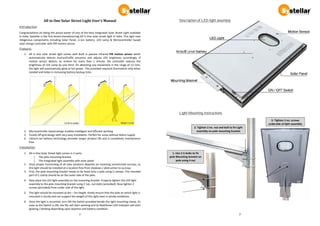
Installation
1. All in One Solar Street light comes in 2 parts.
The pole mounting bracket
The integrated light assembly with solar panel
2. Since proper functioning of all solar products depends on receiving unrestricted sunrays, so
this light should be installed at a location free from shadows / obstruction to sunrays.
3. First, the pole mounting bracket needs to be fixed onto a pole using C-clamps. The rounded
part of C-clamp should be on the outer side of the pole.
4. Now place the LED light assembly on the mounting bracket. Properly tighten the LED light
assembly to the pole mounting bracket using 2 nos. nut-bolts (provided). Now tighten 2
screws (provided) from under side of the light.
5. The light should be mounted at 4m – 5m height. Kindly ensure that the pole on which light is
mounted is sturdy and can support the weight of this light even in windy conditions.
6. Once the light is mounted, turn ON the Switch provided beside the light mounting clamp. As
soon as the Switch is ON, the SSL will start working and its Red/Green LED indicator will start
glowing / blinking depending upon daytime and battery condition.
2
Description of LED light assembly
Light Mounting Instructions
2. Tighten 2 no. nut and bolt to fix Light
assembly on pole mounting bracket
1. Use 2 U-bolts to fix
pole Mounting bracket on
pole using 4 nut
3. Tighten 2 no. screws
underside of light assembly
2
Description of LED light assembly
Light Mounting Instructions
2. Tighten 2 no. nut and bolt to fix Light
assembly on pole mounting bracket
1. Use 2 U-bolts to fix
pole Mounting bracket on
pole using 4 nut
3. Tighten 2 no. screws
underside of light assembly
2
Description of LED light assembly
Light Mounting Instructions
2. Tighten 2 no. nut and bolt to fix Light
assembly on pole mounting bracket
1. Use 2 U-bolts to fix
pole Mounting bracket on
pole using 4 nut
3. Tighten 2 no. screws
underside of light assembly
2. 3
GREEN & RED LED indications
LED Indication Condition
RED: One blink every 2 second Battery discharged
RED: Two blinks every 2 second Solar panel needs to be cleaned
RED: Solid On (Unlikely fault) Battery voltage too high (system fault)
GREEN: Solid On Battery fully charged
GREEN: One blink at 2 seconds interval During DAY, Charging current < 1 Amp
GREEN: Two blink at 2 seconds interval During DAY, Charging current > 1 Amp
Note that the above is prioritized list of indications i.e. when a higher priority indication is there, any lower
priority indication will not be given during that period.
Specifications
*In process of product improvement, product specifications can change without notice
LED Light 12W / 15W Models available
Solar panel Poly-crystalline 40W
Battery capacity 11.1V 10Ah / 15Ah Lithium –ion battery
Motion Sensor
PIR motion sensor (12m range)
Detection: 102° Horizontal & 92⁰ Vertical
Solar charge controller rating 5A
LUMEN Output
1200 /1500Lumen. Dimming to 1/3 intensity
on detecting no motion for more than 1
min.
LED Dispersion angle 120°
LED Driver efficiency >90% (Battery to Load)
LED light operating Voltage Range 9V -12.6 V DC
Load cut-off voltage for battery deep
discharge protection
9 V
Light mounting height 4m – 5m above ground level
Space between light poles 10 m – 15m
Humidity Range 0 to 95% (non-condensing)
Temperature range 0 to 60 °C
Product Warranty 2 Year (Battery warranty 1 year)
Light backup time Full night with dimming
Net Weight 11 kg
Weight with Packing 13 kg
Dimensions (L x W x H) 70cm x 45cm x 7cm
Packing Dimensions (L x W x H) 95cm x 53cm x 16cm
4
WARRANTY CERTIFICATE
We hereby warrant the equipment supplied as per details given below to be free from defects in
material and workmanship for a period specified below from the date of first purchase. The
warranty stands on all parts (except external body, switches & cables). Our liability under this
warranty is limited to repair / replacement of the defective part free of charge and does not
cover any indirect or consequential damages resulting from any reason what so ever. The warranty
will be applicable only if the equipment has been purchased from our authorised dealer & operated
within the operating limits and is not subject to mishandling or misuse by the purchaser. The
warranty does not cover burning of the circuit due to high voltage or due to wiring faults. The repair
will be carried out at the works of the dealer from whom the equipment has been purchased or at
company service centre in Meerut, U.P. The equipment must be sent to the dealer freight paid.
PRODUCT: All In One Solar Street Light
MODEL: □ 12W LED □ 15W LED
WARRANTY PERIOD: 2 years against manufacturing defects (1 year battery warranty)
SERIAL NUMBER: ____________________
COMPANY STAMP
Company Contact details:
Systellar Innovations
Shankar Chowk, Delhi Road, Meerut – 250002
Ph: 0121-2400394 | Email: info@systellar.in
www.systellar.co.in