Thunderbike Triumph Tiger 1050 Adventure Crashbars Fitting Instructions
•
0 recomendaciones•442 vistas

Instructions for fitting Thunderbike crashbars to the Triumph Tiger 1050

Recomendados
Recomendados
Más contenido relacionado
La actualidad más candente
La actualidad más candente (13)
Similar a Thunderbike Triumph Tiger 1050 Adventure Crashbars Fitting Instructions
Similar a Thunderbike Triumph Tiger 1050 Adventure Crashbars Fitting Instructions (10)
Más de Thunderbike Engineering Ltd
Más de Thunderbike Engineering Ltd (6)
Último
Último (20)
Thunderbike Triumph Tiger 1050 Adventure Crashbars Fitting Instructions
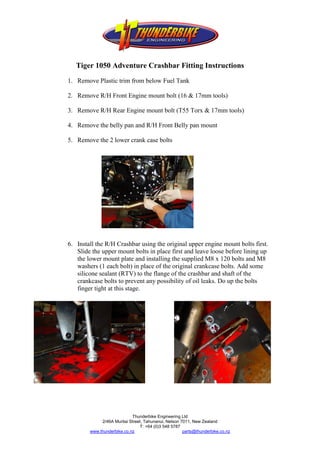
- 1. Tiger 1050 Adventure Crashbar Fitting Instructions 1. Remove Plastic trim from below Fuel Tank 2. Remove R/H Front Engine mount bolt (16 & 17mm tools) 3. Remove R/H Rear Engine mount bolt (T55 Torx & 17mm tools) 4. Remove the belly pan and R/H Front Belly pan mount 5. Remove the 2 lower crank case bolts 6. Install the R/H Crashbar using the original upper engine mount bolts first. Slide the upper mount bolts in place first and leave loose before lining up the lower mount plate and installing the supplied M8 x 120 bolts and M8 washers (1 each bolt) in place of the original crankcase bolts. Add some silicone sealant (RTV) to the flange of the crashbar and shaft of the crankcase bolts to prevent any possibility of oil leaks. Do up the bolts finger tight at this stage. Thunderbike Engineering Ltd 2/46A Muritai Street, Tahunanui, Nelson 7011, New Zealand T: +64 (0)3 548 5787 www.thunderbike.co.nz parts@thunderbike.co.nz
- 2. 7. Torque up all the fasteners in the following order: A. Lower Crank case bolts to 28Nm B. Upper Engine mount bolts 60Nm C. Belly pan mount bracket 18Nm 8. Now proceed to the other side of the bike and repeat the process note that the correct engine mount bolt is the lower rear pictured below and that you will have to install 4 of the supplied M8 washers on the supplied M8 x 45mm bolt between the crashbar and the frame (see picture below right) so that the crashbar is slightly clear of the engine mount plate. 9. Torque up the fasteners in the following order: A. Lower crank case bolts to 28Nm B. Upper front engine mount bolt to 60Nm C. Upper rear engine mount bolt to 20Nm D. Belly pan mount bracket 18Nm 10. Double check everything is in place and tight before re-fitting the belly pan and side covers. 11. Sit back and admire your handy work! Here’s hoping you never have to find out how effective they are! Thunderbike Engineering Ltd 2/46A Muritai Street, Tahunanui, Nelson 7011, New Zealand T: +64 (0)3 548 5787 www.thunderbike.co.nz parts@thunderbike.co.nz