Crypto Mogul, Accused Of Tax Evasion, Cops To False Return - Law360.pdf
The-MyCase-Client-Portal.pdf
1. Page 1 of 6
A
Client’s
Guide
to
MyCase
The
MyCase
Client
Portal
is
an
easy-‐to-‐use,
online
platform
that
provides
you
with
24/7
access
to
important
case
information
and
secure
communications
with
the
your
attorney.
Privately
and
securely
collaborate
with
your
attorney:
• Exchange
confidential
messages
• View
important
case
events
and
deadlines
• Upload
and
access
case
documents
• Comment
on
items
shared
with
you
Activate
Your
MyCase
Client
Portal
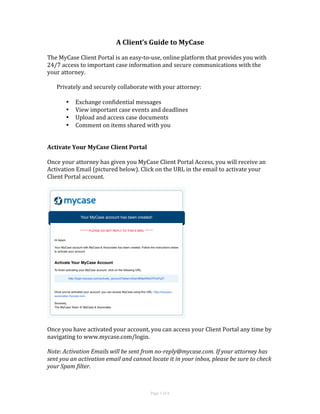
Once
your
attorney
has
given
you
MyCase
Client
Portal
Access,
you
will
receive
an
Activation
Email
(pictured
below).
Click
on
the
URL
in
the
email
to
activate
your
Client
Portal
account.
Once
you
have
activated
your
account,
you
can
access
your
Client
Portal
any
time
by
navigating
to
www.mycase.com/login.
Note:
Activation
Emails
will
be
sent
from
no-‐reply@mycase.com.
If
your
attorney
has
sent
you
an
activation
email
and
cannot
locate
it
in
your
inbox,
please
be
sure
to
check
your
Spam
filter.
2. Page 2 of 6
Navigate
Your
MyCase
Client
Portal
The
screen
shot
below
shows
the
MyCase
Client
Portal
Home
Screen.
This
is
what
you
will
first
see
each
time
you
log
into
your
Client
Portal.
1. Navigation
Tabs
&
Notification
Bubbles
–
There
are
6
Navigational
Tabs
in
the
Client
Portal:
Home,
Calendar,
Documents,
Billing,
Messages,
and
Comments.
In
the
screen
shot
above,
notice
the
red
bubbles
over
the
Calendar,
Billing,
and
Messaging
tab.
This
lets
you
know
that
you
have
a
new
item
waiting
for
you.
Any
time
a
new
item
is
shared
with
you,
a
red
notification
bubble
will
appear
in
your
portal.
2. Recent
Activity
-‐
The
Recent
Activity
stream
lists
updates
related
to
your
case
(i.e.
items
added
to
your
Client
Portal,
changes
made
to
items
already
shared
with
you,
and
communications
sent
to
you).
3. Upload
Document,
Send
Message
&
Pay
Invoice
-‐
These
are
the
main
actions
that
you
can
perform
in
the
Client
Portal.
Upload
Documents
lets
you
choose
a
file
from
your
hard
drive
and
upload
it
into
the
Client
Portal.
Send
Messages
lets
you
write
a
new
message
and
send
it
to
the
firm.
Finally,
if
enabled,
you
may
also
have
the
option
to
pay
your
invoices
through
the
Client
Portal.
4. Pay
Invoice
–
If
an
unpaid
invoice
has
been
posted
to
your
Client
Portal,
you
can
access
and
pay
the
invoice
by
selecting
the
“Pay
Invoice”
option.
Note:
Not
all
Client
Portals
are
enabled
with
online
payments.
5. Calendar
&
Recently
Uploaded
Documents
-‐
The
calendar
box
will
show
you
upcoming
events
and
deadlines.
The
documents
box
will
show
you
the
most
recently
uploaded
documents
that
have
been
shared
with
you.
3. Page 3 of 6
Uploading
Documents
Instead
of
using
email
or
traditional
mail
to
send
documents,
you
can
upload
documents
right
into
the
Client
Portal.
This
way,
your
attorney
can
have
instant,
secure
access
to
the
necessary
documents
they
need
to
work
on
your
case.
To
do
so,
click
on
the
“Upload
Document”
button
in
your
Client
Portal.
You
will
be
taken
to
the
Add
Document
Window
(pictured
below):
1. Case
Link
–
This
is
a
drop-‐down
menu
that
contains
all
the
cases/matters
that
you
have
been
linked
to.
Choose
the
case
that
you
are
uploading
the
document
for.
Note:
If
you
are
not
linked
to
multiple
cases,
the
“Case
Link”
option
will
not
be
present.
2. Doc.
Name
–
Provide
the
name
of
the
document
that
you
will
be
uploading
to
the
Client
Portal.
3. Source
–
Here
is
where
you
can
choose
the
file
you
would
like
to
upload
into
MyCase
from
your
computer.
You
can
drag
the
file
from
your
computer
to
the
Source
Box
or
select
“click
to
browse”
to
browse
your
computer’s
files.
4. Description
–
Provide
any
details
or
notes
you
would
like
to
share
with
your
attorney.
4. Page 4 of 6
Sending
Secure
Messages
Instead
of
sending
an
email
or
calling
your
attorney’s
office,
you
can
send
secure
messages
from
the
Client
Portal.
To
do
so,
click
on
the
“Send
Message”
button
and
you
will
be
taken
to
the
New
Message
Window
(pictured
below):
1. Case
Link
–
This
is
a
drop-‐down
menu
that
contains
each
of
the
cases/matters
that
you
have
been
linked
to.
Choose
the
case
that
your
message
is
regarding.
2. Send
To
–
Once
you
select
the
Case
Link,
you
will
see
the
attorney(s)
and
staff
working
on
your
case.
Check
the
box
next
to
the
people
you
would
like
to
send
the
message
to.
3. Subject
–
Enter
the
subject
for
the
message
here.
4. Message
–
Enter
the
message/body
that
you
would
like
to
send.
5. Page 5 of 6
Paying
an
Invoice
By
selecting
the
“Pay
Invoice”
option
on
your
Home
Screen,
you
will
be
taken
to
all
unpaid
invoices
posted
to
your
Client
Portal.
Select
the
invoice
that
you
would
like
to
pay.
If
the
attorney
has
enabled
online
payments
for
the
invoice,
you
will
have
an
option
to
“Pay
Invoice”
in
the
top-‐right
corner.
A
window
will
open
to
allow
you
to
pay
via
eCheck
and/or
Credit
Card.
Below
is
an
example
of
paying
with
eCheck.
You
will
need
the
following
information
available
if
you
are
planning
to
pay
directly
from
your
checking
account:
• First
Name
• Last
Name
• Routing
Number
• Account
Number
• Bank
Account
Type
(Personal
Checking
or
Business
Checking)
6. Page 6 of 6
Paying
an
Invoice
(continued)
Once
all
of
your
eCheck
payment
information
is
filled
out,
select
“Make
Secure
Payment.”
A
pop-‐up
window
will
appear,
asking
you
to
confirm
the
payment.
Upon
confirmation,
the
payment
will
be
processed.
If
the
payment
is
successful,
you
will
be
taken
to
a
confirmation
of
payment.
You
can
take
note
of
the
“Confirmation
Number”
for
your
reference.