How to make a free countdown calendar in WishSimply
•
0 recomendaciones•338 vistas

Learn how to make your own free countdown calendar in WishSimply easily by following out the simple and well illustrated instructions in this presentation. Make your own at https://wishsimply.com/countdown-calendar/
Denunciar
Compartir
Denunciar
Compartir
Descargar para leer sin conexión

Recomendados
Recomendados
Más contenido relacionado
Último
Último (8)
Panjim Goa Escort Girls ✿✸ 9971646499 ₢♚ Russian Call Girls Panjim Goa Direc...
Panjim Goa Escort Girls ✿✸ 9971646499 ₢♚ Russian Call Girls Panjim Goa Direc...
The 2024 Prime Day Panel: From Preparation to Profit
The 2024 Prime Day Panel: From Preparation to Profit
Call Girls In Dev kunj Delhi 9654467111 Short 1500 Night 6000
Call Girls In Dev kunj Delhi 9654467111 Short 1500 Night 6000
Digital Business Strategy - How Food Brands Compete Through Technology
Digital Business Strategy - How Food Brands Compete Through Technology
call Now 9811711561 Cash Payment乂 Call Girls in Dwarka
call Now 9811711561 Cash Payment乂 Call Girls in Dwarka
Hifi Agartala Escorts Service Girl ^ 9332606886, WhatsApp Anytime Agartala
Hifi Agartala Escorts Service Girl ^ 9332606886, WhatsApp Anytime Agartala
Destacado
Destacado (20)
How Race, Age and Gender Shape Attitudes Towards Mental Health
How Race, Age and Gender Shape Attitudes Towards Mental Health
AI Trends in Creative Operations 2024 by Artwork Flow.pdf
AI Trends in Creative Operations 2024 by Artwork Flow.pdf
Content Methodology: A Best Practices Report (Webinar)
Content Methodology: A Best Practices Report (Webinar)
How to Prepare For a Successful Job Search for 2024
How to Prepare For a Successful Job Search for 2024
Social Media Marketing Trends 2024 // The Global Indie Insights
Social Media Marketing Trends 2024 // The Global Indie Insights
Trends In Paid Search: Navigating The Digital Landscape In 2024
Trends In Paid Search: Navigating The Digital Landscape In 2024
5 Public speaking tips from TED - Visualized summary
5 Public speaking tips from TED - Visualized summary
Google's Just Not That Into You: Understanding Core Updates & Search Intent
Google's Just Not That Into You: Understanding Core Updates & Search Intent
The six step guide to practical project management
The six step guide to practical project management
Beginners Guide to TikTok for Search - Rachel Pearson - We are Tilt __ Bright...
Beginners Guide to TikTok for Search - Rachel Pearson - We are Tilt __ Bright...
Unlocking the Power of ChatGPT and AI in Testing - A Real-World Look, present...
Unlocking the Power of ChatGPT and AI in Testing - A Real-World Look, present...
How to make a free countdown calendar in WishSimply
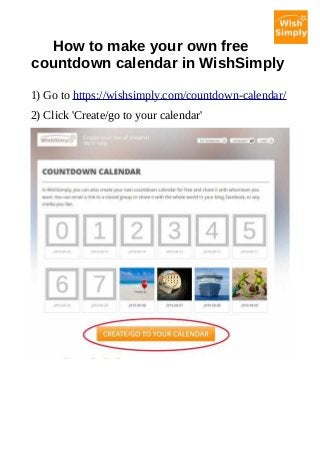
- 1. How to make your own free countdown calendar in WishSimply 1) Go to https://wishsimply.com/countdown-calendar/ 2) Click 'Create/go to your calendar'
- 2. 3) Login / Register to the service with Facebook or Google account.
- 3. 4) Click somewhere in the calendar details area (marked with red box) to open the Calendar details box.
- 4. 5) Set the last day of your choice and click 'save'. (In this example, I used Christmas Eve 2018-12- 24.) 6) Click 'Create a new item'.
- 5. 7) Add an image, text and link, or just one of them, and then click 'Save'.
- 6. 8) Then click 'Preview'. 9) Check that it looks good, and then click 'Close preview' at the bottom of the page.
- 7. 10) Then add more boxes to your calendar until it is ready. You can also change the title from 'My Calendar' to something else if you like, but I kept it as it was. You can also add a small header image/logo, but it is not required. 11) Finally, invite people to see your countdown calendar by clicking the 'invite' button. Or, you can make the calendar public from the settings and share the url as you like. That's it. Try it out at https://wishsimply.com