3 k3y installation_manual
•
0 recomendaciones•376 vistas

The document provides installation instructions for a 3K3y device in a PS3. It involves 21 steps: 1) copying BD drive keys to an SD card; 2) removing covers from the PS3; 3) disconnecting the BD drive power and FFC cables; 4) connecting 3K3y cables to the BD drive and motherboard; 5) placing the 3K3y PCB and connecting its cables; 6) passing an FFC through a hole and connecting it to a USB adapter; 7) plugging the adapter into the PS3's USB port; and 8) replacing the PS3 covers.

Recomendados
Más contenido relacionado
Destacado
Destacado (20)
3 k3y installation_manual
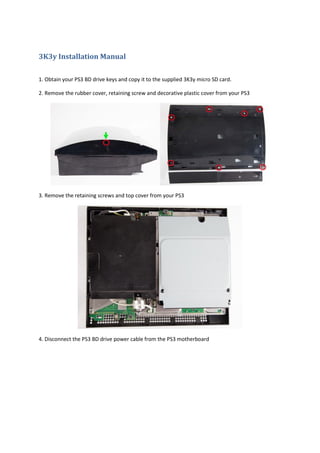
- 1. 3K3y Installation Manual 1. Obtain your PS3 BD drive keys and copy it to the supplied 3K3y micro SD card. 2. Remove the rubber cover, retaining screw and decorative plastic cover from your PS3 3. Remove the retaining screws and top cover from your PS3 4. Disconnect the PS3 BD drive power cable from the PS3 motherboard
- 2. 5. Lift out the PS3 BD drive and disconnect the 60way FFC 6. Connect the 3K3y power Y lead to the PS3 motherboard, ensure the double end of the Y lead is connected to the PS motherboard
- 3. 7. Connect the 3K3y 60 way FFC to the PS3 BD drive, fold it around the PS3 BD drive 8. Connect the 3K3y power Y lead to the PS3 BD drive 9. With the 60 way FFC held out of the way replace the PS3 BD drive
- 4. 10. Place the 3K3y PCB as shown below, secure the PCB using the supplied double sided sticker. 11. Refold the original PS3 60 way FFC as shown and connect it to the 3K3y PCB ZIF connector marked FROM_HOST1, if required it can be secured to the PS3 BD drive with tape. 12. Connect the 3K3y 60 way FFC (from step 7) to the 3K3y PCB ZIF connector marked TO_DRIVE1. Note, the blue plastic reinforcement of the 60 way FFC must be facing up. Note, the 60 way FFC must enter the ZIF at 90 degrees 13. Connect the 3K3y Y lead to the 3K3y PCB. Be sure to orientate the plug correctly, if the connector does not fit easily check the orientation. Never force the plug into the receptacle. 14. With a sharp knife or wire cutters remove part of the plastic case as shown
- 5. 15. Pass the 3K3y 4 way FFC through the hole made in step 14, take care not to damage the FFC 16. Connect the 3K3y 4 way FFC to the 3K3y USB adapter as shown. Note the blue plastic reinforcement must face the female end of the USB adapter. 17. Plug the USB adapter into one of the PS3's USB sockets
- 6. 18. Connect the 3K3y 4 way FFC to the 3K3y PCB ZIF connector marked USB. The 4 way FFC should be routed tidily and may be secured with tape. Note, the blue plastic reinforcement of the 4 way FFC must be facing up. 19. Install the 3K3y micro SD card 20. Carefully replace the top cover of the PS3, ensure that it does not interfere with the 3k3y PCB. Replace the top cover retaining screws. 21. Replace the decorative plastic cover and retaining screw.