

Recomendados
Más contenido relacionado
Destacado
Destacado (20)
Softimage ice swarm of flies tutorial
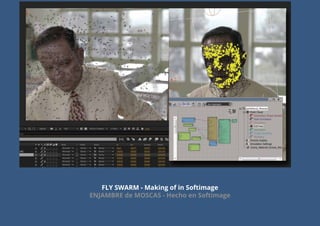
- 1. FLY SWARM - Making of in Softimage ENJAMBRE de MOSCAS - Hecho en Softimage
- 2. * Model ->Primitive->Model->Face Man. Press 8 (explorer). * Drag and drop “Basic Face”, over to Scene root with your mouse. * Middle click Man´s Face Model and hit delete. * Select “Basic_Face” and hit FREEZE to delete stack. We now have a Face. * File ->Import->Model->Fly.mdl (or .obj, fbx if static) * Your model should align it´s front (head) to Z axis My fly model is around 7 thousand triangles. Single mesh. It is not animated * File ->Import->Model->Fly.mdl (u .obj, fbx si es estático) * Tu modelo tiene que alinear la cabeza hacia el eje Z El modelo de la mosca tiene 7 mil triangulos. Un solo mesh. No está animada. * Model ->Primitive->Model->Face Man. Pulsa 8 (explorador). * Arrastra y suelta “Basic Face”, en Scene root con tu ratón. * Click Medio del ratón en Man´s Face Model y borralo. * Selecciona “Basic_Face” y pulsa FREEZE para borrar operadores. Tenemos el modelo de la cara. Create Face model Crea la cara1 Import/create the model of the insect Importar/crear el modelo del insecto2 * If you are going to animate: Create a .mdl in a separate .scn and import model * Si vas animar: Crea un .mdl en una .scn separada, e importa el modelo.
- 3. * Press 4 (ICE module). * Select Face_model. ICE->GET->Property>WeightMap. * Press W (brings weight brush). Paint the area where you want the insects to appear. When you finish, press ESC. * With head selected: ICE>Particles ->Create->Particle->Basic Emission * Press 8. Rename “pointcloud” to “Fly_pointcloud” * Pulse 4 (modulo ICE ). * Selecciona Face_model. ICE->GET->Property>WeightMap. * Pulsa W (aparece el pincel). Pinta el área donde quieres que los insec- tos aparezcan. Cuando termines, pulsa ESC. * Con la geometría de la cabeza seleccionada: ICE>Particles ->Create- >Particle->Basic Emission * Pulsa 8. Renombra “pointcloud” to “Fly_pointcloud” Asign ICE Tree to the face to emmit particles (insects) Asigne el árbol de ICE en la cara para emitir partículas (insectos)3 * This is my own face model * Este modelo facial es mio
- 4. * Push 8 (explorer). Select “Fly_poincloud”. Press ALT+9 (opens ICE tree) You will use ICE compounds. Press the Left-pointing arrow if it´s not pressed. All ICE compounds will appear to the left side of the ICE tree window) * On the search box of the ICE Tree to the upper left, type: INSTANCE. * Drag and drop “Instance Shape” (C) to the tree and plug it to SHAPE input from the EMIT FROM GEOMETRY compound (A). * Pulsa 8 (explorador). Selecciona “Fly_poincloud”. Pulsa ALT+9 (abre la ventana de ICE) Usaremos ICE compounds. Pulsa la flecha apuntando a la izquierda si es que no está presionada. Todos los ICE compounds aparecerán a la izquieda de la ventana del arbol ICE) * En el cámpo de búsqueda en el árbol de ICE en la parte superior izquierda, escribe: INSTANCE. * Arrastra y suelta “Instance Shape” (C) al arbol y conectalo a SHAPE en el com- pound de EMIT FROM GEOMETRY (A). Change the particles to instance the insects Cambia las partículas para instanciar los insectos4 B C D E F F SHOW ICE COMPOUNDS G G A * This is the complete ICE Tree * Este es el arbol ICE del efecto
- 5. Change the particles to instance the insects Cambia las partículas para instanciar los insectos4 * Double click on the INSTANCE SHAPE compound. A property page will open (PPG). * Click on Explorer on the ppg and select the Super_Low_Fly model. * Hierarchy mode should point to Object and Children You should now see the model´s face and insects all over it. * Double click Emit from Geometry compound. Select Emision Type to: Total number of particles. Change it to a number you like. At the bottom of Emit from Geometry, change Speed to: 0 * Haz doble click en el compound INSTANCE SHAPE. Se abre una prop- erty page (PPG). * Clicka en el botón de Explorer en la ppg y selecciona el modelo Super_Low_Fly. * Hierarchy mode debe estar en la selección: Object and Children Ahora verás el modelo de la cara lleno de insectos. * Haz doble click en Emit From Geometry. Cambia Emision Type a: Total number of particles. Cambialo con un número a tu gusto. Al final de Emit from Geometry cambia Speed a: 0.
- 6. Filter the emmision of insects through weight map Filtra la emisión de las partículas a través del weight map5 Play or scrub the timeline to frame 3 and you´ll see the insects on the head. We need to filter the emmiter (the head) only to the painted weightmap zones. * On the ICE tree search box, type: FILTER BY WEIGHT MAP. Drag and drop the compound and connect it to Execute on Emit 1 on the Emmit from Geometry compound. Scrub back timeline to frame 1, then scrub forward to frame 3, you´ll see insects only in the regions you painted. This is live, repaint or erase weight painting by pushing W (right click on this mode will erase). Pulsa Play o rueda la linea de tiempo al cuadro 3 y verás los insectos en la cabeza. Necesitamos filtrar la emisión (en la cabeza) solo para las zonas del Weight Map * En la ventana de ICE, en la caja de búsqueda escribe: FILTER BY WEIGHT MAP. Arrastra y suelta ese compound y conectalo a Execute on Emit 1 oen el compound de Emmit from Geometry. Retrocede al cuadro 1, luego vé al cuadro 3, verás a los insectos en la región que pintastes el Weight Map. El efecto es en vivo, repinta o borra pulsando W (click derecho del ratón en este modo borrará).
- 7. Align the insects to the contour of the face Alinea a los insectos al contorno de la cara6 We need to align the insects. * On the ICE Tree window´s search box type: Align Particle to Surface. Drag and drop it on the ICE Tree, connect it to Execute on Emit2, on the Emmit from Geometry compound. Your compounds will become red. It´s because it needs to know what the surface is. * Drag a connection from the purple point on the Get Basic_Face com- pound and connect it to “Surface1” on the Align Particle to Surface com- pound. Then connect it to Execute on Emit2 like in the picture. Necesitamos alinear los insectos a la cara * En la cája de búsqueda de la ventana ICE escribe: Align Particle to Surface. Arrastra y sueltalo en el arbol de ICE, conectalo a Execute on Emit2, en el compound de Emmit from Geometry. Tus componentes se pintarán de rojo. Es porque necesita conocer cuál es la superficie a la cual alinearse. * Arrastra una conexión desde el punto morado en el compound de Get Basic_Face y conéctalo al “Surface1” del compound de Align Particle to Surface. Conéctalo luego al Execute on Emit2 como en la foto.
- 8. RECAP RESUMEN! Create Face model Crea la cara1 Import/create the model of the insect Importar/crear el modelo del insecto2 Asign ICE Tree to the face to emmit particles (insects) Asigne el árbol de ICE en la cara para emitir partículas (insectos)3 Change the particles to instance the insects Cambia las partículas para instanciar los insectos4 Filter the emmision of insects through weight map Filtra la emisión de las partículas a través del weight map5 The rest of this tutorial is on a videotutorial: http://www.youtube.com/activemotionpictures El resto de este tutorial está en un videotutorial: http://www.youtube.com/activemotionpictures! Align the insects to the contour of the face Alinea a los insectos al contorno de la cara6