SlideShare una empresa de Scribd logo
1 de 6
Descargar para leer sin conexión
Timekeeper™                     TMR221B9-PROD1 Reference Guide                             11/08/09


                                                          1.   Press Reset to select timer mode.
  TMR221B9-PROD1 Production                               2.   Turn knob to set desired time The Select button
                                                               selects between setting tens of seconds and
       Monitoring System                                       seconds.
                                                          3.   Press the Start/Stop button to start the timer.

                                                         The Mode button selects between count up and count
                                                         down modes. You may change between count up and
                                                         count down modes while the timer is running. In count
                                                         down mode, the timer normally stops when it reaches
                                                         zero. In count up mode, the timer keeps running when
                                                         the preset time is reached.

                                                         Press and hold the Mode button to select the beeper
                                                         mode.
                                                         Press and hold the Select button to set the Wrap-It-Up
                                                         time.
                                                         Press the Select button again to set the Green warning
                                                         time.
                                                         User Programmable Presets
                                                          1.   Setup the timer preset time to the desired time.
                                                          2.   Set the green and yellow warning times the way
                                                               you want them.
                                                          3.   Also, select the desired count up/down mode and
The TimeKeeper      TM
                      Count Up/Down timer with                 beeper mode.
           Tallye and History Buttons                     4.   If you want the preset to start the timer
                                                               automatically, start the timer running.
This reference guide covers the TMR221B9-PROD1            5.   Press and hold the desired Preset button to save
model.                                                         the timer preset time, green and yellow warning
     The TMR221B9-PROD1 has a 4 digit display                 times, timer count up/down mode, beeper mode
         and 3 stored presets.                                 and timer run status. When the display changes,
                                                               the settings are stored.
Buttons and Controls                                      6.   To activate the Preset, a single button press will
      Timer Start/Stop.                                       set the timer to the to the exact conditions that
      Timer Reset.                                            were saved.
      Tallye Display.
      Timer Mode selects count up/down. Also
       used to set the beeper mode.
      Select button selects setting
       hours/minutes/seconds and warning times.
      Stored Presets.
      History button to archive timer values and
       production totals.
      Knob for setting times and other values.
LEDs and Displays
      Display: Red LED, 4 digits, 0.56" high.
      LEDs to display warning times: Green-             Starting and Pausing the timer.
       Running; Yellow-Warning; Red-Done.                The Run and Pause Buttons are used to run and pause
      LEDs to display timer mode: Beeper status,        the system without resetting the timer values. These
       Count Up/Down.                                    buttons are connected to remote inputs IN1 and IN2.
      LEDs to display tallye count status and SYNC            Press the RUN button to resume the timer.
       status.                                                 Press the PAUSE button to pause the timer.
Timer Mode


VERSION=17                                      Page 1                            www.alzatex.com
Timekeeper™                        TMR221B9-PROD1 Reference Guide                              11/08/09


Monitoring the production statistics from                   Production Counting Using a Running
      the Timekeeper™.                                            Goal
                                                            The Timekeeper™ can display a running goal and
                                                            production actual counts, calculate and display the
The Timekeeper™ can display the production Goal             deviation between the goal and actual counts, and
count and production Actual count.                          calculate and display production efficiency.
     Press the Tallye button to display the Actual
        count. The tallye LED on the                                To configure the Timekeeper™ to track a
        Timekeeper™will be off.                                      running goal:
     Press and hold the Tallye button to display                   Press RESET to put the Timekeeper™ into
        the production goal. The tallye LED on the                   timer mode.
        Timekeeper™will be off.                                     Turn the knob to set the Takt time. This is
                                                                     the time is takes to produce one unit of
                                                                     production. Press the SELECT button to
                                                                     switch between minutes and seconds.
                                                                    Enable mode 2 of the Auto-Reset-Start
                                                                     mode. See the following section for details.
                                                                    Disable the beeper by selecting mode 0 of the
                                                                     beeper mode. See the following section for
                                                                     details.
                                                                    Change the scale count if desired. See the
                                                                     following section for details.
                                                                    Press the START button to start the
                                                                     countdown timer.
                                                                    Increment the production actual count by
                                                                     momentarily grounding IN4. See the
                                                                     following section for details.
                                                                    Pause and Restart as necessary the timer by
                                                                     pressing the Run or Pause remote buttons.
                                                                    Reset the Goal and Production Actual
                                                                     counts by pressing and holding the
                                                                     HISTORY button (located on the back of the
Saving and Recalling production data                                 Timekeeper™). This action will store the
The Timekeeper™ can save the current production                      current Production Actual count before
actual count and recall the last 16 saved production                 resetting it to 0.
actual counts.
                                                            Production Counting Using a Static or
        Press the Tallye button to display the current
         production actual count. The tallye LED will             Shift Goal
         be off.                                            The Timekeeper™ can display a static or shift goal and
     Press and hold the Tallye button to display           production actual counts, calculate and display the
         the production goal. The tallye LED will be        deviation between the goal and actual counts, and
         off.                                               calculate and display production efficiency.
     Press the History button to display the
         archived actual production count. The tallye               To configure the Timekeeper™ to track a
         LED will be off.                                            static or shift goal:
     Press and hold the History button to store the                Press RESET to put the Timekeeper™ into
         current production actual count. The tallye                 timer mode.
         LED will be green. Once the actual count is                Press and hold the TALLYE button to enter
         stored the running goal and actual counts are               the Goal count set mode.
         reset.                                                     Turn the knob to set the static Goal. Press
The history button holds the most recent 16 production               the SELECT button to switch between the
actual values.                                                       upper and lower display digits.
                                                                    Change the Scale count if desired. See the
                                                                     following section for details.


VERSION=17                                         Page 2                            www.alzatex.com
Timekeeper™                       TMR221B9-PROD1 Reference Guide                            11/08/09


       Increment the production actual count by          RYG Indicators with the Target and
        grounding IN4. See the following section for           Actual Count.
        details.
       Reset the Goal and Production Actual              Beeper modes 5 through 6 only.
        counts by grounding IN3 or by pressing and
        holding the HISTORY button (located on the        The Timekeeper™ displays three warning indicators:
        back of the Timekeeper™). This action will        Green warning, Yellow warning, and a red warning.
        store the current Production Actual count
        before resetting it to 0.                                 The Green lamp comes on when the actual
       The Timekeeper™ will display the running                   count is greater than the target count.
        goal and production actual counts, and                    The Red lamp comes on when the actual
        calculate and display the deviation and                    count is less than the target count.
        efficiency.                                               The Yellow lamp comes on when the system
                                                                   is paused.
                                                          Beeper modes
Red-Yellow-Green Indicators                               The Timekeeper™ has several beeper modes
                                                          associated with the timer: Single beep; Beep at each of
The Red-Yellow-Green display has two operational          the warning times; and beeper disabled. In addition, the
modes.                                                    beeper can be triggered when the actual count is more
                                                          or less than the target count.
       The RYG display works in conjunction with
        the Takt timer.                                           Press and hold the MODE button to enter
       The RYG display works in conjunction with                  the beeper set mode. The Timekeeper™ will
        the Target and Actual counts.                              display Bn where n is a number between 0
                                                                   and 3.
                                                                  Turn the knob until the desired mode is set.
RYG Indicators with the Takt timer.                               Mode 0 turns the beeper off.
                                                                  Mode 1 turns the beeper on. The beeper will
Beeper modes 0 through 4 only.
                                                                   sound when counting complete.
                                                                  Mode 2 turns the beeper on. The beeper will
The Timekeeper™ displays three warning times:
                                                                   sound at the warning times and when the
Green warning, Yellow wrap-it-up warning, and a red
                                                                   countdown is complete.
you're done warning.
                                                                  Mode 3 turns the beeper on. The beeper will
                                                                   sound at the warning times and when the
Press and hold the Select button to set the Yellow
                                                                   countdown is complete. The beeper will beep
steady “Wrap-It-Up” time. Press the Select button
                                                                   every 2 seconds until reset.
again to set the Yellow blink warning time.
                                                                  Mode 4 turns the beeper on. The beeper will
                                                                   sound at the warning times and when the
       The Green lamp comes on when the timer is
                                                                   countdown is complete. The beeper will beep
        started and begins to blink at the green
                                                                   steady until reset.
        warning time.
                                                                  Mode 5 turns the beeper on. The beeper will
       When the Yellow warning time is reached, the
                                                                   beep when the actual count is equal to or
        Green lamp goes off and the Yellow lamp
                                                                   greater than the goal count.
        comes on.
                                                                  Mode 6 turns the beeper on. The beeper will
       When the timer reaches zero, the Red lamp
                                                                   beep when the actual count is less than the
        comes on and the Yellow lamp goes off. In
                                                                   goal count.
        the count down mode, the timer stops when
        the Red lamp turns on. In the count up mode,
        the timer keeps running after the lamp turns      Auto-Reset-Start mode
        Red.                                              The Timekeeper™ can reset and start again each time
       Press the reset button on the TimeKeeperTM to     its countdown reaches zero.
        turn off the Red lamp.
                                                          NOTE: This must be set to mode 2 to enable the TAKT
                                                          timer operation.


VERSION=17                                       Page 3                            www.alzatex.com
Timekeeper™                       TMR221B9-PROD1 Reference Guide                              11/08/09


                                                                     counts up until the next unit is produced.
Press and hold the START/STOP button to enter the                    (Unit address = A02)
Auto-Reset-Start set mode. The Timekeeper™                          Cycle time remaining This timer gets reset to
displays -n where n is a number between 0 and 3.                     the Takt time. It counts down to zero. When it
     Turn the knob until the desired mode is set.                   reaches zero, the timer starts count up from
     Mode 0 turns the Auto-Reset-Start mode off.                    zero indicating the number of minutes and
         The DONE LED will show solid red when                       seconds over the desired Takt time. (Unit
         the countdown is complete.                                  address = A02)
     Mode 1 turns the Auto-Reset-Start mode off.                   Red-Yellow-Green Indicators indicate
         The DONE LED will show blinking red                         whether current cycle time is ahead or behind
         when the countdown is complete.                             the production Takt Time.
     Mode 2 turns the Auto-Reset-Start mode on.                    Red-Yellow-Green Indicators indicate
         In timer mode the Timekeeper™ will reset                    whether you are ahead or behind the
         and restart the countdown automatically                     production goal.
         when the countdown ends. The DONE LED
         will blink red when the countdown is               NOTE: The beeper setup determines the action of the
         complete. The running goal will be                 red-yellow-green indicators.
         incremented by the scale factor amount.
     Mode 3 turns the Auto-Reset-Start mode on.            NOTE: The msetup value must be set to “L 01” to
         The Timekeeper™ will reset and start               display the actual cycle time. The msetup value must
         counting up automatically when the                 be set to “L 00” to display the cycle time remaining.
         countdown ends. The DONE LED will show             See the detailed user manual for more information.
         solid red when the countdown portion is
         complete. The running goal will be
         incremented by the scale factor amount.
Production Scale Factor
The Timekeeper™ can increment the production actual
count by a scale.

        Display the production actual count by
        Pressing the TALLYE button..The
        Timekeeper™ will display the current count.
       Press and hold the SELECT button to
        display the current SCALE FACTOR.
       Turn the knob until the scale factor is set.


Display Outputs
The Production Timekeeper™ can display multiple
parameters. Setup the unit address on the remote
displays to capture the desired values.

       Target Count. This can be a running or static
        production Goal count. (Unit address = A11)
       Actual Count. This the actual number of units
        produced. (Unit address = A12)
       Deviation between target and actual count.
        (Unit address = A13)
       Production Efficiency displayed as a
        percentage. (Unit address = A14)
       Local Display Contents. (Unit address = A00)
       Takt time. This is the target cycle time. (Unit
        address = A01)
       Actual cycle time. Each time a actual count is
        incremented, the cycle time is reset to zero. It


VERSION=17                                         Page 4                            www.alzatex.com
Timekeeper™                       TMR221B9-PROD1 Reference Guide          11/08/09


Remote Inputs
The timer can be started or paused by grounding the
run and pause inputs respectively. The production
actual count can be incremented by grounding the
Count input. The production count and production goal
can be reset by pressing the reset input.
     IN1 – RUN. Changes the display to timer
         mode and starts the timer if it is paused.
     IN2 – PAUSE. Pauses the timer. The timer
         stops, all indicators go off.
     IN3 – RESET. Stores the current production
         actual count. The tallye LED will be green.
         Once the actual count is stored the running
         goal and actual counts are reset. NOTE: This
         input functions the same as pressing and
         holding the HISTORY button.
     IN4 – COUNT. Increments the actual
         production count.

        NOTE: See the wiring diagrams for
        connection details.

An optional optical coupler may be connected to these
inputs for isolated machine control of these inputs.
Setting the Button Delay Hold-off
The Timekeeper™ remote inputs may be connected to
various sensors. There are occasions when it is
necessary to ignore button input after a trigger to
prevent false counts on the tallye count input. For
instance, you may be counting CD cases with a photo-
sensor. The passing of a CD case increments the count,
but a second, false count may occur since CD cases are
clear. By setting a delay time on the count input (IN4)
to 1 second, the false count will be ignored.

       Press the TALLYE button. The
        Timekeeper™ will display the current count.
       Press and hold the START button for 2
        seconds or more. The display will show the
        delay time for input one (IN1).
       Press the SELECT button 3 times. The
        Timekeeper™ will display the delay time for
        input four (IN4).
       Turn the KNOB until the desired time in
        tenths of a second is displayed. A value of 10
        = 1 second; A value of 27 = 2.7 seconds; etc.
       The new value is immediately stored in
        EEPROM and will be restored when the
        power is turned on


VERSION=17                                        Page 5           www.alzatex.com
Timekeeper™                                                                        TMR221B9-PROD1 Reference Guide          11/08/09


               Alzatex, Inc.
                               www.alzatex.com
                                             TMR-221E


            History
   Press Tallye , then History to display saved shift totals.
   Press and hold History to save shift totals, then clear current shift totals.

   Press Tallye to display current shift totals.
   Press and hold Tallye to change production goal.

                                                                                                      Tallye
                                                         TM
       TimeKeeper SM9                                                     Alzatex
  PM
                                                                                      Speaking

  Up                                                                                        Wrap
                                                                                            -it-up          1
 Beep
                                                                                    Done

                                                                                                            2

           Beep                                  Start        Reset   Wrap-it-up
           Up/Dn                                 Stop         Timer    Min/Sec
                                                                                                            3


           Mode                                                         Select
       Press and hold Select button to set wrap-it-up time.                         Press and hold Preset button
       Press and hold Mode button to turn beep off or on.                            to save current settings.


TMR221B9 Specifications
TMR221B9 - Count Up/Down timer with data logging
and presets.

              Auto-shutoff while operating from batteries.
              RJ-11 Jack with Four Remote ground closure
               inputs. Timer start, Timer Stop/Tallye Count
               down, Reset and Tallye Count up.
              RJ-11 Jack for production serial data output to
               operate remote displays or provide data to a
               computer or PLC.
              RJ-11 Jack for remote control serial data input
               from a PLC or computer.
              Controls: 9 buttons and a knob to perform
               various functions.
              Display: 4 digit LED with 0.56” high digits.
              Outputs: Production Goal, Actual, Deviation,
               Efficiency, Takt time, and Cycle time.
              Enclosure: Black painted metal.
              Dimensions: Surface mount W=4.375",
               L=4.5", D=1.375" (TMR221B9)


Power up
When the unit is first powered up all the LEDs come
on and the scrolling message "Hello” is displayed in
the display.


VERSION=17                                                                                                 Page 6   www.alzatex.com

Más contenido relacionado

Más de Alzatex, Inc.

Más de Alzatex, Inc. (6)

Ds231 Alarm Timer V0.06
Ds231 Alarm Timer V0.06Ds231 Alarm Timer V0.06
Ds231 Alarm Timer V0.06
 
Dsa244 B Um
Dsa244 B UmDsa244 B Um
Dsa244 B Um
 
Ds017 E Rate1
Ds017 E Rate1Ds017 E Rate1
Ds017 E Rate1
 
Ds017afm Cutout
Ds017afm CutoutDs017afm Cutout
Ds017afm Cutout
 
Dc117 A Production Timer
Dc117 A Production TimerDc117 A Production Timer
Dc117 A Production Timer
 
Dc117a Wiring0
Dc117a Wiring0Dc117a Wiring0
Dc117a Wiring0
 

Último

🐬 The future of MySQL is Postgres 🐘
🐬  The future of MySQL is Postgres   🐘🐬  The future of MySQL is Postgres   🐘
🐬 The future of MySQL is Postgres 🐘RTylerCroy
 
Mastering MySQL Database Architecture: Deep Dive into MySQL Shell and MySQL R...
Mastering MySQL Database Architecture: Deep Dive into MySQL Shell and MySQL R...Mastering MySQL Database Architecture: Deep Dive into MySQL Shell and MySQL R...
Mastering MySQL Database Architecture: Deep Dive into MySQL Shell and MySQL R...Miguel Araújo
 
04-2024-HHUG-Sales-and-Marketing-Alignment.pptx
04-2024-HHUG-Sales-and-Marketing-Alignment.pptx04-2024-HHUG-Sales-and-Marketing-Alignment.pptx
04-2024-HHUG-Sales-and-Marketing-Alignment.pptxHampshireHUG
 
Advantages of Hiring UIUX Design Service Providers for Your Business
Advantages of Hiring UIUX Design Service Providers for Your BusinessAdvantages of Hiring UIUX Design Service Providers for Your Business
Advantages of Hiring UIUX Design Service Providers for Your BusinessPixlogix Infotech
 
Axa Assurance Maroc - Insurer Innovation Award 2024
Axa Assurance Maroc - Insurer Innovation Award 2024Axa Assurance Maroc - Insurer Innovation Award 2024
Axa Assurance Maroc - Insurer Innovation Award 2024The Digital Insurer
 
HTML Injection Attacks: Impact and Mitigation Strategies
HTML Injection Attacks: Impact and Mitigation StrategiesHTML Injection Attacks: Impact and Mitigation Strategies
HTML Injection Attacks: Impact and Mitigation StrategiesBoston Institute of Analytics
 
Apidays New York 2024 - Scaling API-first by Ian Reasor and Radu Cotescu, Adobe
Apidays New York 2024 - Scaling API-first by Ian Reasor and Radu Cotescu, AdobeApidays New York 2024 - Scaling API-first by Ian Reasor and Radu Cotescu, Adobe
Apidays New York 2024 - Scaling API-first by Ian Reasor and Radu Cotescu, Adobeapidays
 
Developing An App To Navigate The Roads of Brazil
Developing An App To Navigate The Roads of BrazilDeveloping An App To Navigate The Roads of Brazil
Developing An App To Navigate The Roads of BrazilV3cube
 
Partners Life - Insurer Innovation Award 2024
Partners Life - Insurer Innovation Award 2024Partners Life - Insurer Innovation Award 2024
Partners Life - Insurer Innovation Award 2024The Digital Insurer
 
Histor y of HAM Radio presentation slide
Histor y of HAM Radio presentation slideHistor y of HAM Radio presentation slide
Histor y of HAM Radio presentation slidevu2urc
 
Bajaj Allianz Life Insurance Company - Insurer Innovation Award 2024
Bajaj Allianz Life Insurance Company - Insurer Innovation Award 2024Bajaj Allianz Life Insurance Company - Insurer Innovation Award 2024
Bajaj Allianz Life Insurance Company - Insurer Innovation Award 2024The Digital Insurer
 
TrustArc Webinar - Stay Ahead of US State Data Privacy Law Developments
TrustArc Webinar - Stay Ahead of US State Data Privacy Law DevelopmentsTrustArc Webinar - Stay Ahead of US State Data Privacy Law Developments
TrustArc Webinar - Stay Ahead of US State Data Privacy Law DevelopmentsTrustArc
 
Artificial Intelligence: Facts and Myths
Artificial Intelligence: Facts and MythsArtificial Intelligence: Facts and Myths
Artificial Intelligence: Facts and MythsJoaquim Jorge
 
Finology Group – Insurtech Innovation Award 2024
Finology Group – Insurtech Innovation Award 2024Finology Group – Insurtech Innovation Award 2024
Finology Group – Insurtech Innovation Award 2024The Digital Insurer
 
ProductAnonymous-April2024-WinProductDiscovery-MelissaKlemke
ProductAnonymous-April2024-WinProductDiscovery-MelissaKlemkeProductAnonymous-April2024-WinProductDiscovery-MelissaKlemke
ProductAnonymous-April2024-WinProductDiscovery-MelissaKlemkeProduct Anonymous
 
A Year of the Servo Reboot: Where Are We Now?
A Year of the Servo Reboot: Where Are We Now?A Year of the Servo Reboot: Where Are We Now?
A Year of the Servo Reboot: Where Are We Now?Igalia
 
Data Cloud, More than a CDP by Matt Robison
Data Cloud, More than a CDP by Matt RobisonData Cloud, More than a CDP by Matt Robison
Data Cloud, More than a CDP by Matt RobisonAnna Loughnan Colquhoun
 
How to Troubleshoot Apps for the Modern Connected Worker
How to Troubleshoot Apps for the Modern Connected WorkerHow to Troubleshoot Apps for the Modern Connected Worker
How to Troubleshoot Apps for the Modern Connected WorkerThousandEyes
 
Workshop - Best of Both Worlds_ Combine KG and Vector search for enhanced R...
Workshop - Best of Both Worlds_ Combine  KG and Vector search for  enhanced R...Workshop - Best of Both Worlds_ Combine  KG and Vector search for  enhanced R...
Workshop - Best of Both Worlds_ Combine KG and Vector search for enhanced R...Neo4j
 
Real Time Object Detection Using Open CV
Real Time Object Detection Using Open CVReal Time Object Detection Using Open CV
Real Time Object Detection Using Open CVKhem
 

Último (20)

🐬 The future of MySQL is Postgres 🐘
🐬  The future of MySQL is Postgres   🐘🐬  The future of MySQL is Postgres   🐘
🐬 The future of MySQL is Postgres 🐘
 
Mastering MySQL Database Architecture: Deep Dive into MySQL Shell and MySQL R...
Mastering MySQL Database Architecture: Deep Dive into MySQL Shell and MySQL R...Mastering MySQL Database Architecture: Deep Dive into MySQL Shell and MySQL R...
Mastering MySQL Database Architecture: Deep Dive into MySQL Shell and MySQL R...
 
04-2024-HHUG-Sales-and-Marketing-Alignment.pptx
04-2024-HHUG-Sales-and-Marketing-Alignment.pptx04-2024-HHUG-Sales-and-Marketing-Alignment.pptx
04-2024-HHUG-Sales-and-Marketing-Alignment.pptx
 
Advantages of Hiring UIUX Design Service Providers for Your Business
Advantages of Hiring UIUX Design Service Providers for Your BusinessAdvantages of Hiring UIUX Design Service Providers for Your Business
Advantages of Hiring UIUX Design Service Providers for Your Business
 
Axa Assurance Maroc - Insurer Innovation Award 2024
Axa Assurance Maroc - Insurer Innovation Award 2024Axa Assurance Maroc - Insurer Innovation Award 2024
Axa Assurance Maroc - Insurer Innovation Award 2024
 
HTML Injection Attacks: Impact and Mitigation Strategies
HTML Injection Attacks: Impact and Mitigation StrategiesHTML Injection Attacks: Impact and Mitigation Strategies
HTML Injection Attacks: Impact and Mitigation Strategies
 
Apidays New York 2024 - Scaling API-first by Ian Reasor and Radu Cotescu, Adobe
Apidays New York 2024 - Scaling API-first by Ian Reasor and Radu Cotescu, AdobeApidays New York 2024 - Scaling API-first by Ian Reasor and Radu Cotescu, Adobe
Apidays New York 2024 - Scaling API-first by Ian Reasor and Radu Cotescu, Adobe
 
Developing An App To Navigate The Roads of Brazil
Developing An App To Navigate The Roads of BrazilDeveloping An App To Navigate The Roads of Brazil
Developing An App To Navigate The Roads of Brazil
 
Partners Life - Insurer Innovation Award 2024
Partners Life - Insurer Innovation Award 2024Partners Life - Insurer Innovation Award 2024
Partners Life - Insurer Innovation Award 2024
 
Histor y of HAM Radio presentation slide
Histor y of HAM Radio presentation slideHistor y of HAM Radio presentation slide
Histor y of HAM Radio presentation slide
 
Bajaj Allianz Life Insurance Company - Insurer Innovation Award 2024
Bajaj Allianz Life Insurance Company - Insurer Innovation Award 2024Bajaj Allianz Life Insurance Company - Insurer Innovation Award 2024
Bajaj Allianz Life Insurance Company - Insurer Innovation Award 2024
 
TrustArc Webinar - Stay Ahead of US State Data Privacy Law Developments
TrustArc Webinar - Stay Ahead of US State Data Privacy Law DevelopmentsTrustArc Webinar - Stay Ahead of US State Data Privacy Law Developments
TrustArc Webinar - Stay Ahead of US State Data Privacy Law Developments
 
Artificial Intelligence: Facts and Myths
Artificial Intelligence: Facts and MythsArtificial Intelligence: Facts and Myths
Artificial Intelligence: Facts and Myths
 
Finology Group – Insurtech Innovation Award 2024
Finology Group – Insurtech Innovation Award 2024Finology Group – Insurtech Innovation Award 2024
Finology Group – Insurtech Innovation Award 2024
 
ProductAnonymous-April2024-WinProductDiscovery-MelissaKlemke
ProductAnonymous-April2024-WinProductDiscovery-MelissaKlemkeProductAnonymous-April2024-WinProductDiscovery-MelissaKlemke
ProductAnonymous-April2024-WinProductDiscovery-MelissaKlemke
 
A Year of the Servo Reboot: Where Are We Now?
A Year of the Servo Reboot: Where Are We Now?A Year of the Servo Reboot: Where Are We Now?
A Year of the Servo Reboot: Where Are We Now?
 
Data Cloud, More than a CDP by Matt Robison
Data Cloud, More than a CDP by Matt RobisonData Cloud, More than a CDP by Matt Robison
Data Cloud, More than a CDP by Matt Robison
 
How to Troubleshoot Apps for the Modern Connected Worker
How to Troubleshoot Apps for the Modern Connected WorkerHow to Troubleshoot Apps for the Modern Connected Worker
How to Troubleshoot Apps for the Modern Connected Worker
 
Workshop - Best of Both Worlds_ Combine KG and Vector search for enhanced R...
Workshop - Best of Both Worlds_ Combine  KG and Vector search for  enhanced R...Workshop - Best of Both Worlds_ Combine  KG and Vector search for  enhanced R...
Workshop - Best of Both Worlds_ Combine KG and Vector search for enhanced R...
 
Real Time Object Detection Using Open CV
Real Time Object Detection Using Open CVReal Time Object Detection Using Open CV
Real Time Object Detection Using Open CV
 

Tmr221b9 Production Counter Reference

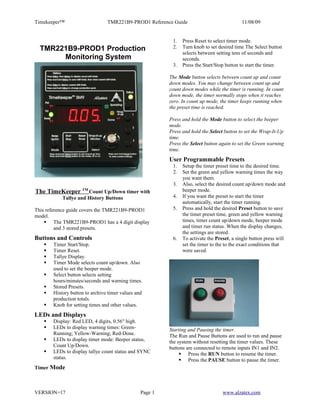
  • 1. Timekeeper™ TMR221B9-PROD1 Reference Guide 11/08/09 1. Press Reset to select timer mode. TMR221B9-PROD1 Production 2. Turn knob to set desired time The Select button selects between setting tens of seconds and Monitoring System seconds. 3. Press the Start/Stop button to start the timer. The Mode button selects between count up and count down modes. You may change between count up and count down modes while the timer is running. In count down mode, the timer normally stops when it reaches zero. In count up mode, the timer keeps running when the preset time is reached. Press and hold the Mode button to select the beeper mode. Press and hold the Select button to set the Wrap-It-Up time. Press the Select button again to set the Green warning time. User Programmable Presets 1. Setup the timer preset time to the desired time. 2. Set the green and yellow warning times the way you want them. 3. Also, select the desired count up/down mode and The TimeKeeper TM Count Up/Down timer with beeper mode. Tallye and History Buttons 4. If you want the preset to start the timer automatically, start the timer running. This reference guide covers the TMR221B9-PROD1 5. Press and hold the desired Preset button to save model. the timer preset time, green and yellow warning  The TMR221B9-PROD1 has a 4 digit display times, timer count up/down mode, beeper mode and 3 stored presets. and timer run status. When the display changes, the settings are stored. Buttons and Controls 6. To activate the Preset, a single button press will  Timer Start/Stop. set the timer to the to the exact conditions that  Timer Reset. were saved.  Tallye Display.  Timer Mode selects count up/down. Also used to set the beeper mode.  Select button selects setting hours/minutes/seconds and warning times.  Stored Presets.  History button to archive timer values and production totals.  Knob for setting times and other values. LEDs and Displays  Display: Red LED, 4 digits, 0.56" high.  LEDs to display warning times: Green- Starting and Pausing the timer. Running; Yellow-Warning; Red-Done. The Run and Pause Buttons are used to run and pause  LEDs to display timer mode: Beeper status, the system without resetting the timer values. These Count Up/Down. buttons are connected to remote inputs IN1 and IN2.  LEDs to display tallye count status and SYNC  Press the RUN button to resume the timer. status.  Press the PAUSE button to pause the timer. Timer Mode VERSION=17 Page 1 www.alzatex.com
  • 2. Timekeeper™ TMR221B9-PROD1 Reference Guide 11/08/09 Monitoring the production statistics from Production Counting Using a Running the Timekeeper™. Goal The Timekeeper™ can display a running goal and production actual counts, calculate and display the The Timekeeper™ can display the production Goal deviation between the goal and actual counts, and count and production Actual count. calculate and display production efficiency.  Press the Tallye button to display the Actual count. The tallye LED on the  To configure the Timekeeper™ to track a Timekeeper™will be off. running goal:  Press and hold the Tallye button to display  Press RESET to put the Timekeeper™ into the production goal. The tallye LED on the timer mode. Timekeeper™will be off.  Turn the knob to set the Takt time. This is the time is takes to produce one unit of production. Press the SELECT button to switch between minutes and seconds.  Enable mode 2 of the Auto-Reset-Start mode. See the following section for details.  Disable the beeper by selecting mode 0 of the beeper mode. See the following section for details.  Change the scale count if desired. See the following section for details.  Press the START button to start the countdown timer.  Increment the production actual count by momentarily grounding IN4. See the following section for details.  Pause and Restart as necessary the timer by pressing the Run or Pause remote buttons.  Reset the Goal and Production Actual counts by pressing and holding the HISTORY button (located on the back of the Saving and Recalling production data Timekeeper™). This action will store the The Timekeeper™ can save the current production current Production Actual count before actual count and recall the last 16 saved production resetting it to 0. actual counts. Production Counting Using a Static or  Press the Tallye button to display the current production actual count. The tallye LED will Shift Goal be off. The Timekeeper™ can display a static or shift goal and  Press and hold the Tallye button to display production actual counts, calculate and display the the production goal. The tallye LED will be deviation between the goal and actual counts, and off. calculate and display production efficiency.  Press the History button to display the archived actual production count. The tallye  To configure the Timekeeper™ to track a LED will be off. static or shift goal:  Press and hold the History button to store the  Press RESET to put the Timekeeper™ into current production actual count. The tallye timer mode. LED will be green. Once the actual count is  Press and hold the TALLYE button to enter stored the running goal and actual counts are the Goal count set mode. reset.  Turn the knob to set the static Goal. Press The history button holds the most recent 16 production the SELECT button to switch between the actual values. upper and lower display digits.  Change the Scale count if desired. See the following section for details. VERSION=17 Page 2 www.alzatex.com
  • 3. Timekeeper™ TMR221B9-PROD1 Reference Guide 11/08/09  Increment the production actual count by RYG Indicators with the Target and grounding IN4. See the following section for Actual Count. details.  Reset the Goal and Production Actual Beeper modes 5 through 6 only. counts by grounding IN3 or by pressing and holding the HISTORY button (located on the The Timekeeper™ displays three warning indicators: back of the Timekeeper™). This action will Green warning, Yellow warning, and a red warning. store the current Production Actual count before resetting it to 0.  The Green lamp comes on when the actual  The Timekeeper™ will display the running count is greater than the target count. goal and production actual counts, and  The Red lamp comes on when the actual calculate and display the deviation and count is less than the target count. efficiency.  The Yellow lamp comes on when the system is paused. Beeper modes Red-Yellow-Green Indicators The Timekeeper™ has several beeper modes associated with the timer: Single beep; Beep at each of The Red-Yellow-Green display has two operational the warning times; and beeper disabled. In addition, the modes. beeper can be triggered when the actual count is more or less than the target count.  The RYG display works in conjunction with the Takt timer.  Press and hold the MODE button to enter  The RYG display works in conjunction with the beeper set mode. The Timekeeper™ will the Target and Actual counts. display Bn where n is a number between 0 and 3.  Turn the knob until the desired mode is set. RYG Indicators with the Takt timer.  Mode 0 turns the beeper off.  Mode 1 turns the beeper on. The beeper will Beeper modes 0 through 4 only. sound when counting complete.  Mode 2 turns the beeper on. The beeper will The Timekeeper™ displays three warning times: sound at the warning times and when the Green warning, Yellow wrap-it-up warning, and a red countdown is complete. you're done warning.  Mode 3 turns the beeper on. The beeper will sound at the warning times and when the Press and hold the Select button to set the Yellow countdown is complete. The beeper will beep steady “Wrap-It-Up” time. Press the Select button every 2 seconds until reset. again to set the Yellow blink warning time.  Mode 4 turns the beeper on. The beeper will sound at the warning times and when the  The Green lamp comes on when the timer is countdown is complete. The beeper will beep started and begins to blink at the green steady until reset. warning time.  Mode 5 turns the beeper on. The beeper will  When the Yellow warning time is reached, the beep when the actual count is equal to or Green lamp goes off and the Yellow lamp greater than the goal count. comes on.  Mode 6 turns the beeper on. The beeper will  When the timer reaches zero, the Red lamp beep when the actual count is less than the comes on and the Yellow lamp goes off. In goal count. the count down mode, the timer stops when the Red lamp turns on. In the count up mode, the timer keeps running after the lamp turns Auto-Reset-Start mode Red. The Timekeeper™ can reset and start again each time  Press the reset button on the TimeKeeperTM to its countdown reaches zero. turn off the Red lamp. NOTE: This must be set to mode 2 to enable the TAKT timer operation. VERSION=17 Page 3 www.alzatex.com
  • 4. Timekeeper™ TMR221B9-PROD1 Reference Guide 11/08/09 counts up until the next unit is produced. Press and hold the START/STOP button to enter the (Unit address = A02) Auto-Reset-Start set mode. The Timekeeper™  Cycle time remaining This timer gets reset to displays -n where n is a number between 0 and 3. the Takt time. It counts down to zero. When it  Turn the knob until the desired mode is set. reaches zero, the timer starts count up from  Mode 0 turns the Auto-Reset-Start mode off. zero indicating the number of minutes and The DONE LED will show solid red when seconds over the desired Takt time. (Unit the countdown is complete. address = A02)  Mode 1 turns the Auto-Reset-Start mode off.  Red-Yellow-Green Indicators indicate The DONE LED will show blinking red whether current cycle time is ahead or behind when the countdown is complete. the production Takt Time.  Mode 2 turns the Auto-Reset-Start mode on.  Red-Yellow-Green Indicators indicate In timer mode the Timekeeper™ will reset whether you are ahead or behind the and restart the countdown automatically production goal. when the countdown ends. The DONE LED will blink red when the countdown is NOTE: The beeper setup determines the action of the complete. The running goal will be red-yellow-green indicators. incremented by the scale factor amount.  Mode 3 turns the Auto-Reset-Start mode on. NOTE: The msetup value must be set to “L 01” to The Timekeeper™ will reset and start display the actual cycle time. The msetup value must counting up automatically when the be set to “L 00” to display the cycle time remaining. countdown ends. The DONE LED will show See the detailed user manual for more information. solid red when the countdown portion is complete. The running goal will be incremented by the scale factor amount. Production Scale Factor The Timekeeper™ can increment the production actual count by a scale.  Display the production actual count by Pressing the TALLYE button..The Timekeeper™ will display the current count.  Press and hold the SELECT button to display the current SCALE FACTOR.  Turn the knob until the scale factor is set. Display Outputs The Production Timekeeper™ can display multiple parameters. Setup the unit address on the remote displays to capture the desired values.  Target Count. This can be a running or static production Goal count. (Unit address = A11)  Actual Count. This the actual number of units produced. (Unit address = A12)  Deviation between target and actual count. (Unit address = A13)  Production Efficiency displayed as a percentage. (Unit address = A14)  Local Display Contents. (Unit address = A00)  Takt time. This is the target cycle time. (Unit address = A01)  Actual cycle time. Each time a actual count is incremented, the cycle time is reset to zero. It VERSION=17 Page 4 www.alzatex.com
  • 5. Timekeeper™ TMR221B9-PROD1 Reference Guide 11/08/09 Remote Inputs The timer can be started or paused by grounding the run and pause inputs respectively. The production actual count can be incremented by grounding the Count input. The production count and production goal can be reset by pressing the reset input.  IN1 – RUN. Changes the display to timer mode and starts the timer if it is paused.  IN2 – PAUSE. Pauses the timer. The timer stops, all indicators go off.  IN3 – RESET. Stores the current production actual count. The tallye LED will be green. Once the actual count is stored the running goal and actual counts are reset. NOTE: This input functions the same as pressing and holding the HISTORY button.  IN4 – COUNT. Increments the actual production count. NOTE: See the wiring diagrams for connection details. An optional optical coupler may be connected to these inputs for isolated machine control of these inputs. Setting the Button Delay Hold-off The Timekeeper™ remote inputs may be connected to various sensors. There are occasions when it is necessary to ignore button input after a trigger to prevent false counts on the tallye count input. For instance, you may be counting CD cases with a photo- sensor. The passing of a CD case increments the count, but a second, false count may occur since CD cases are clear. By setting a delay time on the count input (IN4) to 1 second, the false count will be ignored.  Press the TALLYE button. The Timekeeper™ will display the current count.  Press and hold the START button for 2 seconds or more. The display will show the delay time for input one (IN1).  Press the SELECT button 3 times. The Timekeeper™ will display the delay time for input four (IN4).  Turn the KNOB until the desired time in tenths of a second is displayed. A value of 10 = 1 second; A value of 27 = 2.7 seconds; etc.  The new value is immediately stored in EEPROM and will be restored when the power is turned on VERSION=17 Page 5 www.alzatex.com
  • 6. Timekeeper™ TMR221B9-PROD1 Reference Guide 11/08/09 Alzatex, Inc. www.alzatex.com TMR-221E History Press Tallye , then History to display saved shift totals. Press and hold History to save shift totals, then clear current shift totals. Press Tallye to display current shift totals. Press and hold Tallye to change production goal. Tallye TM TimeKeeper SM9 Alzatex PM Speaking Up Wrap -it-up 1 Beep Done 2 Beep Start Reset Wrap-it-up Up/Dn Stop Timer Min/Sec 3 Mode Select Press and hold Select button to set wrap-it-up time. Press and hold Preset button Press and hold Mode button to turn beep off or on. to save current settings. TMR221B9 Specifications TMR221B9 - Count Up/Down timer with data logging and presets.  Auto-shutoff while operating from batteries.  RJ-11 Jack with Four Remote ground closure inputs. Timer start, Timer Stop/Tallye Count down, Reset and Tallye Count up.  RJ-11 Jack for production serial data output to operate remote displays or provide data to a computer or PLC.  RJ-11 Jack for remote control serial data input from a PLC or computer.  Controls: 9 buttons and a knob to perform various functions.  Display: 4 digit LED with 0.56” high digits.  Outputs: Production Goal, Actual, Deviation, Efficiency, Takt time, and Cycle time.  Enclosure: Black painted metal.  Dimensions: Surface mount W=4.375", L=4.5", D=1.375" (TMR221B9) Power up When the unit is first powered up all the LEDs come on and the scrolling message "Hello” is displayed in the display. VERSION=17 Page 6 www.alzatex.com