
Recomendados
Más contenido relacionado
Destacado
Destacado (19)
Similar a Programming Addressable LED Strips
Similar a Programming Addressable LED Strips (20)
Último
Último (20)
Programming Addressable LED Strips
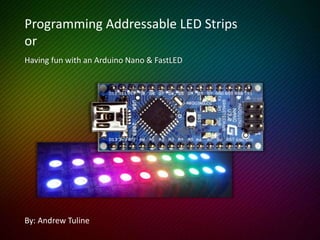
- 1. Having fun with an Arduino Nano & FastLED By: Andrew Tuline Programming Addressable LED Strips or
- 2. Overview • Introductions • To program or not to program • Install IDE and check out drivers • Included examples • More examples • Some reference material • Create your own project Work on your own or with partners, and help each other out.
- 3. This Workshop If you wish to program: • Assumes you’re familiar with .zip files, folders • Basic C++ programming • We’ll try several cool lighting examples Your Arduino is already programmed with an awesome demo, so you don’t NEED to re-program it.
- 4. Installing Arduino Software • On Windows 7 • Installs to C:Program Files (x86)Arduino • Your programs are in C:UsersuseridDocumentsArduino • ‘Tools | Board’ should be changed to say ‘Arduino Nano w/ ATmega328’ • In Device Manager, see ‘Ports (COM & LPT)’ • Device drivers in C:Program Files (x86)ArduinodriversFTDI USB Drivers (we may be using another set of drivers) Are you running 32 bit or 64 bit?
- 5. Touring the IDE • ‘File | Examples’ includes lots of examples • ‘File | Upload’ is how we compile and upload our program to the Arduino • ‘Help | Reference’ includes a local copy of the Language Reference Make GOOD use of those examples!
- 6. Test the Drivers Declare constants & global variables One time setup of ports Continuous loop Test your drivers by compiling and uploading Blink.ino
- 7. Arduino Nano Pins • Digital pins (input/output) • Analog pins (input/output) • Vin, Ground pins • 5V, 3.3V pins • Analog out is PWM • Most pins support other functions This project uses Vin, 5V, Ground and a few digital pins
- 8. Addressable LED Strips • Traditionally, we assign output values to each R, G and B pin on each LED • This can use up a LOT of pins • Addressable LED strips provide circuitry to communicate serially
- 9. LED Strip Connections D12 – D11 – 5V – Gnd – D6 – Vin – Data in Clock in 5V Gnd Button Battery + We’re using APA102 LED’s, aka DotStars
- 10. What is FastLED? • FastLED is a fast, easy-to-use Arduino library for programming addressable LED strips. • FastLED is used by thousands of developers. • It’s FAST! Do a YouTube search for ‘FastLED’
- 11. Downloading FastLED • The latest version is on GitHub at: https://github.com/FastLED/FastLED • Download the zip file. • Extract the directory FastLED-master. • Rename the directory from: FastLED-master to FastLED • Place that directory into: C:Program Files(x86)Arduinolibraries
- 12. FirstLight Example • In the Arduino IDE, select ‘File | Examples | FastLED | FirstLight’ • We need to change the type of LED’s. • We need to change the data (and clock) pins. • We need to change the number of LED’s. • We then need to change the definition. We may need to change colour order!
- 13. FirstLight Code #include "FastLED.h" #define NUM_LEDS 20 #define DATA_PIN 12 #define CLOCK_PIN 11 uint8_t max_bright = 64; CRGB leds[NUM_LEDS]; void setup() { FastLED.addLeds<APA102, DATA_PIN, CLOCK_PIN, GRB>(leds, NUM_LEDS); FastLED.setBrightness(max_bright); } void loop() { for (int whiteLed = 0; whiteLed < NUM_LEDS; whiteLed++) { leds[whiteLed] = CRGB::White; FastLED.show(); delay(100); leds[whiteLed] = CRGB::Black; } } The white LED should march across the array. Try red! // Include the library // Number of LED’s // Our data pin // Our clock pin // Define brightness limiter // Define the LED array // Run once // Initialize the LED array // Limit the brightness // Run continuously // Cycle through each LED in the array // Set the current one white // Show it // Wait for a bit // Set it to black
- 14. Setting LED values • leds[9] = CRGB::Cyan; // Web colours • leds[9].g = 255; // Just set green • leds[0] = CRGB(255,0,0); // CRGB values (red, green, blue) • leds[0] = 0x0000ff; // Use a hex # OR • leds[9] = CSHV(hue, sat, bright); // Each goes up to 255 FastLED provides lots more ways to assign colours to LED’s
- 15. Variable Types Variable types include: – int (-32768 to 32767 is 16 bit signed) – uint (0 to 65535 is 16 bit unsigned) – uint8_t (0 to 255 is 8 bit unsigned) – long (is 32 bits signed) – and many more. . . Variable scope can also be important as well
- 16. Random Numbers long num = random(); // 32 bit uint8_t unum = random8(); // 8 bit int inum = random16(0, 1023); // 16 bit • The ‘long’ can be used to assign random RGB colours • The ‘uint8_t’ can be used to assign hue, brightness values • It can also refer to LED elements in your strip random8() and random16() are FastLED functions
- 17. If Statements This example occasionally flashes a random colour on a random LED. void loop() { uint8_t j = random16(0, 100); // Which LED will we light up if ( j < NUM_LEDS ) { // Only display if that number IS in our array leds[j] = random(); // 32 bit randomizer for colour FastLED.show(); delay(100); leds[j] = CRGB::Black; // Make that LED black again } }
- 18. For Loops This example sets each LED a different colour, waits 2 seconds and repeats. void loop() { for (int i = 0; i < NUM_LEDS; i++) { // Last element is leds[NUM_LEDS-1] leds[i] = random(); // A 32 bit random number } FastLED.show(); delay(2000); }
- 19. We’re Just Getting Started FastLED contains a LOT of functions including: • Random number generation • Fast 8 and 16 bit basic math functions • Fast trigonometry • Setting RGB and HSV values • fill_rainbow, fill_gradient, fading, scaling, blending, noise, palettes • Power management We’re talking FAST
- 20. Rainbow March #include "FastLED.h" #define LED_DT 12 // Data pin #define LED_CK 11 // Clock pin #define NUM_LEDS 20 // Number of LED's #define COLOR_ORDER GRB // Change the order as necessary #define LED_TYPE APA102 // What kind of strip are you using? uint8_t max_bright = 64; // How bright do we want to go struct CRGB leds[NUM_LEDS]; // Initialize our array uint8_t thisdelay = 8; // A delay value for the sequence uint8_t thishue; // Starting hue value. uint8_t deltahue = 5; // Difference in hue between LED’s Use variables where possible
- 21. Rainbow March cont’d void setup() { LEDS.addLeds<LED_TYPE, LED_DT, LED_CK, COLOR_ORDER>(leds, NUM_LEDS); FastLED.setBrightness(max_bright); } void loop () { rainbow_march(); FastLED.show(); delay(thisdelay); } void rainbow_march() { thishue++; fill_rainbow (leds, NUM_LEDS, thishue, deltahue); // FastLED does the heavy lifting }
- 22. More FastLED Demos • There’s also several 3rd party demos at: https://github.com/atuline/FastLED-Demos • Unzip and store them in: C:users<username>DocumentsArduino
- 23. Try More Demo’s • Try one_sine • Try one_sine demo • Try pop_fade_demo • Try ripple • Try two_sin_demo • Try noise16_demo • Try three_sin_demo • Try rainbow_march_demo Don’t forget the FastLED examples
- 24. Google for more FastLED
- 25. Arduino Research • www.fastled.io • github.com • arduino.cc/tutorial • playground.arduino.cc • tronixstuff.com/tutorials • learn.sparkfun.com/tutorials • oomlout.com/a/products/ardx Don’t forget the examples included with the Arduino software
- 26. Inspirational Web Sites • www.instructables.com • www.tindie.com • www.makershed.com • www.makezine.com
- 27. Sources for Parts • www.robotshop.ca • www.sparkfun.com • www.leeselectronics.com • www.gravitech.us • www.adafruit.com • www.ebay.ca • www.aliexpress.com • www.amazon.com • www.dealextreme.com All it takes is a VISA card and your imagination
- 28. Local Events • North Delta Luminary Festival • Vancouver Mini Maker Faire • WestSurDel Fun Night • Vancouver Bike Rave • Christmas events • Any night market Then there’s Burning Man
- 29. University
- 31. Light Something
Notas del editor
- I want to do that and more and I’m going to use the highly popular Arduino Microcontroller.
- Let’s go through some menu items.