SlideShare una empresa de Scribd logo
1 de 12
Descargar para leer sin conexión
I started construction with the chassis plate which was sprayed
Krylon matte black. After it had dried I added factory date stamps,
    inspection marks, and stenciling according to reference photos
The rear suspension was sprayed semi-gloss black, then the metallic
portions were brush painted with Model Master metalizers. The half
   shafts are wrapped in matte aluminum Bare Metal Foil and the
      various nuts and bolts were detailed in various metallics.
The front suspension was assembled straight from the box and
painted in various shades of matte and semi gloss black. The edges
of the upper arms were left bare aluminum as was factory practice
                        for GM at the time.
The lettering on the tires were hand painted with a sewing needle
and Citadel Colors white figure paint. Each rim was given a black oil
 paint wash to pop the detail and the treads were sanded with 400
              grit sandpaper to depict wear and tear.
The engine block was painted Model Master Chevy engine orange and clear coated to
protect it from handling during detailing. The transmission is Model Master dark anodonic
 gray metalizer and the heads/intake manifold are non buffing aluminum. The fuel line is
 florists wire and the ignition wires are black electrical wire pegged in to holes drilled in
                                     the cylinder heads.
Here is the finished engine assembly. The exhausts were painted the same metallic gray
as the transmission and vacuum lines were added according to the GM tech manual made
from small diameter solder. The dipsticks are created from holow core solder and small
 gauge wire bent to shape. I considered rebuilding the belt system but in the end left
                   them as is rather than make all new pulley mounts.
The interior tub was painted Tamiya dark yellow from the spray can to simulate the
Saddle interior option, however once I looked at some vintage photos this color may be a
bit on the light side. The prototype color should be further toward the brown side. The
  carpeting on the floor is Detail Master flocking material and the window cranks were
                       robbed from the Revell 1958 Chevy Impala.
Dashboard was detailed with a sewing needle, acrylic paint, and a whole lot of eye
    strain. Drops of Microscale Krystal Kleer over each gauge face simulates a lens.
Interestingly the decal for the radio depicts a CD player which would never have been on
     a stock 1972 Corvette so I guess I'm calling this one a model of a restoration.
Here is the completed interior with the seats and steering wheel installed. The seats
have belts and hardware from Detail Master and the ignition on the steering column has
a tiny set of keys from an old Model Car Garage set. The decal sheet includes a cover
 of an owners manual so I cut it out and made "pages" from tissue paper then bound it
                   with white glue and set it in the passengers seat.
The body shell was painted Tamiya light gunmetal lacquer and cleared with Tamiya TS-
13. After two weeks of drying I polished the paint with Detail Master polishing cloths,
 Meguire's polishing compound, and Turtle wax. The driver's side windshield pillar was
broken in my kit which was repaired with CA glue and Bondo spot putty before painting.
While most of the kit's chrome was good, both bumpers were heavily scratched and
suffered from pits and mold lines. The chrome was stripped in Castrol Super Clean and
the defects repaired. After a coat of gloss black lacquer the bumpers were re-plated
                            with Alclad II chrome lacquer.
The body was trimmed with Bare Metal Foil and installed on the chassis. Final details
were installed such as decals, mirrors, and the bumpers along with a radio antenna made
  from a base I salvaged out of an old Revell Pontiac Firebird and a length of high E
                                      guitar string.

Más contenido relacionado

La actualidad más candente

La actualidad más candente (13)

2015 Chevy Camaro Brochure | Omaha Area Chevy Dealer
2015 Chevy Camaro Brochure | Omaha Area Chevy Dealer2015 Chevy Camaro Brochure | Omaha Area Chevy Dealer
2015 Chevy Camaro Brochure | Omaha Area Chevy Dealer
 
**02 Mustang GT Premium – 47k – Lots of extras**
**02 Mustang GT Premium – 47k – Lots of extras****02 Mustang GT Premium – 47k – Lots of extras**
**02 Mustang GT Premium – 47k – Lots of extras**
 
Houston Greenway Office Buildings June 2017
Houston Greenway Office Buildings June 2017Houston Greenway Office Buildings June 2017
Houston Greenway Office Buildings June 2017
 
Geloman
GelomanGeloman
Geloman
 
The Woodlands Submarket Office Skyline June 2017
The Woodlands Submarket Office Skyline June 2017The Woodlands Submarket Office Skyline June 2017
The Woodlands Submarket Office Skyline June 2017
 
Westchase Houston Office Building Skyline June 2017
Westchase Houston Office Building Skyline June 2017Westchase Houston Office Building Skyline June 2017
Westchase Houston Office Building Skyline June 2017
 
Sugar Land / E Fort Bend Office Skyline June 2017
Sugar Land / E Fort Bend Office Skyline June 2017Sugar Land / E Fort Bend Office Skyline June 2017
Sugar Land / E Fort Bend Office Skyline June 2017
 
June/July 2013 Sale Flyer
June/July 2013 Sale Flyer June/July 2013 Sale Flyer
June/July 2013 Sale Flyer
 
AA306 HiRes Jag E
AA306 HiRes Jag EAA306 HiRes Jag E
AA306 HiRes Jag E
 
Houston Galleria Skyline June 2017
Houston Galleria Skyline June 2017Houston Galleria Skyline June 2017
Houston Galleria Skyline June 2017
 
2012 - 3 series coupes
2012 - 3 series coupes2012 - 3 series coupes
2012 - 3 series coupes
 
Camaro Article
Camaro ArticleCamaro Article
Camaro Article
 
2010 Chevrolet Camaro Vehicle Specifications
2010 Chevrolet Camaro Vehicle Specifications2010 Chevrolet Camaro Vehicle Specifications
2010 Chevrolet Camaro Vehicle Specifications
 

Similar a 1972 Chevrolet Corvette detailed build

The Restoration Of Duesenberg J 276 3
The Restoration Of Duesenberg J 276 3The Restoration Of Duesenberg J 276 3
The Restoration Of Duesenberg J 276 3OlChev
 
Portfolio Resume 2016
Portfolio Resume 2016Portfolio Resume 2016
Portfolio Resume 2016Sean Murphy
 
Ford mustang at 2015 sema press release
Ford mustang at 2015 sema press releaseFord mustang at 2015 sema press release
Ford mustang at 2015 sema press releasesteeringnews
 
Automotive Industry Work Samples
Automotive Industry Work SamplesAutomotive Industry Work Samples
Automotive Industry Work Sampleserickolson
 
Chapter 29
Chapter 29Chapter 29
Chapter 29mcfalltj
 
Garage x issue1
Garage x issue1Garage x issue1
Garage x issue1jack4435
 
2011 Chevrolet Camaro at Jerry's Chevrolet In Baltimore, Maryland
2011 Chevrolet Camaro at Jerry's Chevrolet In Baltimore, Maryland2011 Chevrolet Camaro at Jerry's Chevrolet In Baltimore, Maryland
2011 Chevrolet Camaro at Jerry's Chevrolet In Baltimore, MarylandJerry's Chevrolet
 
2012 Chevy Camaro
2012 Chevy Camaro2012 Chevy Camaro
2012 Chevy CamaroLinda Swan
 
2011 Chevrolet Camaro Catalog from Chevrolet
2011 Chevrolet Camaro Catalog from Chevrolet2011 Chevrolet Camaro Catalog from Chevrolet
2011 Chevrolet Camaro Catalog from ChevroletJack Burford Chevrolet
 
2011 Chevy Camaro For Sale Cedar Rapids
2011 Chevy Camaro For Sale Cedar Rapids2011 Chevy Camaro For Sale Cedar Rapids
2011 Chevy Camaro For Sale Cedar RapidsCory Hosch
 

Similar a 1972 Chevrolet Corvette detailed build (20)

The Restoration Of Duesenberg J 276 3
The Restoration Of Duesenberg J 276 3The Restoration Of Duesenberg J 276 3
The Restoration Of Duesenberg J 276 3
 
Portfolio Resume 2016
Portfolio Resume 2016Portfolio Resume 2016
Portfolio Resume 2016
 
Ford mustang at 2015 sema press release
Ford mustang at 2015 sema press releaseFord mustang at 2015 sema press release
Ford mustang at 2015 sema press release
 
UpperClass 8-16
UpperClass 8-16UpperClass 8-16
UpperClass 8-16
 
Automotive Industry Work Samples
Automotive Industry Work SamplesAutomotive Industry Work Samples
Automotive Industry Work Samples
 
Triumph build1
Triumph build1Triumph build1
Triumph build1
 
Chapter 29
Chapter 29Chapter 29
Chapter 29
 
Build your own turbine
Build your own turbineBuild your own turbine
Build your own turbine
 
Garage x issue1
Garage x issue1Garage x issue1
Garage x issue1
 
New or old
New or oldNew or old
New or old
 
Coil Pack Project.1
Coil Pack Project.1Coil Pack Project.1
Coil Pack Project.1
 
2011 Chevrolet Camaro at Jerry's Chevrolet In Baltimore, Maryland
2011 Chevrolet Camaro at Jerry's Chevrolet In Baltimore, Maryland2011 Chevrolet Camaro at Jerry's Chevrolet In Baltimore, Maryland
2011 Chevrolet Camaro at Jerry's Chevrolet In Baltimore, Maryland
 
2012 Chevy Camaro
2012 Chevy Camaro2012 Chevy Camaro
2012 Chevy Camaro
 
2011 chevy camaro brochure
2011 chevy camaro brochure2011 chevy camaro brochure
2011 chevy camaro brochure
 
2011 Chevrolet Camaro Catalog from Chevrolet
2011 Chevrolet Camaro Catalog from Chevrolet2011 Chevrolet Camaro Catalog from Chevrolet
2011 Chevrolet Camaro Catalog from Chevrolet
 
2011 Chevy Camaro For Sale Cedar Rapids
2011 Chevy Camaro For Sale Cedar Rapids2011 Chevy Camaro For Sale Cedar Rapids
2011 Chevy Camaro For Sale Cedar Rapids
 
Toyota camry
Toyota camryToyota camry
Toyota camry
 
4 engine block
4 engine block4 engine block
4 engine block
 
13_C-Class_120509.pdf
13_C-Class_120509.pdf13_C-Class_120509.pdf
13_C-Class_120509.pdf
 
13_C-Class_120509.pdf
13_C-Class_120509.pdf13_C-Class_120509.pdf
13_C-Class_120509.pdf
 

1972 Chevrolet Corvette detailed build

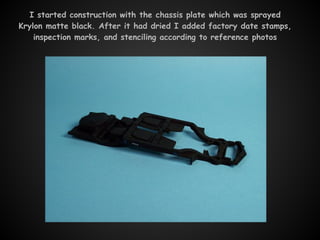
  • 1. I started construction with the chassis plate which was sprayed Krylon matte black. After it had dried I added factory date stamps, inspection marks, and stenciling according to reference photos
  • 2. The rear suspension was sprayed semi-gloss black, then the metallic portions were brush painted with Model Master metalizers. The half shafts are wrapped in matte aluminum Bare Metal Foil and the various nuts and bolts were detailed in various metallics.
  • 3. The front suspension was assembled straight from the box and painted in various shades of matte and semi gloss black. The edges of the upper arms were left bare aluminum as was factory practice for GM at the time.
  • 4. The lettering on the tires were hand painted with a sewing needle and Citadel Colors white figure paint. Each rim was given a black oil paint wash to pop the detail and the treads were sanded with 400 grit sandpaper to depict wear and tear.
  • 5. The engine block was painted Model Master Chevy engine orange and clear coated to protect it from handling during detailing. The transmission is Model Master dark anodonic gray metalizer and the heads/intake manifold are non buffing aluminum. The fuel line is florists wire and the ignition wires are black electrical wire pegged in to holes drilled in the cylinder heads.
  • 6. Here is the finished engine assembly. The exhausts were painted the same metallic gray as the transmission and vacuum lines were added according to the GM tech manual made from small diameter solder. The dipsticks are created from holow core solder and small gauge wire bent to shape. I considered rebuilding the belt system but in the end left them as is rather than make all new pulley mounts.
  • 7. The interior tub was painted Tamiya dark yellow from the spray can to simulate the Saddle interior option, however once I looked at some vintage photos this color may be a bit on the light side. The prototype color should be further toward the brown side. The carpeting on the floor is Detail Master flocking material and the window cranks were robbed from the Revell 1958 Chevy Impala.
  • 8. Dashboard was detailed with a sewing needle, acrylic paint, and a whole lot of eye strain. Drops of Microscale Krystal Kleer over each gauge face simulates a lens. Interestingly the decal for the radio depicts a CD player which would never have been on a stock 1972 Corvette so I guess I'm calling this one a model of a restoration.
  • 9. Here is the completed interior with the seats and steering wheel installed. The seats have belts and hardware from Detail Master and the ignition on the steering column has a tiny set of keys from an old Model Car Garage set. The decal sheet includes a cover of an owners manual so I cut it out and made "pages" from tissue paper then bound it with white glue and set it in the passengers seat.
  • 10. The body shell was painted Tamiya light gunmetal lacquer and cleared with Tamiya TS- 13. After two weeks of drying I polished the paint with Detail Master polishing cloths, Meguire's polishing compound, and Turtle wax. The driver's side windshield pillar was broken in my kit which was repaired with CA glue and Bondo spot putty before painting.
  • 11. While most of the kit's chrome was good, both bumpers were heavily scratched and suffered from pits and mold lines. The chrome was stripped in Castrol Super Clean and the defects repaired. After a coat of gloss black lacquer the bumpers were re-plated with Alclad II chrome lacquer.
  • 12. The body was trimmed with Bare Metal Foil and installed on the chassis. Final details were installed such as decals, mirrors, and the bumpers along with a radio antenna made from a base I salvaged out of an old Revell Pontiac Firebird and a length of high E guitar string.