Windows Movie Maker
•Descargar como PPT, PDF•
3 recomendaciones•873 vistas

How to import videos, trim/make clips (excerpts) from long videos, use the storyboard, difference between project files (MWSMM files) and actual movie (WMV files)

Recomendados
Más contenido relacionado
La actualidad más candente
La actualidad más candente (20)
Similar a Windows Movie Maker
Similar a Windows Movie Maker (20)
Más de cronegeek
Más de cronegeek (11)
Último
Último (20)
Windows Movie Maker
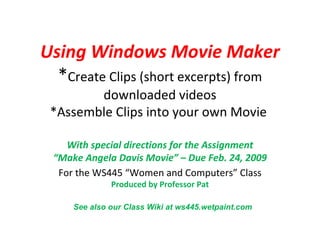
- 1. Using Windows Movie Maker * Create Clips (short excerpts) from downloaded videos *Assemble Clips into your own Movie With special directions for the Assignment “Make Angela Davis Movie” – Due Feb. 24, 2009 For the WS445 “Women and Computers” Class Produced by Professor Pat See also our Class Wiki at ws445.wetpaint.com
- 2. Table of Contents Slide No. Intro to Movie Maker 3 Angela Davis Video Assignment for Feb. 24 4 Begin – Collect all Materials in One Folder 7 Save Work Often - Screenshot 8 To Import a Video 9 To Split Videos 11 Assembling your Movie 13 Dragging Clips to Storyboard, Adding Text Slides 14 & 15 Make the Actual Movie ( Screenshots follow ) 17 Final Words (Last Slide) 21
- 5. Movie Maker Workspace – showing Tasks Panel
- 6. Movie Maker Workspace – After Videos Imported Each Video you import becomes a separate Collection. Microsoft gives each collection the same name as the video file – you can change the name. Displayed here are some Clips (excerpts) I made from the Angela Davis Interview Part 1 from Al Jazeera. I renamed the clips to indicate what they are about. Click the Collections Icon to get this View
- 10. The Import Video Dialog Box Warning : If you leave a checkmark in the “Create clips for your video files,” Movie Maker will divide a 12 minute video into 60 small clips – impossible to work with .
- 12. Screenshot – After Splitting Video
- 14. Dragging Clips to Storyboard
- 15. Adding Text Slides After you have dragged your clips down in the order you want them to appear, you probably want to add some text slides – at least a Title Slide at the beginning of your movie. Click on the Tasks icon near top of window, to display the Tasks pane, where you will see a line "Add Title slides". Click this and choose one of the options.
- 16. Finished Storyboard This shows the Storyboard after I have added several video clips (outlined in blue) and several text slides (outlined in red). If I decide to change the order of my video clips, I can just click on one and drag it to a new location.
- 18. Final Steps – Save Movie (1) See Slide # for the difference between Save Project and Save Movie Also shows options from File menu After you have completed all the work on your Storyboard, and viewed you entire movie in the little player in Movie Maker to be sure it’s all correct Click File>Save Movie & Choose My Computer
- 19. Final Steps – Save Movie (2) Select Filename & Folder to Save In
Notas del editor
- Simple formatting (plain white background, mostly black text) for smaller file & quicker uploading (Also smaller PDF, I hope) All Screenshots made with Fastston Capture