
Recomendados
Recomendados
Más contenido relacionado
Destacado
Destacado (11)
Similar a Trainer Box Assembly Instructions
Similar a Trainer Box Assembly Instructions (20)
Más de crysatal16
Más de crysatal16 (20)
Último
Último (10)
Trainer Box Assembly Instructions
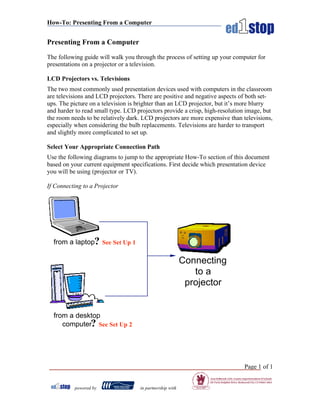
- 1. How-To: Presenting From a Computer Presenting From a Computer The following guide will walk you through the process of setting up your computer for presentations on a projector or a television. LCD Projectors vs. Televisions The two most commonly used presentation devices used with computers in the classroom are televisions and LCD projectors. There are positive and negative aspects of both set- ups. The picture on a television is brighter than an LCD projector, but it’s more blurry and harder to read small type. LCD projectors provide a crisp, high-resolution image, but the room needs to be relatively dark. LCD projectors are more expensive than televisions, especially when considering the bulb replacements. Televisions are harder to transport and slightly more complicated to set up. Select Your Appropriate Connection Path Use the following diagrams to jump to the appropriate How-To section of this document based on your current equipment specifications. First decide which presentation device you will be using (projector or TV). If Connecting to a Projector from a laptop? See Set Up 1 Connecting to a projector from a desktop computer? See Set Up 2 Page 1 of 1 powered by in partnership with
- 2. How-To: Presenting From a Computer If Connecting to a Television Whether you are using a laptop or a desktop computer, look at the back of your computer to know whether or not you have a Video Out port. Look for either an S-Video out port, or an RCA video out port. If you have neither, you will need to use a scan converter. from computer S-Video Output ? See Set Up 3 Connecting from computer RCA Video Output ? See Set Up 4 to a TV No Video-Out port? Must Use a Scan Converter ? See Set Up 5 Page 2 of 2 powered by in partnership with
- 3. How-To: Presenting From a Computer Set Up 1 - Connecting an LCD Projector to a Laptop Computer 1. For safety, turn off the power supply to both the laptop and projector until everything is hooked up. 2. Take the lens cap off the LCD projector. 3. Plug a computer monitor cord (see photo) into either one of the RGB-In ports on the projector. This cable probably came with the projector. NOTE TO MAC USERS: YOU MAY NEED AN ADAPTER TO CONNECT YOUR MAC TO THE PROJECTOR. 4. Plug the other end of this cord into the laptop’s monitor port. This is located on the back of the laptop and has a small monitor symbol. 5. You must turn on the projector before turning on the laptop. 6. If you do not see an image coming from the projector, press and hold the FN key, then press the appropriate display toggle function key (usually F8), and then release them both. This will toggle between the three display combinations: laptop screen only, laptop screen and projector, and projector only. You cycle through these by pressing these monitor toggle keys until you get to the desired display combination. 7. After use, turn off the projector by pressing the power button. For safety purposes, do not unplug the projector until the fan has stopped spinning. Set Up 2 - Connecting an LCD Projector to a Desktop Computer 1. For safety, turn off the power supply to each component until everything is hooked up. 2. Take the lens cap off the LCD projector. 3. Unhook the monitor cord on the back of your CPU. This cord always goes from the monitor to the back of the CPU. The CPU is the main quot;boxquot; of your computer. 4. Plug a computer monitor cable (see photo) into either one of the RGB-In ports on the projector. This cable probably came with the projector. NOTE TO MAC USERS: YOU MAY NEED AN ADAPTER TO CONNECT YOUR MAC TO THE PROJECTOR. 5. Take that cord and plug the other end of it into monitor plug in on the back of your CPU. 6. Plug the monitor cord that you disconnected in step into the RGB-Out port on the projector. This enables your monitor and the projector to display at the same time. 7. You must turn on the projector before turning on the laptop. 8. After use, turn off the projector by pressing the power button. For safety purposes, do not unplug the projector until the fan has stopped spinning. Page 3 of 3 powered by in partnership with
- 4. How-To: Presenting From a Computer Set Up 3 – Connecting to a Television using S-Video Out port If you have an S-Video Out port on your computer, you can connect this output device to any TV. You will need to look at the back of your TV to see if you have an S-Video In port (see image 3.1), or just an RCA Image 3.1 In port (see image 3.2). S-Video Out/ S-Video In Port The following applies to Microsoft Windows Operating Systems: 1. Make sure your computer is off. 2. Connect a video cable from the S-Video from your computer to the input port on your TV. Image 3.2 a. If you have an S-Video In port on your television, RCA Out/ simply connect an S-Video cable (see image 3.4) from RCA In Port the S-Video Out port on the computer to the S-Video In port on the TV. b. If you do not have an S-Video In port on your television, you will need an S-Video to RCA adapter (see image 3.3). Then connect an RCA video cable (see image 3.5 on next page) to the RCA In port on your television. 3. Select the correct line input on the television set by either Image 3.3 selecting the first channel below channel 02, or by toggling S-Video to RCA through the various inputs using the “Input” or “Aux” button Adapter on the remote control. 4. Start up the computer. 5. Click Start, point to Settings, select Control Panel, and choose Display. 6. Click Advanced Properties under the Settings tab; this brings up the video card features. 7. Click on the Display tab; this gives you the output options. 8. Make the TV the primary display and the monitor secondary. Select quot;monitor 2quot; (you do that by selecting monitor 2 with the mousequot; and then quot;moving itquot; to the left of quot;monitor 1quot;. By switching the position of the monitors in your display settings you effectively make the monitor on the left the primary monitor. 9. Click OK to close window. 10. Click OK to apply the changes If these steps do not work, or if you are working on a Image 3.4 Macintosh, see your system administrator for assistance. S-Video Cable Page 4 of 4 powered by in partnership with
- 5. How-To: Presenting From a Computer Set Up 4 – Connecting to a Television using RCA Video Out port If you have an RCA Video Out port on your computer (see image 4.1), you can connect this output device to any TV. The following applies to Microsoft Windows Operating Systems: Image 3.2 RCA Out/ 1. Make sure your computer is off. RCA In Port 2. Connect an RCA video cable (see image 4.2) from the RCA Video Out port on your computer to the RCA input port on your TV. 3. Select the correct line input on the television set by either selecting the first channel below channel 02, or by toggling through the various inputs using the “Input” or “Aux” button on the remote control. 4. Start up the computer. 5. Click Start, point to Settings, select Control Panel, and choose Display. 6. Click Advanced Properties under the Settings tab; this brings up the video card features. 7. Click on the Display tab; this gives you the output options. 8. Make the TV the primary display and the monitor secondary. Select quot;monitor Image 4.2 2quot; (you do that by selecting monitor 2 with RCA Video Cables the mousequot; and then quot;moving itquot; to the left of quot;monitor 1quot;. By switching the position of the monitors in your display settings you effectively make the monitor on the left the primary monitor. 9. Click OK to close window. 10. Click OK to apply the changes If these steps do not work, or if you are working on a Macintosh, see your system administrator for assistance. Page 5 of 5 powered by in partnership with
- 6. How-To: Presenting From a Computer Set Up 5 – Connecting to a Television using a Scan Converter If you don’t have access to a projector, and your computer does not have a video out port, you must use a scan converter. A scan converter is a device (see image 5.1) that sits between your computer and your television, and converts the signal from your computer a readable signal for a television (see image 5.2). Image 5.1 Sample Scan Converter To Monitor To TV, either RCA Video… Out Computer To Computer …OR S-Video Out Computer Image 5.2 Scan Converter Diagram Because there are so many scan converters available, and each has different operating instructions, it is necessary to look at your individual scan converter’s manual in order to set up your scan converter. Page 6 of 6 powered by in partnership with