Más contenido relacionado
Braided leather-knife-lanyard-2
- 1. Braided Leather Knife Lanyard 2 Tailed, Part 1
Outdoors-Magazine.com
http://outdoors-magazine.com
Braided Leather Knife Lanyard
2 Tailed, Part 1
Schwert
- Skills and guides - DYI, Making things. -
Publication: Thursday 1 July 2004
Description :
This article will be presented in two parts. Part one will consist of a pictorial and instructions for the basic Kangaroo leather braided knife lanyard, and Part 2
will demonstrate the semi-decorative cover knots. A fully functional and nice looking lanyard can be done following the directions in Part one only.
Copyright (c) Outdoors-Magazine.com under a Creative Commons
Attribution-Non-Commercial-Share Alike License
Copyright © Outdoors-Magazine.com Page 1/14
- 2. Braided Leather Knife Lanyard 2 Tailed, Part 1
This lanyard is a fairly easy project that both looks good on a sheath knife and is functional.
This lanyard is braided in 1/8 inch handcut kangaroo lace. Semi-fancy cover knots are also
included but are optional in this design.
A lanyard like this both assists in removal of the knife from a deep pouch sheath and can be
used as an extra measure of security when carrying the knife. If the tails of the lanyard are
tucked under your belt the knife has less likelyhood of falling from the sheath.
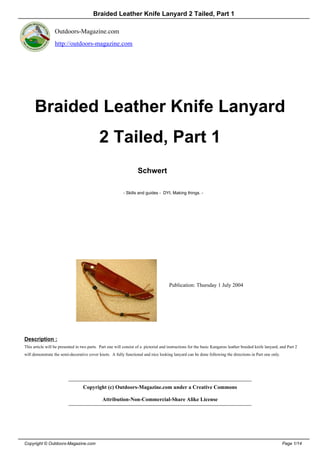
First here is a view of the finished project. Part 1 of this tutorial will not cover the addition of the black cover knots,
but only make the tan portion of this lanyard. The tan portion is a fully functional lanyard and the cover knots are
mostly decorative. Part 2 will complete the lanyard.
2-Tailed Kangaroo Lanyard
Only a few items are necessary to do knife lanyards. The most important item is of course, the leather. Any leather
lace or other materials can be used. This project used 1/8 inch wide handcut kangaroo lace that was purchased from
David Morgan, Woodinville Washington USA. This is expensive material but is of exceptional quality. Less
expensive machine cut lace could also have been used which is also available from David Morgan (see resources).
Depending on the size of the knife, the diameter of the lanyard hole etc various products can be used for knife
lanyards. I find this lace to be nearly ideal for most applications. Kangaroo lace is consistently strong, easy to braid,
looks good and lasts for a long time.
Materials List
Kangaroo leather lace
Clamp of any sort, small
Awl(s), two is good with one not to sharp
Copyright © Outdoors-Magazine.com Page 2/14
- 3. Braided Leather Knife Lanyard 2 Tailed, Part 1
Sharp small knife
Braiding soap
First step is to cut the leather strings, grease and stretch them. The total length of this lanyard for this knife is 10
inches. I generally use twice the total length of the project plus a few inches of lace to start. This gives a generous
bit of leather to work with to allow easy efficient braiding. So, for this project, I cut four 24 inch strings.
Each of these was well greased with a lard/ivory bar soap (braiding soap, David Morgan's recipe), but saddle soap
could also be used. You want the strings slippery to braid, but eventually to dry. This lard/ivory blend works very
well and the recipe will be given below in the Resources.
As you grease the strings, stretch them well, looking for thin or weak spots. Allow them to dry a bit as you get set up
for braiding. I generally roll them around my hand and lay on top of some paper on the back of my monitor. The
monitor heat distributes the grease nicely.
Here is my setup for braiding. I use a cedar board clamped to the desk to allow me to use my awls and clamps to
hold the project during braiding.
Getting Started
Find the middle of the 4 strings. Clamp them with the flesh side up about 2 inches back from the true middle. We
are going to braid starting at the center of the string and eventually want this section to span the true middle of the
set.
Copyright © Outdoors-Magazine.com Page 3/14
- 4. Braided Leather Knife Lanyard 2 Tailed, Part 1
Middled Strings
Separate the 4 strings into a pair on each side. Start braiding by bringing the outer string on the right behind the
inner string on the left side. The flesh side should be turned so it is out on the backside. You are going to braid
under one string over one string---alternating sides. This is called 4-plait braiding.
First Pass
Now the second string, from the left side behind the inner string on the right, under the outer string over the inner
string.
Copyright © Outdoors-Magazine.com Page 4/14
- 5. Braided Leather Knife Lanyard 2 Tailed, Part 1
Second Pass
And then repeat from the other side.
Third Pass
Make sure you get started correctly, then tighten this beginning passes up. A gentle pull on each of the four strings
should tighten everything up nicely, if not use the blunt awl to pick the strings up and pull. Well greased strings slide
into place with a firm tug. Careful not too tight, just snug and firm.
Continue on.
Copyright © Outdoors-Magazine.com Page 5/14
- 6. Braided Leather Knife Lanyard 2 Tailed, Part 1
Continuing 4-plait
This knife has a fairly wide butt. I needed about 2 inches of this round braid to span this width.
Enough of this round braid
Now thread the braid though the lanyard hole of the knife.
Threaded 4-plait
This is the move that makes or breaks this lanyard. This transition step needs to be carefully sorted to make the
Copyright © Outdoors-Magazine.com Page 6/14
- 7. Braided Leather Knife Lanyard 2 Tailed, Part 1
lanyard look nice in the end.
Crux Move, join to 8-plait
First even up both sides of the 4-plait braid. Make sure everything is tight and even. Twist both sides so the flesh
side is up and begin crossing the inner strings. This is a single diamond braid transition, but will rapidly go into 8-plait
4-seam work. 4-seam work is faster and results is a slight square feel to the braid. It is a bit denser with 8 strings
than single diamond work which is why we are going to go to that.
Once you are set like the image, bring the left outer string behind the project, and go under the outer two strings on
the right.
First step of join, from left string
Then do the other side. Keep things loose until you get it set right.
Copyright © Outdoors-Magazine.com Page 7/14
- 8. Braided Leather Knife Lanyard 2 Tailed, Part 1
Second step of join—from right
Now slowly and gently tighten everything up.
Snug this up
Now do one more pass on each side then work this join up nice and tight. You may need to use an awl but again
well greased strings will snug with a firm tug on each of the strings in series. Make sure this looks good on both the
front and back before proceeding.
Copyright © Outdoors-Magazine.com Page 8/14
- 9. Braided Leather Knife Lanyard 2 Tailed, Part 1
Continue 8-plait
Continue with the 8-plait 4-seam work until you have a good "handle" on this braid.
Finish 8-plait braid
When the knife is withdrawn from the sheath the hand naturally falls on this larger diameter section. Make it long
enough but not too long.
Copyright © Outdoors-Magazine.com Page 9/14
- 10. Braided Leather Knife Lanyard 2 Tailed, Part 1
Split into two 4-plait tails
Now the lanyard will be split into two tails. Going back to 4-plait round braid. Clamp off one side of the braid and
begin the bifurcation. Braid will start just as it did from the middled strings above.
Start braid on one tail
Braid a few rounds on one side.
Start braid on other tail
Then go back and braid a bit on the other side. Take time to make the bifurcation look good, again by firming up
each side with an awl or firm tugs on the strings.
Copyright © Outdoors-Magazine.com Page 10/14
- 11. Braided Leather Knife Lanyard 2 Tailed, Part 1
Carry on with one tail
Once both sides are splitting off nicely, finish braiding one tail.
Add loose wall knot at the end
Add a loose wall knot to the first tail. Each string is flopped over its neighbor in the classic lanyard braid knot that
most Girl Scouts know by heart.
Crown and Wall the end
Add a crown to this knot also. Each of the strings is brought around its neighbors leg and up through the middle of
the knot. These were left loose at this step in case some final shortening or lengthening was done at the end.
Copyright © Outdoors-Magazine.com Page 11/14
- 12. Braided Leather Knife Lanyard 2 Tailed, Part 1
Braid the other tail
Go back to the second tail and complete its 4-plait braiding. The tails here were purposefully done at different
lenghts, but symetrical braids could have been done. I just like the asymetric look.
Asymetric strings
Wall and Crown this leg and check for length. I like my lanyards a bit shorter than the total sheath (not including the
fringes).
Crown and Wall this string
At this point the terminator knots can be tightened with an awl. Take care on these as this terminator knot can be
disrupted by too firm a pull. I usually tighten each string round and round until firm and uniform.
Copyright © Outdoors-Magazine.com Page 12/14
- 13. Braided Leather Knife Lanyard 2 Tailed, Part 1
Finished Project
Finished. Part 2 of this tutorial will cover the decorative black cover knots.
Resources
Essential David Morgan Book
David Morgan, Braiding Fine Leather
Bruce Grants Advanced Manual
Copyright © Outdoors-Magazine.com Page 13/14
- 14. Braided Leather Knife Lanyard 2 Tailed, Part 1
Bruce Grant's Encylopedia
David Morgan Hand cut Kangaroo Leather
Very nice machine cut Kangaroo Leather
Braiding Soap as made by David Morgan.
1 pound lard 4 oz ivory bar soap 1.5 cups water
Heat water and shave soap into it. Once soap is dissolved, cut in lard. Stir over gentle heat till a creamy paste is
created. Pour off to a plastic tub and cool. Lasts for years.
Continued in Part 2
Post-scriptum :
Version 1.0 6/30/2004 Beginning
Version 2.0 7/1/2004 Done
Copyright © Outdoors-Magazine.com Page 14/14