SlideShare una empresa de Scribd logo
1 de 16
Descargar para leer sin conexión
info@francehelices.fr
www.francehelices.fr
+(.33).(0)4.93.47.69.38
MANUEL D'INSTALLATION
PSS TYPE PRO
pour arbre de 3/4" à 3
(20 mm à 95mm)
FR
3/4"
info@francehelices.fr
www.francehelices.fr
+(.33).(0)4.93.47.69.38
ATTENTION ! Avant de commencer la pose de votre PSS nous vous demandons de bien lire ces instructions.
Tout manquement à ces rappels pourrait entrainer des risques de blessures graves ou de dommages
important à vous-même ou aux biens.
• BIEN LIRE LE MANUEL DE MONTAGE : Ce joint mécanique PSS que vous vous apprêtez à installer est une
pièce qui permet, lorsqu’elle est proprement installée, d’assurer l’étanchéité entre la mer et l’intérieur du
bateau là où passe l’arbre de l’hélice. Avant tout assurez-vous que, vous-même ou votre opérateur, ayez toutes
les compétences et tous les outils requis pour faire cette opération.
• Si pour quelque raison que ce soit l’inverseur doit être démonté et l’arbre désaccouplé, il est important de
mettre en place les moyens nécessaires permettant de garder sur votre PSS les taux de compressions donnés
à l’installation.
• Ne monter le PSS qu’une fois le bateau hors de l’eau
• NE JAMAIS utiliser de graisse, huile ou dérivés du pétrole lors de l’installation d’un PSS. Une eau savonneuse
fera parfaitement l’affaire pour vous aider à faire glisser le rotor sur l’arbre.
• Avant la pose, assurez vous qu’il n’y a pas de risque de salir le PSS lors de son installation, que l’arbre, les
cales ou toute parties proche de la zone de pose soient propres et non grasses. Au déballage et lors de la
pose, faire bien attention lors des manipulations à ne pas rayer les surfaces polies du carbone ou du rotor
inox.
• Si, par accident, vos PSS tournent à sec, il est important de changer les pipettes d’admission d’eau se
trouvant sur les carbones quand celles-ci sont en plastiques.
• Lors de ce remplacement, attention à ne pas abimer le carbone au serrage. Sur les anciens PSS les filetages
sont coniques et une sur pression risquerait d’endommager le carbone.
• Pour les anciens PSS, et à la demande du client les pipettes de refroidissement peuvent être en Inox. Dans ce
cas elles devront être inspectées tous les 6 mois pour s’assurer qu’il n’y a aucun risque de corrosion.
• Lors de la pose du soufflet sur le tube d’étambot, il est important que le tube ne soit pas en contact avec les
spirales du soufflet, au risque de les abimer. Le tube ne doit donc pas entrer plus loin dans le soufflet que sur
la partie plate comprenant les deux colliers de serrage.
• Pour une installation avec mise à l’air libre (bateaux allant à moins de 10 Nds), attention à ne pas créer de
boucle dans le tuyau et à ce qu’il soit bien au dessus de la flottaison, même en navigation.
• Si le bateau reste sans naviguer pour une longue période (3 mois et plus) il peut être nécessaire de décoller
le carbone du rotor à la remise en service du bateau.
• Comme toutes les installations se trouvant sous la flottaison, il est important d’inspecter votre PSS
régulièrement afin de déceler toute usure et détérioration anormale. Dans tous les cas nous recommandons
de remplacer le soufflet tous les 6 ans même si celui-ci ne présente aucun signe de fatigue.
• Lors des opérations de maintenance, et plus largement, évitez tout contact entre les PSS et des produits à
base de pétrole.
• Toujours contrôler le montage et le bon alignement de l’arbre d’hélice.
• Si les PSS se trouvent dans le même compartiment que des batteries il sera important de contrôler plus
régulièrement l’état du soufflet. Les émanations d’acide sulfurique ont pour effet d’abimer beaucoup plus
rapidement les composants à base de caoutchouc tel que les soufflets.
• Ne pas utiliser de colle pour fixer le soufflet sur le tube d’étambot ou pour maintenir le tuyau de
refroidissement sur la pipette du carbone.
• Ne pas faire tourner le PSS à sec.
• Ne pas utiliser le PSS sur des sous marins.
info@francehelices.fr
www.francehelices.fr
+(.33).(0)4.93.47.69.38
NOTICE DE MONTAGE
LE BATEAU DOIT TOUJOURS ÊTRE À TERRE POUR TOUS TRAVAUX SUR LE PSS
1. Désaccoupler l’arbre du tourteau
2. Désaccoupler l’arbre.
Il y a autant d’accouplements que de fabricants. Certains accouplements sont maintenus par des vis,
d’autres utilisent des goupilles, et d’autres encore un écrou. (Il vous appartient de prendre les outils qui
correspondent à votre cas précis).
3. Démonter le vieux presse-étoupe et sa durite.
info@francehelices.fr
www.francehelices.fr
+(.33).(0)4.93.47.69.38
4. Nettoyer la partie exposée de l’arbre avec du papier de verre ou de la toile émeri très fine (N° 400 ou 600) afin
d’enlever toute trace de saleté et toute aspérité. Apporter une attention toute particulière à la clavette située à
l’avant de l’arbre, au lieu de passage du rotor. Il ne doit subsister AUCUNE aspérité qui pourrait endommager les
joints toriques lors du montage.
5. Faire glisser le soufflet et ses colliers sur le tube d’étambot jusqu’à ce qu’il trouve sa place, le soufflet doit
recouvrir le tube d’étambot sur toute la longueur du manchon afin que les colliers puissent bien le maintenir en
place. ATTENTION : NE FAITES PAS GLISSER LE MANCHON DU SOUFFLET TROP LOIN, la partie avant du tube
pourrait endommager les spires intérieures du soufflet et limiter inconsidérément la course du soufflet. Serrer
les colliers pour fixer le soufflet sur le tube d’étambot et poser les Clamp Jacket de protection sur les bords
tranchant des colliers.
6. Veiller à ce que la bague carbone soit bien en place sur l’extrémité avant du soufflet et à ce que les deux
colliers la fixent correctement. Vérifier également que la face polie de la bague carbone soit parfaitement lisse,
propre et sans défaut.
7. Sortez le rotor de sa poche de protection. Contrôler le bon positionnement des deux (2) joints toriques dans
les rainures situées dans l’alésage du rotor. La surface de montage du rotor doit être parfaitement propre et
sans défaut ou imperfection. Prenez deux (2) (et uniquement deux) vis dans le sac en plastique, appliquer une
goutte de frein filet (tube bleu) sur le filetage de chaque vis de réglage et vissez-les dans les trous du rotor en
veillant à ce qu’elle ne dépasse pas de l’alésage du rotor. CONSERVEZ LES VIS RESTANTES AFIN DE VOUS EN
SERVIR À L’ÉTAPE 14.
8. Lubrifier l’arbre et les joints toriques du rotor, et faire glisser le rotor sur l’arbre. Comme lubrifiant, utilisez un
liquide ne contenant pas d’essence (le mieux est de prendre une solution eau / liquide vaisselle). ATTENTION :
N’UTILISER PAS D’HUILE, DE GRAISSE OU DE SILICONE COMME LUBRIFIANT.
9. Remonter l’accouplement de l’arbre sur l’arbre en vous assurant que tous les dispositifs de sécurité fournis et
recommandés par le fabricant de l’accouplement soient en place
10. Remonter l’accouplement de l’arbre sur la transmission en vous assurant de bien respecter les
spécifications et les tolérances fixées par le fabricant. Assurez-vous que tous les dispositifs de sécurité fournis
et recommandés par le fabricant de l’accouplement soient en place.
11. Maintenant que l’arbre est en place, vérifier que la bague carbone est bien centrée sur l’arbre (l’alésage de la
bague carbone est légèrement plus grand que le diamètre de l’arbre). Vérifiez que le manchon du soufflet et bien
positionné sur le tube d’étambot et que l’arbre est proche du centre du tube. Modifiez le réglage afin qu’il en soit
ainsi. Serrez tous les colliers sur le tube d’étambot et la bague carbone.
12. Faire glisser le rotor en acier inoxydable sur l’arbre jusqu’à ce qu’il VIENNE EN CONTACT avec la bague
carbone. Repérez cette position sur l’arbre, juste à l’avant du rotor, avec un marqueur ou du ruban adhésif car il
s’agit de la position neutre.
13. Faire glisser le rotor vers l’arrière, comprimez le soufflet de la valeur indiquée dans le tableau de
compression du soufflet, en prenant la marque comme point de référence. Le soufflet étant en position de
compression, serrez les deux (2) vis sur l’arbre avec la clé arbres de 20 à 35 mm et de 11 N.m pour les arbres de
38 à 95 mm). Si vous voulez insérer la partie la plus longue de la clé Allen dans le trou, vous pouvez serrer une
pince étau sur la partie courte pour serrer au couple voulu.
14. Prenez deux (2) autres vis dans le sac plastique, appliquer une goutte de frein filet (tube bleu) sur le filetage
de chaque vis de réglage et vissez-en une dans chaque trou. Ajuster les par dessus les premières vis. Elles
serviront de dispositif de sécurité pour les premières vis. Ne pas réutiliser les vis qui ont déjà servi.
15. Monter le collier de type SRC autour de l’arbre et le glisser contre le rotor Inox. Verouiller le avec les deux vis
de serrage.
info@francehelices.fr
www.francehelices.fr
+(.33).(0)4.93.47.69.38
La pression d’eau maximale ne doit pas dépasser 10 PSI / 0.68 BAR
Avec un raccord en T sur la sortie de l’échangeur du moteur.
Remarque : propose des kits en T pour les flexibles de diamètres intérieur 19 mm, 25 mm, 32mm, 38
mm.
Avec un raccord en T en sortie du refroidissement d’huile.
Avec un raccord en T sur le coude d’échappement.
Pour les bateaux sans échangeurs : Ajouter un passe-coque à crépine ou un piquage d’eau en T sur une
autre entrée d’eau. (Remarque : il faut installer une vanne de régulation du débit d’eau, car un débit d’eau
trop élevé peut entrainer une pression trop importante dans le PSS.) Brancher un flexible pouvant aller
dans l’eau, entre les raccords du bateau et le raccord du PSS et fixez-le au moyen de deux (2) colliers, un
à chaque extrémité. Remarque : tous les tuyaux et montages doivent respecter les règles de sécurité en
vigueur. Par exemple, si le piquage sur le moteur est situé en-dessous de la ligne de flottaison, il faut
installer un raccord anti-siphon, en plus de ce que prévoit la bonne pratique.
17. ESSAI : A la mise à l’eau du bateau, inspectez le PSS et vérifiez qu’il est bien en place, il doit être
parfaitement étanche. Démarrez le moteur, il est normal de noter lors de la période de rodage, une
pulvérisation ou un brouillard très fin sortant du joint, ainsi que de la poussière de carbone. Le PSS ne
doit pas fuir à l’arrêt.
16. ALIMENTATION EN EAU DES PSS :
Remarque : sur les bateaux à voile ou les vedettes à déplacement allant à moins de 12 nœuds on peut
utiliser la méthode A ou la méthode B. Cependant, pour les bateaux à déplacement qui ont une bague
hydrolube dans le tube d’étambot, il faut alimenter en eau le joint.
A/ BATEAUX LENTS (vitesse inférieure à 12 nœuds avec le moteur et sans bague hydrolube dans le tube
d’étambot)
Prendre un flexible prévu pour aller sous l’eau de diamètre intérieur 9 mm (non fourni). Branchez le flexible à
un endroit du bateau placé au moins soixante (60) cm au-dessus de la ligne de flottaison, en vous assurant
que le flexible n’exerce aucune pression sur la pièce en carbone du joint. Le flexible doit se trouver aussi
près que possible de l’axe du bateau afin que le haut de l’évent ne soit jamais sous la ligne de flottaison,
même en cas de gîte importante. Utilisez les fixations fournies pour bien maintenir le flexible en position : il
ne doit pas pouvoir se libérer et tomber. Ce flexible est un évent qui permet de s’assurer qu’il ne peut pas
rester d’air dans le joint.
AVERTISSEMENT : ne faites pas de coude sur la longueur de l’évent car cela pourrait créer un phénomène
de siphon, dans les conditions extrêmes. Assurez-vous également que l’évent est bien fixé et qu’il ne peut
pas tomber sous la ligne de flottaison. Si cela devait arriver, alors l’eau entrerait dans le bateau. Il est
également interdit de boucher ou de bloquer la sortie de l’évent, car cela empêcherait l’air de sortir.
B/ BATEAUX RAPIDES (vitesse supérieure à 12 nœuds au moteur) Remarque : les bateaux avec 2 moteurs,
qui dépassent 12 nœuds en navigation sur un seul moteur, doivent installer un raccord entre les joints afin
qu’ils soient toujours alimenter en eau. Pour les bateaux rapides, il faut que le PSS soit raccordé à une
arrivée d’eau afin de le refroidir et de le lubrifier (au-dessus d’environ 12 nœuds un vide se crée dans le tube
d’étambot et l’eau se retire. Cela entraine une perte d’eau de refroidissement, ce qui, à son tour, peut
entrainer une surchauffe de la bague carbone). Il y a plusieurs choix d’arrivée d’eau. La liste donnée ci-
dessous n’est pas exhaustive. Ce ne sont que des exemples, qui peuvent, ou non, s’appliquer à votre propre
bateau.
info@francehelices.fr
www.francehelices.fr
+(.33).(0)4.93.47.69.38
TABLEAU DE COMPRESSION DU SOUFFLET
PERIODE DE RODAGE
Pour tous les PSS, le temps de rodage est d’environ 1 heure. Ce rodage correspond au temps
qu’il faut pour que les surfaces en contact du Carbone et du rotor finissent de se polir. Pendant
cette période, vous pourrez remarquer un léger brouillard ainsi qu’un peu de poudre noire
s’échappant du PSS. Ce phénomène varie selon les installations et ne devrait pas dépasser 100
heures.
info@francehelices.fr
www.francehelices.fr
+(.33).(0)4.93.47.69.38
FAQ
A. Sifflement :
Si vous percevez ce sifflement lorsque le PSS tourne, c’est qu’il n’est pas bien lubrifié. Revoir l’injection
d’eau et le circuit de circulation d’eau du PSS.
ATTENTION: Si le PSS a tourné à sec, faites très attention en touchant le rotor ou le carbone, ils peuvent
être très chauds.
B. Brouillard ou poussière après la période de rodage :
Les valeurs données dans le tableau de compression du soufflet ne sont que des valeurs moyennes, ne
pouvant servir que de guide. La valeur EXACTE de la compression peut varier en fonction du type de
montage du moteur et la pression d’eau arrivant dans le joint. Si, après le rodage, vous constatez une
émission de poussière ou de brouillard, vérifiez que le soufflet est bien comprimé. Si c’est le cas,
augmentez la compression sur le soufflet. Continuez à régler jusqu’à ce l’émission de poussière ou de
brouillard cesse.
Remarque : Finaliser votre réglage en vérouillant le rotor avec des vis neuves.
C. Goutte d’eau au repos :
Si le PSS fuit quand l’arbre ne tourne pas, c’est probablement dû à la présence de matières étrangères
entre le rotor et la bague carbone. Pour nettoyer, insérez un chiffon propre entre les deux surfaces de la
butée (remarque : si le bateau est à l’eau, de l’eau peut pénétrer dans le bateau à ce moment) et frotter
avec le chiffon autour du joint. C’est ainsi que l’eau va pouvoir évacuer les impuretés. Retirez le chiffon : la
fuite doit cesser.
Garantie FABRICANT Limitée : Le P.S.S est garanti par PYI, Inc. contre tout vice de matière et tout défaut
d’exécution, si l’utilisation et la maintenance ont été réalisées de façon correcte, pour une durée de trois (3)
ans à compter de la première date d’utilisation ou de transport, au premier terme échu. Pendant la période
de garantie, toutes les pièces d’origine concernées par cette garantie et reconnues par PYI, Inc. comme
étant défectueuses, à cause de la matière ou de l’exécution, seront soit réparées, soit remplacées, par PYI,
Inc. ou par un de ses agents, à sa seule discrétion, sans frais, à l’exception des frais de transport et de
manutention et des frais de main d’œuvre du revendeur (s’il y en a), ces dernières charges n’étant pas
couvertes par la garantie. La garantie sur la réparation ou le remplacement des pièces, selon la garantie
limitée, expire à la fin de la période de garantie originale.
Limites de la garantie : Cette garantie limitée ne couvre pas, et ne s’applique pas aux PSS dès lors qu’ils : (i)
sont modifiés d’une quelconque façon n’ayant rien à voir avec le PSS tel qu’il a été conçu et livré, (ii) sont
mal installés et/ou entretenus, (iii) incompatibles avec une quelconque partie ou un composant du bateau,
ou une application non fournie par PYI, quelle que soit la cause de la panne ou de l’incompatibilité de cette
partie ou de ce composant, (iv) utilisés à d’autres fins que celles pour lesquelles ils ont été conçus, et/ou (v)
soumis à une mauvaise utilisation, à une négligence ou à des accidents. Pour que la garantie puisse
s’exercer, il faut fournir à un revendeur autorisé du PSS, pendant la période de garantie, le PSS accompagné
de la facture ou d’une preuve d’achat portant le numéro du modèle identifiant le PSS.
A l’exception de la garantie fabricant expressément citée ci-dessus, et dans les limites prévues par la loi
en vigueur, PYI et ses fournisseurs ne font aucune garantie, explicite ou implicite, et réfutent toute
garantie, charge et condition, qu’elle soit expresse, implicite ou statutaire, relativement au PSS, y
compris, mais sans s’y limiter, les garanties implicites de qualité marchande contre tout vice caché, ou
d’adéquation à des buts particuliers ou de correspondance à cette description.
Limite de recours : Dans l’hypothèse d’une rupture de la garantie limitée établie ci-dessus, PYI, ou son
agent autorisé, serait uniquement obligé, à la seule discrétion de PYI, de réparer ou de remplacer le PSS
défectueux. Si, après avoir reçu une notification écrite pour chaque défaut, dysfonctionnement ou autre
panne, et si, après effectué un nombre raisonnable de tentatives visant à corriger le défaut, le
dysfonctionnement ou la panne, le recours n’atteignait pas son but essentiel, alors PYI rembourserait le
prix d’achat payé à PYI en retour du/des produit(s) vendu(s). Ledit remboursement représenterait alors
le maximum de la responsabilité de PYI.
CE RECOURS CONSTITUE LE SEUL ET EXCLUSIF RECOURS DE L’ACHETEUR CONTRE PYI, QUELLE
QUE SOIT LA THÉORIE, QU’ELLE SOIT CONTRACTUELLE, PAR RUPTURE DE LA GARANTIE, PAR ACTE
DÉLICTUEL, Y COMPRIS LA NÉGLIGENCE OU LA RESPONSABILITÉ STRICTE, OU QUELCONQUE
AUTRE ORIGINE.
Limite de responsabilité. Dans la limite permise par la législation applicable, PYI et des fournisseurs
rejettent expressément toute responsabilité pour tout dommage fortuit, spécial, indirect ou consécutif
résultant, quelle qu’en soit la raison. Cette exclusion s’applique à toutes les théories légales selon
lesquelles des dommages et intérêts peuvent être réclamés.
info@francehelices.fr
www.francehelices.fr
+(.33).(0)4.93.47.69.38
info@francehelices.fr
www.francehelices.fr
+(.33).(0)4.93.47.69.38
PSS PRO SEAL
INSTALLATION INSTRUCTIONS
For shafts from 3⁄4“ to 3 ”
(20 mm to 95mm)
EN
3/4
info@francehelices.fr
www.francehelices.fr
+(.33).(0)4.93.47.69.38
IMPORTANT! - BEFORE STARTING YOUR INSTALLATION CAREFULLY READ THE FOLLOWING
WARNINGS
AND INSTRUCTIONS. FAILURE TO PROPERLY FOLLOW THE WARNINGS AND INSTRUCTIONS
COULD LEAD TO PERSONAL INJURY OR EVEN DEATH, OR PHYSICAL, ENVIRONMENTAL OR
PROPERTY DAMAGE.
Do not use sealant to fit the bellow to the stern tube or the hose to hose barb.
Do not run dry.
Do not use the PSS SEAL on a submarine vehicle.
• The PSS (Packless Sealing System) Shaft Seal (“PSS”) you are preparing to install is a through- hull fitting
that protects against water from entering the boat where the shaft enters the hull, when properly installed and
maintained. Make sure that your oryour designated installer is a qualified professionnal, knowledgeable and
skilled to install the PSS correctly, and that you have all the required tools and additional equipment on hand
before begining installation .
• If removing the engine transmission for repair or if launching the boat without a transmission installed, then
the shaft must be kept in place with a device that will secure the shaft with the PSS bellow in its normal
“compressed mode”.
• Install the PSS ONLY with the boat out of the water.
• DO NOT USE oil, grease (petroleum products) or silicone products at any time during the installation. Use
soap and water to lubricate the o-rings of the rotor when sliding it down the shaft.
• Clean the seal area of your boat so you do not contaminate the seal surface with dirt, oil or other foreign
matter. Do not damage or scratch the face of the carbon or the face of the stainless steel rotor during
unpacking or while handling or installing the PSS.
• There should be a total of four (4) set screws in the two holes of the rotor (2 sets screws in each hole). If you
must move the stainless steel rotor, make sure to remove the top set screws in order to access the bottom
two set screws.
• Do not re-use the supplied cupped pointed set screws. If multiple tightening has flattened the cupped-point
set screw, replace the affected screw with a new one.
• There should be a total of four (4) hose clams securing the bellows ends. These clamps should be replaced if
they show any sign of corrosion.
• Do not slide the aft bellow cuff too far down over the stern tube. The leading edge of the stern tube could
cause damage to the inner ribs of the bellow and improperly limit the bellow movement and travel.
• If fitting a vent line (boats under 12 knots), do not run a loop at the top end of the hose as this could promote
a siphon.
• If the boat sits idle for a long period of time (generally 3 months or more), it is necessary to move the carbon
face back to allow a small amount of water to enter the boat.
• As with any hose under the waterline, the PSS bellows must be inspected on a regular basis (i.e., no less than
at least every 6 months under most circumstances) and checked for any signs of deterioration (cracks, splits,
tears, brittleness, or other signs). Upon any sign of deterioration the bellow must be replaced. As preventive
maintenance the bellow should be replaced no less than every 6 years on the Type A Seal, and 8 to 10 years on
the PSS PRO Seals, regardless of its apparent condition.
• Do not allow any petroleum-based liquid or corrosive material to come in contact with the PSS. Take care to
ensure that this does not occur, for example, when performing any general maintenance, or winterizing the
engine.
• The shaft should be near centered and run parallel to the shaft log.
• Do not use an ozone generator (e.g., air cleaner) in or around your boat. The extra ozone will speed up the
deterioration of any rubber product, including the PSS bellow.
• The bellows will need more frequent inspection and replacement in an environment where non-sealed
batteries emit sulfuric acid vapors. Sulfuric acid vapors will accelerate deterioration of any rubber materials
including the PSS bellows.
info@francehelices.fr
www.francehelices.fr
+(.33).(0)4.93.47.69.38
INSTALLATION INSTRUCTIONS
IN ALL CASES, THE BOAT MUST BE OUT OF THE WATER TO PERFORM THIS INSTALLATION.
1. Unbolt the shaft coupling from the transmission coupling.
2. Remove the shaft coupling from the shaft. Coupling styles will vary by manufacturer. Some couplings use
set screws to keep the coupling in place, while others use a roll pin and others use a nut (always use the
appropriate tools and procedures for your particular application).
3. Remove the old stuffing box and packing material. There are three types of packing glands that can be
found on most boats: “Classic”, “Bolt On” and “Threaded”.
4. Clean the entire exposed portion of the shaft with very fine sand paper (# 400 or # 600 grit)
in order to remove any debris or rough edges. Pay particular attention to the keyway located
at the forward end of the shaft, where the stainless steel rotor will pass. The shaft and keyway
must NOT have any sharp edges that could damage the o-rings upon installation.
info@francehelices.fr
www.francehelices.fr
+(.33).(0)4.93.47.69.38
5. Slide the open end of the bellow and its hose clamps down the shaft and onto the bare stern tube and
make sure the bellow has a proper fit over the shaft log. Once in place the bellow should overlap the stern
tube by the same amount as the bellow cuff so the hose clamps
will properly tighten the bellow to the shaft log. WARNING: Do not slide the bellow cuff too far down and
over the stern tube. If the bellow is slid too far onto the stern tube the forward edge of the stern tube could
damage the inner ribs of the bellow and improperly limit the bellow’s travel. Tighten the hose clamps to
secure the bellow to the stern tube and fit the black clamp protector to the tail of the hose clamps.
6. Make sure the carbon flange is in place on the forward end of the bellow and that the two hose clamps
properly secure it. Also confirm that the carbon is free of any defects or imperfections on its polished face.
7. Remove the stainless steel rotor from the protective pouch. Verify that there are two (2) o-rings placed
into the o-ring grooves inside the bore of the rotor. Confirm that the mating face of the rotor is free of any
defects or imperfections. Take 2 (two) set screws from the plastic bag, apply a drop of thread-lock (blue
tube) to the thread of each set screw, and thread them. WARNING: TWO MORE SET SCREWS WILL BE
INSTALLED AT STEP 13. Thread one screw into each hole, stopping just short of the screw protruding into
the inside bore of the rotor.
8. Lubricate the shaft and o-rings of the rotor, and slide the stainless steel rotor down the shaft. Use a
petroleum free liquid (e.g., a dish soap / water solution works well) as the lubricant. CAUTION: DO NOT USE
OIL, GREASE OR SILICONE AS THE LUBRICANT.
9. Re-attach the shaft coupling to the shaft and make sure that all the safety devices provided and
recommended by the coupling manufacturer are in place.
10.Re-attach the shaft coupling to the transmission making sure that it is installed to the manufacturer
specifications and tolerances. Make sure all the safety devices provided and recommended by the coupling
manufacturer are in place.
11. Now that the shaft is in place, verify that the carbon is centered on the shaft (note the carbon ring is
bored at a larger diameter than the shaft, it is normal), verify that the bellow cuff is properly placed on the
stern tube and verify that the shaft is near center in the shaft log. Adjust so the PSS runs true with the
shaft. Tighten all the hose clamps around the stern tube and the carbon.
12. Slide the stainless steel rotor down the shaft until it just TOUCHES the carbon. Mark this position on the
shaft as the “neutral” position with a marker or a piece of tape on the shaft just in front of the rotor.
13. Sliding the stainless steel rotor aft, compress the bellow by the amount indicated on the bellow
compression chart shown below, using the “neutral” mark as a reference point. While keeping the bellow in
the “compressed” position, tighten the two (2) set screws against the shaft with the provided allen wrench
(Use approximately 6 foot pounds of torque for shafts 3⁄4” to 13⁄8” and 8 foot pounds of torque for shafts 1
” to 3 ”). If you need to insert the long arm of the allen wrench into the hole, a vice-grip, for example, may
be fitted on the short arm to help provide the required torque.
Install the 2 part clamp around the shaft and slide it against the rotor. Tighten the clamp screws.
3/4
1/2
info@francehelices.fr
www.francehelices.fr
+(.33).(0)4.93.47.69.38
BELLOW COMPRESSION CHART
15. Remove from the plastic bag 2 (two) additional set screws, apply a drop of thread-lock (blue
tube) to the thread of each set screw, and thread one into each hole. This will act as a locking
device for the first set screws. Do not re-use cupped point set screws.
16. Plumbing the system :
Note: Sailboats or displacement powerboats with a powering speed below 12 knots can use either
method A or B. However, displacement boats with a bearing in the shaft log must plumb water to
the seal.
15.1 Low speed boats: (Under 12 knots of boat speed under power and no bearing in the
shaft log).
Using a 3⁄8” (8 or 9 mm) ID “underwater rated” hose (not provided with the PSS), connect the hose
to the hose barb fitting installed on the carbon and secure the hose with two (2) hose clamps. Run
the hose to a point in the boat at least two (2) feet above the waterline, making sure that the hose
does not apply any load on the carbon part of the seal. Keep the hose as close as possible to the
centerline of the vessel so the top of the vent hose is never below the waterline, even if the boat
heels. Secure the hose in place with the necessary fittings that insure it will not pull free and drop.
This hose is now a venting hose that will help ensure that no air is trapped in the seal.
WARNINGS: Do not run a loop at the top end of the vent hose as it could start a siphon action in
some extreme conditions. Make sure the vent hose is properly secured from falling below the
waterline. If the vent hose were to fall down below the waterline, water would come in the boat. Do
not plug or block the end of the vent hose, as this would prevent the line from venting.
info@francehelices.fr
www.francehelices.fr
+(.33).(0)4.93.47.69.38
Maximum water pressure should not exceed 10 PSI.
T-off the engine raw water-cooling line. (Note:T-kits are available separately
Thread a barb fitting into the drain plug of the heat exchanger if applicable.
Thread barb fitting into the drain plug of the exhaust manifold if the manifold
15.2 High-speed boats: (Over 12 knots of boat speed under power).
Note: Twin engine boats that can exceed 12 knots on a single engine must run a crossover line between
seals to ensure both seals maintain water flow, while running on only one engine.
For high-speed vessels it is required that a water supply be plumbed to the PSS for the purpose of cooling
and lubricating the seal faces (i.e., at over approximately 12 knots of speed a vacuum is created in the
stern tube and water is drawn away from the PSS resulting in a loss of cooling water that may cause the
carbon to over heat). There are multiple sources of water for the supply. The following are a few non-
exhaustive examples. These are examples only and they may or may not apply to your particular boat.
Note:
from PYI Inc for internal hose 3⁄4”, 1” , 11⁄4”, 11⁄2”)
is raw water-cooled.
• Add a small scoop under water for keel-cooled boats or T-off another water
pick up. (Note: A valve must be installed to regulate the water flow as too high water flow may over
pressurize the PSS seal). Use an appropriate “underwater rated” hose from the fittings on the boat and the
fitting on the PSS and secure them with two (2) hose clamps at each end.
NOTICE: All plumbing must follow the standards and practices of proper boatplumbing. For example, if the
pick-up on the engine is located under the waterline, an anti-siphon fitting must be installed, in addition to
other standards and practices.
16. Testing: When launching the boat, inspect the PSS and make sure the PSS is properly in place. Water
should not be entering the boat from the PSS seal area. Run the engine in gear as in a normal operation. It
is normal at this time to notice a very fine spray or mist coming from the seal and some carbon dust, as the
PSS requires a break in period (see below). The PSS should not be leaking at rest and should never spray
more than just a fine spray or mist.
TROUBLE SHOOTING
A. High-pitched squeal:
If you hear a high-pitched squeal from the PSS shaft seal during operation, the seal may not be getting
water. Review and correct plumbing to the seal.
CAUTION: If the seal has run dry use caution! The faces (stainless steel rotor and carbon) may be very hot.
info@francehelices.fr
www.francehelices.fr
+(.33).(0)4.93.47.69.38
B. Spray or mist during operation after the break in period:
The dimensions provided in the “Bellow compression chart” are average figures and are provided as a guide.
The EXACT compression amounts required can vary due to different types of engine mounts and water
pressure being fed to the seal. If you experience any spray or mist following the break in period, make sure
that the bellows had been compressed properly. If so, add an additional 1⁄4” of compression to the seal and
soon the mist should disappear. Keep adjusting until the spray or mist stops.
C. Dripping at rest:
If the PSS seal drips while at rest then it is likely that foreign material is on the face of the seal between the
stainless steel rotor and the carbon flange. To clean this foreign material from the seal, insert a clean rag
carefully between the two faces (Note: some water will come into the boat at this time if the boat is in the
water) and work the rag around the seal. As you do this, the incoming water will flush the impurities. Remove
the rag from the seal and the leak should stop.
REAK-IN PERIOD
On average, the PSS requires approximately one (1) hour of break in time, which allows the carbon flange to
polish the mating face of the stainless steel rotor. During the break in period you will experience a very fine
mist, sometimes associated with a black dust coming from the PSS. Under normal conditions, this will stop
after an average of one (1) hour running time.
Copyright © 2018 PYI, Inc. All rights are reserved. No part of this document may be reproduced, transmitted,
transcribed, stored in a retrieval system, or translated into any language or computer language, in any form or
by any means, without the prior written permission of PYI, Inc.
PYI, Inc. makes no representations or warranties, express or implied, with respect to this document or the
contents herein and specifically disclaims any implied warranties of merchantability or fitness for any
particular purpose. In addition, PYI, Inc. reserves the right to revise this document and to make changes from
time to time in the content hereof.
MANUFACTURER warranty : The PSS (Packless Sealing System) Shaft Seal (“PSS”)is warranted by PYI, Inc.
(“PYI”)to the original purchaser only to be free from defects in material and workmanship under normal use
and maintenance for a period of three (3) years from the date of first use or shipment, whichever comes first.
During
the warranty period, all original parts subject to this limited warranty and determined by PYI to be defective in
materials or workmanship, will either be repaired or replaced by PYI or its authorized agent, at its sole option,
free of charge, except for shipping and handling charges and dealer labor charges (if applicable), which
charges
are not covered by this limited warranty. The warranty on any part repaired or replaced under this limited
warranty expires at the end of the original warranty period.
Limitations of Limited Warranty : This limited warranty does not cover and does not apply to any PSS:
(i) altered in any way inconsistent with the shaft seal design as provided, (ii) improperly installed and/or
maintained, (iii) incompatible with any portion or component of any boat or application that is not
supplied by PYI, regardless of the cause of the failure or incompatibility of such portion or component,
(iv) used for purposes other than those for which it was designed, and/or (v) subjected to misuse,
neglect or accidents. In order to obtain warranty service, the PSS, together with the bill of sale or other
dated proof-of-purchase document identifying the shaft seal model number, must be presented to an
authorized PSS dealer during the warranty period. For assistance in locating an authorized PSS dealer,
please contact PYI at:
Except for the limited warranty expressly provided above, to the maximum extent permitted by applicable
law, PYI and its suppliers make no warranties, express or implied, and disclaim all warranties, duties and
conditions, whether express, implied or statutory, with respect to the PSS, including, without limitation,
any implied warranties of merchantability, against latent defects, fitness for a particular purpose, or
correspondence to description.
Limitation of Remedies : In the event of a breach of the limited warranty set forth above, PYI or its
authorized agent will only be obligated at PYI’s sole option to either repair or replace the failed PSS. If
after written notice to PYI of each defect, malfunction or other failure and a reasonable number of
attempts to correct the defect, malfunction or other failure and the remedy fails of its essential purpose,
PYI shall refund the purchase price
paid to PYI in exchange for the return of the sold good(s). Said refund shall be the maximum liability of
PYI. THE FOREGOING REMEDY IS THE SOLE AND EXCLUSIVE REMEDY OF THE BUYER AGAINST PYI
REGARDLESS OF THEORY, WHETHER ARISING IN CONTRACT, BREACH OF ANY WARRANTY, TORT,
INCLUDING STRICT LIABILITY OR NEGLIGENCE, OR OTHERWISE.
Limitation of Liability : To the maximum extent permitted by applicable law, PYI and its suppliers
expressly disclaim and exclude any liability for any incidental, special, indirect or consequential damages
resulting from any reason whatsoever. This exclusion applies to all legal theories under which damages
may be sought.
Note: This limited warranty gives you specific legal rights and you may also have other rights which may
vary from state to state.
Please refer to the P.S.S. Shaft Seal Instruction Booklet for installation instructions.
info@francehelices.fr
www.francehelices.fr
+(.33).(0)4.93.47.69.38

Más contenido relacionado

Similar a MANUEL INSTALLATION PSS TYPE PRO 20 A 90 MM

Poujoulat - Conduits polycombustibles simple paroi inox
Poujoulat - Conduits polycombustibles simple paroi inoxPoujoulat - Conduits polycombustibles simple paroi inox
Poujoulat - Conduits polycombustibles simple paroi inoxArchitectura
 
Écrous Tensionneurs à vis multiple HEICO-TEC
Écrous Tensionneurs à vis multiple HEICO-TECÉcrous Tensionneurs à vis multiple HEICO-TEC
Écrous Tensionneurs à vis multiple HEICO-TECLaurent Vincent
 
Remplacement joints d'injecteurs fiesta 1.6 tdci dv6 ated4
Remplacement joints d'injecteurs fiesta 1.6 tdci dv6 ated4Remplacement joints d'injecteurs fiesta 1.6 tdci dv6 ated4
Remplacement joints d'injecteurs fiesta 1.6 tdci dv6 ated4lionel63520
 
Offredeservices 160830144423
Offredeservices 160830144423Offredeservices 160830144423
Offredeservices 160830144423WajdiBenMohamed
 
Offre de services technocast
Offre de services technocastOffre de services technocast
Offre de services technocastyamnaine Mahfoud
 
DéMont. Remont. Des Roulements
DéMont. Remont. Des RoulementsDéMont. Remont. Des Roulements
DéMont. Remont. Des Roulementsyouri59490
 
Ecrou tensionneur Heico-Tec
Ecrou tensionneur Heico-TecEcrou tensionneur Heico-Tec
Ecrou tensionneur Heico-TecYannick Ramirez
 
Installer un systeme d'arrosage enterre
Installer un systeme d'arrosage enterreInstaller un systeme d'arrosage enterre
Installer un systeme d'arrosage enterreGENICIMO
 
Tds sika-anchorfix1-fr
Tds sika-anchorfix1-frTds sika-anchorfix1-fr
Tds sika-anchorfix1-frPantinPP
 
les principaux moyens de freinage des ecrous et des vis
les principaux moyens de freinage des ecrous et des visles principaux moyens de freinage des ecrous et des vis
les principaux moyens de freinage des ecrous et des visclaudevidal5
 
Destructeur de documents Kobra 430 TS #Mode d'emploi
Destructeur de documents Kobra 430 TS #Mode d'emploiDestructeur de documents Kobra 430 TS #Mode d'emploi
Destructeur de documents Kobra 430 TS #Mode d'emploiTerface
 
freinage visserie fil frein
 freinage visserie  fil frein freinage visserie  fil frein
freinage visserie fil freinclaudevidal5
 
Poujoulat - Conduits polycombustibles double paroi isolés laine de roche
Poujoulat - Conduits polycombustibles double paroi isolés laine de rochePoujoulat - Conduits polycombustibles double paroi isolés laine de roche
Poujoulat - Conduits polycombustibles double paroi isolés laine de rocheArchitectura
 

Similar a MANUEL INSTALLATION PSS TYPE PRO 20 A 90 MM (20)

Poujoulat - Conduits polycombustibles simple paroi inox
Poujoulat - Conduits polycombustibles simple paroi inoxPoujoulat - Conduits polycombustibles simple paroi inox
Poujoulat - Conduits polycombustibles simple paroi inox
 
Écrous Tensionneurs à vis multiple HEICO-TEC
Écrous Tensionneurs à vis multiple HEICO-TECÉcrous Tensionneurs à vis multiple HEICO-TEC
Écrous Tensionneurs à vis multiple HEICO-TEC
 
1510201
15102011510201
1510201
 
1510201
15102011510201
1510201
 
Remplacement joints d'injecteurs fiesta 1.6 tdci dv6 ated4
Remplacement joints d'injecteurs fiesta 1.6 tdci dv6 ated4Remplacement joints d'injecteurs fiesta 1.6 tdci dv6 ated4
Remplacement joints d'injecteurs fiesta 1.6 tdci dv6 ated4
 
Offredeservices 160830144423
Offredeservices 160830144423Offredeservices 160830144423
Offredeservices 160830144423
 
Offre de services technocast
Offre de services technocastOffre de services technocast
Offre de services technocast
 
DéMont. Remont. Des Roulements
DéMont. Remont. Des RoulementsDéMont. Remont. Des Roulements
DéMont. Remont. Des Roulements
 
1510202
15102021510202
1510202
 
1510202
15102021510202
1510202
 
Ecrou tensionneur Heico-Tec
Ecrou tensionneur Heico-TecEcrou tensionneur Heico-Tec
Ecrou tensionneur Heico-Tec
 
Installer un systeme d'arrosage enterre
Installer un systeme d'arrosage enterreInstaller un systeme d'arrosage enterre
Installer un systeme d'arrosage enterre
 
Tds sika-anchorfix1-fr
Tds sika-anchorfix1-frTds sika-anchorfix1-fr
Tds sika-anchorfix1-fr
 
les principaux moyens de freinage des ecrous et des vis
les principaux moyens de freinage des ecrous et des visles principaux moyens de freinage des ecrous et des vis
les principaux moyens de freinage des ecrous et des vis
 
Destructeur de documents Kobra 430 TS #Mode d'emploi
Destructeur de documents Kobra 430 TS #Mode d'emploiDestructeur de documents Kobra 430 TS #Mode d'emploi
Destructeur de documents Kobra 430 TS #Mode d'emploi
 
freinage visserie fil frein
 freinage visserie  fil frein freinage visserie  fil frein
freinage visserie fil frein
 
1510204
15102041510204
1510204
 
1510204
15102041510204
1510204
 
Poujoulat - Conduits polycombustibles double paroi isolés laine de roche
Poujoulat - Conduits polycombustibles double paroi isolés laine de rochePoujoulat - Conduits polycombustibles double paroi isolés laine de roche
Poujoulat - Conduits polycombustibles double paroi isolés laine de roche
 
Brochure_ND
Brochure_NDBrochure_ND
Brochure_ND
 

Más de emmanuelle bezzi

Más de emmanuelle bezzi (20)

FRANCE HELICES salons nautiques
FRANCE HELICES salons nautiquesFRANCE HELICES salons nautiques
FRANCE HELICES salons nautiques
 
Anodes bateau
Anodes bateauAnodes bateau
Anodes bateau
 
Reparation helice bateau
Reparation helice bateauReparation helice bateau
Reparation helice bateau
 
Best Surface Drive Supplier France Helices.pdf
Best Surface Drive Supplier  France Helices.pdfBest Surface Drive Supplier  France Helices.pdf
Best Surface Drive Supplier France Helices.pdf
 
FRANCE HELICES propulsion marine
FRANCE HELICES propulsion marineFRANCE HELICES propulsion marine
FRANCE HELICES propulsion marine
 
Anode bateau zinc
Anode bateau zincAnode bateau zinc
Anode bateau zinc
 
pss shaft seal type a cotes compression.pdf
pss shaft seal type a cotes compression.pdfpss shaft seal type a cotes compression.pdf
pss shaft seal type a cotes compression.pdf
 
réparation hélices 4 pales
réparation hélices 4 palesréparation hélices 4 pales
réparation hélices 4 pales
 
CHAISE A STRATIFIER BRONZE
CHAISE A STRATIFIER BRONZECHAISE A STRATIFIER BRONZE
CHAISE A STRATIFIER BRONZE
 
PROPSPEED FRANCE
PROPSPEED FRANCEPROPSPEED FRANCE
PROPSPEED FRANCE
 
PROPSPEED FRANCE
PROPSPEED FRANCEPROPSPEED FRANCE
PROPSPEED FRANCE
 
BAGUE HYDROLUBE
BAGUE HYDROLUBEBAGUE HYDROLUBE
BAGUE HYDROLUBE
 
FRANCE HELICES en Corse du 14 au 17 novembre 2022
FRANCE HELICES en Corse du 14 au 17 novembre 2022FRANCE HELICES en Corse du 14 au 17 novembre 2022
FRANCE HELICES en Corse du 14 au 17 novembre 2022
 
réparation hélice
réparation héliceréparation hélice
réparation hélice
 
bague hydrolube
bague hydrolubebague hydrolube
bague hydrolube
 
bague hydrolube
bague hydrolubebague hydrolube
bague hydrolube
 
REPARATION HELICE (80 x 100 cm) (2).pdf
REPARATION HELICE (80 x 100 cm) (2).pdfREPARATION HELICE (80 x 100 cm) (2).pdf
REPARATION HELICE (80 x 100 cm) (2).pdf
 
Réparation d'hélices
Réparation d'hélicesRéparation d'hélices
Réparation d'hélices
 
REPARATION HELICE 6 PALES
REPARATION HELICE 6 PALES REPARATION HELICE 6 PALES
REPARATION HELICE 6 PALES
 
Réparation d'hélices
Réparation d'hélicesRéparation d'hélices
Réparation d'hélices
 

MANUEL INSTALLATION PSS TYPE PRO 20 A 90 MM

  • 2. info@francehelices.fr www.francehelices.fr +(.33).(0)4.93.47.69.38 ATTENTION ! Avant de commencer la pose de votre PSS nous vous demandons de bien lire ces instructions. Tout manquement à ces rappels pourrait entrainer des risques de blessures graves ou de dommages important à vous-même ou aux biens. • BIEN LIRE LE MANUEL DE MONTAGE : Ce joint mécanique PSS que vous vous apprêtez à installer est une pièce qui permet, lorsqu’elle est proprement installée, d’assurer l’étanchéité entre la mer et l’intérieur du bateau là où passe l’arbre de l’hélice. Avant tout assurez-vous que, vous-même ou votre opérateur, ayez toutes les compétences et tous les outils requis pour faire cette opération. • Si pour quelque raison que ce soit l’inverseur doit être démonté et l’arbre désaccouplé, il est important de mettre en place les moyens nécessaires permettant de garder sur votre PSS les taux de compressions donnés à l’installation. • Ne monter le PSS qu’une fois le bateau hors de l’eau • NE JAMAIS utiliser de graisse, huile ou dérivés du pétrole lors de l’installation d’un PSS. Une eau savonneuse fera parfaitement l’affaire pour vous aider à faire glisser le rotor sur l’arbre. • Avant la pose, assurez vous qu’il n’y a pas de risque de salir le PSS lors de son installation, que l’arbre, les cales ou toute parties proche de la zone de pose soient propres et non grasses. Au déballage et lors de la pose, faire bien attention lors des manipulations à ne pas rayer les surfaces polies du carbone ou du rotor inox. • Si, par accident, vos PSS tournent à sec, il est important de changer les pipettes d’admission d’eau se trouvant sur les carbones quand celles-ci sont en plastiques. • Lors de ce remplacement, attention à ne pas abimer le carbone au serrage. Sur les anciens PSS les filetages sont coniques et une sur pression risquerait d’endommager le carbone. • Pour les anciens PSS, et à la demande du client les pipettes de refroidissement peuvent être en Inox. Dans ce cas elles devront être inspectées tous les 6 mois pour s’assurer qu’il n’y a aucun risque de corrosion. • Lors de la pose du soufflet sur le tube d’étambot, il est important que le tube ne soit pas en contact avec les spirales du soufflet, au risque de les abimer. Le tube ne doit donc pas entrer plus loin dans le soufflet que sur la partie plate comprenant les deux colliers de serrage. • Pour une installation avec mise à l’air libre (bateaux allant à moins de 10 Nds), attention à ne pas créer de boucle dans le tuyau et à ce qu’il soit bien au dessus de la flottaison, même en navigation. • Si le bateau reste sans naviguer pour une longue période (3 mois et plus) il peut être nécessaire de décoller le carbone du rotor à la remise en service du bateau. • Comme toutes les installations se trouvant sous la flottaison, il est important d’inspecter votre PSS régulièrement afin de déceler toute usure et détérioration anormale. Dans tous les cas nous recommandons de remplacer le soufflet tous les 6 ans même si celui-ci ne présente aucun signe de fatigue. • Lors des opérations de maintenance, et plus largement, évitez tout contact entre les PSS et des produits à base de pétrole. • Toujours contrôler le montage et le bon alignement de l’arbre d’hélice. • Si les PSS se trouvent dans le même compartiment que des batteries il sera important de contrôler plus régulièrement l’état du soufflet. Les émanations d’acide sulfurique ont pour effet d’abimer beaucoup plus rapidement les composants à base de caoutchouc tel que les soufflets. • Ne pas utiliser de colle pour fixer le soufflet sur le tube d’étambot ou pour maintenir le tuyau de refroidissement sur la pipette du carbone. • Ne pas faire tourner le PSS à sec. • Ne pas utiliser le PSS sur des sous marins.
  • 3. info@francehelices.fr www.francehelices.fr +(.33).(0)4.93.47.69.38 NOTICE DE MONTAGE LE BATEAU DOIT TOUJOURS ÊTRE À TERRE POUR TOUS TRAVAUX SUR LE PSS 1. Désaccoupler l’arbre du tourteau 2. Désaccoupler l’arbre. Il y a autant d’accouplements que de fabricants. Certains accouplements sont maintenus par des vis, d’autres utilisent des goupilles, et d’autres encore un écrou. (Il vous appartient de prendre les outils qui correspondent à votre cas précis). 3. Démonter le vieux presse-étoupe et sa durite.
  • 4. info@francehelices.fr www.francehelices.fr +(.33).(0)4.93.47.69.38 4. Nettoyer la partie exposée de l’arbre avec du papier de verre ou de la toile émeri très fine (N° 400 ou 600) afin d’enlever toute trace de saleté et toute aspérité. Apporter une attention toute particulière à la clavette située à l’avant de l’arbre, au lieu de passage du rotor. Il ne doit subsister AUCUNE aspérité qui pourrait endommager les joints toriques lors du montage. 5. Faire glisser le soufflet et ses colliers sur le tube d’étambot jusqu’à ce qu’il trouve sa place, le soufflet doit recouvrir le tube d’étambot sur toute la longueur du manchon afin que les colliers puissent bien le maintenir en place. ATTENTION : NE FAITES PAS GLISSER LE MANCHON DU SOUFFLET TROP LOIN, la partie avant du tube pourrait endommager les spires intérieures du soufflet et limiter inconsidérément la course du soufflet. Serrer les colliers pour fixer le soufflet sur le tube d’étambot et poser les Clamp Jacket de protection sur les bords tranchant des colliers. 6. Veiller à ce que la bague carbone soit bien en place sur l’extrémité avant du soufflet et à ce que les deux colliers la fixent correctement. Vérifier également que la face polie de la bague carbone soit parfaitement lisse, propre et sans défaut. 7. Sortez le rotor de sa poche de protection. Contrôler le bon positionnement des deux (2) joints toriques dans les rainures situées dans l’alésage du rotor. La surface de montage du rotor doit être parfaitement propre et sans défaut ou imperfection. Prenez deux (2) (et uniquement deux) vis dans le sac en plastique, appliquer une goutte de frein filet (tube bleu) sur le filetage de chaque vis de réglage et vissez-les dans les trous du rotor en veillant à ce qu’elle ne dépasse pas de l’alésage du rotor. CONSERVEZ LES VIS RESTANTES AFIN DE VOUS EN SERVIR À L’ÉTAPE 14. 8. Lubrifier l’arbre et les joints toriques du rotor, et faire glisser le rotor sur l’arbre. Comme lubrifiant, utilisez un liquide ne contenant pas d’essence (le mieux est de prendre une solution eau / liquide vaisselle). ATTENTION : N’UTILISER PAS D’HUILE, DE GRAISSE OU DE SILICONE COMME LUBRIFIANT. 9. Remonter l’accouplement de l’arbre sur l’arbre en vous assurant que tous les dispositifs de sécurité fournis et recommandés par le fabricant de l’accouplement soient en place 10. Remonter l’accouplement de l’arbre sur la transmission en vous assurant de bien respecter les spécifications et les tolérances fixées par le fabricant. Assurez-vous que tous les dispositifs de sécurité fournis et recommandés par le fabricant de l’accouplement soient en place. 11. Maintenant que l’arbre est en place, vérifier que la bague carbone est bien centrée sur l’arbre (l’alésage de la bague carbone est légèrement plus grand que le diamètre de l’arbre). Vérifiez que le manchon du soufflet et bien positionné sur le tube d’étambot et que l’arbre est proche du centre du tube. Modifiez le réglage afin qu’il en soit ainsi. Serrez tous les colliers sur le tube d’étambot et la bague carbone. 12. Faire glisser le rotor en acier inoxydable sur l’arbre jusqu’à ce qu’il VIENNE EN CONTACT avec la bague carbone. Repérez cette position sur l’arbre, juste à l’avant du rotor, avec un marqueur ou du ruban adhésif car il s’agit de la position neutre. 13. Faire glisser le rotor vers l’arrière, comprimez le soufflet de la valeur indiquée dans le tableau de compression du soufflet, en prenant la marque comme point de référence. Le soufflet étant en position de compression, serrez les deux (2) vis sur l’arbre avec la clé arbres de 20 à 35 mm et de 11 N.m pour les arbres de 38 à 95 mm). Si vous voulez insérer la partie la plus longue de la clé Allen dans le trou, vous pouvez serrer une pince étau sur la partie courte pour serrer au couple voulu. 14. Prenez deux (2) autres vis dans le sac plastique, appliquer une goutte de frein filet (tube bleu) sur le filetage de chaque vis de réglage et vissez-en une dans chaque trou. Ajuster les par dessus les premières vis. Elles serviront de dispositif de sécurité pour les premières vis. Ne pas réutiliser les vis qui ont déjà servi. 15. Monter le collier de type SRC autour de l’arbre et le glisser contre le rotor Inox. Verouiller le avec les deux vis de serrage.
  • 5. info@francehelices.fr www.francehelices.fr +(.33).(0)4.93.47.69.38 La pression d’eau maximale ne doit pas dépasser 10 PSI / 0.68 BAR Avec un raccord en T sur la sortie de l’échangeur du moteur. Remarque : propose des kits en T pour les flexibles de diamètres intérieur 19 mm, 25 mm, 32mm, 38 mm. Avec un raccord en T en sortie du refroidissement d’huile. Avec un raccord en T sur le coude d’échappement. Pour les bateaux sans échangeurs : Ajouter un passe-coque à crépine ou un piquage d’eau en T sur une autre entrée d’eau. (Remarque : il faut installer une vanne de régulation du débit d’eau, car un débit d’eau trop élevé peut entrainer une pression trop importante dans le PSS.) Brancher un flexible pouvant aller dans l’eau, entre les raccords du bateau et le raccord du PSS et fixez-le au moyen de deux (2) colliers, un à chaque extrémité. Remarque : tous les tuyaux et montages doivent respecter les règles de sécurité en vigueur. Par exemple, si le piquage sur le moteur est situé en-dessous de la ligne de flottaison, il faut installer un raccord anti-siphon, en plus de ce que prévoit la bonne pratique. 17. ESSAI : A la mise à l’eau du bateau, inspectez le PSS et vérifiez qu’il est bien en place, il doit être parfaitement étanche. Démarrez le moteur, il est normal de noter lors de la période de rodage, une pulvérisation ou un brouillard très fin sortant du joint, ainsi que de la poussière de carbone. Le PSS ne doit pas fuir à l’arrêt. 16. ALIMENTATION EN EAU DES PSS : Remarque : sur les bateaux à voile ou les vedettes à déplacement allant à moins de 12 nœuds on peut utiliser la méthode A ou la méthode B. Cependant, pour les bateaux à déplacement qui ont une bague hydrolube dans le tube d’étambot, il faut alimenter en eau le joint. A/ BATEAUX LENTS (vitesse inférieure à 12 nœuds avec le moteur et sans bague hydrolube dans le tube d’étambot) Prendre un flexible prévu pour aller sous l’eau de diamètre intérieur 9 mm (non fourni). Branchez le flexible à un endroit du bateau placé au moins soixante (60) cm au-dessus de la ligne de flottaison, en vous assurant que le flexible n’exerce aucune pression sur la pièce en carbone du joint. Le flexible doit se trouver aussi près que possible de l’axe du bateau afin que le haut de l’évent ne soit jamais sous la ligne de flottaison, même en cas de gîte importante. Utilisez les fixations fournies pour bien maintenir le flexible en position : il ne doit pas pouvoir se libérer et tomber. Ce flexible est un évent qui permet de s’assurer qu’il ne peut pas rester d’air dans le joint. AVERTISSEMENT : ne faites pas de coude sur la longueur de l’évent car cela pourrait créer un phénomène de siphon, dans les conditions extrêmes. Assurez-vous également que l’évent est bien fixé et qu’il ne peut pas tomber sous la ligne de flottaison. Si cela devait arriver, alors l’eau entrerait dans le bateau. Il est également interdit de boucher ou de bloquer la sortie de l’évent, car cela empêcherait l’air de sortir. B/ BATEAUX RAPIDES (vitesse supérieure à 12 nœuds au moteur) Remarque : les bateaux avec 2 moteurs, qui dépassent 12 nœuds en navigation sur un seul moteur, doivent installer un raccord entre les joints afin qu’ils soient toujours alimenter en eau. Pour les bateaux rapides, il faut que le PSS soit raccordé à une arrivée d’eau afin de le refroidir et de le lubrifier (au-dessus d’environ 12 nœuds un vide se crée dans le tube d’étambot et l’eau se retire. Cela entraine une perte d’eau de refroidissement, ce qui, à son tour, peut entrainer une surchauffe de la bague carbone). Il y a plusieurs choix d’arrivée d’eau. La liste donnée ci- dessous n’est pas exhaustive. Ce ne sont que des exemples, qui peuvent, ou non, s’appliquer à votre propre bateau.
  • 6. info@francehelices.fr www.francehelices.fr +(.33).(0)4.93.47.69.38 TABLEAU DE COMPRESSION DU SOUFFLET PERIODE DE RODAGE Pour tous les PSS, le temps de rodage est d’environ 1 heure. Ce rodage correspond au temps qu’il faut pour que les surfaces en contact du Carbone et du rotor finissent de se polir. Pendant cette période, vous pourrez remarquer un léger brouillard ainsi qu’un peu de poudre noire s’échappant du PSS. Ce phénomène varie selon les installations et ne devrait pas dépasser 100 heures.
  • 7. info@francehelices.fr www.francehelices.fr +(.33).(0)4.93.47.69.38 FAQ A. Sifflement : Si vous percevez ce sifflement lorsque le PSS tourne, c’est qu’il n’est pas bien lubrifié. Revoir l’injection d’eau et le circuit de circulation d’eau du PSS. ATTENTION: Si le PSS a tourné à sec, faites très attention en touchant le rotor ou le carbone, ils peuvent être très chauds. B. Brouillard ou poussière après la période de rodage : Les valeurs données dans le tableau de compression du soufflet ne sont que des valeurs moyennes, ne pouvant servir que de guide. La valeur EXACTE de la compression peut varier en fonction du type de montage du moteur et la pression d’eau arrivant dans le joint. Si, après le rodage, vous constatez une émission de poussière ou de brouillard, vérifiez que le soufflet est bien comprimé. Si c’est le cas, augmentez la compression sur le soufflet. Continuez à régler jusqu’à ce l’émission de poussière ou de brouillard cesse. Remarque : Finaliser votre réglage en vérouillant le rotor avec des vis neuves. C. Goutte d’eau au repos : Si le PSS fuit quand l’arbre ne tourne pas, c’est probablement dû à la présence de matières étrangères entre le rotor et la bague carbone. Pour nettoyer, insérez un chiffon propre entre les deux surfaces de la butée (remarque : si le bateau est à l’eau, de l’eau peut pénétrer dans le bateau à ce moment) et frotter avec le chiffon autour du joint. C’est ainsi que l’eau va pouvoir évacuer les impuretés. Retirez le chiffon : la fuite doit cesser. Garantie FABRICANT Limitée : Le P.S.S est garanti par PYI, Inc. contre tout vice de matière et tout défaut d’exécution, si l’utilisation et la maintenance ont été réalisées de façon correcte, pour une durée de trois (3) ans à compter de la première date d’utilisation ou de transport, au premier terme échu. Pendant la période de garantie, toutes les pièces d’origine concernées par cette garantie et reconnues par PYI, Inc. comme étant défectueuses, à cause de la matière ou de l’exécution, seront soit réparées, soit remplacées, par PYI, Inc. ou par un de ses agents, à sa seule discrétion, sans frais, à l’exception des frais de transport et de manutention et des frais de main d’œuvre du revendeur (s’il y en a), ces dernières charges n’étant pas couvertes par la garantie. La garantie sur la réparation ou le remplacement des pièces, selon la garantie limitée, expire à la fin de la période de garantie originale. Limites de la garantie : Cette garantie limitée ne couvre pas, et ne s’applique pas aux PSS dès lors qu’ils : (i) sont modifiés d’une quelconque façon n’ayant rien à voir avec le PSS tel qu’il a été conçu et livré, (ii) sont mal installés et/ou entretenus, (iii) incompatibles avec une quelconque partie ou un composant du bateau, ou une application non fournie par PYI, quelle que soit la cause de la panne ou de l’incompatibilité de cette partie ou de ce composant, (iv) utilisés à d’autres fins que celles pour lesquelles ils ont été conçus, et/ou (v) soumis à une mauvaise utilisation, à une négligence ou à des accidents. Pour que la garantie puisse s’exercer, il faut fournir à un revendeur autorisé du PSS, pendant la période de garantie, le PSS accompagné de la facture ou d’une preuve d’achat portant le numéro du modèle identifiant le PSS.
  • 8. A l’exception de la garantie fabricant expressément citée ci-dessus, et dans les limites prévues par la loi en vigueur, PYI et ses fournisseurs ne font aucune garantie, explicite ou implicite, et réfutent toute garantie, charge et condition, qu’elle soit expresse, implicite ou statutaire, relativement au PSS, y compris, mais sans s’y limiter, les garanties implicites de qualité marchande contre tout vice caché, ou d’adéquation à des buts particuliers ou de correspondance à cette description. Limite de recours : Dans l’hypothèse d’une rupture de la garantie limitée établie ci-dessus, PYI, ou son agent autorisé, serait uniquement obligé, à la seule discrétion de PYI, de réparer ou de remplacer le PSS défectueux. Si, après avoir reçu une notification écrite pour chaque défaut, dysfonctionnement ou autre panne, et si, après effectué un nombre raisonnable de tentatives visant à corriger le défaut, le dysfonctionnement ou la panne, le recours n’atteignait pas son but essentiel, alors PYI rembourserait le prix d’achat payé à PYI en retour du/des produit(s) vendu(s). Ledit remboursement représenterait alors le maximum de la responsabilité de PYI. CE RECOURS CONSTITUE LE SEUL ET EXCLUSIF RECOURS DE L’ACHETEUR CONTRE PYI, QUELLE QUE SOIT LA THÉORIE, QU’ELLE SOIT CONTRACTUELLE, PAR RUPTURE DE LA GARANTIE, PAR ACTE DÉLICTUEL, Y COMPRIS LA NÉGLIGENCE OU LA RESPONSABILITÉ STRICTE, OU QUELCONQUE AUTRE ORIGINE. Limite de responsabilité. Dans la limite permise par la législation applicable, PYI et des fournisseurs rejettent expressément toute responsabilité pour tout dommage fortuit, spécial, indirect ou consécutif résultant, quelle qu’en soit la raison. Cette exclusion s’applique à toutes les théories légales selon lesquelles des dommages et intérêts peuvent être réclamés. info@francehelices.fr www.francehelices.fr +(.33).(0)4.93.47.69.38
  • 9. info@francehelices.fr www.francehelices.fr +(.33).(0)4.93.47.69.38 PSS PRO SEAL INSTALLATION INSTRUCTIONS For shafts from 3⁄4“ to 3 ” (20 mm to 95mm) EN 3/4
  • 10. info@francehelices.fr www.francehelices.fr +(.33).(0)4.93.47.69.38 IMPORTANT! - BEFORE STARTING YOUR INSTALLATION CAREFULLY READ THE FOLLOWING WARNINGS AND INSTRUCTIONS. FAILURE TO PROPERLY FOLLOW THE WARNINGS AND INSTRUCTIONS COULD LEAD TO PERSONAL INJURY OR EVEN DEATH, OR PHYSICAL, ENVIRONMENTAL OR PROPERTY DAMAGE. Do not use sealant to fit the bellow to the stern tube or the hose to hose barb. Do not run dry. Do not use the PSS SEAL on a submarine vehicle. • The PSS (Packless Sealing System) Shaft Seal (“PSS”) you are preparing to install is a through- hull fitting that protects against water from entering the boat where the shaft enters the hull, when properly installed and maintained. Make sure that your oryour designated installer is a qualified professionnal, knowledgeable and skilled to install the PSS correctly, and that you have all the required tools and additional equipment on hand before begining installation . • If removing the engine transmission for repair or if launching the boat without a transmission installed, then the shaft must be kept in place with a device that will secure the shaft with the PSS bellow in its normal “compressed mode”. • Install the PSS ONLY with the boat out of the water. • DO NOT USE oil, grease (petroleum products) or silicone products at any time during the installation. Use soap and water to lubricate the o-rings of the rotor when sliding it down the shaft. • Clean the seal area of your boat so you do not contaminate the seal surface with dirt, oil or other foreign matter. Do not damage or scratch the face of the carbon or the face of the stainless steel rotor during unpacking or while handling or installing the PSS. • There should be a total of four (4) set screws in the two holes of the rotor (2 sets screws in each hole). If you must move the stainless steel rotor, make sure to remove the top set screws in order to access the bottom two set screws. • Do not re-use the supplied cupped pointed set screws. If multiple tightening has flattened the cupped-point set screw, replace the affected screw with a new one. • There should be a total of four (4) hose clams securing the bellows ends. These clamps should be replaced if they show any sign of corrosion. • Do not slide the aft bellow cuff too far down over the stern tube. The leading edge of the stern tube could cause damage to the inner ribs of the bellow and improperly limit the bellow movement and travel. • If fitting a vent line (boats under 12 knots), do not run a loop at the top end of the hose as this could promote a siphon. • If the boat sits idle for a long period of time (generally 3 months or more), it is necessary to move the carbon face back to allow a small amount of water to enter the boat. • As with any hose under the waterline, the PSS bellows must be inspected on a regular basis (i.e., no less than at least every 6 months under most circumstances) and checked for any signs of deterioration (cracks, splits, tears, brittleness, or other signs). Upon any sign of deterioration the bellow must be replaced. As preventive maintenance the bellow should be replaced no less than every 6 years on the Type A Seal, and 8 to 10 years on the PSS PRO Seals, regardless of its apparent condition. • Do not allow any petroleum-based liquid or corrosive material to come in contact with the PSS. Take care to ensure that this does not occur, for example, when performing any general maintenance, or winterizing the engine. • The shaft should be near centered and run parallel to the shaft log. • Do not use an ozone generator (e.g., air cleaner) in or around your boat. The extra ozone will speed up the deterioration of any rubber product, including the PSS bellow. • The bellows will need more frequent inspection and replacement in an environment where non-sealed batteries emit sulfuric acid vapors. Sulfuric acid vapors will accelerate deterioration of any rubber materials including the PSS bellows.
  • 1
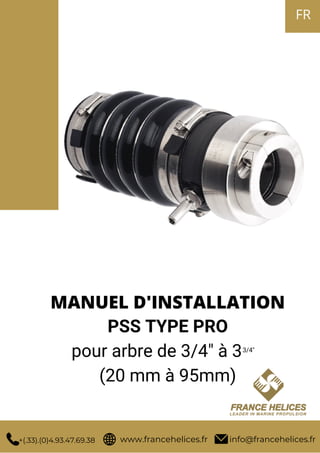
1. info@francehelices.fr www.francehelices.fr +(.33).(0)4.93.47.69.38 INSTALLATION INSTRUCTIONS IN ALL CASES, THE BOAT MUST BE OUT OF THE WATER TO PERFORM THIS INSTALLATION. 1. Unbolt the shaft coupling from the transmission coupling. 2. Remove the shaft coupling from the shaft. Coupling styles will vary by manufacturer. Some couplings use set screws to keep the coupling in place, while others use a roll pin and others use a nut (always use the appropriate tools and procedures for your particular application). 3. Remove the old stuffing box and packing material. There are three types of packing glands that can be found on most boats: “Classic”, “Bolt On” and “Threaded”. 4. Clean the entire exposed portion of the shaft with very fine sand paper (# 400 or # 600 grit) in order to remove any debris or rough edges. Pay particular attention to the keyway located at the forward end of the shaft, where the stainless steel rotor will pass. The shaft and keyway must NOT have any sharp edges that could damage the o-rings upon installation.
  • 12. info@francehelices.fr www.francehelices.fr +(.33).(0)4.93.47.69.38 5. Slide the open end of the bellow and its hose clamps down the shaft and onto the bare stern tube and make sure the bellow has a proper fit over the shaft log. Once in place the bellow should overlap the stern tube by the same amount as the bellow cuff so the hose clamps will properly tighten the bellow to the shaft log. WARNING: Do not slide the bellow cuff too far down and over the stern tube. If the bellow is slid too far onto the stern tube the forward edge of the stern tube could damage the inner ribs of the bellow and improperly limit the bellow’s travel. Tighten the hose clamps to secure the bellow to the stern tube and fit the black clamp protector to the tail of the hose clamps. 6. Make sure the carbon flange is in place on the forward end of the bellow and that the two hose clamps properly secure it. Also confirm that the carbon is free of any defects or imperfections on its polished face. 7. Remove the stainless steel rotor from the protective pouch. Verify that there are two (2) o-rings placed into the o-ring grooves inside the bore of the rotor. Confirm that the mating face of the rotor is free of any defects or imperfections. Take 2 (two) set screws from the plastic bag, apply a drop of thread-lock (blue tube) to the thread of each set screw, and thread them. WARNING: TWO MORE SET SCREWS WILL BE INSTALLED AT STEP 13. Thread one screw into each hole, stopping just short of the screw protruding into the inside bore of the rotor. 8. Lubricate the shaft and o-rings of the rotor, and slide the stainless steel rotor down the shaft. Use a petroleum free liquid (e.g., a dish soap / water solution works well) as the lubricant. CAUTION: DO NOT USE OIL, GREASE OR SILICONE AS THE LUBRICANT. 9. Re-attach the shaft coupling to the shaft and make sure that all the safety devices provided and recommended by the coupling manufacturer are in place. 10.Re-attach the shaft coupling to the transmission making sure that it is installed to the manufacturer specifications and tolerances. Make sure all the safety devices provided and recommended by the coupling manufacturer are in place. 11. Now that the shaft is in place, verify that the carbon is centered on the shaft (note the carbon ring is bored at a larger diameter than the shaft, it is normal), verify that the bellow cuff is properly placed on the stern tube and verify that the shaft is near center in the shaft log. Adjust so the PSS runs true with the shaft. Tighten all the hose clamps around the stern tube and the carbon. 12. Slide the stainless steel rotor down the shaft until it just TOUCHES the carbon. Mark this position on the shaft as the “neutral” position with a marker or a piece of tape on the shaft just in front of the rotor. 13. Sliding the stainless steel rotor aft, compress the bellow by the amount indicated on the bellow compression chart shown below, using the “neutral” mark as a reference point. While keeping the bellow in the “compressed” position, tighten the two (2) set screws against the shaft with the provided allen wrench (Use approximately 6 foot pounds of torque for shafts 3⁄4” to 13⁄8” and 8 foot pounds of torque for shafts 1 ” to 3 ”). If you need to insert the long arm of the allen wrench into the hole, a vice-grip, for example, may be fitted on the short arm to help provide the required torque. Install the 2 part clamp around the shaft and slide it against the rotor. Tighten the clamp screws. 3/4 1/2
  • 13. info@francehelices.fr www.francehelices.fr +(.33).(0)4.93.47.69.38 BELLOW COMPRESSION CHART 15. Remove from the plastic bag 2 (two) additional set screws, apply a drop of thread-lock (blue tube) to the thread of each set screw, and thread one into each hole. This will act as a locking device for the first set screws. Do not re-use cupped point set screws. 16. Plumbing the system : Note: Sailboats or displacement powerboats with a powering speed below 12 knots can use either method A or B. However, displacement boats with a bearing in the shaft log must plumb water to the seal. 15.1 Low speed boats: (Under 12 knots of boat speed under power and no bearing in the shaft log). Using a 3⁄8” (8 or 9 mm) ID “underwater rated” hose (not provided with the PSS), connect the hose to the hose barb fitting installed on the carbon and secure the hose with two (2) hose clamps. Run the hose to a point in the boat at least two (2) feet above the waterline, making sure that the hose does not apply any load on the carbon part of the seal. Keep the hose as close as possible to the centerline of the vessel so the top of the vent hose is never below the waterline, even if the boat heels. Secure the hose in place with the necessary fittings that insure it will not pull free and drop. This hose is now a venting hose that will help ensure that no air is trapped in the seal. WARNINGS: Do not run a loop at the top end of the vent hose as it could start a siphon action in some extreme conditions. Make sure the vent hose is properly secured from falling below the waterline. If the vent hose were to fall down below the waterline, water would come in the boat. Do not plug or block the end of the vent hose, as this would prevent the line from venting.
  • 14. info@francehelices.fr www.francehelices.fr +(.33).(0)4.93.47.69.38 Maximum water pressure should not exceed 10 PSI. T-off the engine raw water-cooling line. (Note:T-kits are available separately Thread a barb fitting into the drain plug of the heat exchanger if applicable. Thread barb fitting into the drain plug of the exhaust manifold if the manifold 15.2 High-speed boats: (Over 12 knots of boat speed under power). Note: Twin engine boats that can exceed 12 knots on a single engine must run a crossover line between seals to ensure both seals maintain water flow, while running on only one engine. For high-speed vessels it is required that a water supply be plumbed to the PSS for the purpose of cooling and lubricating the seal faces (i.e., at over approximately 12 knots of speed a vacuum is created in the stern tube and water is drawn away from the PSS resulting in a loss of cooling water that may cause the carbon to over heat). There are multiple sources of water for the supply. The following are a few non- exhaustive examples. These are examples only and they may or may not apply to your particular boat. Note: from PYI Inc for internal hose 3⁄4”, 1” , 11⁄4”, 11⁄2”) is raw water-cooled. • Add a small scoop under water for keel-cooled boats or T-off another water pick up. (Note: A valve must be installed to regulate the water flow as too high water flow may over pressurize the PSS seal). Use an appropriate “underwater rated” hose from the fittings on the boat and the fitting on the PSS and secure them with two (2) hose clamps at each end. NOTICE: All plumbing must follow the standards and practices of proper boatplumbing. For example, if the pick-up on the engine is located under the waterline, an anti-siphon fitting must be installed, in addition to other standards and practices. 16. Testing: When launching the boat, inspect the PSS and make sure the PSS is properly in place. Water should not be entering the boat from the PSS seal area. Run the engine in gear as in a normal operation. It is normal at this time to notice a very fine spray or mist coming from the seal and some carbon dust, as the PSS requires a break in period (see below). The PSS should not be leaking at rest and should never spray more than just a fine spray or mist. TROUBLE SHOOTING A. High-pitched squeal: If you hear a high-pitched squeal from the PSS shaft seal during operation, the seal may not be getting water. Review and correct plumbing to the seal. CAUTION: If the seal has run dry use caution! The faces (stainless steel rotor and carbon) may be very hot.
  • 15. info@francehelices.fr www.francehelices.fr +(.33).(0)4.93.47.69.38 B. Spray or mist during operation after the break in period: The dimensions provided in the “Bellow compression chart” are average figures and are provided as a guide. The EXACT compression amounts required can vary due to different types of engine mounts and water pressure being fed to the seal. If you experience any spray or mist following the break in period, make sure that the bellows had been compressed properly. If so, add an additional 1⁄4” of compression to the seal and soon the mist should disappear. Keep adjusting until the spray or mist stops. C. Dripping at rest: If the PSS seal drips while at rest then it is likely that foreign material is on the face of the seal between the stainless steel rotor and the carbon flange. To clean this foreign material from the seal, insert a clean rag carefully between the two faces (Note: some water will come into the boat at this time if the boat is in the water) and work the rag around the seal. As you do this, the incoming water will flush the impurities. Remove the rag from the seal and the leak should stop. REAK-IN PERIOD On average, the PSS requires approximately one (1) hour of break in time, which allows the carbon flange to polish the mating face of the stainless steel rotor. During the break in period you will experience a very fine mist, sometimes associated with a black dust coming from the PSS. Under normal conditions, this will stop after an average of one (1) hour running time. Copyright © 2018 PYI, Inc. All rights are reserved. No part of this document may be reproduced, transmitted, transcribed, stored in a retrieval system, or translated into any language or computer language, in any form or by any means, without the prior written permission of PYI, Inc. PYI, Inc. makes no representations or warranties, express or implied, with respect to this document or the contents herein and specifically disclaims any implied warranties of merchantability or fitness for any particular purpose. In addition, PYI, Inc. reserves the right to revise this document and to make changes from time to time in the content hereof. MANUFACTURER warranty : The PSS (Packless Sealing System) Shaft Seal (“PSS”)is warranted by PYI, Inc. (“PYI”)to the original purchaser only to be free from defects in material and workmanship under normal use and maintenance for a period of three (3) years from the date of first use or shipment, whichever comes first. During the warranty period, all original parts subject to this limited warranty and determined by PYI to be defective in materials or workmanship, will either be repaired or replaced by PYI or its authorized agent, at its sole option, free of charge, except for shipping and handling charges and dealer labor charges (if applicable), which charges are not covered by this limited warranty. The warranty on any part repaired or replaced under this limited warranty expires at the end of the original warranty period.
  • 16. Limitations of Limited Warranty : This limited warranty does not cover and does not apply to any PSS: (i) altered in any way inconsistent with the shaft seal design as provided, (ii) improperly installed and/or maintained, (iii) incompatible with any portion or component of any boat or application that is not supplied by PYI, regardless of the cause of the failure or incompatibility of such portion or component, (iv) used for purposes other than those for which it was designed, and/or (v) subjected to misuse, neglect or accidents. In order to obtain warranty service, the PSS, together with the bill of sale or other dated proof-of-purchase document identifying the shaft seal model number, must be presented to an authorized PSS dealer during the warranty period. For assistance in locating an authorized PSS dealer, please contact PYI at: Except for the limited warranty expressly provided above, to the maximum extent permitted by applicable law, PYI and its suppliers make no warranties, express or implied, and disclaim all warranties, duties and conditions, whether express, implied or statutory, with respect to the PSS, including, without limitation, any implied warranties of merchantability, against latent defects, fitness for a particular purpose, or correspondence to description. Limitation of Remedies : In the event of a breach of the limited warranty set forth above, PYI or its authorized agent will only be obligated at PYI’s sole option to either repair or replace the failed PSS. If after written notice to PYI of each defect, malfunction or other failure and a reasonable number of attempts to correct the defect, malfunction or other failure and the remedy fails of its essential purpose, PYI shall refund the purchase price paid to PYI in exchange for the return of the sold good(s). Said refund shall be the maximum liability of PYI. THE FOREGOING REMEDY IS THE SOLE AND EXCLUSIVE REMEDY OF THE BUYER AGAINST PYI REGARDLESS OF THEORY, WHETHER ARISING IN CONTRACT, BREACH OF ANY WARRANTY, TORT, INCLUDING STRICT LIABILITY OR NEGLIGENCE, OR OTHERWISE. Limitation of Liability : To the maximum extent permitted by applicable law, PYI and its suppliers expressly disclaim and exclude any liability for any incidental, special, indirect or consequential damages resulting from any reason whatsoever. This exclusion applies to all legal theories under which damages may be sought. Note: This limited warranty gives you specific legal rights and you may also have other rights which may vary from state to state. Please refer to the P.S.S. Shaft Seal Instruction Booklet for installation instructions. info@francehelices.fr www.francehelices.fr +(.33).(0)4.93.47.69.38