SlideShare una empresa de Scribd logo
1 de 2
Descargar para leer sin conexión
Instructions
Safety Tips
•  lways use a rubber dam to prevent items from being inhaled or swallowed.
A
SmartView Clip doubles as a rubber dam clamp.
• Tie floss to the SmartView Clip for added security.
• Matrices and wedges are for single use only.
•  o ensure sterility, steam-autoclave or chemclave SmartView Clips,
T
SmartBands and instruments.
•  and Forceps are recommended for use with SmartBand matrices and
B
any type of wedge.

1

Wedge before placement

2

Place matrix into embrasure

3

Place the SmartView Clip

4

SmartView Clip in ideal position

5

Fit Rubber Dam

Pre-wedging helps create a gap for
the matrix band. It also prevents
bleeding during cavity prep. Push
the wedge in firmly and proceed
with the prep.

Remove the wedge if pre-wedging
was used. Place a contoured
SmartBand with the band forceps
and place a wedge to seal the lower
gingival third.

Slide the SmartView Clip over the
wedge and slowly release the clip
so that it straddles the wedges and
locks the band in place.

This image shows the SmartView Clip
in the correct position. Notice how the
tips of the tines are close to the gingival
margin and the slot is touching the
wedge. Make sure that the clip is in
direct contact with the wedge and will not
move any further in an apical direction.

Stretch the rubber dam over the
SmartView Clip.

over t

700 Park Avenue
Grand Haven, MI 49417
888-208-1765
www.dentismart.com
6

Secure With Floss

7

Place the SmartView Clip
backwards for a DO restoration

8

Wedging from both sides

9

Remove the matrix

Secure the rubber dam by sliding a
piece of floss between the two
teeth on the opposite side of the
SmartView Clip and you are done.

Sometimes, as with an MOD, it is better
to place the SmartView Clip backwards.
The clip should be placed for the DO as
shown above. The SmartView Clip can
be used either way, depending on the
dentist’s preference.

The SmartView System allows an
additional wedge to be placed from the
opposite side, without removing the clip.

To remove the matrix, simply grab the
edge of the of the matrix with the
SmartBand Forceps and slowly lift to
remove. The non-stick surface of the
SmartBand prevents bonding with the
composite for easy removal.

Instrument Care  Cleaning
STORAGE – Surgical instruments should be stored in sterilizing trays of proper size lined with soft silicone mats.
Instruments should not touch each other. We recommend using protective tips made of soft silicone tubing of the
proper size and thickness. Do not use rubber or plastic protective tips, which can melt during autoclaving and
cause damage to instruments.
INSPECTION – Be sure to inspect every instrument at the end of your surgical day. Please conduct this
inspection under a microscope or with magnification lens.
CLEANING – Manual Cleaning. Use a mild soap solution approved for surgical instruments with a soft brush
or instrument wipe to clean instrument and remove stains. Never use abrasive powders or steel wool to remove
stubborn stains—these can damage the super fine finish of an instrument and can actually help cause corrosion
of stainless instruments.
Use distilled and demineralized water to rinse instruments thoroughly then carefully dry them with a hot air blower
or lint-free cloth.
Ultrasonic Cleaning. This is the best method of cleaning surgical instruments. Use only cleaning solutions
approved for surgical instruments. Change the solution frequently, always use demineralized or distilled water.
Heat water to 150º Fahrenheit (62º C) using an immersion heater, or in a separate stainless container, if your unit
does not have an automatic built-in water heater. Be sure that you and your staff members are completely familiar
with the manufacturer’s instructions, which came with your ultrasonic cleaner. Instruments should never touch
each other in the ultrasonic cleaner. After removing instruments from the ultrasonic cleaner, rinse the instruments
under running water first, and then rinse again in clean demineralized water. Instruments should never be air dried
in room temperature because this will cause corrosion on stainless instruments especially in knurled and laser
engraved areas. That is why it is highly recommend using a hot air blower to thoroughly dry the instruments.
LUBRICATION – It is recommended to lubricate all moving parts after each cleaning. Use only silicone or Teflon
lubricants which can hold up under autoclaving. We recommend the use of Instrument Milk. Never use ordinary
lubricants or cover up even the slightest corrosion with a lubricant.
STERILIZATION – Stainless Steel and Titanium instruments can be sterilized via steam autoclaving, chemical
disinfectants, ethylene oxide gas, or even dry hot air. Gas and dry chemical sterilization are the best methods for
stainless steel instruments, but they take a lengthy time period to accomplish the desired result. The most practical
method of sterilization is heat or steam, which require less time. However, these methods can be damaging to delicate
stainless steel instruments. Use care when sterilizing your instruments. And, once again, be sure that you and your
staff have read and fully understand the instructions supplied by the manufacturer of your particular sterilizer.
DentiSmart
700 Park Avenue
Grand Haven, MI 49417

Manufactured in USA
bt DentiSmart

R2-06/13

Más contenido relacionado

La actualidad más candente

Getting a Grip on Hand Protection - Your Guide to the Right Glove
Getting a Grip on Hand Protection - Your Guide to the Right GloveGetting a Grip on Hand Protection - Your Guide to the Right Glove
Getting a Grip on Hand Protection - Your Guide to the Right GloveDelaney Smith
 
The guide to face masks
The guide to face masksThe guide to face masks
The guide to face masksmallcominda
 
Types of Gloves in dentistry
Types of Gloves in dentistryTypes of Gloves in dentistry
Types of Gloves in dentistryKhalid Ibrahim
 
Working at Height - Safety Harness Inspection
Working at Height - Safety Harness InspectionWorking at Height - Safety Harness Inspection
Working at Height - Safety Harness InspectionRudi Nieuwoudt
 
Lawn Mower Safety
Lawn Mower SafetyLawn Mower Safety
Lawn Mower Safetyvtsiri
 
14 eye protection for grinding welding operations
14  eye protection for grinding  welding operations14  eye protection for grinding  welding operations
14 eye protection for grinding welding operationsAlan Bassett
 
Basic shop safety rules
Basic shop safety rulesBasic shop safety rules
Basic shop safety rulesManny Daleon
 
Tweezers for eyebrow
Tweezers for eyebrowTweezers for eyebrow
Tweezers for eyebrowchandlerjoe
 
Mechanical Technology Grade 12 Chapter 3 Safety In The Workshop
Mechanical Technology Grade 12 Chapter 3 Safety In The WorkshopMechanical Technology Grade 12 Chapter 3 Safety In The Workshop
Mechanical Technology Grade 12 Chapter 3 Safety In The WorkshopFuture Managers
 
Fet 3 safety
Fet 3 safetyFet 3 safety
Fet 3 safetysabree57
 
Portabletools 180327071232
Portabletools 180327071232Portabletools 180327071232
Portabletools 180327071232rajanraj39
 

La actualidad más candente (20)

Finger saver user guide
Finger saver user guideFinger saver user guide
Finger saver user guide
 
Getting a Grip on Hand Protection - Your Guide to the Right Glove
Getting a Grip on Hand Protection - Your Guide to the Right GloveGetting a Grip on Hand Protection - Your Guide to the Right Glove
Getting a Grip on Hand Protection - Your Guide to the Right Glove
 
Welding safety
Welding safetyWelding safety
Welding safety
 
Cut off machine
Cut off machineCut off machine
Cut off machine
 
Hand Protection
Hand ProtectionHand Protection
Hand Protection
 
17. ppe
17. ppe17. ppe
17. ppe
 
The guide to face masks
The guide to face masksThe guide to face masks
The guide to face masks
 
Types of Gloves in dentistry
Types of Gloves in dentistryTypes of Gloves in dentistry
Types of Gloves in dentistry
 
Working at Height - Safety Harness Inspection
Working at Height - Safety Harness InspectionWorking at Height - Safety Harness Inspection
Working at Height - Safety Harness Inspection
 
Safety in Brushing
Safety in BrushingSafety in Brushing
Safety in Brushing
 
Hand injuries
Hand injuriesHand injuries
Hand injuries
 
Lawn Mower Safety
Lawn Mower SafetyLawn Mower Safety
Lawn Mower Safety
 
14 eye protection for grinding welding operations
14  eye protection for grinding  welding operations14  eye protection for grinding  welding operations
14 eye protection for grinding welding operations
 
Basic shop safety rules
Basic shop safety rulesBasic shop safety rules
Basic shop safety rules
 
01a machine shop safety
01a machine shop safety01a machine shop safety
01a machine shop safety
 
Tweezers for eyebrow
Tweezers for eyebrowTweezers for eyebrow
Tweezers for eyebrow
 
Common Surgical Skills
Common Surgical SkillsCommon Surgical Skills
Common Surgical Skills
 
Mechanical Technology Grade 12 Chapter 3 Safety In The Workshop
Mechanical Technology Grade 12 Chapter 3 Safety In The WorkshopMechanical Technology Grade 12 Chapter 3 Safety In The Workshop
Mechanical Technology Grade 12 Chapter 3 Safety In The Workshop
 
Fet 3 safety
Fet 3 safetyFet 3 safety
Fet 3 safety
 
Portabletools 180327071232
Portabletools 180327071232Portabletools 180327071232
Portabletools 180327071232
 

Similar a Smart view instruction for use

ICT COMPUTER HARDWARE SERVICING-PPT.pptx
ICT COMPUTER HARDWARE SERVICING-PPT.pptxICT COMPUTER HARDWARE SERVICING-PPT.pptx
ICT COMPUTER HARDWARE SERVICING-PPT.pptxEchelleOgatis
 
Safety hazards in machines -material handling
Safety hazards in machines -material handlingSafety hazards in machines -material handling
Safety hazards in machines -material handlingAlfredFranklinV
 
Chapter 06
Chapter 06Chapter 06
Chapter 06mcfalltj
 
Chapter 06
Chapter 06Chapter 06
Chapter 06mcfalltj
 
Hyundai HL757 7 Service Repair Manual.pdf
Hyundai HL757 7 Service Repair Manual.pdfHyundai HL757 7 Service Repair Manual.pdf
Hyundai HL757 7 Service Repair Manual.pdfExcavator
 
John deere s2348 scotts yard and garden tractor service repair manual
John deere s2348 scotts yard and garden tractor service repair manualJohn deere s2348 scotts yard and garden tractor service repair manual
John deere s2348 scotts yard and garden tractor service repair manualfjjskekdm
 
HYUNDAI HL740 TM-7 LOADER Service Repair Manual-extracted.pdf
HYUNDAI HL740 TM-7 LOADER Service Repair Manual-extracted.pdfHYUNDAI HL740 TM-7 LOADER Service Repair Manual-extracted.pdf
HYUNDAI HL740 TM-7 LOADER Service Repair Manual-extracted.pdfExcavator
 
John deere 2254 hv sabre lawn garden tractor service repair manual
John deere 2254 hv sabre lawn garden tractor service repair manualJohn deere 2254 hv sabre lawn garden tractor service repair manual
John deere 2254 hv sabre lawn garden tractor service repair manualfjjskedmmemm
 
John deere 2554 hv sabre lawn garden tractor service repair manual
John deere 2554 hv sabre lawn garden tractor service repair manualJohn deere 2554 hv sabre lawn garden tractor service repair manual
John deere 2554 hv sabre lawn garden tractor service repair manualfjsjekkdmnem
 
Precautions using machine tools
Precautions using machine toolsPrecautions using machine tools
Precautions using machine toolsNarendra Katdare
 
Introduction to Mech MH safety.ppt
Introduction to Mech MH safety.pptIntroduction to Mech MH safety.ppt
Introduction to Mech MH safety.pptDMuthuRajan
 

Similar a Smart view instruction for use (12)

ICT COMPUTER HARDWARE SERVICING-PPT.pptx
ICT COMPUTER HARDWARE SERVICING-PPT.pptxICT COMPUTER HARDWARE SERVICING-PPT.pptx
ICT COMPUTER HARDWARE SERVICING-PPT.pptx
 
Safety hazards in machines -material handling
Safety hazards in machines -material handlingSafety hazards in machines -material handling
Safety hazards in machines -material handling
 
Chapter 06
Chapter 06Chapter 06
Chapter 06
 
Chapter 06
Chapter 06Chapter 06
Chapter 06
 
Hyundai HL757 7 Service Repair Manual.pdf
Hyundai HL757 7 Service Repair Manual.pdfHyundai HL757 7 Service Repair Manual.pdf
Hyundai HL757 7 Service Repair Manual.pdf
 
Use of tools chs
Use of tools chsUse of tools chs
Use of tools chs
 
John deere s2348 scotts yard and garden tractor service repair manual
John deere s2348 scotts yard and garden tractor service repair manualJohn deere s2348 scotts yard and garden tractor service repair manual
John deere s2348 scotts yard and garden tractor service repair manual
 
HYUNDAI HL740 TM-7 LOADER Service Repair Manual-extracted.pdf
HYUNDAI HL740 TM-7 LOADER Service Repair Manual-extracted.pdfHYUNDAI HL740 TM-7 LOADER Service Repair Manual-extracted.pdf
HYUNDAI HL740 TM-7 LOADER Service Repair Manual-extracted.pdf
 
John deere 2254 hv sabre lawn garden tractor service repair manual
John deere 2254 hv sabre lawn garden tractor service repair manualJohn deere 2254 hv sabre lawn garden tractor service repair manual
John deere 2254 hv sabre lawn garden tractor service repair manual
 
John deere 2554 hv sabre lawn garden tractor service repair manual
John deere 2554 hv sabre lawn garden tractor service repair manualJohn deere 2554 hv sabre lawn garden tractor service repair manual
John deere 2554 hv sabre lawn garden tractor service repair manual
 
Precautions using machine tools
Precautions using machine toolsPrecautions using machine tools
Precautions using machine tools
 
Introduction to Mech MH safety.ppt
Introduction to Mech MH safety.pptIntroduction to Mech MH safety.ppt
Introduction to Mech MH safety.ppt
 

Más de Centric Learning

General dentistry an evaluation and adjustment method article
General dentistry an evaluation and adjustment method articleGeneral dentistry an evaluation and adjustment method article
General dentistry an evaluation and adjustment method articleCentric Learning
 
Preventing anterior open bites final
Preventing anterior open bites finalPreventing anterior open bites final
Preventing anterior open bites finalCentric Learning
 
Pala beta test impression instructions
Pala beta test impression instructionsPala beta test impression instructions
Pala beta test impression instructionsCentric Learning
 
Pala beta test presentation
Pala beta test presentationPala beta test presentation
Pala beta test presentationCentric Learning
 
2567 pala digital_dentures_manual_v3_singles
2567 pala digital_dentures_manual_v3_singles2567 pala digital_dentures_manual_v3_singles
2567 pala digital_dentures_manual_v3_singlesCentric Learning
 
Secchi flyer - Denver, CO 2014-10-17
Secchi flyer - Denver, CO 2014-10-17Secchi flyer - Denver, CO 2014-10-17
Secchi flyer - Denver, CO 2014-10-17Centric Learning
 
Burris flyer - Tunica, MS 11-14-2014
Burris flyer - Tunica, MS 11-14-2014Burris flyer - Tunica, MS 11-14-2014
Burris flyer - Tunica, MS 11-14-2014Centric Learning
 
Gammichia conservative dentistry
Gammichia conservative dentistryGammichia conservative dentistry
Gammichia conservative dentistryCentric Learning
 
Demi ultra rt deck may 2014 under curing and cure technology
Demi ultra rt deck may 2014 under curing and cure technologyDemi ultra rt deck may 2014 under curing and cure technology
Demi ultra rt deck may 2014 under curing and cure technologyCentric Learning
 
Mtm simple lingual flyer owen-2014-09-19_10-10
Mtm simple lingual flyer   owen-2014-09-19_10-10Mtm simple lingual flyer   owen-2014-09-19_10-10
Mtm simple lingual flyer owen-2014-09-19_10-10Centric Learning
 
Article shipley increasing rate of aligner progression
Article shipley increasing rate of aligner progressionArticle shipley increasing rate of aligner progression
Article shipley increasing rate of aligner progressionCentric Learning
 
Article teixeira effects of micro-osteoperforation
Article teixeira effects of micro-osteoperforationArticle teixeira effects of micro-osteoperforation
Article teixeira effects of micro-osteoperforationCentric Learning
 
Pro dentist spring 2014 game changers-graham
Pro dentist spring 2014 game changers-grahamPro dentist spring 2014 game changers-graham
Pro dentist spring 2014 game changers-grahamCentric Learning
 

Más de Centric Learning (20)

Lets growtooth
Lets growtoothLets growtooth
Lets growtooth
 
General dentistry an evaluation and adjustment method article
General dentistry an evaluation and adjustment method articleGeneral dentistry an evaluation and adjustment method article
General dentistry an evaluation and adjustment method article
 
Preventing anterior open bites final
Preventing anterior open bites finalPreventing anterior open bites final
Preventing anterior open bites final
 
Pala beta test impression instructions
Pala beta test impression instructionsPala beta test impression instructions
Pala beta test impression instructions
 
Pala beta test presentation
Pala beta test presentationPala beta test presentation
Pala beta test presentation
 
2567 pala digital_dentures_manual_v3_singles
2567 pala digital_dentures_manual_v3_singles2567 pala digital_dentures_manual_v3_singles
2567 pala digital_dentures_manual_v3_singles
 
Secchi flyer - Denver, CO 2014-10-17
Secchi flyer - Denver, CO 2014-10-17Secchi flyer - Denver, CO 2014-10-17
Secchi flyer - Denver, CO 2014-10-17
 
Burris flyer - Tunica, MS 11-14-2014
Burris flyer - Tunica, MS 11-14-2014Burris flyer - Tunica, MS 11-14-2014
Burris flyer - Tunica, MS 11-14-2014
 
Gammichia conservative dentistry
Gammichia conservative dentistryGammichia conservative dentistry
Gammichia conservative dentistry
 
2 irishdentaljournal
2  irishdentaljournal2  irishdentaljournal
2 irishdentaljournal
 
19, 20 dm_dec_clin_donley
19, 20 dm_dec_clin_donley19, 20 dm_dec_clin_donley
19, 20 dm_dec_clin_donley
 
Sweepstakes rules
Sweepstakes rulesSweepstakes rules
Sweepstakes rules
 
Rr58 kerr demiultra-efile
Rr58 kerr demiultra-efileRr58 kerr demiultra-efile
Rr58 kerr demiultra-efile
 
Demi ultra rt deck may 2014 under curing and cure technology
Demi ultra rt deck may 2014 under curing and cure technologyDemi ultra rt deck may 2014 under curing and cure technology
Demi ultra rt deck may 2014 under curing and cure technology
 
Freeland flyer 2014-08-22
Freeland flyer 2014-08-22Freeland flyer 2014-08-22
Freeland flyer 2014-08-22
 
Mtm simple lingual flyer owen-2014-09-19_10-10
Mtm simple lingual flyer   owen-2014-09-19_10-10Mtm simple lingual flyer   owen-2014-09-19_10-10
Mtm simple lingual flyer owen-2014-09-19_10-10
 
Scagd save the date
Scagd save the dateScagd save the date
Scagd save the date
 
Article shipley increasing rate of aligner progression
Article shipley increasing rate of aligner progressionArticle shipley increasing rate of aligner progression
Article shipley increasing rate of aligner progression
 
Article teixeira effects of micro-osteoperforation
Article teixeira effects of micro-osteoperforationArticle teixeira effects of micro-osteoperforation
Article teixeira effects of micro-osteoperforation
 
Pro dentist spring 2014 game changers-graham
Pro dentist spring 2014 game changers-grahamPro dentist spring 2014 game changers-graham
Pro dentist spring 2014 game changers-graham
 

Smart view instruction for use

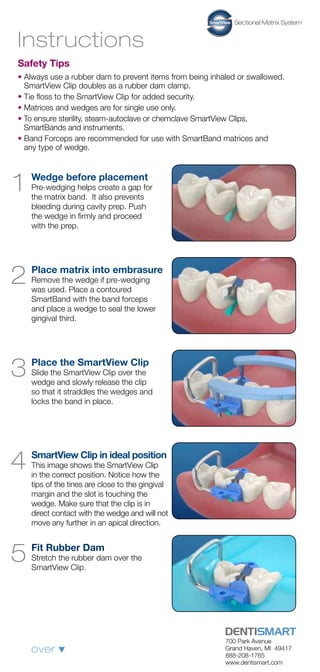
  • 1. Instructions Safety Tips • lways use a rubber dam to prevent items from being inhaled or swallowed. A SmartView Clip doubles as a rubber dam clamp. • Tie floss to the SmartView Clip for added security. • Matrices and wedges are for single use only. • o ensure sterility, steam-autoclave or chemclave SmartView Clips, T SmartBands and instruments. • and Forceps are recommended for use with SmartBand matrices and B any type of wedge. 1 Wedge before placement 2 Place matrix into embrasure 3 Place the SmartView Clip 4 SmartView Clip in ideal position 5 Fit Rubber Dam Pre-wedging helps create a gap for the matrix band. It also prevents bleeding during cavity prep. Push the wedge in firmly and proceed with the prep. Remove the wedge if pre-wedging was used. Place a contoured SmartBand with the band forceps and place a wedge to seal the lower gingival third. Slide the SmartView Clip over the wedge and slowly release the clip so that it straddles the wedges and locks the band in place. This image shows the SmartView Clip in the correct position. Notice how the tips of the tines are close to the gingival margin and the slot is touching the wedge. Make sure that the clip is in direct contact with the wedge and will not move any further in an apical direction. Stretch the rubber dam over the SmartView Clip. over t 700 Park Avenue Grand Haven, MI 49417 888-208-1765 www.dentismart.com
  • 2. 6 Secure With Floss 7 Place the SmartView Clip backwards for a DO restoration 8 Wedging from both sides 9 Remove the matrix Secure the rubber dam by sliding a piece of floss between the two teeth on the opposite side of the SmartView Clip and you are done. Sometimes, as with an MOD, it is better to place the SmartView Clip backwards. The clip should be placed for the DO as shown above. The SmartView Clip can be used either way, depending on the dentist’s preference. The SmartView System allows an additional wedge to be placed from the opposite side, without removing the clip. To remove the matrix, simply grab the edge of the of the matrix with the SmartBand Forceps and slowly lift to remove. The non-stick surface of the SmartBand prevents bonding with the composite for easy removal. Instrument Care Cleaning STORAGE – Surgical instruments should be stored in sterilizing trays of proper size lined with soft silicone mats. Instruments should not touch each other. We recommend using protective tips made of soft silicone tubing of the proper size and thickness. Do not use rubber or plastic protective tips, which can melt during autoclaving and cause damage to instruments. INSPECTION – Be sure to inspect every instrument at the end of your surgical day. Please conduct this inspection under a microscope or with magnification lens. CLEANING – Manual Cleaning. Use a mild soap solution approved for surgical instruments with a soft brush or instrument wipe to clean instrument and remove stains. Never use abrasive powders or steel wool to remove stubborn stains—these can damage the super fine finish of an instrument and can actually help cause corrosion of stainless instruments. Use distilled and demineralized water to rinse instruments thoroughly then carefully dry them with a hot air blower or lint-free cloth. Ultrasonic Cleaning. This is the best method of cleaning surgical instruments. Use only cleaning solutions approved for surgical instruments. Change the solution frequently, always use demineralized or distilled water. Heat water to 150º Fahrenheit (62º C) using an immersion heater, or in a separate stainless container, if your unit does not have an automatic built-in water heater. Be sure that you and your staff members are completely familiar with the manufacturer’s instructions, which came with your ultrasonic cleaner. Instruments should never touch each other in the ultrasonic cleaner. After removing instruments from the ultrasonic cleaner, rinse the instruments under running water first, and then rinse again in clean demineralized water. Instruments should never be air dried in room temperature because this will cause corrosion on stainless instruments especially in knurled and laser engraved areas. That is why it is highly recommend using a hot air blower to thoroughly dry the instruments. LUBRICATION – It is recommended to lubricate all moving parts after each cleaning. Use only silicone or Teflon lubricants which can hold up under autoclaving. We recommend the use of Instrument Milk. Never use ordinary lubricants or cover up even the slightest corrosion with a lubricant. STERILIZATION – Stainless Steel and Titanium instruments can be sterilized via steam autoclaving, chemical disinfectants, ethylene oxide gas, or even dry hot air. Gas and dry chemical sterilization are the best methods for stainless steel instruments, but they take a lengthy time period to accomplish the desired result. The most practical method of sterilization is heat or steam, which require less time. However, these methods can be damaging to delicate stainless steel instruments. Use care when sterilizing your instruments. And, once again, be sure that you and your staff have read and fully understand the instructions supplied by the manufacturer of your particular sterilizer. DentiSmart 700 Park Avenue Grand Haven, MI 49417 Manufactured in USA bt DentiSmart R2-06/13