
Recomendados
Más contenido relacionado
La actualidad más candente
La actualidad más candente (20)
Destacado
Destacado (20)
Similar a Cardiac auscultation
Similar a Cardiac auscultation (20)
Último
Último (20)
Cardiac auscultation
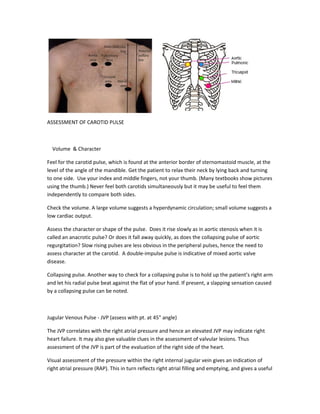
- 1. ASSESSMENT OF CAROTID PULSE Volume & Character Feel for the carotid pulse, which is found at the anterior border of sternomastoid muscle, at the level of the angle of the mandible. Get the patient to relax their neck by lying back and turning to one side. Use your index and middle fingers, not your thumb. (Many textbooks show pictures using the thumb.) Never feel both carotids simultaneously but it may be useful to feel them independently to compare both sides. Check the volume. A large volume suggests a hyperdynamic circulation; small volume suggests a low cardiac output. Assess the character or shape of the pulse. Does it rise slowly as in aortic stenosis when it is called an anacrotic pulse? Or does it fall away quickly, as does the collapsing pulse of aortic regurgitation? Slow rising pulses are less obvious in the peripheral pulses, hence the need to assess character at the carotid. A double-impulse pulse is indicative of mixed aortic valve disease. Collapsing pulse. Another way to check for a collapsing pulse is to hold up the patient’s right arm and let his radial pulse beat against the flat of your hand. If present, a slapping sensation caused by a collapsing pulse can be noted. Jugular Venous Pulse - JVP (assess with pt. at 45" angle) The JVP correlates with the right atrial pressure and hence an elevated JVP may indicate right heart failure. It may also give valuable clues in the assessment of valvular lesions. Thus assessment of the JVP is part of the evaluation of the right side of the heart. Visual assessment of the pressure within the right internal jugular vein gives an indication of right atrial pressure (RAP). This in turn reflects right atrial filling and emptying, and gives a useful
- 2. indicator of cardiac disease. JVP assessment is an important but difficult skill to master. We need to be able to imagine or “visualise” the internal jugular vein. Although the external jugular veins are fairly readily seen, they do not give reliable information. One problem is that we cannot actually see the internal jugular vein itself and we therefore require to visualise the vein. However, although the lower part of the internal jugular vein itself lies deep between the clavicular and sternal heads of sternocleidomastoid muscle, its pulsations can be seen in a normal person lying at 450 (degrees). The pulsation does not arise from the vein but reflects changes in pressure within the right atrium. One essential element is to make sure that the neck is relaxed. Position the patient at 450. Ask the patient to turn his head slightly to the left and let his neck “sink” into the pillow. Look between the heads of sternocleidomastoid just above the clavicle for the pulsations of the right internal jugular vein. It is worth looking at both sides of the neck for the clearest pulsation, and “sky-lining” the neck sometimes helps. (Stand slightly back from the patient and look across the neck.) Often in young fit subjects, the pressure is low and the vein tends to be empty at 45 degrees. Gentle pressure, just above the clavicle, will fill the vein and it will tend to bulge anterior to sternocleidomastoid and empty on release. Performing the Valsalva manoeuvre (forceful expiration against a closed glottis) may also help to fill the vein. The double waveform (a and v) of venous pulsation (compared with an arterial pulse) is impalpable and can be stopped by gentle compression. This helps to distinguish it from arterial pulsation which cannot easily be obliterated. Gentle pressure below the right costal margin will elevate the JVP briefly, however it has no effect on arterial pulsations. (Hepatojugular reflux) If this effect lasts longer than 5 seconds, it could be an indicator of right heart failure. Assess the height of the JVP. It is measured as the vertical height of the highest point of pulsation above the sternal angle, by imagining a horizontal line drawn from the upper level of pulsation to a point vertically above the sternal angle. (Note that this is not the same as the sternal notch. The sternal angle or Angle of Louis is continuous with the second costal cartilage.) The height of JVP should be less than 4cm vertically above the sternal angle. To recap, the normal upper limit of height of the JVP is 3cm vertically above the sternal angle. The right atrium lies approximately 5cm below the sternum. So this figure of a maximum height of 3cm corresponds to a right atrial pressure (RAP) of 8cm water. Textbooks may give right atrial pressure in mmHg and cause you some confusion. In order to convert cm of water to mmHg multiply by 0.75. (8cm water x 0.75 = 6mmHg). A RAP greater than 8cm water or 6mmHg may indicate a problem of right heart function, usually right heart failure secondary to left heart failure or pulmonary disease. Other important causes include fluid overload, superior vena caval
- 3. obstruction, tricuspid regurgitation and conduction blocks and arrhythmias. A low pressure may indicate that the heart is under filled due to hypovolaemia e.g. dehydration, blood loss. The waveform of the JVP should also be noted. It has 2 visible peaks, the a and the v wave but don’t worry overly at this stage about visualising them - focus on the height. JVP waveform - In practice the JVP takes very little time to assess. However you will require practise! The a wave coincides with right atrial contraction, the v wave with right atrial filling when the tricuspid valve is closed in systole. It represents a passive rise in venous pressure (venous filling) as venous return continues against a closed tricuspid valve. The c wave is so small in a normal subject that it is usually not visible to the naked eye. It is due to tricuspid valve closure, indicating onset of ventricular contraction. INSPECTION AND PALPATION OF PRAECORDIUM A. Inspect praecordium (chest) for shape, respiratory rate, scars and visible apex beat. B. Palpate praecordium for heaves and thrills. Locate the apex beat and assess character. The praecordium is the front of the chest overlying the heart. Look for abnormal chest shape, respiratory rate, operation scars, pacemaker and visible pulsations. In thin people the apex beat may be seen to pulsate. Look for abnormal cardiac pulsations e.g. left ventricular aneurysm. PALPATION - Feel for the apex beat left parasternal impulse or “heave” and aortic and pulmonary “thrills”
- 4. Apex beat (defined as the most inferior point where the cardiac impulse is still palpable) Locate the apex beat accurately with the flat of and fingers of your right hand. Count down the ribs from the sternal angle. The normal apex beat should be in the 5th intercostal space in the mid clavicular line. Decide if the apex beat is normal or displaced. Lateral displacement suggests an enlarged heart. Asking the patient to lean forward may help locate the apex beat if it is hard to palpate. Character of apex beat. Normal or abnormal? If abnormal, is it tapping (as in mitral stenosis), heaving (aortic regurgitation) or thrusting (left ventricular hypertrophy)? Left parasternal palpation Place your outstretched right hand just to the left of the sternum, with your fingers pointing towards the neck. You will feel normal respiration. A left parasternal heave (an abnormal finding) will lift the heel of your hand with each heart beat. This would suggest right ventricular hypertrophy. Thrills A thrill is a palpable vibration caused by turbulent blood flow and is always pathological. Feel for a thrill (rather like a cat purring) at the apex, the upper part of the praecordium and in the sternal notch. The commonest cause of a thrill is aortic stenosis. AUSCULTATION OF PRAECORDIUM A. (Initially whilst palpating the carotid pulse) auscultate the praecordium, for heart sounds and murmurs in all of the 4 key areas. Use both bell and diaphragm. Position patient on left side and auscultate with bell in expiration. B. Auscultate in left axilla for radiation of a murmur, and auscultate carotids for radiation and bruits. C. Sit patient forwards. Auscultate in expiration with diaphragm at lower left sternal edge. D. Auscultate the lung bases with diaphragm. Feel for sacral oedema. AUSCULTATION FOR HEART SOUNDS AND MURMURS There is no “correct” or “incorrect” auscultation routine. Find a routine that suits you. (As a guide for you, auscultation in a routine examination should take approximately 2 minutes. A third of this time should be concentrated on the mitral area. Of course any abnormal findings
- 5. will increase the time spent on auscultation.) Initially auscultate whilst palpating the carotid pulse with your left fingers (2nd 3rd and 4th fingers) to distinguish S1 from S2 and therefore assist in identification of systole and diastole. Listen to each auscultatory component in at least the four classical auscultation areas: - apex, lower left, upper left and right sternal edges. Known as the:- mitral/apex area, (5th intercostal space, ICS, mid clavicular line) tricuspid area, (around the 3rd, 4th and 5th left ICSs, at the left sternal edge, LSE) pulmonary area (2nd left ICS lateral to sternum, LSE) and aortic area (2nd right ICS lateral to sternum). These areas, although known as the mitral, tricuspid, pulmonary and aortic areas, in fact have no anatomical meaning. They are the key areas where the heart sounds and murmurs radiating from these valves are traditionally considered to be best heard. Be prepared to hunt around slightly to find the optimum position for your stethoscope but don’t move too quickly or you could miss a sound. Generally, you want to move your stethoscope in an S-shape, starting at the apex beat. Listen systematically to the auscultatory events in the cardiac cycle i.e. 1st and 2nd heart sounds (S1 and 2) and listen in the systolic and diastolic intervals for added sounds and murmurs. Time events with simultaneous palpation of the carotid. Use both the bell and diaphragm appropriately in the 4 areas – remember that the bell should only be placed lightly on the skin. In particular use the bell at the apex for low frequency sounds (i.e. murmurs) and the diaphragm at the base for high frequency sounds. Roll your patient slightly onto his left side and listen in the 5th ICS with the bell for the low frequency mid diastolic murmur of mitral stenosis. (Listen in full expiration. This may enhance a murmur.) Auscultate in the axilla with the diaphragm for radiation and comparative loudness of a systolic murmur. (e.g. the pan systolic murmur of mitral regurgitation radiates to the axilla.) In addition auscultate with the diaphragm over both carotids for bruits and radiation of murmurs, (the ejection systolic murmur of aortic stenosis radiates to the neck.)
- 6. Next sit your patient forwards and listen with the diaphragm at the lower left sternal edge, in expiration, for the high frequency diastolic murmur of aortic regurgitation. Finally, with the diaphragm, auscultate at the lung bases for the crackles of left ventricular failure. While your patient is sitting forwards feel for sacral oedema. Press over the sacrum for 10 seconds. Lift thumb and look for indentation.