Emissive materials v ray for sketch-up manual
•
1 recomendación•3,435 vistas

Emissive materials v ray for sketch-up manual

Recomendados
Más contenido relacionado
La actualidad más candente
La actualidad más candente (11)
Similar a Emissive materials v ray for sketch-up manual
Similar a Emissive materials v ray for sketch-up manual (20)
Más de Jaime Honigman
Más de Jaime Honigman (12)
Último
Último (20)
Emissive materials v ray for sketch-up manual
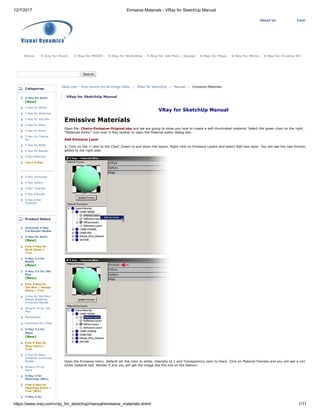
- 1. 12/7/2017 Emissive Materials - VRay for SketchUp Manual https://www.vray.com/vray_for_sketchup/manual/emissive_materials.shtml 1/11 About Us Contact Us Home V-Ray for Revit V-Ray for MODO V-Ray for SketchUp V-Ray for 3ds Max / Design V-Ray for Maya V-Ray for Rhino V-Ray for Cinema 4D Search Categories V-Ray for Revit (New) V-Ray for MODO V-Ray for SketchUp V-Ray for 3ds Max V-Ray for Maya V-Ray for Rhino V-Ray for Cinema 4D V-Ray for NUKE V-Ray for Blender V-Ray Materials Learn V-Ray V-Ray Showcase V-Ray Gallery V-Ray Tutorials V-Ray Manuals V-Ray Artist Spotlight Product Select Universal V-Ray 3.0 Render Nodes V-Ray for Revit (New) Free V-Ray for Revit Demo / Trial V-Ray 3.4 for MODO (New) V-Ray 3.5 for 3ds Max (New) Free V-Ray for 3ds Max / Design Demo / Trial V-Ray for 3ds Max / Design Academic University Bundle Phoenix FD for 3ds Max MultiScatter AutoGrass for V-Ray V-Ray 3.4 for Maya (New) Free V-Ray for Maya Demo / Trial V-Ray for Maya Academic University Bundle Phoenix FD for Maya V-Ray 3 for SketchUp (Win) Free V-Ray for SketchUp Demo / Trial (Win) V-Ray 3 for VRay.com - Your source for all things VRay :: VRay for SketchUp :: Manual :: Emissive Materials VRay for SketchUp Manual VRay for SketchUp Manual Emissive Materials Open file: Chairs-Emissive-Original.skp and we are going to show you how to create a self-illuminated material. Select the green chair on the right. Select "Materials Editor" icon over V-Ray toolbar to open the Material editor dialog box. Add Emissive Layer 1. Click on the + next to the Chair_Green to pull down the layers. Right click on Emissive Layers and select Add new layer. You will see the new Emissive layer added to the right side. Open the Emissive menu. Default set the color to white, intensity to 1 and Transparency color to black. Click on Material Preview and you will see a completely white material ball. Render it and you will get the image like the one on the bottom.
- 2. 12/7/2017 Emissive Materials - VRay for SketchUp Manual https://www.vray.com/vray_for_sketchup/manual/emissive_materials.shtml 2/11 SketchUp Mac OS X Free V-Ray for SketchUp Demo / Trial (Mac OS X) V-Ray for SketchUp EDU to Commercial Upgrade V-Ray for SketchUp Academic University Bundle Skatter for SketchUp V-Ray 2.0 for Rhino Free V-Ray for Rhino Demo / Trial V-Ray for Rhino EDU to Commercial Upgrade V-Ray 2.0 for Rhino Academic University Bundle V-Ray 3.4 for C4D (New) PDPlayer V-Ray Resources Free V-Ray Demo Free V-Ray Tools Help V-Ray Product Support Contact us Retrieve Account Information Privacy statement Terms & Conditions Payment Options Self-illuminated material can make the object become a lightsource itself. It does not limit to a certain shape like a regular light type does. Every part of object can be illuminated and used as a lightsource. Self-illuminated material is perfect to create objects like: light ball, light tube, light shade, stylish lighting, cold light and lit screen. However, emissive materials should not be used as the primary lighting for a scene. If you are using a physical camera in your scene, you may notice that your light emitting materials render black or darker than expected. This is because the physical camera reacts differently to light than a regular camera does. Because of this you may have to make your light emitting materials significantly brighter in order to be rendered by the physical camera. Adjust the Intensity Default set the Intensity to 1. Below images are rendered with Intensity of 3 (left) and 5 (right). Adjust the color Default set the color to white. Click on the color box to change to a different color. Notice that if the setting of the Intensity is too high, the color of the object itself will become close to white. Only the light come out from this self-illuminated object will carry the correct color. So we recommend you not to use this as a normal lightsource. Just make it as a decorative object in the scene. Please refer to below image chart for results of various Emissive Intensities. By controlling the degree of Transparency under the Emissive Color, you can still keep the diffuse color of the object. For example, when the Intensity is higher than 2, the diffuse color is washed out and become white. To avoid the self-illuminated object become white, please also refer to the Color Mapping.
- 3. 12/7/2017 Emissive Materials - VRay for SketchUp Manual https://www.vray.com/vray_for_sketchup/manual/emissive_materials.shtml 3/11 Emissive Textures Except using colors as light source for the self-illuminated materials, you can also use texture map directly as light source. 1. Click on the "m" to the right of the Color under Emissive control panel. 2. The Texture Editor will then open up. Select Bitmap from Type's pull down menu and you will see the control panel show up to the right. 3. Under Bitmap, click on the "m" to the right of the file and pick a bitmap to use as the light source.
- 4. 12/7/2017 Emissive Materials - VRay for SketchUp Manual https://www.vray.com/vray_for_sketchup/manual/emissive_materials.shtml 4/11 4. After the bitmap is selected, the "m" now becomes "M". Click on the Update button to preview the bitmap. Click on Apply and you can use this bitmap as the light source. 5. Click on Update Preview and you will see the Bitmap is now on the material ball. Render it and you will get the result as the image on the bottom. Please note that if any type of map is being used in Texture Editor, the Color and Intensity under Emissive will no longer function. You can't use these two option to control the brightness of the material any more. You need to click on the "M" and go back to the Texture Editor and adjust brightness there. All other control options in the Texture Editor work the same like this.
- 5. 12/7/2017 Emissive Materials - VRay for SketchUp Manual https://www.vray.com/vray_for_sketchup/manual/emissive_materials.shtml 5/11 Click on the "M" and go back to the Texture Editor window. Please pay special attention to below options as these options are often used for controlling the Bitmap texture map. Multiplier: Controls the intensity of the Bitmap. Default set to 1. Increase this number will intensify the color tone, brightness and color contrast. Preview will no show much of difference if the value is too small. Blur under Bitmap: Control the blurriness of the Bitmap. Default set to 0.15. Set to 0 will not have any blur effect to the Bitmap. Override under Bitmap: Adjust the Gamma value of the Bitmap. Increase the value will make the Bitmap brighter. This parameter is also important for workflow. Tile: Repeat the Bitmap texture on the object. Default set to selected. When uncheck the Tile, you will see only one Bitmap texture on the object. UVW Repeat: Controls how many times a map is repeated within a given space (either within the surface, or within mappings) UVW Rotation: Adjust the degree of rotation of the Bitmap The darker environment lighting will not affect the Bitmap setting for self-illuminated material (ipod image). The Bitmap will still render as its own setting for brightness. Use the same way to create cold light effect. Also shown below are two other examples. V-Ray 3 for SketchUp
- 6. 12/7/2017 Emissive Materials - VRay for SketchUp Manual https://www.vray.com/vray_for_sketchup/manual/emissive_materials.shtml 6/11 V-Ray 3 for SketchUp is here and includes a new User Interface, Denoiser, Clipper, SketchUp 2017 support and more! Feature Showcase: New UI Streamlined user interface for faster workflows. Denoiser Automatically reduce noise and cut render times by up to 50%. Clipper Create cutaways and section renders with ease.
- 7. 12/7/2017 Emissive Materials - VRay for SketchUp Manual https://www.vray.com/vray_for_sketchup/manual/emissive_materials.shtml 7/11 Purchase V-Ray 3 for SketchUp Now! V-Ray 3 for SketchUp Windows Edition V-Ray 3 for SketchUp Mac Edition Upgrade from V-Ray 2 for SketchUp to V- Ray 3 for SketchUp Skatter for SketchUp Skatter for SketchUp
- 8. 12/7/2017 Emissive Materials - VRay for SketchUp Manual https://www.vray.com/vray_for_sketchup/manual/emissive_materials.shtml 8/11 Rendering by Brice Desportes The Smart SketchUp Plugin For Scattering Populate your scenes with UNLIMITED Vegetation with TOTAL CONTROL all while SAVING TIME and never leave SKETCHUP! Skatter is Your Best Friend From small carpets in a living room to large scale forests, Skatter is designed to help you achieve the final look fast and easy. Render Unlimited Amounts of Objects Through its "Render only" feature, Skatter sends all the scattering information directly to the render engines, bypassing Sketchup. That way, you keep a lightweight and responsive file while still being able to render huge amounts of objects.
- 9. 12/7/2017 Emissive Materials - VRay for SketchUp Manual https://www.vray.com/vray_for_sketchup/manual/emissive_materials.shtml 9/11 Rendering by Mads Bjerre Olesen Click here for more information Learn V-Ray Learn V-Ray
- 10. 12/7/2017 Emissive Materials - VRay for SketchUp Manual https://www.vray.com/vray_for_sketchup/manual/emissive_materials.shtml 10/11 Click here for more information V-Ray Newsletter Renderings by Dennis Brunn Subscribe to our V-Ray Newsletter Subscribe to our V-Ray Newsletter and receive new V-Ray product announcements, special sales, tutorial updates and more! Brought to you by Visual Dynamics® LLC. Your email address is never shared and is always kept strictly confidential. Each newsletter that we send always has a single click unsubscribe link so that you can unsubscribe at any time if you decide that you wish to do so. * Your email address: * Enter the security code shown: Subscribe
- 11. 12/7/2017 Emissive Materials - VRay for SketchUp Manual https://www.vray.com/vray_for_sketchup/manual/emissive_materials.shtml 11/11 VRay.com is a service of Visual Dynamics® LLC Copyright © 2016 VRay.com -