

Recomendados
Recomendados
Más contenido relacionado
Más de جمال الكندي
Más de جمال الكندي (18)
Último
Último (20)
Sillout pdf
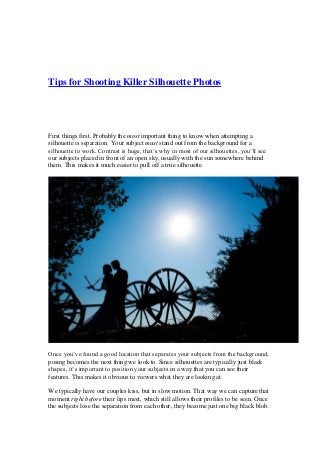
- 1. Tips for Shooting Killer Silhouette Photos First things first. Probably the most important thing to know when attempting a silhouette is separation. Your subject must stand out from the background for a silhouette to work. Contrast is huge, that’s why in most of our silhouettes, you’ll see our subjects placed in front of an open sky, usually with the sun somewhere behind them. This makes it much easier to pull off a true silhouette. Once you’ve found a good location that separates your subjects from the background, posing becomes the next thing we look to. Since silhouettes are typically just black shapes, it’s important to position your subjects in a way that you can see their features. This makes it obvious to viewers what they are looking at. We typically have our couples kiss, but in slow motion. That way we can capture that moment right before their lips meet, which still allows their profiles to be seen. Once the subjects lose the separation from each other, they become just one big black blob.
- 2. In the shot above, there was a perfect area for our subjects to stand. Your eye tends to go straight to the couple because the two big trees lead right to them, and the rest of the scene is dominated by very detailed lines, so the contour of their bodies stand out even more. Make sure to set your aperture so you have a large depth of field, allowing all the details to be in focus as well. I shoot most of my silhouettes with my 35mm lens and I try not to go lower than an aperture of f/8.
- 3. The best time of day for a silhouette is around sunset. This provides many more opportunities. If there are awesome clouds in the sky like those in the photo above, even better! The setting sun turns those clouds that beautiful orange color and adds to the overall appeal of the image.
- 4. In some situations, I’m not able to place the couple above the horizon line (which would make the bright sky the backdrop) or there are just too many obstacles. In this case, I really wanted all the trees in the shot, so I had Tori squat behind the subjects
- 5. and hold a flash with an off-camera trigger attached to it. This creates an awesome rim light around the couple and separates them from the dark tree behind them. Using a wide angle lens for silhouettes is my favorite! It gives a better perspective to our subject’s surroundings. If I wasn’t using a wide angle lens in the photo above, the viewer wouldn’t be able to get a feeling of how big the trees were compared to the couple, taking away some of the dramatic feel from the image. And once again, I saw an opening in the trees that I knew would be a perfect spot to place our subjects, so I had them walk slowly across the scene while I waited for the right moment. They stand out even more because their shape is so different than their surroundings, allowing the viewer’s attention to move straight to the couple.
- 6. We got lucky in the shot above. Normally, it wouldn’t have worked out since she has an equally dark object behind her (the branches), but since the sun is lighting up her hair and creating a rim light separating her from the branches, it worked perfectly.
- 7. Imagine this shot with her feet down and their heads together… It’d be one black blob sticking out of a hill. Instead, we had Eldine jump into Keith’s arms and throw her feet up in the air, which makes it much easier to understand what’s going on.
- 8. Here’s a good example of using something other than the sky to separate the subjects from the background. From where we were standing, the sun was creating a beautiful light across the lake. In this case, it was bright enough to create a nice silhouette. This is one of my favorites, even though it could have been done better. The dark cloud behind the couple makes it so they don’t stand out as much as they should. What I should have done was to have Tori pop a flash off behind them so a rim light would separate them from the background more than they are.