Kehinde Wiley Graphite Portrait
•Descargar como PPT, PDF•
5 recomendaciones•3,668 vistas

This is one of my most successful made from scratch lesson plans that I teach. It's the Keystone of my portraiture unit.

Recomendados
Más contenido relacionado
La actualidad más candente
La actualidad más candente (20)
Destacado
Destacado (10)
Similar a Kehinde Wiley Graphite Portrait
Similar a Kehinde Wiley Graphite Portrait (20)
Más de Joe Turek
Más de Joe Turek (12)
Último
Último (20)
Kehinde Wiley Graphite Portrait
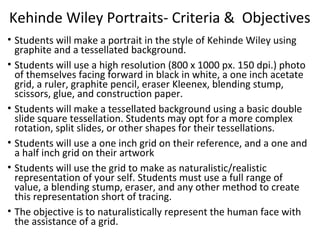
- 1. Kehinde Wiley Portraits- Criteria & Objectives • Students will make a portrait in the style of Kehinde Wiley using graphite and a tessellated background. • Students will use a high resolution (800 x 1000 px. 150 dpi.) photo of themselves facing forward in black in white, a one inch acetate grid, a ruler, graphite pencil, eraser Kleenex, blending stump, scissors, glue, and construction paper. • Students will make a tessellated background using a basic double slide square tessellation. Students may opt for a more complex rotation, split slides, or other shapes for their tessellations. • Students will use a one inch grid on their reference, and a one and a half inch grid on their artwork • Students will use the grid to make as naturalistic/realistic representation of your self. Students must use a full range of value, a blending stump, eraser, and any other method to create this representation short of tracing. • The objective is to naturalistically represent the human face with the assistance of a grid.
- 2. Kehinde Wiley • • • • Born in 1977 (he's in his thirties) Lives in New York city His work has been exhibited internationally and is a part of major collections in museums across the U.S. The themes of his paintings stretch from reinterpretations of master's work to simply depicting African American men in positions of power, namely that of French aristocracy, renaissance masters, or other neoclassical masters Works primarily with Oil paint and gold leaf on paper and canvas, his works range in size from the small to the HUGE
- 13. Jean-Auguste-Dominique Ingres’ Napoleon I on his Imperial Throne (1806)
- 14. Theodore GéricaultThe Officer of the Hussars, oil on canvas, circa 1812, 37 in × 105 in, Louvre, Paris
- 17. 1. Cut out a 2 in. x 2 in. or a 3 in. x 3in. square from a sheet of notebook paper or scrap paper 2. Draw a design starting in corner A and ending in corner B. The line has to go from corner to corner. 3. Cut it out, slide it to the other side of the square and tape it along that edge. 4. You can do this again on the top edge with the available space.
- 18. 1. Trace your tessellation tile on a piece of construction paper 2. Cut out your tiles 3. Paste them on another color of construction paper, stagger them in a alternating pattern that interlocks 4. Make sure you bring your pattern all the way to the edge and cut off the extra. Fill the entire background with tiles. 1. 3. 2. 4.
- 19. To perform a more complicated tessellation you can split the design halfway. Slide from any portion of the square. And when you glue down your tiles glue them on a diagonal grid. 1. 2. 3.
- 22. My Example, close but not a complete likeness Turn on ZoomIt Ctrl+2= draw Shift+click for line
- 23. Student Examples Acetate grid, dry erase markers can outline features Photo reference
- 24. First attempt, the student did not refer to the grid Second attempt after acknowledging the grid