Fluidic Sliding Panels – Auto adjust to any device screen without browser refresh

Let’s talk about creating a sliding panel system that adjusts automatically to any screen size or rather any device resolution. The sliding is implemented using CSS3 Transitions and I have targeted only webkit based browsers. So the app will run on any iOS, Android devices including computer browsers such as Google Chrome and Apple Safari. If you have seen a Sencha Touch app which uses a nested list or the sliding animated panels then you must have noticed that the same app adjusts itself to any screen size as well as the portrait and landscape mode. So our demo will do the same. I have a very simple implementation of auto adjusting sliding panels. For the full post download this file or visit the actual blog post link: http://jbkflex.wordpress.com/2012/08/18/fluidic-sliding-panels-auto-adjust-to-any-device-screen-without-browser-refresh/

Recomendados
Recomendados
Más contenido relacionado
Último
Último (20)
Destacado
Destacado (20)
Fluidic Sliding Panels – Auto adjust to any device screen without browser refresh
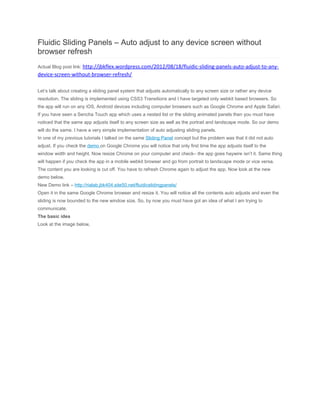
- 1. Fluidic Sliding Panels – Auto adjust to any device screen without browser refresh Actual Blog post link: http://jbkflex.wordpress.com/2012/08/18/fluidic-sliding-panels-auto-adjust-to-any- device-screen-without-browser-refresh/ Let’s talk about creating a sliding panel system that adjusts automatically to any screen size or rather any device resolution. The sliding is implemented using CSS3 Transitions and I have targeted only webkit based browsers. So the app will run on any iOS, Android devices including computer browsers such as Google Chrome and Apple Safari. If you have seen a Sencha Touch app which uses a nested list or the sliding animated panels then you must have noticed that the same app adjusts itself to any screen size as well as the portrait and landscape mode. So our demo will do the same. I have a very simple implementation of auto adjusting sliding panels. In one of my previous tutorials I talked on the same Sliding Panel concept but the problem was that it did not auto adjust. If you check the demo on Google Chrome you will notice that only first time the app adjusts itself to the window width and height. Now resize Chrome on your computer and check– the app goes haywire isn’t it. Same thing will happen if you check the app in a mobile webkit browser and go from portrait to landscape mode or vice versa. The content you are looking is cut off. You have to refresh Chrome again to adjust the app. Now look at the new demo below, New Demo link – http://rialab.jbk404.site50.net/fluidicslidingpanels/ Open it in the same Google Chrome browser and resize it. You will notice all the contents auto adjusts and even the sliding is now bounded to the new window size. So, by now you must have got an idea of what I am trying to communicate. The basic idea Look at the image below,
- 2. The wire frame explains the secrets First of all I have used 100% width and height, so this makes it auto adjust to any screen size. Next the two panels are placed at absolute positions – panel1 at left 0px and panel2 at left:100%. This ensures that whatever be the window width the second panel Panel2 is always at the extreme right (i.e window width) of Panel1. Both panels are inside a wrapper element which has overflow:hidden and occupies the size of the window. So at a time only one panel is displayed. The panels are then moved in and out of the wrapper and it looks like panels are sliding in and sliding out. I have used CSS3 transition to move them. Let’s look at the code now. HTML The basic markup is laid down below, <div id="wrapper"> <div id="innerWrapper"> <div class="panel" id="panel1"> <!-- Panel1 content goes inside here --> </div> <div class="panel" id="panel2"> <!-- Panel2 content goes inside here -->
- 3. </div> </div> </div> You can see the two panels – panel1 and panel2 inside the wrapper. Both panel1 and panel2 has dummy content inside them. So check them out by viewing the source code of the demo app. This markup is complemented by the CSS. Let’s check that out. CSS html,body { margin:0; padding:0; font-family:Helvetica; font-size:14px; background-color:#ccc; color:#222; width:100%; height:100%; } #wrapper { width:100%; height:100%; overflow:hidden; } #innerWrapper {
- 4. min-width:100%; min-height:100%; /*height:100%; width:100%;*/ position:relative; } #innerWrapper .panels { width:100%; height:100%; position:absolute; -webkit-transition:left 300ms; } #panel1 { left:0; } #panel2 { left:100%; } You can see that I have given both html and body a width/height of 100%. This is important. This ensures that the outermost container occupies the window size. Next up I have the wrapper and innerWrapper, for which the style rules are self explanatory. Thereafter I have set the style rules for the panels. You can see that panels have been positioned absolute. Both panels have also been set the CSS3 transition rule, for which I have assigned the left property. So, any changes in the left property for the panels, they will be moved smoothly over time. Also panel2 is
- 5. positioned at left:100%, I have talked about this in the basic idea section already. This is the basic style that will set up our markup. There are other style rules basically for the dummy contents inside the panels, you can check that out in the source code. Now, lets move onto our javascript which will actually move the panels. JavaScript The script is pretty simple. I have only two event listener functions for the buttons in the markup. function slideIn() { document.getElementById("panel1").style.left = "-100%"; document.getElementById("panel2").style.left = "0"; } function slideOut() { document.getElementById("panel2").style.left = "100%"; document.getElementById("panel1").style.left = "0"; } The slideIn() function is called when the Slide In button in panel1 is clicked. This sets the panel1′s left position to -100% and panel2′s to 0 (zero). And since we have set CSS3 transition movement to listen to the left style property, so the movement of both the panels is smooth over time. Similarly, the slideOut() function is called when Slide Outbutton in panel2 is clicked. Assigning a value of 100% to the left style property moves it by the width of the window towards left side. Hence even if you resize the browser window in your computer or change the orientation of the mobile device the sliding distance is always the width of the window. So, overall a very simple technique to create sliding panels that automatically adjust without any browser refresh. Here is the link to the demo once again. Also right click to view the source. http://rialab.jbk404.site50.net/fluidicslidingpanels/ You can utilize the same method to create a lot of other important functionalities for mobile web apps.