
Recomendados
Más contenido relacionado
La actualidad más candente
La actualidad más candente (20)
Destacado
Destacado (20)
Similar a Crocodile stitch tutorial
Similar a Crocodile stitch tutorial (20)
Crocodile stitch tutorial
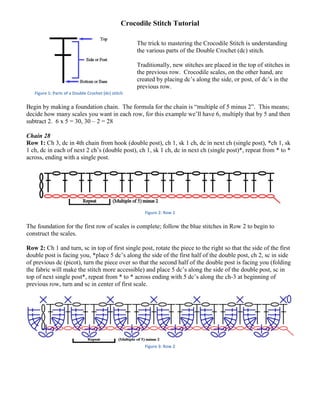
- 1. Crocodile Stitch Tutorial The trick to mastering the Crocodile Stitch is understanding the various parts of the Double Crochet (dc) stitch. Traditionally, new stitches are placed in the top of stitches in the previous row. Crocodile scales, on the other hand, are created by placing dc’s along the side, or post, of dc’s in the previous row. Figure 1: Parts of a Double Crochet (dc) stitch Begin by making a foundation chain. The formula for the chain is “multiple of 5 minus 2”. This means; decide how many scales you want in each row, for this example we’ll have 6, multiply that by 5 and then subtract 2. 6 x 5 = 30, 30 – 2 = 28 Chain 28 Row 1: Ch 3, dc in 4th chain from hook (double post), ch 1, sk 1 ch, dc in next ch (single post), *ch 1, sk 1 ch, dc in each of next 2 ch’s (double post), ch 1, sk 1 ch, dc in next ch (single post)*, repeat from * to * across, ending with a single post. Figure 2: Row 1 The foundation for the first row of scales is complete; follow the blue stitches in Row 2 to begin to construct the scales. Row 2: Ch 1 and turn, sc in top of first single post, rotate the piece to the right so that the side of the first double post is facing you, *place 5 dc’s along the side of the first half of the double post, ch 2, sc in side of previous dc (picot), turn the piece over so that the second half of the double post is facing you (folding the fabric will make the stitch more accessible) and place 5 dc’s along the side of the double post, sc in top of next single post*, repeat from * to * across ending with 5 dc’s along the ch-3 at beginning of previous row, turn and sc in center of first scale. Figure 3: Row 2
- 2. This set of symbols, found at the tip of each scale, represent a picot formed by three stitches; two chain stitches followed by a single crochet in the side of the previous dc at the very top of the stitch. This causes the scale to take on a pointed, rather than a rounded shape. Figure 4: Picot Row 3 lays the foundation for the next layer of scales, follow the black stitches. Row 3: Ch 4 (single post), 2 dc’s (double post) in single post between scales, ch 1, *dc (single post) in center of next scale, ch 1, 2 dc’s (double post) in single post between scales*, repeat from * to * across, ending with double post. Figure 5: Row 3 Because the rows overlap significantly, the next row is shown in green. Row 4: Ch 1 and turn, rotate the piece to the right so that the side of the first double post is facing you, *place 5 dc’s along the side of the first half of the double post, ch 2, sc in side of previous dc (picot), turn the piece over so that the second half of the double post is facing you (folding the fabric will make the stitch more accessible) and place 5 dc’s along the side of the double post, sc in top of next single post*, repeat from * to * across ending with a sc in the top of the ch-3 at beginning of previous row. Figure 6: Row 4 And that’s it…simply repeat rows 1-4 as many times as necessary to achieve the desired length.
- 3. Figure 7: Crocodile Stitch Symbol Pattern