
Recomendados
Más contenido relacionado
La actualidad más candente
La actualidad más candente (18)
Destacado
Similar a Creating forms word 2003
Similar a Creating forms word 2003 (20)
Más de Khoa (K.A)
Último
Último (20)
Creating forms word 2003
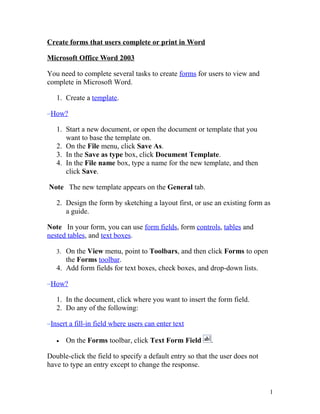
- 1. Create forms that users complete or print in Word Microsoft Office Word 2003 You need to complete several tasks to create forms for users to view and complete in Microsoft Word. 1. Create a template. How? 1. Start a new document, or open the document or template that you want to base the template on. 2. On the File menu, click Save As. 3. In the Save as type box, click Document Template. 4. In the File name box, type a name for the new template, and then click Save. Note The new template appears on the General tab. 2. Design the form by sketching a layout first, or use an existing form as a guide. Note In your form, you can use form fields, form controls, tables and nested tables, and text boxes. 3. On the View menu, point to Toolbars, and then click Forms to open the Forms toolbar. 4. Add form fields for text boxes, check boxes, and drop-down lists. How? 1. In the document, click where you want to insert the form field. 2. Do any of the following: Insert a fill-in field where users can enter text • On the Forms toolbar, click Text Form Field . Double-click the field to specify a default entry so that the user does not have to type an entry except to change the response. 1
- 2. Insert a check box next to an independent option that users select or clear • On the Forms toolbar, click Check Box Form Field . You can also use this button to insert a check box next to each item in a group of choices that are not mutually exclusive — that is, users can select more than one. Insert a drop-down list box that restricts available choices to those you specify 1. On the Forms toolbar, click Drop-Down Form Field . 2. Double-click the drop-down form field. 3. To add an item, type the name of the item in the Drop-down item box, and then click Add. 5. If necessary, edit the appearance of the fields. Do any of the following: Remove or change the order of items in a drop-down list form field 1. Double-click the drop-down form field you want to change. 2. Do any of the following, and then click OK: • To delete an item, click the item in the Items in drop-down list box, and then click Remove. • To move an item, click the item in the Items in drop-down list box, and then click the Move arrow buttons. Change the formatting of form field results 1. Select the form field you want to format. 2. On the Format menu, click Font. 3. Select the options you want. Display or remove shading • Click Form Field Shading on the Forms toolbar. Note The shading appears on the screen so users can quickly identify the fields they need to respond to. This shading does not print. 2
- 3. 6. Set or edit properties for the form field. How? 1. Double-click the form field you want to change. 2. Change the options you want, and then click OK. 7. Add Help or automation to the form. Do any of the following: Add Help text to a form control 1. Double-click the form field to which you want to add Help text. 2. Click Add Help Text. 3. To display Help text in the status bar, click the Status Bar tab, click Type your own, and then type your Help text in the box. To display Help text in a message box when a user presses F1, click the Help Key (F1) tab, click Type your own, and then type your Help text in the box. Automate your form 1. Create the macros you want to use, and store them in the form template. If another template contains macros you want to use, copy them into the form template. Security Use caution when you are adding macros to your form. Macros may be designed in such a way that their use could pose a security risk. We recommend that you use macros from trusted sources only. 2. Double-click the form field you want to assign a macro to. 3. To run a macro when the insertion point enters the form field, click the macro in the Entry box. To run a macro when the insertion point exits the form field, click the macro in the Exit box. Note If you store the entry and exit macros in your Normal template and then distribute a form to others, the entry and exit macros may not run 3
- 4. because the macros won't be available to the users. You must store the macros that you use in a form in the form template. 8. Add protection to the form. Users cannot fill out a form until you add protection to it. Word provides several types of protection. Do any one of the following: Add protection to test a form as you design or change it • On the Forms toolbar, click Protect Form . Note You can manually reset form fields by clicking Reset Form Fields on the Forms toolbar. Add protection to help prevent users from changing a form Note When you follow these steps to add protection to a document, the form fields are reset. 1. On the Tools menu, click Protect Document. 2. In the Protect Document task pane, under Editing restrictions, select the Allow only this type of editing in the document check box, and then click Filling in forms in the list of editing restrictions. 3. To add protection to only parts of a form, click Select sections, and then clear the check boxes for the sections you don't want to add protection to. Note To add protection to only parts of a form, those parts must be in separate sections. (On the Insert menu, click Break to create section breaks.) 4. Click Yes, Start Enforcing Protection. 5. To assign a password to the form so that users who know the password can remove the protection and change the form, type a password in the Enter new password (optional) box, and then confirm the password. Users who don't know the password can still enter information in the form fields. 9. Save the form, and then distribute it as you would any other document that you send for review. 4
- 5. Tips • You can also create a form by starting with a sample template. Many are available on the Microsoft Office Online Web site. • If you want, you can test the form prior to distributing it. Open the form, fill it out as the user would, and then save a copy in the designated location. 5
- 6. Tips • You can also create a form by starting with a sample template. Many are available on the Microsoft Office Online Web site. • If you want, you can test the form prior to distributing it. Open the form, fill it out as the user would, and then save a copy in the designated location. 5