Install wireless printer
•Descargar como PPTX, PDF•
0 recomendaciones•274 vistas

installing wireless printers

Recomendados
Recomendados
Más contenido relacionado
Último
Último (20)
Destacado
Destacado (20)
Install wireless printer
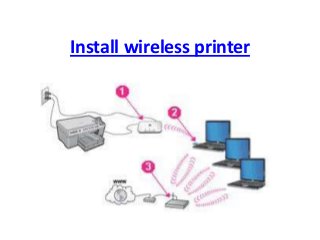
- 2. steps needed to install wireless printer are as follows • First you need to be sure your printer has wireless router or a wireless network adaptor. • Power on the printer and router. • Go to control panel then select network and sharing center. • Then select the option- add a wireless device to the network then enable DHCP option on the printer.
- 3. • Then you will obtain the IP address automatically. • Configure DHCP sever of wireless router. Again assign IP address automatically. • Verify connectivity. Try to print something for testing, if problem persists then verify IP address again.
- 4. Installing without a CD- • You can add your printer using the OS own add printer option. Printer should be present on the network and must configure wireless setting on the printer by using Web configuration interface. If network is correct then operating system automatically discovers software should find it.
- 5. • . If OS fails to do so you need to download the drivers from the website. If the OS doesn't find the printer in a search, the fallback method is to add the printer as a local printer (normally USB) and then assign it a standard TCP/IP port--specifically, an IP address port. You'll need to know the printer's IP address or device name for this method to work. In OS X, you can add the printer as an IP Printer. You'll need to download any required drivers manually.
- 6. • Call for installing wireless printer 24x 7 at toll free number 1-888-918-2345