SlideShare una empresa de Scribd logo
1 de 18
Descargar para leer sin conexión
How to Upgrade GV-CMS Series to the Latest Version


                                                                  Article ID: GV06-10-06-17
                                                                  Release Date: 06/17/2010


Follow the steps below to back up current database and restore it to the latest version of
GV-CMS Series, including Center V2, Vital Sign Monitor (VSM), Dispatch Server and Control
Center.


1. Upgrading the GV-Center V2

Applied to
GV-Center V2 Version 8.3 and later


Backing up the Current Configuration Settings

1. Install Fast Backup and Restore Main System from the CMS Software DVD and start
   the program. This window appears.


GeoVision Inc.                                  1                  Revision Date: 2010/6/17
2. Click Backup Remote AP Settings and select Center V2 Server. This window appears.


3. Click     , and specify the storage path for the backup file. The file name is XXX.exe.


Backing up the Current Account Database

1. Start the GV-Center V2.

2. Click the Accounts icon. This window appears.


3. Select Export.

4. Specify the storage path for the backup file. The file name is XXX.abb.


GeoVision Inc.                                 2                 Revision Date: 2010/6/17
Installing the Latest Version and Restoring the Previous Database

1. Uninstall the current version of GV-Center V2.

2. Uninstall the current version of the USB Device driver and install the latest version of it.

   A. Insert the CMS Software DVD to the computer. This window appears. Select Install or
       Remove GeoVision GV-Series Driver.


   B. Select Install GeoVision USB Device Driver and select Remove.


   C. Select Install GeoVision USB Device Driver and select Install.


GeoVision Inc.                                   3                  Revision Date: 2010/6/17
3. To install the latest version of GV-Center V2, select Install GeoVision Vxxxx Central
   Monitoring System and then select GeoVision Center V2 System. By default, the
   installation directory is C:Center V2.

4. Restore the configuration settings to the new version of GV-Center V2.

   A.   Run the backup file of the setup data (XXX.exe). This window appears.


   B.   Click Restore Remote AP and select Center V2 Server. The previous configuration
        settings are restored.

5. Restore the account database to the new version of GV-Center v2.

   A.   Start the GV-Center V2.

   B.   Click the Accounts icon. This window appears.


   C.   Select Import, and locate the backup file of the account database (XXX.abb).

6. Restart the GV-Center V2. The version upgrade is complete.


GeoVision Inc.                                4                 Revision Date: 2010/6/17
Note: You may not upgrade the GV-Center V2 by using the Software CD, but by using the
upgrade or patch download link provided by GeoVision. In this case, you should locate related
executive programs from folders to start.

1. To uninstall the current version of the USB Device driver and install the new version, run
   GvUsb.exe.

2. To install the latest version of GV-Center V2, run setup.exe.


GeoVision Inc.                                  5                  Revision Date: 2010/6/17
2. Upgrading the GV-VSM (Vital Sign Monitor)

Applied to
GV-VSM Version 8.3 and later


Backing up the Current Configuration Settings

1. Install the Fast Backup and Restore Main System from the CMS Software DVD and
   start the program. This window appears.


2. Click Backup Remote AP Settings and select VSM Server. This window appears.


3. Click      , and then specify the storage path for the backup file. The file name is

   XXX.exe.


GeoVision Inc.                                  6                  Revision Date: 2010/6/17
Backing up the Current Account Database

1. Start the GV-VSM.

2. Click the Account icon. This window appears.


3. Click the Import/Export Address Book icon and select Export.

4. Specify the storage path for the backup file. The file name is XXX.abb.


Installing the Latest Version and Restoring the Previous Database

1. Uninstall the current version of GV-VSM.

2. Uninstall the current version of the USB Device driver and install the latest version of it.

   A. Insert the CMS Software DVD to the computer. This window appears. Select Install or
       Remove GeoVision GV-Series Driver.


GeoVision Inc.                                   7                  Revision Date: 2010/6/17
B. Select Install GeoVision USB Device Driver and select Remove.


   C. Select Install GeoVision USB Device Driver and select Install.


3. To install the latest version of GV-VSM, select Install GeoVision Vxxxx Central
   Monitoring System and then select GeoVision Vital Sign Monitor System. By default,
   the installation directory is C:VSM.

4. Restore the setup data to the new version of GV-VSM.

   A.   Open the backup file of the setup data (XXX.exe). This window appears.


   B.   Click Restore Remote AP and select VSM Server. The previous configuration
        settings are restored.


GeoVision Inc.                                8                Revision Date: 2010/6/17
5. Restore the account database to the new version of the GV-VSM.

    A.   Start the GV-VSM.

    B.   Click the Account icon. This window appears.


    C.   Select Import, and locate the backup file of the account database (XXX.abb). The
         previous account database is restored.

6. Restart the GV-VSM. The version upgrade is complete.


Note: You may not upgrade the GV-VSM by using the Software CD, but by using the upgrade
or patch download link provided by GeoVision. In this case, you should locate related
executive programs from folders to start.

1. To uninstall the current version of the USB Device driver and install the new version, run
   GvUsb.exe.

2. To install the latest version of GV-VSM, run setup.exe.


GeoVision Inc.                                  9                 Revision Date: 2010/6/17
3. Upgrading the GV-Dispatch Server

Applied to
GV-Dispatch Version 8.3 and later


Backing up the Current Configuration Settings

1. Install the Fast Backup and Restore Main System from the CMS Software DVD and
   start the program. This window appears.


2. Click Backup Remote AP Settings and select Dispatch Server. This window appears.


3. Click      , and then specify the storage path for the backup file. The file name is

   XXX.exe.


GeoVision Inc.                                  10                  Revision Date: 2010/6/17
Backing up the Current Account Database

1. Start the GV-Dispatch Server.

2. Click the Account icon. This window appears.


3. Select Export to Dispatch Format.

4. Specify the storage path for the backup file. The file name is XXX.abb.


Installing the latest Version and Restoring the Previous Database

1. Uninstall the current version of GV-Dispatch Server.

2. Uninstall the current version of the USB Device driver and install the latest version of it.

   A. Insert the CMS Software DVD to the computer. This window appears. Select Install or
       Remove GeoVision GV-Series Driver.


GeoVision Inc.                                   11                   Revision Date: 2010/6/17
B. Select Install GeoVision USB Device Driver and select Remove.


   C. Select Install GeoVision USB Device Driver and select Install.


3. To install the latest version of GV-Dispatch Server, select Install GeoVision Vxxxx
   Central Monitoring System and then select GeoVision Dispatch Server System. By
   default, the installation directory is C:Dispatch.

4. Restore the setup data to the new version of GV-Dispatch Server.

   A.   Open the backup file of the setup data (XXX.exe). This window appears.


   B.   Click Restore Remote AP and select Dispatch Server. The previous configuration
        settings are restored.


GeoVision Inc.                                   12               Revision Date: 2010/6/17
5. Restore the account database to the new version of GV-Dispatch Server.

   A.   Start the GV-Dispatch Server.

   B.   Click the Account icon. This window appears.


   C.   Select Import, and locate the backup file of the account database. The previous
        account database is restored (XXX.abb).

6. Restart the GV-Dispatch Server. The version upgrade is complete.


Note: You may not upgrade the GV-Dispatch Server by using the Software CD, but by using
the upgrade or patch download link provided by GeoVision. In this case, you should locate
related executive programs from folders to start.

1. To uninstall the current version of the USB Device driver and install the new version, run
   GvUsb.exe.

2. To install the latest version of GV-Dispatch Server, run setup.exe.


GeoVision Inc.                                  13                 Revision Date: 2010/6/17
4. Upgrading the GV-Control Center

Applied to
GV-Control Center Version 8.3 and later


Backing up the Current Configuration Settings

1. Install the Fast Backup and Restore Main System from the CMS Software DVD and
   start the program. This window appears.


2. Click Backup Remote AP Settings and select Control Center Server. This window
   appears.


3. Click      , and then specify the storage path for the backup file. The file name will be

   XXX.exe.

GeoVision Inc.                                  14                   Revision Date: 2010/6/17
Backing up the Current Host Database

1. Start the GV-Control Center.

2. Click the Configure icon. This window appears.


3. Select Export Data. This window appears. You can set up a password if necessary. Then
   Click OK.


4. Specify a storage path for the backup file. The file name is
   CtrCenter_Setup2010XXXX.ccb.


GeoVision Inc.                                  15                Revision Date: 2010/6/17
Installing the Latest Version and Restoring the Previous Host Database

1. Uninstall the current version of GV-Control Center.

2. Uninstall the current version of the USB Device driver and install the latest version of it.

   A. Insert the CMS Software DVD to the computer. This window appears. Select Install or
       Remove GeoVision GV-Series Driver.


   B. Select Install GeoVision USB Device Driver and select Remove.


   C. Select Install GeoVision USB Device Driver and select Install.


GeoVision Inc.                                   16                   Revision Date: 2010/6/17
3. To install the latest version of GV-Control Center, select Install GeoVision Vxxxx
   Central Monitoring System and then select GeoVision Control Center System. By
   default, the installation directory is C:Control Center.

4. Restore the setup data to the new version of GV-Control Center.

   A.   Open the backup file of the setup data (XXX.exe). This window appears.


   B.   Click Restore Remote AP and select Control Center Server. The previous
        configuration settings are restored.

5. Restore the host database to the new version of the GV-Control Center.

   A.   Start the GV-Control Center.

   B.   Click the Configure icon. This window appears.


   C.   Select Import Data, and locate the backup file of the host database
        (CtrCenter_Setup2010XXXX.ccb). The previous host database is restored.

6. Restart the GV-Control Center. The version upgrade is complete.


GeoVision Inc.                                   17               Revision Date: 2010/6/17
Note: You may not upgrade the GV-Control Center by using the Software CD, but by using
the upgrade or patch download link provided by GeoVision. In this case, you should locate
related executive programs from folders to start.

1. To uninstall the current version of the USB Device driver and install the new version, run
   GvUsb.exe.

2. To install the latest version of GV-Control Center, run setup.exe.


GeoVision Inc.                                  18                 Revision Date: 2010/6/17

Más contenido relacionado

La actualidad más candente

Arcelor Mittal intern
Arcelor Mittal internArcelor Mittal intern
Arcelor Mittal internAnshul Jain
 
SOP - 2013 Server Build
SOP - 2013 Server BuildSOP - 2013 Server Build
SOP - 2013 Server BuildRobert Jones
 
Microsoft Hardware Certification Kit (HCK) setup
Microsoft Hardware Certification Kit (HCK) setupMicrosoft Hardware Certification Kit (HCK) setup
Microsoft Hardware Certification Kit (HCK) setupYan Vugenfirer
 
Windows Deployment Services Tutorial
Windows Deployment Services TutorialWindows Deployment Services Tutorial
Windows Deployment Services TutorialTravis Kench
 
GeoVision : Access Control Solutions : How to : Upgrading AS Manager
GeoVision : Access Control Solutions : How to : Upgrading AS ManagerGeoVision : Access Control Solutions : How to : Upgrading AS Manager
GeoVision : Access Control Solutions : How to : Upgrading AS ManagerTSOLUTIONS
 

La actualidad más candente (6)

Arcelor Mittal intern
Arcelor Mittal internArcelor Mittal intern
Arcelor Mittal intern
 
Windows 10
Windows 10Windows 10
Windows 10
 
SOP - 2013 Server Build
SOP - 2013 Server BuildSOP - 2013 Server Build
SOP - 2013 Server Build
 
Microsoft Hardware Certification Kit (HCK) setup
Microsoft Hardware Certification Kit (HCK) setupMicrosoft Hardware Certification Kit (HCK) setup
Microsoft Hardware Certification Kit (HCK) setup
 
Windows Deployment Services Tutorial
Windows Deployment Services TutorialWindows Deployment Services Tutorial
Windows Deployment Services Tutorial
 
GeoVision : Access Control Solutions : How to : Upgrading AS Manager
GeoVision : Access Control Solutions : How to : Upgrading AS ManagerGeoVision : Access Control Solutions : How to : Upgrading AS Manager
GeoVision : Access Control Solutions : How to : Upgrading AS Manager
 

Destacado

GeoVision : CCTV Solutions : Set Noise tolerance to avoid false alarm
GeoVision : CCTV Solutions : Set Noise tolerance to avoid false alarmGeoVision : CCTV Solutions : Set Noise tolerance to avoid false alarm
GeoVision : CCTV Solutions : Set Noise tolerance to avoid false alarmTSOLUTIONS
 
GeoVision : CCTV Solutions : GV-NVR for Object counting
GeoVision : CCTV Solutions : GV-NVR for Object countingGeoVision : CCTV Solutions : GV-NVR for Object counting
GeoVision : CCTV Solutions : GV-NVR for Object countingTSOLUTIONS
 
GeoVision : Video Management Solutions : How to : Trigger GV-NVR Thru AS-200
GeoVision : Video Management Solutions : How to : Trigger GV-NVR Thru AS-200GeoVision : Video Management Solutions : How to : Trigger GV-NVR Thru AS-200
GeoVision : Video Management Solutions : How to : Trigger GV-NVR Thru AS-200TSOLUTIONS
 
GeoVision : Access Control Solutions : Single Door with 2 times schedule
GeoVision : Access Control Solutions : Single Door with 2 times schedule GeoVision : Access Control Solutions : Single Door with 2 times schedule
GeoVision : Access Control Solutions : Single Door with 2 times schedule TSOLUTIONS
 
GeoVision : CCTV Solutions : Multicast solutions
GeoVision : CCTV Solutions : Multicast solutionsGeoVision : CCTV Solutions : Multicast solutions
GeoVision : CCTV Solutions : Multicast solutionsTSOLUTIONS
 
faq using blackb..._view_7000_series_cameras
faq using blackb..._view_7000_series_camerasfaq using blackb..._view_7000_series_cameras
faq using blackb..._view_7000_series_camerasTSOLUTIONS
 
Fisheye integration notes_updated101217
Fisheye integration notes_updated101217Fisheye integration notes_updated101217
Fisheye integration notes_updated101217TSOLUTIONS
 
faq symbian nokia player can access 3 gpp
faq symbian nokia player can access 3 gppfaq symbian nokia player can access 3 gpp
faq symbian nokia player can access 3 gppTSOLUTIONS
 

Destacado (8)

GeoVision : CCTV Solutions : Set Noise tolerance to avoid false alarm
GeoVision : CCTV Solutions : Set Noise tolerance to avoid false alarmGeoVision : CCTV Solutions : Set Noise tolerance to avoid false alarm
GeoVision : CCTV Solutions : Set Noise tolerance to avoid false alarm
 
GeoVision : CCTV Solutions : GV-NVR for Object counting
GeoVision : CCTV Solutions : GV-NVR for Object countingGeoVision : CCTV Solutions : GV-NVR for Object counting
GeoVision : CCTV Solutions : GV-NVR for Object counting
 
GeoVision : Video Management Solutions : How to : Trigger GV-NVR Thru AS-200
GeoVision : Video Management Solutions : How to : Trigger GV-NVR Thru AS-200GeoVision : Video Management Solutions : How to : Trigger GV-NVR Thru AS-200
GeoVision : Video Management Solutions : How to : Trigger GV-NVR Thru AS-200
 
GeoVision : Access Control Solutions : Single Door with 2 times schedule
GeoVision : Access Control Solutions : Single Door with 2 times schedule GeoVision : Access Control Solutions : Single Door with 2 times schedule
GeoVision : Access Control Solutions : Single Door with 2 times schedule
 
GeoVision : CCTV Solutions : Multicast solutions
GeoVision : CCTV Solutions : Multicast solutionsGeoVision : CCTV Solutions : Multicast solutions
GeoVision : CCTV Solutions : Multicast solutions
 
faq using blackb..._view_7000_series_cameras
faq using blackb..._view_7000_series_camerasfaq using blackb..._view_7000_series_cameras
faq using blackb..._view_7000_series_cameras
 
Fisheye integration notes_updated101217
Fisheye integration notes_updated101217Fisheye integration notes_updated101217
Fisheye integration notes_updated101217
 
faq symbian nokia player can access 3 gpp
faq symbian nokia player can access 3 gppfaq symbian nokia player can access 3 gpp
faq symbian nokia player can access 3 gpp
 

Similar a GeoVision : Video Management Solutions : How to : Upgrading GV-CMS CenterV2 ControlCenter

Cognos 10 upgrade migrate fixpack by bhawani nandan prasad
Cognos 10 upgrade migrate fixpack by bhawani nandan prasadCognos 10 upgrade migrate fixpack by bhawani nandan prasad
Cognos 10 upgrade migrate fixpack by bhawani nandan prasadBhawani N Prasad
 
%5 b change%20notice%5d%20gv-usb%20dongle%20data%20erased%20after%20downgrade
%5 b change%20notice%5d%20gv-usb%20dongle%20data%20erased%20after%20downgrade%5 b change%20notice%5d%20gv-usb%20dongle%20data%20erased%20after%20downgrade
%5 b change%20notice%5d%20gv-usb%20dongle%20data%20erased%20after%20downgradeTSOLUTIONS
 
Cis 206 i lab 2 backing up and restoring data
Cis 206 i lab 2 backing up and restoring dataCis 206 i lab 2 backing up and restoring data
Cis 206 i lab 2 backing up and restoring dataacece556
 
Capital software installation procedure
Capital software installation procedureCapital software installation procedure
Capital software installation procedureSomashekar S.M
 
Update to IBM Connections 5 CR1 step by-step guide
Update to IBM Connections 5 CR1 step by-step guideUpdate to IBM Connections 5 CR1 step by-step guide
Update to IBM Connections 5 CR1 step by-step guideRoberto Boccadoro
 
Sccm Interview Questions and Answers
Sccm Interview Questions and AnswersSccm Interview Questions and Answers
Sccm Interview Questions and AnswersKashifSCCMTrainer
 
M.O.M. 7i: Getting Started
M.O.M. 7i: Getting StartedM.O.M. 7i: Getting Started
M.O.M. 7i: Getting StartedDydacomp
 
Installation Process Of New Gen Lib Oss On Windows Xp For Library Automation ...
Installation Process Of New Gen Lib Oss On Windows Xp For Library Automation ...Installation Process Of New Gen Lib Oss On Windows Xp For Library Automation ...
Installation Process Of New Gen Lib Oss On Windows Xp For Library Automation ...Goutam Biswas
 
How to update Jeep navigation
How to update Jeep navigationHow to update Jeep navigation
How to update Jeep navigationJamesSteve7
 
How to backup active directory domain services database in windows server 201...
How to backup active directory domain services database in windows server 201...How to backup active directory domain services database in windows server 201...
How to backup active directory domain services database in windows server 201...laonap166
 
To pass ite chapter 5 exam
To pass ite chapter 5 examTo pass ite chapter 5 exam
To pass ite chapter 5 examAhmed Abdullah
 
7 Eclipse Cdt
7 Eclipse Cdt7 Eclipse Cdt
7 Eclipse Cdtadaddada
 
Backing Up Database Before Upgrading GV-ASManager V2.3
Backing Up Database Before Upgrading GV-ASManager V2.3Backing Up Database Before Upgrading GV-ASManager V2.3
Backing Up Database Before Upgrading GV-ASManager V2.3TSOLUTIONS
 
Practical Installation Process Of New Gen Lib Oss On Windows Xp For Library A...
Practical Installation Process Of New Gen Lib Oss On Windows Xp For Library A...Practical Installation Process Of New Gen Lib Oss On Windows Xp For Library A...
Practical Installation Process Of New Gen Lib Oss On Windows Xp For Library A...Goutam Biswas
 
Corrupt Backup
Corrupt BackupCorrupt Backup
Corrupt BackupJhone Smit
 
Install NewGenLib on Windows XP
Install NewGenLib on Windows XPInstall NewGenLib on Windows XP
Install NewGenLib on Windows XPRupesh Kumar
 

Similar a GeoVision : Video Management Solutions : How to : Upgrading GV-CMS CenterV2 ControlCenter (20)

Cognos 10 upgrade migrate fixpack by bhawani nandan prasad
Cognos 10 upgrade migrate fixpack by bhawani nandan prasadCognos 10 upgrade migrate fixpack by bhawani nandan prasad
Cognos 10 upgrade migrate fixpack by bhawani nandan prasad
 
%5 b change%20notice%5d%20gv-usb%20dongle%20data%20erased%20after%20downgrade
%5 b change%20notice%5d%20gv-usb%20dongle%20data%20erased%20after%20downgrade%5 b change%20notice%5d%20gv-usb%20dongle%20data%20erased%20after%20downgrade
%5 b change%20notice%5d%20gv-usb%20dongle%20data%20erased%20after%20downgrade
 
Cis 206 i lab 2 backing up and restoring data
Cis 206 i lab 2 backing up and restoring dataCis 206 i lab 2 backing up and restoring data
Cis 206 i lab 2 backing up and restoring data
 
Capital software installation procedure
Capital software installation procedureCapital software installation procedure
Capital software installation procedure
 
Update to IBM Connections 5 CR1 step by-step guide
Update to IBM Connections 5 CR1 step by-step guideUpdate to IBM Connections 5 CR1 step by-step guide
Update to IBM Connections 5 CR1 step by-step guide
 
Sccm Interview Questions and Answers
Sccm Interview Questions and AnswersSccm Interview Questions and Answers
Sccm Interview Questions and Answers
 
M.O.M. 7i: Getting Started
M.O.M. 7i: Getting StartedM.O.M. 7i: Getting Started
M.O.M. 7i: Getting Started
 
KB Article 1-FINAL
KB Article 1-FINALKB Article 1-FINAL
KB Article 1-FINAL
 
Installation Process Of New Gen Lib Oss On Windows Xp For Library Automation ...
Installation Process Of New Gen Lib Oss On Windows Xp For Library Automation ...Installation Process Of New Gen Lib Oss On Windows Xp For Library Automation ...
Installation Process Of New Gen Lib Oss On Windows Xp For Library Automation ...
 
Components lab
Components labComponents lab
Components lab
 
How to update Jeep navigation
How to update Jeep navigationHow to update Jeep navigation
How to update Jeep navigation
 
Components lab
Components labComponents lab
Components lab
 
How to backup active directory domain services database in windows server 201...
How to backup active directory domain services database in windows server 201...How to backup active directory domain services database in windows server 201...
How to backup active directory domain services database in windows server 201...
 
000 252
000 252000 252
000 252
 
To pass ite chapter 5 exam
To pass ite chapter 5 examTo pass ite chapter 5 exam
To pass ite chapter 5 exam
 
7 Eclipse Cdt
7 Eclipse Cdt7 Eclipse Cdt
7 Eclipse Cdt
 
Backing Up Database Before Upgrading GV-ASManager V2.3
Backing Up Database Before Upgrading GV-ASManager V2.3Backing Up Database Before Upgrading GV-ASManager V2.3
Backing Up Database Before Upgrading GV-ASManager V2.3
 
Practical Installation Process Of New Gen Lib Oss On Windows Xp For Library A...
Practical Installation Process Of New Gen Lib Oss On Windows Xp For Library A...Practical Installation Process Of New Gen Lib Oss On Windows Xp For Library A...
Practical Installation Process Of New Gen Lib Oss On Windows Xp For Library A...
 
Corrupt Backup
Corrupt BackupCorrupt Backup
Corrupt Backup
 
Install NewGenLib on Windows XP
Install NewGenLib on Windows XPInstall NewGenLib on Windows XP
Install NewGenLib on Windows XP
 

Más de TSOLUTIONS

VIVOTEK Presentation : บรรยายพิเศษเทคโนโลยีระบบกล้องวงจรปิด IPCCTV Technology...
VIVOTEK Presentation : บรรยายพิเศษเทคโนโลยีระบบกล้องวงจรปิด IPCCTV Technology...VIVOTEK Presentation : บรรยายพิเศษเทคโนโลยีระบบกล้องวงจรปิด IPCCTV Technology...
VIVOTEK Presentation : บรรยายพิเศษเทคโนโลยีระบบกล้องวงจรปิด IPCCTV Technology...TSOLUTIONS
 
VIVOTEK Presentation : TSOLUTIONS : Integrated Security Solutions Provider fo...
VIVOTEK Presentation : TSOLUTIONS : Integrated Security Solutions Provider fo...VIVOTEK Presentation : TSOLUTIONS : Integrated Security Solutions Provider fo...
VIVOTEK Presentation : TSOLUTIONS : Integrated Security Solutions Provider fo...TSOLUTIONS
 
GeoVision : Access Control Solutions : How to : Wiegand settings
GeoVision : Access Control Solutions : How to : Wiegand settingsGeoVision : Access Control Solutions : How to : Wiegand settings
GeoVision : Access Control Solutions : How to : Wiegand settingsTSOLUTIONS
 
GeoVision : Access Control Solutions : Knowledge : AS Manager using MSSQL Server
GeoVision : Access Control Solutions : Knowledge : AS Manager using MSSQL ServerGeoVision : Access Control Solutions : Knowledge : AS Manager using MSSQL Server
GeoVision : Access Control Solutions : Knowledge : AS Manager using MSSQL ServerTSOLUTIONS
 
GeoVision : Video Management Solutions : Technology Solutions Index
GeoVision : Video Management Solutions : Technology Solutions IndexGeoVision : Video Management Solutions : Technology Solutions Index
GeoVision : Video Management Solutions : Technology Solutions IndexTSOLUTIONS
 
GeoVision : Video Management Solutions : Open Windows Firewall to allow Webca...
GeoVision : Video Management Solutions : Open Windows Firewall to allow Webca...GeoVision : Video Management Solutions : Open Windows Firewall to allow Webca...
GeoVision : Video Management Solutions : Open Windows Firewall to allow Webca...TSOLUTIONS
 
GeoVision : Intergation Solutions : GV-NVR and Access Control with PTZ preset...
GeoVision : Intergation Solutions : GV-NVR and Access Control with PTZ preset...GeoVision : Intergation Solutions : GV-NVR and Access Control with PTZ preset...
GeoVision : Intergation Solutions : GV-NVR and Access Control with PTZ preset...TSOLUTIONS
 
GeoVision : CCTV Solutions : GV-NVR Sanyo connection issue
GeoVision : CCTV Solutions : GV-NVR Sanyo connection issueGeoVision : CCTV Solutions : GV-NVR Sanyo connection issue
GeoVision : CCTV Solutions : GV-NVR Sanyo connection issueTSOLUTIONS
 
GeoVision : CCTV Solutions : Rename preset cause GV-NVR restart
GeoVision : CCTV Solutions : Rename preset cause GV-NVR restartGeoVision : CCTV Solutions : Rename preset cause GV-NVR restart
GeoVision : CCTV Solutions : Rename preset cause GV-NVR restartTSOLUTIONS
 
GeoVision : CCTV Solutions : GV-NVR Remote error message
GeoVision : CCTV Solutions : GV-NVR Remote error messageGeoVision : CCTV Solutions : GV-NVR Remote error message
GeoVision : CCTV Solutions : GV-NVR Remote error messageTSOLUTIONS
 
GeoVision : CCTV Solutions : Recording issue with Bosch IP Camera
GeoVision : CCTV Solutions : Recording issue with Bosch IP CameraGeoVision : CCTV Solutions : Recording issue with Bosch IP Camera
GeoVision : CCTV Solutions : Recording issue with Bosch IP CameraTSOLUTIONS
 
GeoVision : CCTV Solutions : RAID vs Non-RAID System for Storing Surveillance...
GeoVision : CCTV Solutions : RAID vs Non-RAID System for Storing Surveillance...GeoVision : CCTV Solutions : RAID vs Non-RAID System for Storing Surveillance...
GeoVision : CCTV Solutions : RAID vs Non-RAID System for Storing Surveillance...TSOLUTIONS
 
GeoVision : CCTV Solutions : POS Display for Player
GeoVision : CCTV Solutions : POS Display for PlayerGeoVision : CCTV Solutions : POS Display for Player
GeoVision : CCTV Solutions : POS Display for PlayerTSOLUTIONS
 
GeoVision : CCTV Solutions : GV-NVR Lite VS QNAP VS-2008 Pro
GeoVision : CCTV Solutions : GV-NVR Lite VS QNAP VS-2008 ProGeoVision : CCTV Solutions : GV-NVR Lite VS QNAP VS-2008 Pro
GeoVision : CCTV Solutions : GV-NVR Lite VS QNAP VS-2008 ProTSOLUTIONS
 
GeoVision : CCTV Solutions : GV-NVR for Multiple remote connections
GeoVision : CCTV Solutions : GV-NVR for Multiple remote connectionsGeoVision : CCTV Solutions : GV-NVR for Multiple remote connections
GeoVision : CCTV Solutions : GV-NVR for Multiple remote connectionsTSOLUTIONS
 
GeoVision : Integration Solutions : CCTV and Access Control Monitor Entry or ...
GeoVision : Integration Solutions : CCTV and Access Control Monitor Entry or ...GeoVision : Integration Solutions : CCTV and Access Control Monitor Entry or ...
GeoVision : Integration Solutions : CCTV and Access Control Monitor Entry or ...TSOLUTIONS
 
Jpeg image viewer_error
Jpeg image viewer_errorJpeg image viewer_error
Jpeg image viewer_errorTSOLUTIONS
 
Issues with screen_saver
Issues with screen_saverIssues with screen_saver
Issues with screen_saverTSOLUTIONS
 
Issues of added_ip_devices
Issues of added_ip_devicesIssues of added_ip_devices
Issues of added_ip_devicesTSOLUTIONS
 
Issues of added_ip_devices
Issues of added_ip_devicesIssues of added_ip_devices
Issues of added_ip_devicesTSOLUTIONS
 

Más de TSOLUTIONS (20)

VIVOTEK Presentation : บรรยายพิเศษเทคโนโลยีระบบกล้องวงจรปิด IPCCTV Technology...
VIVOTEK Presentation : บรรยายพิเศษเทคโนโลยีระบบกล้องวงจรปิด IPCCTV Technology...VIVOTEK Presentation : บรรยายพิเศษเทคโนโลยีระบบกล้องวงจรปิด IPCCTV Technology...
VIVOTEK Presentation : บรรยายพิเศษเทคโนโลยีระบบกล้องวงจรปิด IPCCTV Technology...
 
VIVOTEK Presentation : TSOLUTIONS : Integrated Security Solutions Provider fo...
VIVOTEK Presentation : TSOLUTIONS : Integrated Security Solutions Provider fo...VIVOTEK Presentation : TSOLUTIONS : Integrated Security Solutions Provider fo...
VIVOTEK Presentation : TSOLUTIONS : Integrated Security Solutions Provider fo...
 
GeoVision : Access Control Solutions : How to : Wiegand settings
GeoVision : Access Control Solutions : How to : Wiegand settingsGeoVision : Access Control Solutions : How to : Wiegand settings
GeoVision : Access Control Solutions : How to : Wiegand settings
 
GeoVision : Access Control Solutions : Knowledge : AS Manager using MSSQL Server
GeoVision : Access Control Solutions : Knowledge : AS Manager using MSSQL ServerGeoVision : Access Control Solutions : Knowledge : AS Manager using MSSQL Server
GeoVision : Access Control Solutions : Knowledge : AS Manager using MSSQL Server
 
GeoVision : Video Management Solutions : Technology Solutions Index
GeoVision : Video Management Solutions : Technology Solutions IndexGeoVision : Video Management Solutions : Technology Solutions Index
GeoVision : Video Management Solutions : Technology Solutions Index
 
GeoVision : Video Management Solutions : Open Windows Firewall to allow Webca...
GeoVision : Video Management Solutions : Open Windows Firewall to allow Webca...GeoVision : Video Management Solutions : Open Windows Firewall to allow Webca...
GeoVision : Video Management Solutions : Open Windows Firewall to allow Webca...
 
GeoVision : Intergation Solutions : GV-NVR and Access Control with PTZ preset...
GeoVision : Intergation Solutions : GV-NVR and Access Control with PTZ preset...GeoVision : Intergation Solutions : GV-NVR and Access Control with PTZ preset...
GeoVision : Intergation Solutions : GV-NVR and Access Control with PTZ preset...
 
GeoVision : CCTV Solutions : GV-NVR Sanyo connection issue
GeoVision : CCTV Solutions : GV-NVR Sanyo connection issueGeoVision : CCTV Solutions : GV-NVR Sanyo connection issue
GeoVision : CCTV Solutions : GV-NVR Sanyo connection issue
 
GeoVision : CCTV Solutions : Rename preset cause GV-NVR restart
GeoVision : CCTV Solutions : Rename preset cause GV-NVR restartGeoVision : CCTV Solutions : Rename preset cause GV-NVR restart
GeoVision : CCTV Solutions : Rename preset cause GV-NVR restart
 
GeoVision : CCTV Solutions : GV-NVR Remote error message
GeoVision : CCTV Solutions : GV-NVR Remote error messageGeoVision : CCTV Solutions : GV-NVR Remote error message
GeoVision : CCTV Solutions : GV-NVR Remote error message
 
GeoVision : CCTV Solutions : Recording issue with Bosch IP Camera
GeoVision : CCTV Solutions : Recording issue with Bosch IP CameraGeoVision : CCTV Solutions : Recording issue with Bosch IP Camera
GeoVision : CCTV Solutions : Recording issue with Bosch IP Camera
 
GeoVision : CCTV Solutions : RAID vs Non-RAID System for Storing Surveillance...
GeoVision : CCTV Solutions : RAID vs Non-RAID System for Storing Surveillance...GeoVision : CCTV Solutions : RAID vs Non-RAID System for Storing Surveillance...
GeoVision : CCTV Solutions : RAID vs Non-RAID System for Storing Surveillance...
 
GeoVision : CCTV Solutions : POS Display for Player
GeoVision : CCTV Solutions : POS Display for PlayerGeoVision : CCTV Solutions : POS Display for Player
GeoVision : CCTV Solutions : POS Display for Player
 
GeoVision : CCTV Solutions : GV-NVR Lite VS QNAP VS-2008 Pro
GeoVision : CCTV Solutions : GV-NVR Lite VS QNAP VS-2008 ProGeoVision : CCTV Solutions : GV-NVR Lite VS QNAP VS-2008 Pro
GeoVision : CCTV Solutions : GV-NVR Lite VS QNAP VS-2008 Pro
 
GeoVision : CCTV Solutions : GV-NVR for Multiple remote connections
GeoVision : CCTV Solutions : GV-NVR for Multiple remote connectionsGeoVision : CCTV Solutions : GV-NVR for Multiple remote connections
GeoVision : CCTV Solutions : GV-NVR for Multiple remote connections
 
GeoVision : Integration Solutions : CCTV and Access Control Monitor Entry or ...
GeoVision : Integration Solutions : CCTV and Access Control Monitor Entry or ...GeoVision : Integration Solutions : CCTV and Access Control Monitor Entry or ...
GeoVision : Integration Solutions : CCTV and Access Control Monitor Entry or ...
 
Jpeg image viewer_error
Jpeg image viewer_errorJpeg image viewer_error
Jpeg image viewer_error
 
Issues with screen_saver
Issues with screen_saverIssues with screen_saver
Issues with screen_saver
 
Issues of added_ip_devices
Issues of added_ip_devicesIssues of added_ip_devices
Issues of added_ip_devices
 
Issues of added_ip_devices
Issues of added_ip_devicesIssues of added_ip_devices
Issues of added_ip_devices
 

Último

My Hashitalk Indonesia April 2024 Presentation
My Hashitalk Indonesia April 2024 PresentationMy Hashitalk Indonesia April 2024 Presentation
My Hashitalk Indonesia April 2024 PresentationRidwan Fadjar
 
Transcript: #StandardsGoals for 2024: What’s new for BISAC - Tech Forum 2024
Transcript: #StandardsGoals for 2024: What’s new for BISAC - Tech Forum 2024Transcript: #StandardsGoals for 2024: What’s new for BISAC - Tech Forum 2024
Transcript: #StandardsGoals for 2024: What’s new for BISAC - Tech Forum 2024BookNet Canada
 
Breaking the Kubernetes Kill Chain: Host Path Mount
Breaking the Kubernetes Kill Chain: Host Path MountBreaking the Kubernetes Kill Chain: Host Path Mount
Breaking the Kubernetes Kill Chain: Host Path MountPuma Security, LLC
 
Salesforce Community Group Quito, Salesforce 101
Salesforce Community Group Quito, Salesforce 101Salesforce Community Group Quito, Salesforce 101
Salesforce Community Group Quito, Salesforce 101Paola De la Torre
 
Transforming Data Streams with Kafka Connect: An Introduction to Single Messa...
Transforming Data Streams with Kafka Connect: An Introduction to Single Messa...Transforming Data Streams with Kafka Connect: An Introduction to Single Messa...
Transforming Data Streams with Kafka Connect: An Introduction to Single Messa...HostedbyConfluent
 
The 7 Things I Know About Cyber Security After 25 Years | April 2024
The 7 Things I Know About Cyber Security After 25 Years | April 2024The 7 Things I Know About Cyber Security After 25 Years | April 2024
The 7 Things I Know About Cyber Security After 25 Years | April 2024Rafal Los
 
Raspberry Pi 5: Challenges and Solutions in Bringing up an OpenGL/Vulkan Driv...
Raspberry Pi 5: Challenges and Solutions in Bringing up an OpenGL/Vulkan Driv...Raspberry Pi 5: Challenges and Solutions in Bringing up an OpenGL/Vulkan Driv...
Raspberry Pi 5: Challenges and Solutions in Bringing up an OpenGL/Vulkan Driv...Igalia
 
SQL Database Design For Developers at php[tek] 2024
SQL Database Design For Developers at php[tek] 2024SQL Database Design For Developers at php[tek] 2024
SQL Database Design For Developers at php[tek] 2024Scott Keck-Warren
 
Injustice - Developers Among Us (SciFiDevCon 2024)
Injustice - Developers Among Us (SciFiDevCon 2024)Injustice - Developers Among Us (SciFiDevCon 2024)
Injustice - Developers Among Us (SciFiDevCon 2024)Allon Mureinik
 
A Domino Admins Adventures (Engage 2024)
A Domino Admins Adventures (Engage 2024)A Domino Admins Adventures (Engage 2024)
A Domino Admins Adventures (Engage 2024)Gabriella Davis
 
The Role of Taxonomy and Ontology in Semantic Layers - Heather Hedden.pdf
The Role of Taxonomy and Ontology in Semantic Layers - Heather Hedden.pdfThe Role of Taxonomy and Ontology in Semantic Layers - Heather Hedden.pdf
The Role of Taxonomy and Ontology in Semantic Layers - Heather Hedden.pdfEnterprise Knowledge
 
Automating Business Process via MuleSoft Composer | Bangalore MuleSoft Meetup...
Automating Business Process via MuleSoft Composer | Bangalore MuleSoft Meetup...Automating Business Process via MuleSoft Composer | Bangalore MuleSoft Meetup...
Automating Business Process via MuleSoft Composer | Bangalore MuleSoft Meetup...shyamraj55
 
Boost PC performance: How more available memory can improve productivity
Boost PC performance: How more available memory can improve productivityBoost PC performance: How more available memory can improve productivity
Boost PC performance: How more available memory can improve productivityPrincipled Technologies
 
Tech-Forward - Achieving Business Readiness For Copilot in Microsoft 365
Tech-Forward - Achieving Business Readiness For Copilot in Microsoft 365Tech-Forward - Achieving Business Readiness For Copilot in Microsoft 365
Tech-Forward - Achieving Business Readiness For Copilot in Microsoft 3652toLead Limited
 
From Event to Action: Accelerate Your Decision Making with Real-Time Automation
From Event to Action: Accelerate Your Decision Making with Real-Time AutomationFrom Event to Action: Accelerate Your Decision Making with Real-Time Automation
From Event to Action: Accelerate Your Decision Making with Real-Time AutomationSafe Software
 
Swan(sea) Song – personal research during my six years at Swansea ... and bey...
Swan(sea) Song – personal research during my six years at Swansea ... and bey...Swan(sea) Song – personal research during my six years at Swansea ... and bey...
Swan(sea) Song – personal research during my six years at Swansea ... and bey...Alan Dix
 
[2024]Digital Global Overview Report 2024 Meltwater.pdf
[2024]Digital Global Overview Report 2024 Meltwater.pdf[2024]Digital Global Overview Report 2024 Meltwater.pdf
[2024]Digital Global Overview Report 2024 Meltwater.pdfhans926745
 
Handwritten Text Recognition for manuscripts and early printed texts
Handwritten Text Recognition for manuscripts and early printed textsHandwritten Text Recognition for manuscripts and early printed texts
Handwritten Text Recognition for manuscripts and early printed textsMaria Levchenko
 
Enhancing Worker Digital Experience: A Hands-on Workshop for Partners
Enhancing Worker Digital Experience: A Hands-on Workshop for PartnersEnhancing Worker Digital Experience: A Hands-on Workshop for Partners
Enhancing Worker Digital Experience: A Hands-on Workshop for PartnersThousandEyes
 
Slack Application Development 101 Slides
Slack Application Development 101 SlidesSlack Application Development 101 Slides
Slack Application Development 101 Slidespraypatel2
 

Último (20)

My Hashitalk Indonesia April 2024 Presentation
My Hashitalk Indonesia April 2024 PresentationMy Hashitalk Indonesia April 2024 Presentation
My Hashitalk Indonesia April 2024 Presentation
 
Transcript: #StandardsGoals for 2024: What’s new for BISAC - Tech Forum 2024
Transcript: #StandardsGoals for 2024: What’s new for BISAC - Tech Forum 2024Transcript: #StandardsGoals for 2024: What’s new for BISAC - Tech Forum 2024
Transcript: #StandardsGoals for 2024: What’s new for BISAC - Tech Forum 2024
 
Breaking the Kubernetes Kill Chain: Host Path Mount
Breaking the Kubernetes Kill Chain: Host Path MountBreaking the Kubernetes Kill Chain: Host Path Mount
Breaking the Kubernetes Kill Chain: Host Path Mount
 
Salesforce Community Group Quito, Salesforce 101
Salesforce Community Group Quito, Salesforce 101Salesforce Community Group Quito, Salesforce 101
Salesforce Community Group Quito, Salesforce 101
 
Transforming Data Streams with Kafka Connect: An Introduction to Single Messa...
Transforming Data Streams with Kafka Connect: An Introduction to Single Messa...Transforming Data Streams with Kafka Connect: An Introduction to Single Messa...
Transforming Data Streams with Kafka Connect: An Introduction to Single Messa...
 
The 7 Things I Know About Cyber Security After 25 Years | April 2024
The 7 Things I Know About Cyber Security After 25 Years | April 2024The 7 Things I Know About Cyber Security After 25 Years | April 2024
The 7 Things I Know About Cyber Security After 25 Years | April 2024
 
Raspberry Pi 5: Challenges and Solutions in Bringing up an OpenGL/Vulkan Driv...
Raspberry Pi 5: Challenges and Solutions in Bringing up an OpenGL/Vulkan Driv...Raspberry Pi 5: Challenges and Solutions in Bringing up an OpenGL/Vulkan Driv...
Raspberry Pi 5: Challenges and Solutions in Bringing up an OpenGL/Vulkan Driv...
 
SQL Database Design For Developers at php[tek] 2024
SQL Database Design For Developers at php[tek] 2024SQL Database Design For Developers at php[tek] 2024
SQL Database Design For Developers at php[tek] 2024
 
Injustice - Developers Among Us (SciFiDevCon 2024)
Injustice - Developers Among Us (SciFiDevCon 2024)Injustice - Developers Among Us (SciFiDevCon 2024)
Injustice - Developers Among Us (SciFiDevCon 2024)
 
A Domino Admins Adventures (Engage 2024)
A Domino Admins Adventures (Engage 2024)A Domino Admins Adventures (Engage 2024)
A Domino Admins Adventures (Engage 2024)
 
The Role of Taxonomy and Ontology in Semantic Layers - Heather Hedden.pdf
The Role of Taxonomy and Ontology in Semantic Layers - Heather Hedden.pdfThe Role of Taxonomy and Ontology in Semantic Layers - Heather Hedden.pdf
The Role of Taxonomy and Ontology in Semantic Layers - Heather Hedden.pdf
 
Automating Business Process via MuleSoft Composer | Bangalore MuleSoft Meetup...
Automating Business Process via MuleSoft Composer | Bangalore MuleSoft Meetup...Automating Business Process via MuleSoft Composer | Bangalore MuleSoft Meetup...
Automating Business Process via MuleSoft Composer | Bangalore MuleSoft Meetup...
 
Boost PC performance: How more available memory can improve productivity
Boost PC performance: How more available memory can improve productivityBoost PC performance: How more available memory can improve productivity
Boost PC performance: How more available memory can improve productivity
 
Tech-Forward - Achieving Business Readiness For Copilot in Microsoft 365
Tech-Forward - Achieving Business Readiness For Copilot in Microsoft 365Tech-Forward - Achieving Business Readiness For Copilot in Microsoft 365
Tech-Forward - Achieving Business Readiness For Copilot in Microsoft 365
 
From Event to Action: Accelerate Your Decision Making with Real-Time Automation
From Event to Action: Accelerate Your Decision Making with Real-Time AutomationFrom Event to Action: Accelerate Your Decision Making with Real-Time Automation
From Event to Action: Accelerate Your Decision Making with Real-Time Automation
 
Swan(sea) Song – personal research during my six years at Swansea ... and bey...
Swan(sea) Song – personal research during my six years at Swansea ... and bey...Swan(sea) Song – personal research during my six years at Swansea ... and bey...
Swan(sea) Song – personal research during my six years at Swansea ... and bey...
 
[2024]Digital Global Overview Report 2024 Meltwater.pdf
[2024]Digital Global Overview Report 2024 Meltwater.pdf[2024]Digital Global Overview Report 2024 Meltwater.pdf
[2024]Digital Global Overview Report 2024 Meltwater.pdf
 
Handwritten Text Recognition for manuscripts and early printed texts
Handwritten Text Recognition for manuscripts and early printed textsHandwritten Text Recognition for manuscripts and early printed texts
Handwritten Text Recognition for manuscripts and early printed texts
 
Enhancing Worker Digital Experience: A Hands-on Workshop for Partners
Enhancing Worker Digital Experience: A Hands-on Workshop for PartnersEnhancing Worker Digital Experience: A Hands-on Workshop for Partners
Enhancing Worker Digital Experience: A Hands-on Workshop for Partners
 
Slack Application Development 101 Slides
Slack Application Development 101 SlidesSlack Application Development 101 Slides
Slack Application Development 101 Slides
 

GeoVision : Video Management Solutions : How to : Upgrading GV-CMS CenterV2 ControlCenter

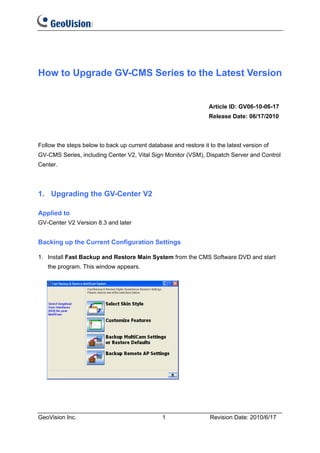
  • 1. How to Upgrade GV-CMS Series to the Latest Version Article ID: GV06-10-06-17 Release Date: 06/17/2010 Follow the steps below to back up current database and restore it to the latest version of GV-CMS Series, including Center V2, Vital Sign Monitor (VSM), Dispatch Server and Control Center. 1. Upgrading the GV-Center V2 Applied to GV-Center V2 Version 8.3 and later Backing up the Current Configuration Settings 1. Install Fast Backup and Restore Main System from the CMS Software DVD and start the program. This window appears. GeoVision Inc. 1 Revision Date: 2010/6/17
  • 2. 2. Click Backup Remote AP Settings and select Center V2 Server. This window appears. 3. Click , and specify the storage path for the backup file. The file name is XXX.exe. Backing up the Current Account Database 1. Start the GV-Center V2. 2. Click the Accounts icon. This window appears. 3. Select Export. 4. Specify the storage path for the backup file. The file name is XXX.abb. GeoVision Inc. 2 Revision Date: 2010/6/17
  • 3. Installing the Latest Version and Restoring the Previous Database 1. Uninstall the current version of GV-Center V2. 2. Uninstall the current version of the USB Device driver and install the latest version of it. A. Insert the CMS Software DVD to the computer. This window appears. Select Install or Remove GeoVision GV-Series Driver. B. Select Install GeoVision USB Device Driver and select Remove. C. Select Install GeoVision USB Device Driver and select Install. GeoVision Inc. 3 Revision Date: 2010/6/17
  • 4. 3. To install the latest version of GV-Center V2, select Install GeoVision Vxxxx Central Monitoring System and then select GeoVision Center V2 System. By default, the installation directory is C:Center V2. 4. Restore the configuration settings to the new version of GV-Center V2. A. Run the backup file of the setup data (XXX.exe). This window appears. B. Click Restore Remote AP and select Center V2 Server. The previous configuration settings are restored. 5. Restore the account database to the new version of GV-Center v2. A. Start the GV-Center V2. B. Click the Accounts icon. This window appears. C. Select Import, and locate the backup file of the account database (XXX.abb). 6. Restart the GV-Center V2. The version upgrade is complete. GeoVision Inc. 4 Revision Date: 2010/6/17
  • 5. Note: You may not upgrade the GV-Center V2 by using the Software CD, but by using the upgrade or patch download link provided by GeoVision. In this case, you should locate related executive programs from folders to start. 1. To uninstall the current version of the USB Device driver and install the new version, run GvUsb.exe. 2. To install the latest version of GV-Center V2, run setup.exe. GeoVision Inc. 5 Revision Date: 2010/6/17
  • 6. 2. Upgrading the GV-VSM (Vital Sign Monitor) Applied to GV-VSM Version 8.3 and later Backing up the Current Configuration Settings 1. Install the Fast Backup and Restore Main System from the CMS Software DVD and start the program. This window appears. 2. Click Backup Remote AP Settings and select VSM Server. This window appears. 3. Click , and then specify the storage path for the backup file. The file name is XXX.exe. GeoVision Inc. 6 Revision Date: 2010/6/17
  • 7. Backing up the Current Account Database 1. Start the GV-VSM. 2. Click the Account icon. This window appears. 3. Click the Import/Export Address Book icon and select Export. 4. Specify the storage path for the backup file. The file name is XXX.abb. Installing the Latest Version and Restoring the Previous Database 1. Uninstall the current version of GV-VSM. 2. Uninstall the current version of the USB Device driver and install the latest version of it. A. Insert the CMS Software DVD to the computer. This window appears. Select Install or Remove GeoVision GV-Series Driver. GeoVision Inc. 7 Revision Date: 2010/6/17
  • 8. B. Select Install GeoVision USB Device Driver and select Remove. C. Select Install GeoVision USB Device Driver and select Install. 3. To install the latest version of GV-VSM, select Install GeoVision Vxxxx Central Monitoring System and then select GeoVision Vital Sign Monitor System. By default, the installation directory is C:VSM. 4. Restore the setup data to the new version of GV-VSM. A. Open the backup file of the setup data (XXX.exe). This window appears. B. Click Restore Remote AP and select VSM Server. The previous configuration settings are restored. GeoVision Inc. 8 Revision Date: 2010/6/17
  • 9. 5. Restore the account database to the new version of the GV-VSM. A. Start the GV-VSM. B. Click the Account icon. This window appears. C. Select Import, and locate the backup file of the account database (XXX.abb). The previous account database is restored. 6. Restart the GV-VSM. The version upgrade is complete. Note: You may not upgrade the GV-VSM by using the Software CD, but by using the upgrade or patch download link provided by GeoVision. In this case, you should locate related executive programs from folders to start. 1. To uninstall the current version of the USB Device driver and install the new version, run GvUsb.exe. 2. To install the latest version of GV-VSM, run setup.exe. GeoVision Inc. 9 Revision Date: 2010/6/17
  • 10. 3. Upgrading the GV-Dispatch Server Applied to GV-Dispatch Version 8.3 and later Backing up the Current Configuration Settings 1. Install the Fast Backup and Restore Main System from the CMS Software DVD and start the program. This window appears. 2. Click Backup Remote AP Settings and select Dispatch Server. This window appears. 3. Click , and then specify the storage path for the backup file. The file name is XXX.exe. GeoVision Inc. 10 Revision Date: 2010/6/17
  • 11. Backing up the Current Account Database 1. Start the GV-Dispatch Server. 2. Click the Account icon. This window appears. 3. Select Export to Dispatch Format. 4. Specify the storage path for the backup file. The file name is XXX.abb. Installing the latest Version and Restoring the Previous Database 1. Uninstall the current version of GV-Dispatch Server. 2. Uninstall the current version of the USB Device driver and install the latest version of it. A. Insert the CMS Software DVD to the computer. This window appears. Select Install or Remove GeoVision GV-Series Driver. GeoVision Inc. 11 Revision Date: 2010/6/17
  • 12. B. Select Install GeoVision USB Device Driver and select Remove. C. Select Install GeoVision USB Device Driver and select Install. 3. To install the latest version of GV-Dispatch Server, select Install GeoVision Vxxxx Central Monitoring System and then select GeoVision Dispatch Server System. By default, the installation directory is C:Dispatch. 4. Restore the setup data to the new version of GV-Dispatch Server. A. Open the backup file of the setup data (XXX.exe). This window appears. B. Click Restore Remote AP and select Dispatch Server. The previous configuration settings are restored. GeoVision Inc. 12 Revision Date: 2010/6/17
  • 13. 5. Restore the account database to the new version of GV-Dispatch Server. A. Start the GV-Dispatch Server. B. Click the Account icon. This window appears. C. Select Import, and locate the backup file of the account database. The previous account database is restored (XXX.abb). 6. Restart the GV-Dispatch Server. The version upgrade is complete. Note: You may not upgrade the GV-Dispatch Server by using the Software CD, but by using the upgrade or patch download link provided by GeoVision. In this case, you should locate related executive programs from folders to start. 1. To uninstall the current version of the USB Device driver and install the new version, run GvUsb.exe. 2. To install the latest version of GV-Dispatch Server, run setup.exe. GeoVision Inc. 13 Revision Date: 2010/6/17
  • 14. 4. Upgrading the GV-Control Center Applied to GV-Control Center Version 8.3 and later Backing up the Current Configuration Settings 1. Install the Fast Backup and Restore Main System from the CMS Software DVD and start the program. This window appears. 2. Click Backup Remote AP Settings and select Control Center Server. This window appears. 3. Click , and then specify the storage path for the backup file. The file name will be XXX.exe. GeoVision Inc. 14 Revision Date: 2010/6/17
  • 15. Backing up the Current Host Database 1. Start the GV-Control Center. 2. Click the Configure icon. This window appears. 3. Select Export Data. This window appears. You can set up a password if necessary. Then Click OK. 4. Specify a storage path for the backup file. The file name is CtrCenter_Setup2010XXXX.ccb. GeoVision Inc. 15 Revision Date: 2010/6/17
  • 16. Installing the Latest Version and Restoring the Previous Host Database 1. Uninstall the current version of GV-Control Center. 2. Uninstall the current version of the USB Device driver and install the latest version of it. A. Insert the CMS Software DVD to the computer. This window appears. Select Install or Remove GeoVision GV-Series Driver. B. Select Install GeoVision USB Device Driver and select Remove. C. Select Install GeoVision USB Device Driver and select Install. GeoVision Inc. 16 Revision Date: 2010/6/17
  • 17. 3. To install the latest version of GV-Control Center, select Install GeoVision Vxxxx Central Monitoring System and then select GeoVision Control Center System. By default, the installation directory is C:Control Center. 4. Restore the setup data to the new version of GV-Control Center. A. Open the backup file of the setup data (XXX.exe). This window appears. B. Click Restore Remote AP and select Control Center Server. The previous configuration settings are restored. 5. Restore the host database to the new version of the GV-Control Center. A. Start the GV-Control Center. B. Click the Configure icon. This window appears. C. Select Import Data, and locate the backup file of the host database (CtrCenter_Setup2010XXXX.ccb). The previous host database is restored. 6. Restart the GV-Control Center. The version upgrade is complete. GeoVision Inc. 17 Revision Date: 2010/6/17
  • 18. Note: You may not upgrade the GV-Control Center by using the Software CD, but by using the upgrade or patch download link provided by GeoVision. In this case, you should locate related executive programs from folders to start. 1. To uninstall the current version of the USB Device driver and install the new version, run GvUsb.exe. 2. To install the latest version of GV-Control Center, run setup.exe. GeoVision Inc. 18 Revision Date: 2010/6/17