Sunset photography
•
0 recomendaciones•144 vistas

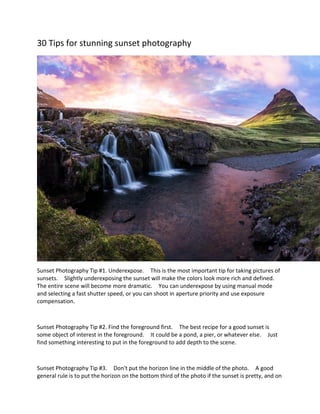
30 Tips for stunning sunset photography

Recomendados
Más contenido relacionado
La actualidad más candente
La actualidad más candente (20)
Similar a Sunset photography
Similar a Sunset photography (20)
Más de Leo Erwin Garcia
Más de Leo Erwin Garcia (20)
Último
Último (20)
Sunset photography
- 1. 30 Tips for stunning sunset photography Sunset Photography Tip #1. Underexpose. This is the most important tip for taking pictures of sunsets. Slightly underexposing the sunset will make the colors look more rich and defined. The entire scene will become more dramatic. You can underexpose by using manual mode and selecting a fast shutter speed, or you can shoot in aperture priority and use exposure compensation. Sunset Photography Tip #2. Find the foreground first. The best recipe for a good sunset is some object of interest in the foreground. It could be a pond, a pier, or whatever else. Just find something interesting to put in the foreground to add depth to the scene. Sunset Photography Tip #3. Don't put the horizon line in the middle of the photo. A good general rule is to put the horizon on the bottom third of the photo if the sunset is pretty, and on
- 2. the top third of the photo if the sunset is lackluster. Sunset Photography Tip #4. TURN AROUND! Sometimes the scene behind you can be gorgeous and all the photographers miss it because they are too busy looking at the sun. The sunset produces beautiful warm light and a beautiful scene might be bathing in that warm light behind you. Don't forget to look over your shoulder. Sunset Photography Tip #5. Shoot in aperture priority with exposure compensation while the sun is still in the sky, and then switch to manual once the sun dips below the horizon. This will allow you to have the convenience of shooting in aperture priority as the light levels change quickly before sunset, and then you can switch to manual mode to get a more precise exposure after the sun goes down. In low light settings, the exposure meter on your camera will often be innaccurate, so manual mode after sunset is the best option. Sunset Photography Tip #6. Stay longer. The sky will usually light up with color again about 25 minutes after the sun dips below the horizon. Most photographers miss this second sunset,
- 3. and it's more beautiful than the first most of the time! Sunset Photography Tip #7. Create silhouettes in the foreground. Just speed up your shutter speed and you'll have a silhouette. The key to taking a good silhouette shot is to find a subject with fine details that will let the sun shine through it and that has a recognizable shape. If you have something too huge as the silhouette, it takes away from the picture since it is just a large area of blackness. Sunset Photography Tip #8. Ditch auto white balance for once. Change the white balance to “shade” and you'll get beautiful golden tones out of an otherwise lackluster sunset. Sunset Photography Tip #9. Before the sun dips below the horizon, consider shooting in HDR to capture most of the dynamic range. Sunset Photography Tip #10. Wait for the right clouds. The ideal conditions are a partly cloudy day with spotty clouds. When the clouds are just a flat gray sheet of cloud (one of you will surely know what type of cloud this is and inform me in a comment below), it will not light up as much. Wait for patchy whispy clouds. Sunset Photography Tip #11. Consider shooting panoramas or vertoramas to contrast the sunset colors with the other colors of the sky.
- 4. Sunset Photography Tip #12. Before the sun actually sets, stop down your lens's aperture to a high value such as f/22. This will make the rays of the sun more clear. It will give the sun a starburst effect. Very cool. Sunset Photography Tip #13. Ditch the filters. Yes, that includes. the polarizer. Polarizers will NOT help saturate the colors in a sunset. This is a topic I wrote about a few weeks ago. Go check out that post for more info. Also, UV filters are discouraged all of the time, but they should be outright forbidden when shooting sunsets. The extra flat piece of glass–which is often not coated–will cut the saturation (richness of colors) and contrast of your sunset photos. Sunset Photography Tip #14. Take off your sunglasses. I promise if you forget to take off your sunglasses, you'll think the photos are all darker than they really are because the LCD will look unnaturally dark. If you forget, you'll kick yourself when you look at the photos on the computer. Sunset Photography Tip #15. Don't get so carried away at looking at the pretty clouds that you get buck fever and focus on the clouds. Remember that, for most landscape photos, the proper focus point should be one third the way up from the bottom of the photo. This is a rough approximation of the hyperfocal distance. Sunset Photography Tip #16. Shoot RAW. I know you've heard it before, but sunsets are a time where this is especially important. There is a wealth of delicate light information in a sunset that is simply thrown in the trash if you shoot JPEG. Don't shoot yourself in the foot. Sunset Photography Tip #17. Look for objects which are reflecting the sunset colors. Perhaps it is a building behind you, or a car windshield, or a still body of water, etc. With the reflection, you can incorporate it into the larger landscape or just make it a photo of its own. Sunset Photography Tip #18. The best sunsets seem to happen on the evening of a rainy day. If the clouds start to break up at all around sunset, grab your camera and head out. Just trust me on this one. Sunset Photography Tip #19. Make sure to use a little flash if you're shooting a portrait of someone standing in front of a sunset. Otherwise their face will look dark and muddy. Sunset Photography Tip #20. If you want the sun to look large in the sunset, use a telephoto lens. If you want the sun to look small in the scene, use a wide-angle lens.
- 5. Sunset Photography Tip #21. Don't forget to change your picture style. This can be changed afterward if you shoot in RAW, but if you shoot JPEG, you'll definitely want to use the landscape picture style (Canon) or picture control (Nikon). Sunset Photography Tip #22. Watch out for birds! Including a few flying birds in the sky can really add interest to a landscape. Sunset Photography Tip #23. When the sun is still up, the bright light in front of you may make your LCD appear darker than it really is. The same is true for the “second sunset” which happens 20 minutes after the sun actually sets. When it is darker at this time, you might think your images are brighter than they really are. Because of the varying light conditions that occur when shooting sunsets, it is best to trust the histogram rather than the LCD. Don't delete until you can view the images on your computer. Sunset Photography Tip #24. Don't get tricked into using the sunset icon on your mode dial. That is an automatic mode and will take away your ability to choose a creative aperture, shutter
- 6. speed, etc. Sunset Photography Tip #25. Download a good sunrise/sunset app for your phone. Just search in your smartphone's app store and get a free app that will give you a calendar of sunrise and sunset times. Never miss a sunset again! Sunset Photography Tip #26. No mistake you make in shooting a sunset will be as obvious as an uneven horizon line. Use the bubble level on your ballhead or the electronic level on some newer DSLRs to make sure the horizon is straight. Sunset Photography Tip #27. If you're shooting a portrait of someone standing in front of a sunset, be careful where you place the horizon line. It always looks awkward when the horizon line is placed at the level of the neck of the subject. You're usually safer putting the horizon line around the person's tummy or chest area. Sunset Photography Tip #28. Make sure to clean your lens and sensor! Dust spots will be obvious when viewed against the bright sky when you're stopped down to high aperture values. Sunset Photography Tip #29. Use a graduated neutral density filter to darken the sky and allow the camera to get enough light to expose the landscape. The darkening of the sky will also add color to the scene. Sunset Photography Tip #30. Watch for Reflections! The photo above shows me holding the cover of Shutterbug Magazine where I was lucky enough to get the cover shot. Shooting that picture, there wasn't that much color in the sky, but it was just enough to bathe the water in the foreground in a little color that made the photo feel rich and interesting. Always look for ways you can reflect the sunset colors, which makes it feel like you had more of a sunset than you really did.