
Recomendados
Recomendados
Más contenido relacionado
Similar a Geo Chat Technical UserGuide
Similar a Geo Chat Technical UserGuide (20)
Último
Último (20)
Geo Chat Technical UserGuide
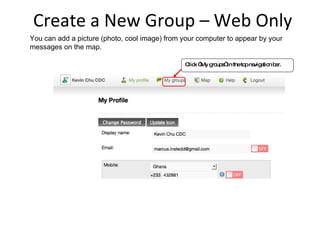
- 1. Create a New Group – Web Only You can add a picture (photo, cool image) from your computer to appear by your messages on the map. Click “My groups” in the top navigation bar.
- 2. Create a New Group – Web Only Create a new group by clicking on “Create new Group” at the left of the page (below the names of the groups you have created). Click “Create New Group” in the left panel.
- 3. Create a New Group (web only) Now, fill in information about your group (more to come!). Name : A name to describe your group. For example, “Kenyan Rapid Response Team” or “Bukoba Women’s Leadership Team.” Description : A short description of the purpose of the group or describing the team’s role. Group Alias : A very short version of the name of your group, for example “KRRT” (a short way of saying “Kenyan Rapid Response Team”). Users will have to enter this Group Alias in their phones, so make it simple to type in, short and with no spaces.
- 4. Create a Group – Location Select a location for the group. To set the default group location, 1.Enter a city name or address in the “Address” tab OR 2.A latitude or longitude (if you have them) in the Decimal or DMS OR 3. Find the correct location on the map and Right-Click that spot to mark the location of the group. 4. Click “Find” What does default location mean? This location (called “default”) is where group members will appear on the map if their location can’t be determined by any means. For example, you can put the default location in your capital city, headquarter offices, or in the approximate location of the activity of the group (ex: Kenya Rapid Response Team default location is Nairobi, Kenya). .
- 5. Create a Group – Describe Interaction Decide how the group will interact (will their messages go to everyone?). Hide this group from searches and listings : Selecting this option will make your group invisible in the public list of groups. Only members will see it appear, and you will have to let other people know the group exists if you want them to join. Leaving this unselected will let your group appear on the public listing, making it easier to find and join. This group requires approval to join : If you select this option users who want to join will have to ‘apply’ to join the group and an administrator will have to approve them into the group. If the option is unselected, other people can join the group without waiting for an administrator to approve their membership. Make this group a chatroom : Selecting this option will make group members receive all of other members’ updates, making it easy to allow anyone to talk with anyone. Leaving this option unselected will allow everyone to send messages, but they will only be viewed on the mobile phone of the group creator. Anyone with access to the map can view all the messages and reply from the map . Read this one carefully. GeoChat is most useful if everyone in the group can see all of the messages, so as a Chatroom.
- 7. Create a Group – Add Members Invite people to join the group. There are two ways to invite people to join GeoChat: from the website or from their phone. From the web (shown here), you can only ADD people who have a GeoChat account. Add Members : 1. Start by searching for a GeoChat user’s name in the ‘add member’ box. You can search by family or given name or both. If you know a user has an account and you cannot find them, try a few different forms of their name. 2. Click “Search” after entering their name. 3. Members with that name will appear below. Invite this person. Now that you have found the GeoChat user, you can invite them to join the group by clicking “invite this person.” The message includes the name of your group. You can add more information but keep it short because it will be sent as a text message.
- 9. View Messages on Map Filters : click here to display all the groups of which you are a member. the groups you want to view on the map. Messages : On the left panel are all of the messages coming into GeoChat from all the groups you have above , with the most recent at the top. To view messages, select the group(s) you want to view on the map. Those messages will appear in the lower left panel. Which group? At the bottom of each message, it tells you WHEN the message was sent and from which group it was sent.
- 10. View Messages on Map (A) Click on a message and a bubble will open and the most recent messages from that person will open in a bubble. You can view the messages from one person by clicking on their message on the left panel (A) or by clicking on their icon on the map (B). (B) Click on their icon (the icon covers a small pin so sometimes you need to get the click right in the middle of the picture. Watch for the “hand”). All the messages from that person in that location will open in a bubble.
- 11. View Messages on Map You can also search and sort the messages for specific words such as “water” or “diarrhea.” Here we searched for a project called “Riff.” 1. Go to “Search inbox” box on the left panel 2. Enter your search term. We searched for a project called “Riff.” 4. All messages with the search word appear below. See the word “Riff” in each message. 3. Click the microscope icon.
- 14. Mobile…
- 15. Mobile: Join Look up the GeoChat number for each telecom provider by country. Find the GeoChat mobile number for your country and telecom carrier from the GeoChat Help link or directly at: http://geochat.instedd.org/Home/SharedGateways One country can have more than one number, depending on the carrier. Here Albania has 2 numbers, one for each local carrier.
- 16. Mobile: Test GeoChat Enter the designated GeoChat phone number. Remember to start the number with a +. Test the GeoChat phone number by sending a test message: #ping Send the message “#ping” to test GeoChat. Wait for a reply to confirm the number works for your phone.
- 17. Mobile: Join a Group Create a group on the GeoChat website. Ask group members to join from their mobile phones with their name and the group name. Send: “ DISPLAY NAME*GROUP NAME” (example: paul zula*foi) If you already belong to GeoChat, send #join GROUPNAME (example #join FOI) Display Name (ex: Paul Zula)– the name that will appear before each message you send. Make sure your team can recognize you with this name. Group name (ex: FOI, for Friends of InSTEDD) – enter the short version of the group name (called “group alias” on the website.
- 18. Mobile: Give Location GeoChat puts every message sent by phone onto the map. To see where you are, send in a message with your Town Name. Send: AT “LOCATION” [no quotes] Enter your full address, village, country, LAT*LONG, whatever. It will appear on the map if that location is listed in our combination atlas (Google Maps, etc). Include your country if the town name is likely to appear in many countries (ex: at bristol, england) Messages now appear in GeoChat at that location (ex: Ed’s messages are now shown in Phnom Penh)
- 19. Mobile: Send Messages! Now you can start sending messages. You can just send messages! That’s it.