
Recomendados
Recomendados
Más contenido relacionado
La actualidad más candente
La actualidad más candente (20)
Destacado
Similar a Git Tutorial EclipseCon France 2014 - Git Exercise 01 - installation and configuration
Similar a Git Tutorial EclipseCon France 2014 - Git Exercise 01 - installation and configuration (20)
Más de msohn
Más de msohn (20)
Último
Último (20)
Git Tutorial EclipseCon France 2014 - Git Exercise 01 - installation and configuration
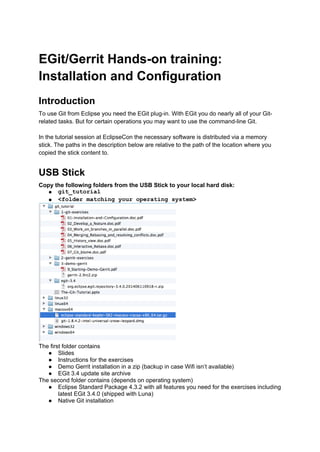
- 1. EGit/Gerrit Hands-on training: Installation and Configuration Introduction To use Git from Eclipse you need the EGit plug-in. With EGit you do nearly all of your Git- related tasks. But for certain operations you may want to use the command-line Git. In the tutorial session at EclipseCon the necessary software is distributed via a memory stick. The paths in the description below are relative to the path of the location where you copied the stick content to. USB Stick Copy the following folders from the USB Stick to your local hard disk: ● git_tutorial ● <folder matching your operating system> The first folder contains ● Slides ● Instructions for the exercises ● Demo Gerrit installation in a zip (backup in case Wifi isn’t available) ● EGit 3.4 update site archive The second folder contains (depends on operating system) ● Eclipse Standard Package 4.3.2 with all features you need for the exercises including latest EGit 3.4.0 (shipped with Luna) ● Native Git installation
- 2. Install Eclipse Packages (with pre-installed features) To save time we created Eclipse Standard 4.3.2 packages with all needed features pre- installed: ● EGit / JGit : all features, 3.4 Take them from your copy of the USB stick. Simply unpack the package and start Eclipse using eclipse/eclipse, if necessary you may need to adjust permGen and maximum heap size in the eclipse.ini file. In case there is a problem with the package for your platform you may try to use an existing Eclipse installation and install EGit into it as described in the next section. Manual EGit Installation (Backup) To install EGit into an existing Eclipse installation (anything from 3.8 to 4.4 should work) follow this section. For the sample project you will need an Eclipse installation having JDT and PDE. Install it from the following p2 repository archive on the USB stick: ● click “Archive…” and select local path to the archive on the memory stick: ○ <stick>/git-tutorial/egit-3.4/ org.eclipse.egit.repository-3.4.0.201406110918-r.zip and install all features ● If you are preparing an Eclipse installation before the training you may install EGit 3.4 from http://download.eclipse.org/egit/updates-3.4
- 3. Installing native Git (optional) All exercises in this tutorial can be done with EGit so you may skip installing native git. If you want to try native Git you may use it on the same repository you are working on with EGit. In case you want to use native Git for some reason here short instructions how to install it 1. Install command line git If you install prior to EclipseCon session go to http://git-scm.com/download to find the installation matching your operating system. During EclipseCon session the installations will be provided on a memory stick. a. Linux: install git using your favorite package manager b. Mac: install git from <stick>/mac-64/git-1.8.4.2-intel-universal-snow- leopard.dmg c. Windows: Install msysgit from <stick>/windows*/Git-1.9.4- preview20140611.exe During the installation leave all the options to their defaults besides the installation directory. Registration and Configuration 1. Eclipse User Account needed to use Gerrit server at Eclipse In order to contribute to any Gerrit hosted repository you need an Eclipse user account. If you are an Eclipse committer or if you can logon to Eclipse sites like forums (http://www.eclipse.org/forums), Bugzilla (https://bugs.eclipse.org/bugs), Wiki (http://wiki.eclipse.org/) you already have an Eclipse account. ○ If you forgot your password visit the registration page (https://dev.eclipse.org/ site_login/createaccount.php) to change it ○ Otherwise go to the registration page (https://dev.eclipse.org/site_login/ createaccount.php) and register for a new account. 1. Sign the Contributor agreement Before your first contribution can be accepted, you need to electronically sign the Eclipse Foundation Contributor License Agreement (CLA). You only have to do this once, and it covers all Eclipse projects. ○ Log into the Eclipse projects forge; ○ Click on "Contributor License Agreement"; and ○ Complete the form. 2. Register to Gerrit ○ Logon to https://git.eclipse.org/r/ using the registered email address and password ○ Note down the username; you will need it for Git access
- 4. ○ Visit https://git.eclipse.org/r/#/settings/projects and configure a watch for project “sandbox/egit-training”. Afterwards you can use the “My > Watched Changes” link to get a list for changes pending in code review for the projects you are watching. URLs for the Example Repository used in this Training
- 5. This section contains a list of useful URLs. You do not need to check them now. The exercises also contain the necessary URLs. URLs for Eclipse Gerrit server on git.eclipse.org: Browser access ○ Gerrit WebUI : https://git.eclipse.org/r/ ○ use email address and password of your Eclipse account to logon ○ Browsing Git online using cgit: http://git.eclipse.org/c/sandbox/egit-training.git/ Git access ○ HTTPS protocol: https://git.eclipse.org/r/sandbox/egit-training.git ○ find your username here https://git.eclipse.org/r/#/settings/ ○ generate the HTTP password here https://git.eclipse.org/r/#/settings/http-password ○ find your username here https://git.eclipse.org/r/#/settings/ ○ if necessary generate a ssh key pair and upload the public ssh key to https://git.eclipse.org/r/#/settings/ssh-keys Build jobs ○ a verification build job is verifying all changes pushed for review, find the verification build job here: https://hudson.eclipse.org/egit/job/egit-training.gerrit/ ○ Feel free to configure Mylyn Builds to watch the build job If the network is down or slow or you are offline you may run a pre-configured demo Gerrit locally. In that case first go through the instructions “3-demo-gerrit/ 9_Starting-Demo-Gerrit” and then come back to this exercise. If you do the exercises using the local demo Gerrit the URLs for git communication with Gerrit are different: ○ HTTP protocol: http://localhost:8080/egit-training.git ○ Gerrit WebUI is then reachable under : http://localhost:8080/ ○ there is no GitWeb included in the demo Gerrit installation ○ there is no Hudson included with the demo Gerrit EGit Configuration ○ Windows only: HOME environment variable (if not set EGit will ask when you use EGit for the first time). Please check if it is set to your user home directory.
- 6. ○ Hint: Git needs to know who (user & email) commits to a repository. Don’t worry: when EGit needs this information for the first time it will ask you. Communication Protocols Git supports many communication protocols, for this tutorial we choose HTTP (section 4. below). This choices provide both read and write access using the same URL to the central example repository hosted on Gerrit running on git.eclipse.org . HTTP configuration ○ open https://git.eclipse.org/r/#/settings/http-password and click Generate Password to generate your HTTP password ○ you may then communicate over HTTP using the URL https://git.eclipse.org/r/ p/sandbox/egit-training.git and the credentials given on https://git.eclipse.org/ r/#/settings/http-password Result
- 7. It is crucial to check that your HTTP configuration is correct. To ensure that try to clone the example repository. You will need this repository to continue with the following exercises. Clone the example repository and import projects into Eclipse ● Open the “Git Repositories” view: Window > Show View > Other > Git > Git Repositories ● Click Clone a Git repository in the git repositories view. ● Enter the URL https://git.eclipse.org/r/sandbox/egit-training and click Next.
- 8. ● Click Next. You should see some branch names in the next dialog. Make sure all shown branches are selected. ● Click Next. In the “Directory” field, choose a path where to store the local repository. The default path can be configured in Preferences > Team > Git in the field “Default Repository folder” ● Make sure the “Import all existing projects after clone finishes” checkbox is selected ● Click Finish
- 9. Configure Gerrit When you use Gerrit as a server for the central repository you need some configuration settings of your local repository. ● Normally do not directly push to the branch on the remote repository but into the review queue. Before you push to Gerrit you have to configure that once for your local repository. ● You may need another URL. This is not the case in our training setup. ● You should push changes with a change-ID line in the commit message. You can configure the local repository such that EGit will always create a Change-ID. ● You may want to fetch the review notes from Gerrit (More details in another exercise). Gerrit configuration wizard Open the node “Remotes” of your repository in the Git Repositories View. Select Gerrit Configuration… on “origin” You can keep the default values in the Wizard page:
- 10. Resulting Repository Configuration You can check the result in the Configuration of the local repository. Select Properties on the repository node in the Git Repositories View. Get Familiar with the Example Project ● The example repository contains two projects. ○ org.eclipse.example.calc: contains a simple calculator ○ org.eclipse.example.calc.test:contains unit tests ○ Both projects contain launch configurations. Use them to start the calculator or run the unit tests. Note that for Mac there is a specific launch configuration (with the “Mac” in the name). ● You may browse the central example repository using cgit at: http://git.eclipse.org/c/sandbox/egit-training.git/ Additional EGit configuration and useful views
- 11. EGit Documentation The EGit user guide is bundled with the EGit feature, invoke it via Help > Help Contents > EGit Documentation. Git Workbench Toolbar and Menu In order to simplify usage of the most frequently used Git actions the Git Command Group can be activated to show a Git Workbench Toolbar and/or Menu ● right-click in the workbench toolbar area and click Customize perspective... , or, on a Mac, select Window -> Customize Perspective ● in the tab Command Groups Availability click Git, this will enable both the Git workbench toolbar and menu ● in the tabs Toolbar Visibility and Menu Visibility you may configure which actions should appear in the Git Workbench toolbar and menu Repositories View To get an overview on your git repositories open the Git Repositories View.
- 12. Select the example project and click Show in > Git Repositories Under Remotes > origin you see the fetch and the just created push configuration. To see the details select the URL and click Open Properties View. To see the complete repository configuration, click the same menu entry on the repository node. History View To browse the history of the repository, open the History View: On the repository node in the Git Repositories View click Show in History. Best you arrange the Repositories View and the History View next to each other, as shown below. Copyright © 2014 by S. Lay, M. Sohn