Beginners Guide to TikTok for Search - Rachel Pearson - We are Tilt __ Bright...
Blog using Blogger
1. 1
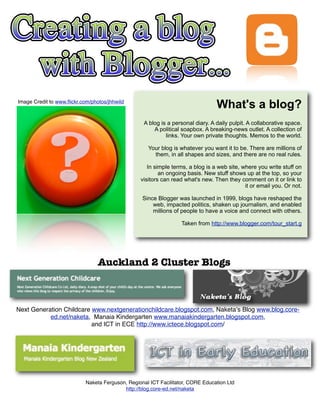
Image Credit to www.flickr.com/photos/jhhwild
What's a blog?
A blog is a personal diary. A daily pulpit. A collaborative space.
A political soapbox. A breaking-news outlet. A collection of
links. Your own private thoughts. Memos to the world.
Your blog is whatever you want it to be. There are millions of
them, in all shapes and sizes, and there are no real rules.
In simple terms, a blog is a web site, where you write stuff on
an ongoing basis. New stuff shows up at the top, so your
visitors can read what's new. Then they comment on it or link to
it or email you. Or not.
Since Blogger was launched in 1999, blogs have reshaped the
web, impacted politics, shaken up journalism, and enabled
millions of people to have a voice and connect with others.
Taken from http://www.blogger.com/tour_start.g
Auckland 2 Cluster Blogs
Next Generation Childcare www.nextgenerationchildcare.blogspot.com, Naketaʼs Blog www.blog.core-
ed.net/naketa, Manaia Kindergarten www.manaiakindergarten.blogspot.com,
and ICT in ECE http://www.ictece.blogspot.com/
Naketa Ferguson, Regional ICT Facilitator, CORE Education Ltd
http://blog.core-ed.net/naketa
2. 2
Why blog?
“A blog gives you your own voice on the web. It's a place to collect and share things that you find
interesting— whether it's your political commentary, a personal diary, or links to web sites you want to
remember. Many people use a blog just to organize their own thoughts, while others command
influential, worldwide audiences of thousands. Professional and amateur journalists use blogs to
publish breaking news, while personal journalers reveal inner thoughts” taken from Blogger.com
Before you consider creating a blog there are a number of things you should take into consideration.
For me the most important aspect is the ʻpurposeʼ of creating a blog? Why are you creating it? The
reasons for creating a blog are varied, from daily documentation, communication with parents,
reflective journals and e-portfolios. To get an idea of different uses take the time to explore blogs on
different topics. You can search within blogger to find a wide variety of blogs or for educational blogs
in New Zealand visit you will find some here http://www.nz-interface.co.nz/blog/.
Secondly, you will need to think about permissions and consent. How will you seek permission of
teachers, students, parents and whānau? Will you upload video, images, writing? When you do
acquire parent permission to use images and video on the blog are you comfortable that they have
made their decision based on all the information i.e. informed consent. For further information on
Cybersafety visit http://www.netsafe.org.nz.
Along with these key aspects think about who will contribute to the blog? What systems will you put in
place to ensure the blog is regularly updated? Will you make it private or open to the public?
Getting Started
Blogger is a product of Google so
if you have a Google Account you
can sign in using your existing
Google details. However, if you do
not have a Google Account you
will have to create one before
starting your new blog.
Google Account
If you do not have a Google Account you will have to sign up for
one. Having a Google Account allows you to use a number of
applications including Google Docs for collaborative documents,
Gmail for Emails, Picassa for photos and a whole lot more...
Naketa Ferguson, Regional ICT Facilitator, CORE Education Ltd
http://blog.core-ed.net/naketa
3. 3
Signing up
Now you will have to accept the
terms and condition of using Blogger
and create a Display Name. I use
‘Naketa’ other people use
pseudonyms. The choice is entirely
yours. Type in your display name
and click on the orange arrow to
continue.
Name your blog
Now its time to name your blog. Giving your blog a title can be
a difficult task but remember you can always delete your blog
later on if it doesn’t suit your purpose. I have a blog called
“Naketa’s Photo a Day blog”, some of my centres have “Manaia
Kindergarten” or “Next Generation” again the choice is entirely
yours. You will also have to think about a url address i.e.
naketa.blogspot.com or imsocool.blogspot.com. However,
popular ones like that could already be taken, check availability
to make sure. When you have done that ...click on Continue.
Naketa Ferguson, Regional ICT Facilitator, CORE Education Ltd
http://blog.core-ed.net/naketa
4. 4
Choosing a
background
Like any website you have the
option to personalise the look
and feel of your blog. Blogger
allows you to personalise the
colours and format of your blog.
They provide a number of
options for you to choose from.
You can test them out before
committing to a certain one by
pressing the ‘Preview template’
link at the bottom of each style.
and you always have the option
to change the colours, fonts,
headers and template later on.
Click continue!
You’ve got a Blog!!
You will then be taken to a page that says that you
blog has been created. Click on the ‘Start Blogging’
arrow.
Naketa Ferguson, Regional ICT Facilitator, CORE Education Ltd
http://blog.core-ed.net/naketa
5. 5
Your 1st post...
Now you can post things to your new blog. In the posting tab you
will find everything you need to write and personalise your text,
upload images and video, add labels, publish and save your
posts.
Type your title here. Ensure
your title is relevant to your Preview your post
content and short and at anytime to get an
sharp to capture the idea on what it will
readers attention. look like published.
Create your posts in this
section. You can use a
variety of images, video
and text inside one post.
Use labels to easily
identify the content
of your post. On
the main page you
can use labels to
find all the posts
about teachers,
blue etc.
Depending on the
labels you choose.
You can use the ‘Save
Now’ button to revisit posts
‘Publish post’ will process and publish at a later date.
your work and publish
straight to the blog.
Quote marks for
text, these look
quite effective
Enlarge or reduce file when quoting
size and change font Font alignment another source. Upload video
format. Change font colour
Italics and Bold Numbers and
bullets
Hyperlink text Upload image
Naketa Ferguson, Regional ICT Facilitator, CORE Education Ltd
http://blog.core-ed.net/naketa
6. Adding an image to your blog 6
You can add 1 to 5 images at any one time. Ensure you have
copyright to use these images on your blog. If you have the
image under a creative commons license ensure you give full
credit to the owner of the image.
Type your title
Click on add image icon
Click on browse and
search for your image A window like this will
on your computer. appear for you to find
the image.
Sometimes placing
the images you want
to use on the desktop
makes it a much
easier process. Click
open when you find
the one you want
Choose where you want
the image to sit
Once you have chosen
your images click
“upload image”. This
may take a while if the
A window like this will
files are large.
appear when your
images are uploaded.
Click ‘done’ which will
take you back to your
post.
Naketa Ferguson, Regional ICT Facilitator, CORE Education Ltd
http://blog.core-ed.net/naketa
7. 7
Continue writing your post and preview to
ensure it looks the way you want to.
When you have completed this “Publish
Post”.
“View Blog” to see what everyone else will
see when they visit your blog. If you find
that you would like to make changes find the
pencil on the bottom right hand corner and
make your changes. Push publish post to
save again.
Edit posts using this icon
Naketa Ferguson, Regional ICT Facilitator, CORE Education Ltd
http://blog.core-ed.net/naketa
8. 8
Adding a video to your blog
You can add video to your blog in a variety of ways. You can add
them from your computer, or use an HTML code to embed video
from websites such as Youtube, Animoto or Slideshare.
Click on add video icon
Type your title
Click on browse to find the
video in your computer.
Click on open when you
have found your video.
Name your video
By ticking this box you agree
that the video does not
contain obscene materials
and you have full copyright of
its content. Even background
music to the video needs to
be copyright free.
Upload your video. You
will not be able to continue
unless you have ticked the
terms and conditions box.
Naketa Ferguson, Regional ICT Facilitator, CORE Education Ltd
http://blog.core-ed.net/naketa
9. 9
A window like this will appear when you have
clicked on “upload video”. This takes a long time
especially if the files are large in size.
Once the movie is uploaded your video will appear
like this one shown to the right. Only then will you
be able to “publish post” or “save”. You can still add
images and text to your post.
Video looks like this when it is posted to the blog.
Naketa Ferguson, Regional ICT Facilitator, CORE Education Ltd
http://blog.core-ed.net/naketa
10. 10
To add video from external sites like Youtube find
the video you like. You will see on all “embeddable”
videos an ‘embed code’.
Copy the entire HTML code.
Go back to your blog post and paste the entire
code. Then push publish post,
The video will appear in your blog like the one
shown to the left. You can get embed codes from
the following sites:
http://www.youtube.com/
http://www.slideshare.net/
http://www.edtalks.org
http://www.ted.com/
http://animoto.com/
Plus so much more....
Naketa Ferguson, Regional ICT Facilitator, CORE Education Ltd
http://blog.core-ed.net/naketa
11. 11
Other backgrounds
I use a theme from TheCutestBlogontheBlock.com. They have
heaps of different looking backgrounds that are quick and easy to
install on your Blogger blog.
To use a background from ‘The cutest Blog on the Block’, search
through the styles and templates listed. When you have found
one you like click on the template. Scroll half way down the page
to find the HTML code.
Copy this code by dragging your mouse and scrolling
from top to bottom. Go back to your blog. If you are
signed in you will see ‘Customize” on the top right
corner of your blog.
Add and Arrange Elements allows you to add a
number of gadgets on the side bar of your blog
including Labels, Widgets, Blog feeds and images etc.
Click on “Add Gadget”.
Naketa Ferguson, Regional ICT Facilitator, CORE Education Ltd
http://blog.core-ed.net/naketa
12. 12
Click on the plus sign next to the “HTML/Java Script”
gadget. A window like the one to the right will appear.
Copy and paste the code and push save. Your
background will appear when you press ‘View Blog’.
Naketa Ferguson, Regional ICT Facilitator, CORE Education Ltd
http://blog.core-ed.net/naketa