
Recomendados
Más contenido relacionado
Similar a Papilio junior v2
Similar a Papilio junior v2 (20)
Papilio junior v2
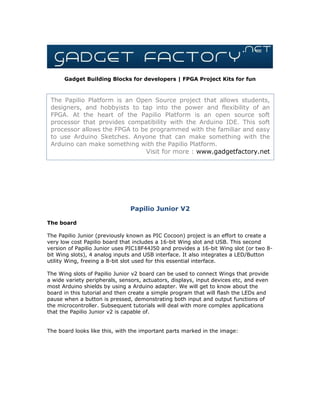
- 1. Gadget Building Blocks for developers | FPGA Project Kits for fun The Papilio Platform is an Open Source project that allows students, designers, and hobbyists to tap into the power and flexibility of an FPGA. At the heart of the Papilio Platform is an open source soft processor that provides compatibility with the Arduino IDE. This soft processor allows the FPGA to be programmed with the familiar and easy to use Arduino Sketches. Anyone that can make something with the Arduino can make something with the Papilio Platform. Visit for more : www.gadgetfactory.net Papilio Junior V2 The board The Papilio Junior (previously known as PIC Cocoon) project is an effort to create a very low cost Papilio board that includes a 16-bit Wing slot and USB. This second version of Papilio Junior uses PIC18F44J50 and provides a 16-bit Wing slot (or two 8- bit Wing slots), 4 analog inputs and USB interface. It also integrates a LED/Button utility Wing, freeing a 8-bit slot used for this essential interface. The Wing slots of Papilio Junior v2 board can be used to connect Wings that provide a wide variety peripherals, sensors, actuators, displays, input devices etc, and even most Arduino shields by using a Arduino adapter. We will get to know about the board in this tutorial and then create a simple program that will flash the LEDs and pause when a button is pressed, demonstrating both input and output functions of the microcontroller. Subsequent tutorials will deal with more complex applications that the Papilio Junior v2 is capable of. The board looks like this, with the important parts marked in the image:
- 2. 1. USB connector: Provides USB link to the PC and supplies power to the board. If your application does not use connection to the PC and can be powered from the adapter, the USB cable need not be used. 2. DC power Jack: Additional power source for non-connected, stand-alone applications. Use a good quality regulated 5V DC adapter. 3. Power source selection jumper: Select between USB power or wall-adapter. 4. PICkit2 header: You can use the Microchip PICkit2 programmer to rewrite the entire device, not needed if you are using the bootloader. 5. Boot Mode jumper: The bootloader reads this jumper to switch to bootloader mode, else simply starts your application. 6. Reset button: Simple, resets the controller. 7. LED/Button interface: One always needs some way to interact with the program, a frequently needed interface - the LED/Button Wing is integrated on the board, saving you one 8-bit Wing slot. It has 4 tactile switches and 4 LEDs that you can define any way you like in your application.
- 3. 8. Wing slots: These are connectors that connect that Papilio Wings to provide additional functionality to the microcontroller. 9. Analog header: Provides 6 analog inputs 10. The PIC18F44J50: The main controller, runs with a 8 MHz crystal and is configured to work at 24 MHz. The USB section of the controller runs at 48 MHz. The essentials The Papilio Junior v2 support software is written in C, using the Microchip MPLAB IDE and C18 compiler. You can download the MPLAB IDE, as well as trial version of the C18 compiler. The trial version won't expire and won't stop working, it will just turn off the optimizations after 60 days, which may result in a bit larger and/or slower programs. You may want to purchase the compiler after the evaluation period is over. You will also need the Microchip HID bootloader updated to work with the Papilio Junior v2, and the demo programs available on the development pages. Here are the links to everything you would need: Microchip MPLAB IDE Microchip C18 compiler (requires registration, you may select a version that suits your interest) Microchip Application Libraries (that contain USB framework and the HID bootloader application) Project SVN Updated HID bootloader for Papilio Junior v2 and Demo applications You will also need a standard USB-A to mini-USB cable. Note: Please install the MPLAB IDE before the C18 compiler. You don't need the USB framework right away, but we will be using it in more advanced tutorials. Wing slots There is one 16-bit slot (or two 8-bit slots) which is defined on the silkscreen. There is another 16-bit slot adjacent to it, but it is NOT a different slot. These is just a mirrored slot provided to facilitate using multiple wings, especially that are larger in size and may not allow the neighbouring 8-bit slot to be populated. You can simply turn the Wing around and connect it to the mirror slot on the other side. Of course, the connections will also be mirrored and you must update the code accordingly. To simplify these definitions, the two Wings are named as 'A' and 'B' respectively. Again, these NOT different Wings. The 16-bit wing slot is split into two 8-bit wing slots, lower slots with pins 0-7 and higher slot with pins 8-15. Thus, there are 4 wing slots AL, AH and BL, BH oriented in opposite directions.
- 4. The microcontroller pins are mapped to the Wing slots as follows: 16 bit slots 8-bit slots RP pin MCU Port pin A B AH/AL BH/BL A0 B15 AL0 BH7 RP17 RC6 A1 B14 AL1 BH6 RP18 RC7 A2 B13 AL2 BH5 RP21 RD4 A3 B12 AL3 BH4 RP22 RD5 A4 B11 AL4 BH3 RP23 RD6 A5 B10 AL5 BH2 RP24 RD7 A6 B9 AL6 BH1 RP3 RB0 A7 B8 AL7 BH0 RP4 RB1 A8 B7 AH0 BL7 RP5 RB2 A9 B6 AH1 BL6 RP6 RB3 A10 B5 AH2 BL5 RP7 RB4 A11 B4 AH3 BL4 RP8 RB5 A12 B3 AH4 BL3 RP9 RB6 A13 B2 AH5 BL2 RP10 RB7 A14 B1 AH6 BL1 RP0 RA0 A15 B0 AH7 BL0 RP1 RA1 The orientation of the Wing slots is depicated on the board silkscreen. To allow source level compatibility, all Papilio Junior versions provide header files that define the wing pins and functions to configure and manipulate them so that you don' t need to use actual port/pin names in your source code. The above table shows different names of the same physical pin on the wing slot. For example, the pin A0 or B15 on 16-bit slots or pin AL0 or BH7 on 8-bit slots are same physical pins, that are referred to as remappable pin 17 by the microcontroller, that is also its GPIO pin 6 of I/O port C. To avoid confusion, one should use correct name of the pin according to the context. For example if you are using a 8-bit Wing, you can simply refer to its slot as AL or AH or BL or BH and then address its individual pins. You may not need to use Microchip names for these pins at all. Here are a few tutorials to help you get started with the Papilio Junior v2: 1 Getting Started With Papilio Junior v2 2 First program on the Papilio Junior v2 3 Using 1-axis Stepper Wing with Papilio Junior v2
- 5. 4 PapilioJr2CDCcomms 5 SensorsWithPapilioJr2 6 PapilioJr2TempMonitor 7 UsingArduinoAdapterWithPapilioJr2