SlideShare una empresa de Scribd logo
1 de 3
Descargar para leer sin conexión
COURSE	
  COPY	
   1	


Open	
  the	
  course	
  that	
  you	
  wish	
  to	
  copy	
  to	
  (start	
  at	
  the	
  destination).	
  
Click	
  Edit	
  Course.	


On	
  this	
  Course	
  Administration	
  screen,	
  locate	
  and	
  click	
  on	
  Import	
  /	
  Export	
  /	
  Copy	
  Components.	


When	
  asked	
  “What	
  would	
  you	
  like	
  to	
  do?"	
  on	
  the	
  
Import/Export/Copy	
  Components	
  screen,	
  	
  
keep	
  the	
  first	
  selection	
  marked	
  Copy	
  
Components	
  from	
  Another	
  Course	
  or	
  
Template.	


Keep	
  checked	
  protected	
  resources.	


Click	
  Start.	


On	
  the	
  Copy	
  Course	
  Components	
  screen,	
  choose	
  to	
  Copy	
  the	
  selected	
  course	
  components	
  from	
  
and	
  use	
  the	
  drop-­‐down	
  arrow	
  to	
  select	
  the	
  course	
  offering	
  you	
  are	
  copying	
  from	
  (the	
  source).	
  
Wait!	
  Allow	
  a	
  10-­‐15	
  second	
  load	
  time	
  delay	
  before	
  you	
  click	
  continue.	


Choose	
  Components	
  to	
  Copy	
  expands	
  below	
  the	
  selected	
  course.	
  Either	
  choose	
  to:	
  
     • Select	
  All	
  Components	
  (highly	
  recommended)	
  or	
  
     • Individually	
  select	
  which	
  components	
  you	
  want	
  to	
  copy.	
  This	
  option	
  gives	
  you	
  more	
  control	
  
       over	
  what	
  items	
  are	
  copied	
  into	
  your	
  course,	
  but	
  also	
  creates	
  more	
  room	
  for	
  errors	
  and	
  
       omissions.	
  Use	
  this	
  option	
  only	
  if	
  you	
  want	
  small	
  amounts	
  of	
  course	
  materials	
  (i.e.	
  a	
  certain	
  
       unit,	
  exam,	
  or	
  content	
  item).	


                  After	
  making	
  your	
  selections,	
  press	
  Continue	
  at	
  the	
  bottom	
  of	
  the	
  screen.	
  
COURSE	
  COPY	
   3	


                                                   On	
  the	
  Confirm	
  Components	
  to	
  Copy	
  screen,	
  scroll	
  down	
  to	
  the	
  
                                                   bottom	
  of	
  the	
  page	
  and	
  click	
  Finish.	


                                                   Allow	
  10-­‐30	
  seconds	
  for	
  the	
  copy	
  to	
  take	
  place	
  (length	
  of	
  time	
  
                                                   will	
  vary	
  based	
  on	
  the	
  size	
  of	
  the	
  course	
  and	
  your	
  internet	
  speed).	


                                                   Do	
  not	
  close	
  this	
  page	
  until	
  the	
  copy	
  is	
  finished.	


                                                   When	
  the	
  copy	
  is	
  complete,	
  all	
  items	
  selected	
  will	
  display	
  with	
  
                                                   green	
  check	
  marks	
  and	
  the	
  phrase	
  “items	
  were	
  successfully	
  
                                                   copied”	
  on	
  the	
  Copy	
  Summary	
  page.	


                                                   Click	
  Done.	


Notes:	
  If	
  you	
  choose	
  to	
  select	
  individual	
  items,	
  
additional	
  screen	
  steps	
  will	
  allow	
  you	
  to	
  make	
  those	
  
selections	
  more	
  specifically.	
  Follow	
  the	
  prompts	
  and	
  
press	
  Continue	
  when	
  done	
  with	
  each	
  screen.	
  Using	
  
this	
  option,	
  you	
  must	
  carefully	
  select	
  course	
  files	
  with	
  
each	
  content	
  item	
  you	
  wish	
  to	
  copy,	
  or	
  links	
  will	
  not	
  
work	
  correctly	
  in	
  the	
  new	
  course.	


Once	
  a	
  course	
  has	
  been	
  copied,	
  be	
  sure	
  to	
  edit	
  the	
  
new	
  course	
  for	
  date	
  changes,	
  updates,	
  and	
  to	
  test	
  all	
  
links	
  from	
  a	
  student	
  perspective.	
  	
  You	
  may	
  delete	
  
unwanted	
  items	
  from	
  the	
  new	
  course.	
  

Más contenido relacionado

Destacado

Successful Synchronous Sessions in Six Steps (Using Adobe Connect)
Successful Synchronous Sessions in Six Steps (Using Adobe Connect)Successful Synchronous Sessions in Six Steps (Using Adobe Connect)
Successful Synchronous Sessions in Six Steps (Using Adobe Connect)CTL at Greenville College
 
How to assess a Discussion Topic per student in D2L Learning Environment 9.4.1.
How to assess a Discussion Topic per student in D2L Learning Environment 9.4.1.How to assess a Discussion Topic per student in D2L Learning Environment 9.4.1.
How to assess a Discussion Topic per student in D2L Learning Environment 9.4.1.CTL at Greenville College
 
Instructions for Form 4506-A, Request for Public Inspection or Copy of Exempt...
Instructions for Form 4506-A, Request for Public Inspection or Copy of Exempt...Instructions for Form 4506-A, Request for Public Inspection or Copy of Exempt...
Instructions for Form 4506-A, Request for Public Inspection or Copy of Exempt...taxman taxman
 
Towards Building Community: The Value of Your Teaching Presence in the Onli...
Towards Building Community:  The Value of  Your Teaching Presence in the Onli...Towards Building Community:  The Value of  Your Teaching Presence in the Onli...
Towards Building Community: The Value of Your Teaching Presence in the Onli...CTL at Greenville College
 

Destacado (9)

Adding course assistants
Adding course assistantsAdding course assistants
Adding course assistants
 
Releasing grades in d2 l
Releasing grades in d2 lReleasing grades in d2 l
Releasing grades in d2 l
 
Successful Synchronous Sessions in Six Steps (Using Adobe Connect)
Successful Synchronous Sessions in Six Steps (Using Adobe Connect)Successful Synchronous Sessions in Six Steps (Using Adobe Connect)
Successful Synchronous Sessions in Six Steps (Using Adobe Connect)
 
How to assess a Discussion Topic per student in D2L Learning Environment 9.4.1.
How to assess a Discussion Topic per student in D2L Learning Environment 9.4.1.How to assess a Discussion Topic per student in D2L Learning Environment 9.4.1.
How to assess a Discussion Topic per student in D2L Learning Environment 9.4.1.
 
Instructions for Form 4506-A, Request for Public Inspection or Copy of Exempt...
Instructions for Form 4506-A, Request for Public Inspection or Copy of Exempt...Instructions for Form 4506-A, Request for Public Inspection or Copy of Exempt...
Instructions for Form 4506-A, Request for Public Inspection or Copy of Exempt...
 
Theoretical Perspectives Overview
Theoretical Perspectives OverviewTheoretical Perspectives Overview
Theoretical Perspectives Overview
 
Towards Building Community: The Value of Your Teaching Presence in the Onli...
Towards Building Community:  The Value of  Your Teaching Presence in the Onli...Towards Building Community:  The Value of  Your Teaching Presence in the Onli...
Towards Building Community: The Value of Your Teaching Presence in the Onli...
 
iPad Tips and Hints
iPad Tips and HintsiPad Tips and Hints
iPad Tips and Hints
 
Facilitating the discussion forum workshop
Facilitating the discussion forum workshopFacilitating the discussion forum workshop
Facilitating the discussion forum workshop
 

Similar a Course copy instructions

Oracle User Productiviy Kit
Oracle User Productiviy KitOracle User Productiviy Kit
Oracle User Productiviy KitLarry Sherrod
 
Final Cut Pro X Weynand Certification Lesson 1
Final Cut Pro X Weynand Certification Lesson 1Final Cut Pro X Weynand Certification Lesson 1
Final Cut Pro X Weynand Certification Lesson 1Samuel Edsall
 
Cis 206 i lab 2 backing up and restoring data
Cis 206 i lab 2 backing up and restoring dataCis 206 i lab 2 backing up and restoring data
Cis 206 i lab 2 backing up and restoring dataacece556
 
Power Point Lesson 05
Power Point  Lesson 05Power Point  Lesson 05
Power Point Lesson 05Nasir Jumani
 
Topelite storm impatica_final_presentation (1)
Topelite storm impatica_final_presentation (1)Topelite storm impatica_final_presentation (1)
Topelite storm impatica_final_presentation (1)hbrown5018
 
Advanced Features of SMART - TCEA 2012
Advanced Features of SMART -  TCEA 2012Advanced Features of SMART -  TCEA 2012
Advanced Features of SMART - TCEA 2012Linda Rush
 
Sample Storyboard Computers 101
Sample Storyboard Computers 101Sample Storyboard Computers 101
Sample Storyboard Computers 101Jacqueline Lewis
 
Differentiating Instruction using SMART Notebook Software
Differentiating Instruction using SMART Notebook SoftwareDifferentiating Instruction using SMART Notebook Software
Differentiating Instruction using SMART Notebook Softwarekarlaholt
 
IC4 DVD-ROM Installation Instructions.pdf
IC4 DVD-ROM Installation Instructions.pdfIC4 DVD-ROM Installation Instructions.pdf
IC4 DVD-ROM Installation Instructions.pdfEddyRosario6
 
New employee -Author Guide
New employee -Author GuideNew employee -Author Guide
New employee -Author Guidetaskstream
 
Myitlab how to_use_grader
Myitlab how to_use_graderMyitlab how to_use_grader
Myitlab how to_use_gradercarolbillingcwi
 
Wireframe & Prototype - Task Management
Wireframe & Prototype - Task ManagementWireframe & Prototype - Task Management
Wireframe & Prototype - Task ManagementSuraj Rao
 
Introduction to gui based operating system
Introduction to gui based operating systemIntroduction to gui based operating system
Introduction to gui based operating systemJaydip Kayal
 
Windows 8.1 Guide
Windows 8.1 GuideWindows 8.1 Guide
Windows 8.1 GuideCorcelll
 
Nhs ultranet guide
Nhs ultranet guideNhs ultranet guide
Nhs ultranet guidethsieh
 
Bb7 course export
Bb7 course exportBb7 course export
Bb7 course exportgkrynen
 

Similar a Course copy instructions (20)

Oracle User Productiviy Kit
Oracle User Productiviy KitOracle User Productiviy Kit
Oracle User Productiviy Kit
 
Final Cut Pro X Weynand Certification Lesson 1
Final Cut Pro X Weynand Certification Lesson 1Final Cut Pro X Weynand Certification Lesson 1
Final Cut Pro X Weynand Certification Lesson 1
 
Cis 206 i lab 2 backing up and restoring data
Cis 206 i lab 2 backing up and restoring dataCis 206 i lab 2 backing up and restoring data
Cis 206 i lab 2 backing up and restoring data
 
Power Point Lesson 05
Power Point  Lesson 05Power Point  Lesson 05
Power Point Lesson 05
 
Topelite storm impatica_final_presentation (1)
Topelite storm impatica_final_presentation (1)Topelite storm impatica_final_presentation (1)
Topelite storm impatica_final_presentation (1)
 
Advanced Features of SMART - TCEA 2012
Advanced Features of SMART -  TCEA 2012Advanced Features of SMART -  TCEA 2012
Advanced Features of SMART - TCEA 2012
 
Sample Storyboard Computers 101
Sample Storyboard Computers 101Sample Storyboard Computers 101
Sample Storyboard Computers 101
 
Differentiating Instruction using SMART Notebook Software
Differentiating Instruction using SMART Notebook SoftwareDifferentiating Instruction using SMART Notebook Software
Differentiating Instruction using SMART Notebook Software
 
IC4 DVD-ROM Installation Instructions.pdf
IC4 DVD-ROM Installation Instructions.pdfIC4 DVD-ROM Installation Instructions.pdf
IC4 DVD-ROM Installation Instructions.pdf
 
New employee -Author Guide
New employee -Author GuideNew employee -Author Guide
New employee -Author Guide
 
MyITLab: Using Grader
MyITLab: Using GraderMyITLab: Using Grader
MyITLab: Using Grader
 
Myitlab how to_use_grader
Myitlab how to_use_graderMyitlab how to_use_grader
Myitlab how to_use_grader
 
Wireframe & Prototype - Task Management
Wireframe & Prototype - Task ManagementWireframe & Prototype - Task Management
Wireframe & Prototype - Task Management
 
Introduction to gui based operating system
Introduction to gui based operating systemIntroduction to gui based operating system
Introduction to gui based operating system
 
Main handout
Main handoutMain handout
Main handout
 
Main handout
Main handoutMain handout
Main handout
 
Introduction to editing
Introduction to editingIntroduction to editing
Introduction to editing
 
Windows 8.1 Guide
Windows 8.1 GuideWindows 8.1 Guide
Windows 8.1 Guide
 
Nhs ultranet guide
Nhs ultranet guideNhs ultranet guide
Nhs ultranet guide
 
Bb7 course export
Bb7 course exportBb7 course export
Bb7 course export
 

Course copy instructions

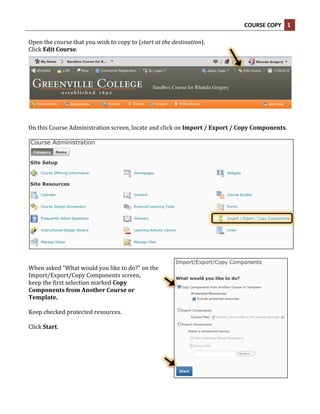
  • 1. COURSE  COPY   1     Open  the  course  that  you  wish  to  copy  to  (start  at  the  destination).   Click  Edit  Course.       On  this  Course  Administration  screen,  locate  and  click  on  Import  /  Export  /  Copy  Components.           When  asked  “What  would  you  like  to  do?"  on  the   Import/Export/Copy  Components  screen,     keep  the  first  selection  marked  Copy   Components  from  Another  Course  or   Template.     Keep  checked  protected  resources.     Click  Start.              
  • 2. On  the  Copy  Course  Components  screen,  choose  to  Copy  the  selected  course  components  from   and  use  the  drop-­‐down  arrow  to  select  the  course  offering  you  are  copying  from  (the  source).   Wait!  Allow  a  10-­‐15  second  load  time  delay  before  you  click  continue.     Choose  Components  to  Copy  expands  below  the  selected  course.  Either  choose  to:   • Select  All  Components  (highly  recommended)  or   • Individually  select  which  components  you  want  to  copy.  This  option  gives  you  more  control   over  what  items  are  copied  into  your  course,  but  also  creates  more  room  for  errors  and   omissions.  Use  this  option  only  if  you  want  small  amounts  of  course  materials  (i.e.  a  certain   unit,  exam,  or  content  item).                                         After  making  your  selections,  press  Continue  at  the  bottom  of  the  screen.  
  • 3. COURSE  COPY   3         On  the  Confirm  Components  to  Copy  screen,  scroll  down  to  the   bottom  of  the  page  and  click  Finish.     Allow  10-­‐30  seconds  for  the  copy  to  take  place  (length  of  time   will  vary  based  on  the  size  of  the  course  and  your  internet  speed).       Do  not  close  this  page  until  the  copy  is  finished.     When  the  copy  is  complete,  all  items  selected  will  display  with   green  check  marks  and  the  phrase  “items  were  successfully   copied”  on  the  Copy  Summary  page.     Click  Done.                             Notes:  If  you  choose  to  select  individual  items,   additional  screen  steps  will  allow  you  to  make  those   selections  more  specifically.  Follow  the  prompts  and   press  Continue  when  done  with  each  screen.  Using   this  option,  you  must  carefully  select  course  files  with   each  content  item  you  wish  to  copy,  or  links  will  not   work  correctly  in  the  new  course.     Once  a  course  has  been  copied,  be  sure  to  edit  the   new  course  for  date  changes,  updates,  and  to  test  all   links  from  a  student  perspective.    You  may  delete   unwanted  items  from  the  new  course.