SlideShare una empresa de Scribd logo
1 de 10
Descargar para leer sin conexión
23/11/2013 Create a table - Access - Office.com
office.microsoft.com/en-in/access-help/create-a-table-HA001224251.aspx 1/10
Show AllWhen you create a database, you store your data in tables—subject-based lists that contain rows
and columns. For instance, you can create a Contacts table to store a list of names, addresses, and
telephone numbers, or a Products table to store information about products.
This article explains how to create a table, how to add fields to a table, and how to set a table's primary key. It also
explains how to set field and table properties.
Because other database objects depend so heavily on tables, you should always start your design of a database by
creating all of its tables and then creating any other objects. Before you create tables, carefully consider your
requirements and determine all the tables that you need. For an introduction to planning and designing a
database, see the article Database design basics.
NOTE This article does not explain how to create a table by using a data-definition query. Find links to more
information about data-definition queries in the See Also section.
In this article
Overview
Before you begin
Create a new table
Add a field to a table
Save a table
Overview
A table is a database object that you use to store data about a particular subject, such as employees or products.
A table consists of records and fields.
Each record contains data about one instance of the table subject, such as a particular employee. A record is also
commonly called a row or an instance.
Each field contains data about one aspect of the table subject, such as first name or e-mail address. A field is also
commonly called a column or an attribute.
A record consists of field values, such as Contoso, Ltd. or someone@example.com. A field value is also commonly
called a fact.
A record
A field
A field value
A database can contain many tables, each storing information about a different subject. Each table can contain
many fields of different types of data, such as text, numbers, dates, and hyperlinks.
Table and field properties
Tables and fields also have properties that you can set to control their characteristics or behavior.
A table open in Design view.
Table properties
Field properties
In an Access database, table properties are attributes of a table that affect the appearance or behavior of the table
as a whole. Table properties are set in the table's property sheet, in Design view. For example, you can set a table's
Default View property to specify how the table is displayed by default.
A field property applies to a particular field in a table and defines one of the field's characteristics or an aspect of
the field's behavior. You can set some field properties in Datasheet view. You can also set any field property in
Design view by using the Field Properties pane.
Create a table
23/11/2013 Create a table - Access - Office.com
office.microsoft.com/en-in/access-help/create-a-table-HA001224251.aspx 2/10
Data types
Every field has a data type. A field's data type indicates the kind of data that the field stores, such as large
amounts of text or attached files.
A data type is a field property, but it differs from other field properties as follows:
You set a field's data type in the table design grid, not in the Field Properties pane.
A field's data type determines what other properties the field has.
You must set a field's data type when you create the field.
NOTE You can create a new field in Access by entering data in a new column in Datasheet view. When you
create a field by entering data in Datasheet view, Access automatically assigns a data type for the field, based on
the value that you enter. If no other data type is implied by your input, Access sets the data type to Text. If
needed, you can change the data type by using the Ribbon, part of the new Microsoft Office Fluent user interface.
Examples of automatic data type detection
Table relationships
Although each table stores data about a different subject, tables in a database usually store data about subjects
that are related to each other. For example, a database might contain:
A customers table that lists your company’s customers and their addresses.
A products table that lists the products that you sell, including prices and pictures for each item.
An orders table that tracks customer orders.
Because you store data about different subjects in separate tables, you need some way to tie the data together so
that you can easily combine related data from those separate tables. To connect the data stored in different tables,
you create relationships. A relationship is a logical connection between two tables that specifies fields that the
tables have in common.
Keys
Fields that are part of a table relationship are called keys. A key usually consists of one field, but may consist of
more than one field. There are two kinds of keys:
Primary key A table can have only one primary key. A primary key consists of one or more fields that
uniquely identify each record that you store in the table. Often, there is a unique identification number, such as
an ID number, a serial number, or a code, that serves as a primary key. For example, you might have a
Customers table where each customer has a unique customer ID number. The customer ID field is the primary
key of the Customers table. When a primary key contains more than one field, it is usually composed of pre-
existing fields that, taken together, provide unique values. For example, you might use a combination of last
name, first name, and birth date as the primary key for a table about people.
Foreign key A table can also have one or more foreign keys. A foreign key contains values that correspond
to values in the primary key of another table. For example, you might have an Orders table in which each order
has a customer ID number that corresponds to a record in a Customers table. The customer ID field is a foreign
key of the Orders table.
The correspondence of values between key fields forms the basis of a table relationship. You use a table
relationship to combine data from related tables. For example, suppose that you have a Customers table and an
Orders table. In your Customers table, each record is identified by the primary key field, ID.
To associate each order with a customer, you add a foreign key field to the Orders table that corresponds to the
ID field of the Customers table, and then create a relationship between the two keys. When you add a record to
the Orders table, you use a value for customer ID that comes from the Customers table. Whenever you want to
view any information about an order's customer, you use the relationship to identify which data from the
Customers table corresponds to which records in the Orders table.
23/11/2013 Create a table - Access - Office.com
office.microsoft.com/en-in/access-help/create-a-table-HA001224251.aspx 3/10
A table relationship, shown in the Relationships window.
A primary key, identified by the key icon next to the field name.
A foreign key — note the absence of the key icon.
Benefits of using relationships
Keeping data separated in related tables produces the following benefits:
Consistency Because each item of data is recorded only once, in one table, there is less opportunity for
ambiguity or inconsistency. For example, you store a customer's name only once, in a table about customers,
rather than storing it repeatedly (and potentially inconsistently) in a table that contains order data.
Efficiency Recording data in only one place means you use less disk space. Moreover, smaller tables tend to
provide data more quickly than larger tables. Finally, if you don't use separate tables for separate subjects, you
will introduce null values (the absence of data) and redundancy into your tables, both of which can waste space
and impede performance.
Comprehensibility The design of a database is easier to understand if the subjects are properly separated
into tables.
TIP Plan your tables with relationships in mind. You can use the Lookup Wizard to create a foreign key field if
the table that contains the corresponding primary key already exists. The Lookup Wizard creates the relationship
for you.
Before you begin
Before you start to create tables in Microsoft Office Access 2007, there are a few differences from earlier versions
of Access that you should keep in mind.
Table and field templates have replaced the Table Wizard In earlier versions of Access, you used the
Table Wizard to create a table quickly by answering a few questions. In Office Access 2007, the Table Wizard has
been replaced by table and field templates.
Datasheet creation In Office Access 2007, you can create and modify tables and fields while working in
Datasheet view.
More information about these features is presented in the following section.
Create a new table
A simple database, such as a contact list, might use only a single table. Many databases, however, use several
tables. When you create a new database, you create a new file on your computer that acts as a container for all of
the objects in your database, including your tables.
TIP In Access 2010, you can use Application Parts to quickly add commonly used tables, forms, and
reports to your database. Read an article or try Office 2010!
You can create a table by creating a new database, by inserting a table into an existing database, or by
importing or linking to a table from another data source — such as a Microsoft Office Excel workbook, a Microsoft
Office Word document, a text file, or another database. When you create a new, blank database, a new, empty
table is automatically inserted for you. You can then enter data in the table to start defining your fields.
What do you want to do?
Create a new table in a new database
Create a new table in an existing database
Use a table template to create a table
Import or link to create a table
Use a SharePoint site to create a table
Set a table's primary key
Set a table's properties
23/11/2013 Create a table - Access - Office.com
office.microsoft.com/en-in/access-help/create-a-table-HA001224251.aspx 4/10
Create a new table in a new database
1. Click the Microsoft Office Button , and then click New.
2. In the File Name box, type a file name for the new database.
3. To browse to a different location to save the database, click the folder icon.
4. Click Create.
The new database opens, and a new table named Table1 is created and opens in Datasheet view.
Create a new table in an existing database
1. Click the Microsoft Office Button , and then click Open.
2. In the Open dialog box, select the database that you want to open, and then click Open.
3. On the Create tab, in the Tables group, click Table.
A new table is inserted in the database and the table opens in Datasheet view.
Top of Section
Use a table template to create a table
In earlier versions of Access, you used the Table Wizard to quickly create a table from sample tables and fields. In
Office Access 2007, you use table templates and field templates instead.
A table template is an empty table that you can start using as-is, or modify to suit your needs. Office Access 2007
comes with the following table templates, designed to be compatible with the Windows SharePoint Services 3.0
lists of the same name:
Contacts A table for managing business contact information, which includes e-mail addresses, Web page
URLs, and attachments, such as a service contract and a photo.
Tasks A table for tracking tasks, which includes a field for attachments.
Issues A table for tracking issues, which includes a field for attachments and an append-only Memo field that
keeps a history of old field values.
Events A table for managing events, which includes a rich text Memo field and a field for attachments.
Assets A table for managing business assets, which includes two currency fields so that you can track asset
depreciation.
After you create a table by using a table template, you may want to add fields by using field templates. A field
template is a predefined field that you can add to any table in Datasheet view. For more information about using a
field template, see the section Add a field by using a field template, later in this article.
Create a new table by using a table template
1. Click the Microsoft Office Button , and then click Open.
2. In the Open dialog box, select and open the database in which you wish to create a table.
3. On the Create tab, in the Tables group, click Table Templates and then select one of the available
templates from the list.
A new table is inserted, based on the table template that you chose.
Top of Section
Import or link to create a table
You can create a table by importing or linking to data that is stored elsewhere. You can import or link to data in
an Excel worksheet, a Windows SharePoint Services list, an XML file, another Access database, a Microsoft Office
Outlook folder, and more.
When you import data, you create a copy of the data in a new table in the current database. Subsequent changes
to the source data will have no effect on the imported data, and changes to the imported data do not affect the
source data. After you connect to a data source and import its data, you can then use the imported data without
connecting to the source. You can change the design of an imported table.
When you link to data, you create a linked table in the current database that represents a live link to the existing
23/11/2013 Create a table - Access - Office.com
office.microsoft.com/en-in/access-help/create-a-table-HA001224251.aspx 5/10
information that is stored elsewhere. When you change data in a linked table, you are changing it in the source.
Whenever data changes in the source, that change is shown in the linked table. You must be able to connect to
the data source whenever you use a linked table. You cannot change the design of a linked table.
NOTE You cannot edit data in an Excel worksheet by using a linked table. As a workaround, import the source
data into an Access database, and then link to the database from Excel. For more information about linking to
Access from Excel, search Excel Help, or see the links in the See Also section.
Create a new table by importing or linking to external data
1. Click the Microsoft Office Button , and then click Open.
2. In the Open dialog box, select and open the database in which you wish to create a new table.
3. On the External Data tab, in the Import group, click one of the available data sources.
4. Follow the instructions in the dialog boxes that appear at each step.
Access creates the new table and displays it in the Navigation Pane.
TIP You can also import or link to a SharePoint list by using a command on the Create tab.
Top of Section
Use a SharePoint site to create a table
You can create a table in your database that imports from or links to a SharePoint list. You can also create a new
SharePoint list by using a predefined template. The predefined templates in Office Access 2007 include Contacts,
Tasks, Issues, and Events.
1. Click the Microsoft Office Button , and then click Open.
2. In the Open dialog box, select the database in which you want to create the new table, and then click Open.
3. On the Create tab, in the Tables group, click SharePoint Lists.
4. Do one of the following:
Create a SharePoint list that is based on a template
1. Click either Contacts, Tasks, Issues, or Events.
2. In the Create New List dialog box, type the URL for the SharePoint site where you want to create
the list.
3. Enter a name for the new list and its description in the Specify a name for the new list and
Description boxes.
4. To open the linked table after it is created, select the Open the list when finished check box
(selected by default).
Create a new custom list
1. Click Custom.
2. In the Create New List dialog box, type the URL for the SharePoint site where you want to create
the list.
3. Enter a name for the new list and its description in the Specify a name for the new list and
Description boxes.
4. To open the linked table after it is created, select the Open the list when finished check box
(selected by default).
Import the data from an existing list
1. Click Existing SharePoint List.
2. In the Get External Data dialog box, type the URL for the SharePoint site that contains the data
that you want to import.
3. Click Import the source data into a new table in the current database, and then click Next.
23/11/2013 Create a table - Access - Office.com
office.microsoft.com/en-in/access-help/create-a-table-HA001224251.aspx 6/10
4. Select the check box next to each SharePoint list that you want to import.
Link to an existing list
1. Click Existing SharePoint List.
2. In the Get External Data - SharePoint Site dialog box, type the URL for the SharePoint site that
contains the list to which you want to link.
3. Click Link to the data source by creating a linked table, and then click Next.
4. Select the check box next to each SharePoint list to which you want to link.
Top of Section
Set a table's primary key
Unless you have a specific reason not to, you should specify a primary key for a table. Access automatically creates
an index for the primary key, which can help improve database performance. Access also makes sure that every
record has a value in the primary key field, and that the value is always unique. Unique values are crucial, because
otherwise there is no way to reliably distinguish a particular row from other rows.
When you create a new table in Datasheet view, Access automatically creates a primary key for you and assigns it
a field name of ID and the AutoNumber data type.
In Design view, you can change or remove the primary key, or set the primary key for a table that doesn't already
have one.
Determine which fields to use as a primary key
Sometimes, you might already have data that you want to use as a primary key. For example, you may have
existing ID numbers for your employees. If you create a table to track employee information, you might decide to
use the existing employee ID as the primary key for the table. Or, perhaps employee ID is only unique in
combination with department ID, requiring that you use both fields together as the primary key. A good candidate
for the primary key has the following characteristics:
Each record has a unique value for the field or combination of fields.
The field or combination of fields is never empty or null — there is always a value.
The values do not change.
If no suitable data exists to use as a primary key, you can create a new field to use as a primary key. When you
create a new field to use as a primary key, set the field's data type to AutoNumber to help make sure that it meets
the three characteristics in the preceding list.
Set or change the primary key
1. Select the table whose primary key you want to set or change.
2. On the Home tab, in the Views group, click View, and then click Design View.
3. In the table design grid, select the field or fields that you want to use as the primary key.
To select one field, click the row selector for the field that you want.
To select more than one field, hold down CTRL, and then click the row selector for each field.
4. On the Design tab, in the Tools group, click Primary Key.
A key indicator appears to the left of the field or fields that you specify as the primary key.
Remove the primary key
1. Select the table whose primary key you want to remove.
2. On the Home tab, in the Views group, click View, and then click Design View.
3. Click the row selector for the current primary key. If the primary key consists of multiple fields, hold down CTRL,
and then click the row selector for each field.
4. On the Design tab, in the Tools group, click Primary Key.
The key indicator is removed from the field or fields that you previously specified as the primary key.
NOTE When you save a new table without setting a primary key, Access prompts you to create a new field for
the primary key. If you click Yes, Access creates an ID field that uses the AutoNumber data type to provide a
23/11/2013 Create a table - Access - Office.com
office.microsoft.com/en-in/access-help/create-a-table-HA001224251.aspx 7/10
unique value for each record. If your table already includes an AutoNumber field, Access uses it as the primary key.
If you click No, Access does not add a field, and no primary key is set.
Top of Section
Set a table's properties
In addition to setting properties fields, you can also set properties that apply to an entire table or to entire
records.
1. Select the table whose properties you want to set.
2. On the Home tab, in the Views group, click View, and then click Design View.
3. On the Design tab, in the Show/Hide group, click Property Sheet.
The table property sheet is shown.
4. On the property sheet, click the General tab.
5. Click the box to the left of the property that you want to set, and then enter a setting for the property.
Available table properties
TIP To provide more space to enter or edit a setting in the property box, press SHIFT+F2 to display the Zoom
box. If you are setting the Validation Rule property to an expression and would like help in building it, click
next to the ValidationRule property box to display the Expression Builder.
6. To save your changes, press CTRL+S.
Top of Section
Add a field to a table
You store each piece of data that you want to track in a field. For example, in a contacts table you create fields for
Last Name, First Name, Telephone Number, and Address. In a products table you create fields for Product Name,
Product ID, and Price.
Before you create fields, try to separate data into its smallest useful parts. It is much easier to combine data later
than it is to pull it apart. For example, instead of a Full Name field, consider creating separate fields for Last Name
and First Name. Then, you can easily search or sort by First Name, Last Name, or both. If you plan to report, sort,
search, or calculate on an item of data, put that item in a field by itself. For more information about designing a
database and creating fields, see the links in the See Also section.
After you create a field, you can also set field properties to control its appearance and behavior.
What do you want to do?
Add a field by entering data
Add a field from an existing table
Set field properties
Add a field by entering data
When you create a new table or open an existing table in Datasheet view, you can add a field to the table by
entering data in the Add New Field column of the datasheet.
Enter data in the Add New Field column.
1. Create or open a table in Datasheet view.
NOTE For more information about creating a table, see the section, Create a new table.
2. In the Add New Field column, enter the name of the field that you want to create.
Use a descriptive name so that the field will be easier to identify.
3. Enter data in the new field.
Top of Section
Add a field by using a field template
Sometimes it is easier to choose from a predefined list of fields that fit your needs than to manually create a field.
23/11/2013 Create a table - Access - Office.com
office.microsoft.com/en-in/access-help/create-a-table-HA001224251.aspx 8/10
You can use the Field Templates task pane to choose from a list of field templates. A field template is a
predefined set of characteristics and properties that describes a field. The field template definition includes a field
name, a data type, a setting for the field's Format property, and other field properties.
1. On the Home tab, in the Views group, click View, and then click Datasheet View.
2. On the Datasheet tab, in the Fields & Columns group, click New Field.
3. Select one or more fields in the Field Templates pane, and then drag them to the table where you want to
insert the new column.
Top of Section
Add a field from an existing table
If your database already contains tables, you can add a field from one of those tables to your new table by using
the Field List pane. The Field List pane lists all the other tables in your database, grouped into two categories:
Fields available in related tables and Fields available in other tables. If the table you are adding a field to
is in relationships with other tables, the related tables' fields are listed first in the Field List pane.
1. Click the Microsoft Office Button , and then click Open.
2. In the Open dialog box, select and open the database that you want to work with.
3. In the Navigation Pane, double-click the table to which you want to add an existing field.
The table opens in Datasheet view.
4. On the Datasheet tab, in the Fields & Columns group, click Add Existing Fields.
5. Click the plus sign (+) next to a table in the Field List pane to display the list of fields in that table.
6. Select the field that you want, and drag it to the table where you want to insert the new column.
7. Follow the instructions in the Lookup Wizard.
After you have completed the wizard, the field appears in the table in Datasheet view.
NOTE When you add a field from an unrelated table and then complete the Lookup Wizard, a new one-to-many
relationship is automatically created between the table in the Field List pane and the table that you have open.
23/11/2013 Create a table - Access - Office.com
office.microsoft.com/en-in/access-help/create-a-table-HA001224251.aspx 9/10
Find links to more information about the Lookup Wizard in the See Also section.
Top of Section
Set field properties
After you create a field, you can set field properties to control its appearance and behavior.
For example, by setting field properties, you can:
Control the appearance of data in a field
Help prevent incorrect data entry in a field
Specify default values for a field
Help speed up searching and sorting on a field
You can set some of the available field properties while you work in Datasheet view. To have access to and set the
complete list of field properties; however, you must use Design view.
Set field properties in Datasheet view
You can rename a field, change its data type, change its Format property, and change some of a field's other
properties while you work in Datasheet view.
Open a table in Datasheet view
1. In the Navigation Pane, right-click the table that you want to open.
2. On the shortcut menu, click Datasheet view.
Rename a field
When you add a field by entering data in Datasheet view, Access automatically assigns a generic name to the field.
Access assigns the name Field1 to the first new field, Field2 to the second new field, and so on. By default, a field's
name is used as its label wherever the field is displayed, such as a column heading on a datasheet. Renaming fields
so that they have more descriptive names helps make them easier to use when you view or edit records.
1. Right-click the heading of the field that you want to rename (for example, Field1).
2. On the shortcut menu, click Rename Column.
3. Enter the new name in the field heading.
Field names can consist of up to 64 characters (letters or numbers), including spaces.
Change a field's data type
When you create a field by entering data in Datasheet view, Access examines that data to determine the
appropriate data type for the field. For example, if you enter 1/1/2006, Access recognizes that data as a date and
sets the data type for the field to Date/Time. If Access can't definitively determine the data type, the data type is
set to Text by default.
The data type of the field determines which other field properties you can set. For example, you can set only the
Append Only property for a field that has the Hyperlink data type or the Memo data type.
There may be cases where you want to manually change a field's data type. For example, suppose you have room
numbers that resemble dates, such as 10/2001. If you enter 10/2001 into a new field in Datasheet view, the
automatic data type detection feature selects the Date/Time data type for the field. Because room numbers are
labels, and not dates, they should use the Text data type. Use the following procedure to change a field's data
type.
1. On the Ribbon, click the Datasheet tab .
2. In the Data Type list, in the Data Type & Formatting group, select the data type that you want.
Available data types
Change a field's format
In addition to determining the data type of a new field, Access may also set the Format property for the field,
depending on what you enter. For example, if you enter 10:50 a.m., Access sets the data type to Date/Time and
the Format property to Medium Time. To manually change a field's Format property, do the following:
1. On the Ribbon, click the Datasheet tab.
2. In the Format list, in the Data Type & Formatting group, enter the format that you want.
NOTE The Format list may be unavailable for some fields (for example, Text), depending on the data type of the
field.
Set other field properties
1. In Datasheet view, click the field for which you want to set the property.
23/11/2013 Create a table - Access - Office.com
office.microsoft.com/en-in/access-help/create-a-table-HA001224251.aspx 10/10
2. On the Datasheet tab, in the Data Type & Formatting group, select the properties that you want.
Top of Section
Set field properties in Design view
You can set any field property while you work with a table in Design view. In Design view, you set a field's data
type in the table design grid, and you set other properties in the Field Properties pane.
Open a table in Design view
1. In the Navigation Pane, right-click the table.
2. On the shortcut menu, click Design view.
Change a field's data type
1. In the table design grid, locate the field for which you want to set the data type.
2. In the Data Type column, choose a data type from the list.
Available data types
Set other field properties
1. In the table design grid, select the field for which you want to set properties. Access displays the properties for
this field in the Field Properties pane.
NOTE The data type of the field determines the properties that you can set.
2. In the Field Properties pane, enter the settings that you want for each property, or press F6 and then use
the arrow keys to select a property.
What field properties are available?
3. To provide more space for entering or editing a property setting in the property box, press SHIFT+F2 to display
the Zoom box.
TIP If you are entering an input mask or validation expression and would like help in building it, click next to
the property box to display the appropriate builder.
4. To save your changes, press CTRL+S.
Find links to more information about data types and field properties in the See Also section.
Top of Section
Save a table
After you create or modify a table, you should save its design. When you save a table for the first time, give it a
name that describes the data that it contains. You can use up to 64 alphanumeric characters, including spaces. For
example, you might name a table Customers, Parts Inventory, or Products.
TIP You should decide on a naming convention for the objects in your database, and use it consistently.
1. Click the Microsoft Office Button , and then click Save, or press CTRL+S .
2. If you are saving the table for the first time, type a name for the table, and then click OK.
Site Directory Contact Us Submit Feedback Legal Trademarks Privacy and Cookies Accessibility © 2013 Microsoft Corporation. All rights reserved.

Más contenido relacionado

La actualidad más candente

MS Access Ch 2 PPT
MS Access Ch 2 PPTMS Access Ch 2 PPT
MS Access Ch 2 PPTprsmith72
 
Microsoft Access 2007: Get To Know Access
Microsoft Access 2007: Get To Know AccessMicrosoft Access 2007: Get To Know Access
Microsoft Access 2007: Get To Know Accessomoviejohn
 
ECDL module 5: using databases [To be continued]
ECDL module 5: using databases [To be continued] ECDL module 5: using databases [To be continued]
ECDL module 5: using databases [To be continued] Hassan Ayad
 
Ecdl v5 module 5 print
Ecdl v5 module 5 printEcdl v5 module 5 print
Ecdl v5 module 5 printMichael Lew
 
Microsoft Access 2007
Microsoft Access 2007Microsoft Access 2007
Microsoft Access 2007Reshma Arun
 
Microsoft Access Notes 2007 Ecdl
Microsoft Access Notes 2007 EcdlMicrosoft Access Notes 2007 Ecdl
Microsoft Access Notes 2007 EcdlRichard Butler
 
Access lesson 01 Microsoft Access Basics
Access lesson 01 Microsoft Access BasicsAccess lesson 01 Microsoft Access Basics
Access lesson 01 Microsoft Access BasicsAram SE
 
Access presentation
Access presentationAccess presentation
Access presentationDUSPviz
 
SharePoint Lists 101 (Text)
SharePoint Lists 101 (Text)SharePoint Lists 101 (Text)
SharePoint Lists 101 (Text)Thomas Duff
 
Training MS Access 2007
Training MS Access 2007Training MS Access 2007
Training MS Access 2007crespoje
 
Access 2007 Training
Access 2007 TrainingAccess 2007 Training
Access 2007 Trainingpparakh
 
Access lesson 02 Creating a Database
Access lesson 02 Creating a DatabaseAccess lesson 02 Creating a Database
Access lesson 02 Creating a DatabaseAram SE
 
Ms access notes
Ms access notesMs access notes
Ms access notesIKIARA
 
PPT On MS-Access 2007 | Full Concepts |
PPT On MS-Access 2007 | Full Concepts |PPT On MS-Access 2007 | Full Concepts |
PPT On MS-Access 2007 | Full Concepts |Umesh Kumar
 

La actualidad más candente (20)

MS Access Ch 2 PPT
MS Access Ch 2 PPTMS Access Ch 2 PPT
MS Access Ch 2 PPT
 
Microsoft Access 2007: Get To Know Access
Microsoft Access 2007: Get To Know AccessMicrosoft Access 2007: Get To Know Access
Microsoft Access 2007: Get To Know Access
 
ECDL module 5: using databases [To be continued]
ECDL module 5: using databases [To be continued] ECDL module 5: using databases [To be continued]
ECDL module 5: using databases [To be continued]
 
Ms access 2007 pptx
Ms access 2007 pptxMs access 2007 pptx
Ms access 2007 pptx
 
Ecdl v5 module 5 print
Ecdl v5 module 5 printEcdl v5 module 5 print
Ecdl v5 module 5 print
 
Access 2007
Access 2007Access 2007
Access 2007
 
Microsoft Access 2007
Microsoft Access 2007Microsoft Access 2007
Microsoft Access 2007
 
Microsoft Access Notes 2007 Ecdl
Microsoft Access Notes 2007 EcdlMicrosoft Access Notes 2007 Ecdl
Microsoft Access Notes 2007 Ecdl
 
Access lesson 01 Microsoft Access Basics
Access lesson 01 Microsoft Access BasicsAccess lesson 01 Microsoft Access Basics
Access lesson 01 Microsoft Access Basics
 
001.general
001.general001.general
001.general
 
Access presentation
Access presentationAccess presentation
Access presentation
 
SharePoint Lists 101 (Text)
SharePoint Lists 101 (Text)SharePoint Lists 101 (Text)
SharePoint Lists 101 (Text)
 
1. access
1. access1. access
1. access
 
Training MS Access 2007
Training MS Access 2007Training MS Access 2007
Training MS Access 2007
 
Ms access 2007
Ms access 2007Ms access 2007
Ms access 2007
 
Access 2007 Training
Access 2007 TrainingAccess 2007 Training
Access 2007 Training
 
Access lesson 02 Creating a Database
Access lesson 02 Creating a DatabaseAccess lesson 02 Creating a Database
Access lesson 02 Creating a Database
 
Ms access notes
Ms access notesMs access notes
Ms access notes
 
PPT On MS-Access 2007 | Full Concepts |
PPT On MS-Access 2007 | Full Concepts |PPT On MS-Access 2007 | Full Concepts |
PPT On MS-Access 2007 | Full Concepts |
 
Access ppt
Access ppt Access ppt
Access ppt
 

Similar a Create a table access - office

10359485
1035948510359485
10359485kavumo
 
MS-Access Tables Forms Queries Reports.ppt
MS-Access Tables Forms Queries Reports.pptMS-Access Tables Forms Queries Reports.ppt
MS-Access Tables Forms Queries Reports.ppt1520lakshyagupta
 
MS-Access Tables Forms Queries Reports.ppt
MS-Access Tables Forms Queries Reports.pptMS-Access Tables Forms Queries Reports.ppt
MS-Access Tables Forms Queries Reports.pptwondmhunegn
 
MS-Access Tables Forms Queries Reports.ppt
MS-Access Tables Forms Queries Reports.pptMS-Access Tables Forms Queries Reports.ppt
MS-Access Tables Forms Queries Reports.pptJoselitoTan2
 
access1.ppt
access1.pptaccess1.ppt
access1.pptmayada34
 
Operate Spreadsheet applications ppt.pptx
Operate Spreadsheet applications ppt.pptxOperate Spreadsheet applications ppt.pptx
Operate Spreadsheet applications ppt.pptxEsubalew21
 
AB Database Assignment 1 –FOR STUDENTS TO COMPLETEFirst create .docx
AB Database Assignment 1 –FOR STUDENTS TO COMPLETEFirst create .docxAB Database Assignment 1 –FOR STUDENTS TO COMPLETEFirst create .docx
AB Database Assignment 1 –FOR STUDENTS TO COMPLETEFirst create .docxbartholomeocoombs
 
Microsoft Access ppt.ppt
Microsoft Access ppt.pptMicrosoft Access ppt.ppt
Microsoft Access ppt.pptJoshCasas1
 
ChoiAccess.pptbuhuhujhhuhuhuhuhuhhhhhhhhhhhhh
ChoiAccess.pptbuhuhujhhuhuhuhuhuhhhhhhhhhhhhhChoiAccess.pptbuhuhujhhuhuhuhuhuhhhhhhhhhhhhh
ChoiAccess.pptbuhuhujhhuhuhuhuhuhhhhhhhhhhhhhhazhamina
 
ChoiAccess.ppt
ChoiAccess.pptChoiAccess.ppt
ChoiAccess.pptljgmcrone
 
Module 08 Access & Use Database Application.pptx
Module 08 Access & Use Database Application.pptxModule 08 Access & Use Database Application.pptx
Module 08 Access & Use Database Application.pptxEsubalew21
 
Database Concepts and Terminologies
Database Concepts and TerminologiesDatabase Concepts and Terminologies
Database Concepts and TerminologiesOusman Faal
 
Physical elements of data
Physical elements of dataPhysical elements of data
Physical elements of dataDimara Hakim
 
Creating and editing a database
Creating and editing a databaseCreating and editing a database
Creating and editing a databasecrystalpullen
 
1Copyright © 2014 Pearson Education, Inc. Publishing as Pren.docx
1Copyright © 2014 Pearson Education, Inc. Publishing as Pren.docx1Copyright © 2014 Pearson Education, Inc. Publishing as Pren.docx
1Copyright © 2014 Pearson Education, Inc. Publishing as Pren.docxhyacinthshackley2629
 

Similar a Create a table access - office (20)

10359485
1035948510359485
10359485
 
MS-Access Tables Forms Queries Reports.ppt
MS-Access Tables Forms Queries Reports.pptMS-Access Tables Forms Queries Reports.ppt
MS-Access Tables Forms Queries Reports.ppt
 
MS-Access Tables Forms Queries Reports.ppt
MS-Access Tables Forms Queries Reports.pptMS-Access Tables Forms Queries Reports.ppt
MS-Access Tables Forms Queries Reports.ppt
 
MS-Access Tables Forms Queries Reports.ppt
MS-Access Tables Forms Queries Reports.pptMS-Access Tables Forms Queries Reports.ppt
MS-Access Tables Forms Queries Reports.ppt
 
access1.ppt
access1.pptaccess1.ppt
access1.ppt
 
Data processing
Data processingData processing
Data processing
 
Operate Spreadsheet applications ppt.pptx
Operate Spreadsheet applications ppt.pptxOperate Spreadsheet applications ppt.pptx
Operate Spreadsheet applications ppt.pptx
 
AB Database Assignment 1 –FOR STUDENTS TO COMPLETEFirst create .docx
AB Database Assignment 1 –FOR STUDENTS TO COMPLETEFirst create .docxAB Database Assignment 1 –FOR STUDENTS TO COMPLETEFirst create .docx
AB Database Assignment 1 –FOR STUDENTS TO COMPLETEFirst create .docx
 
Microsoft Access ppt.ppt
Microsoft Access ppt.pptMicrosoft Access ppt.ppt
Microsoft Access ppt.ppt
 
ChoiAccess.pptbuhuhujhhuhuhuhuhuhhhhhhhhhhhhh
ChoiAccess.pptbuhuhujhhuhuhuhuhuhhhhhhhhhhhhhChoiAccess.pptbuhuhujhhuhuhuhuhuhhhhhhhhhhhhh
ChoiAccess.pptbuhuhujhhuhuhuhuhuhhhhhhhhhhhhh
 
ChoiAccess.ppt
ChoiAccess.pptChoiAccess.ppt
ChoiAccess.ppt
 
Module 08 Access & Use Database Application.pptx
Module 08 Access & Use Database Application.pptxModule 08 Access & Use Database Application.pptx
Module 08 Access & Use Database Application.pptx
 
Database Concepts and Terminologies
Database Concepts and TerminologiesDatabase Concepts and Terminologies
Database Concepts and Terminologies
 
CIS145 Final Review
CIS145 Final ReviewCIS145 Final Review
CIS145 Final Review
 
Priyank Goel PPT.pptx
Priyank Goel PPT.pptxPriyank Goel PPT.pptx
Priyank Goel PPT.pptx
 
Cis145 Final Review
Cis145 Final ReviewCis145 Final Review
Cis145 Final Review
 
01 Microsoft Access
01 Microsoft Access01 Microsoft Access
01 Microsoft Access
 
Physical elements of data
Physical elements of dataPhysical elements of data
Physical elements of data
 
Creating and editing a database
Creating and editing a databaseCreating and editing a database
Creating and editing a database
 
1Copyright © 2014 Pearson Education, Inc. Publishing as Pren.docx
1Copyright © 2014 Pearson Education, Inc. Publishing as Pren.docx1Copyright © 2014 Pearson Education, Inc. Publishing as Pren.docx
1Copyright © 2014 Pearson Education, Inc. Publishing as Pren.docx
 

Create a table access - office

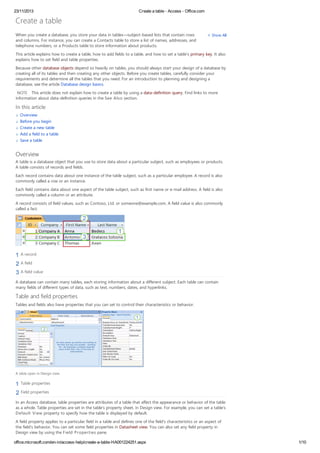
  • 1. 23/11/2013 Create a table - Access - Office.com office.microsoft.com/en-in/access-help/create-a-table-HA001224251.aspx 1/10 Show AllWhen you create a database, you store your data in tables—subject-based lists that contain rows and columns. For instance, you can create a Contacts table to store a list of names, addresses, and telephone numbers, or a Products table to store information about products. This article explains how to create a table, how to add fields to a table, and how to set a table's primary key. It also explains how to set field and table properties. Because other database objects depend so heavily on tables, you should always start your design of a database by creating all of its tables and then creating any other objects. Before you create tables, carefully consider your requirements and determine all the tables that you need. For an introduction to planning and designing a database, see the article Database design basics. NOTE This article does not explain how to create a table by using a data-definition query. Find links to more information about data-definition queries in the See Also section. In this article Overview Before you begin Create a new table Add a field to a table Save a table Overview A table is a database object that you use to store data about a particular subject, such as employees or products. A table consists of records and fields. Each record contains data about one instance of the table subject, such as a particular employee. A record is also commonly called a row or an instance. Each field contains data about one aspect of the table subject, such as first name or e-mail address. A field is also commonly called a column or an attribute. A record consists of field values, such as Contoso, Ltd. or someone@example.com. A field value is also commonly called a fact. A record A field A field value A database can contain many tables, each storing information about a different subject. Each table can contain many fields of different types of data, such as text, numbers, dates, and hyperlinks. Table and field properties Tables and fields also have properties that you can set to control their characteristics or behavior. A table open in Design view. Table properties Field properties In an Access database, table properties are attributes of a table that affect the appearance or behavior of the table as a whole. Table properties are set in the table's property sheet, in Design view. For example, you can set a table's Default View property to specify how the table is displayed by default. A field property applies to a particular field in a table and defines one of the field's characteristics or an aspect of the field's behavior. You can set some field properties in Datasheet view. You can also set any field property in Design view by using the Field Properties pane. Create a table
  • 2. 23/11/2013 Create a table - Access - Office.com office.microsoft.com/en-in/access-help/create-a-table-HA001224251.aspx 2/10 Data types Every field has a data type. A field's data type indicates the kind of data that the field stores, such as large amounts of text or attached files. A data type is a field property, but it differs from other field properties as follows: You set a field's data type in the table design grid, not in the Field Properties pane. A field's data type determines what other properties the field has. You must set a field's data type when you create the field. NOTE You can create a new field in Access by entering data in a new column in Datasheet view. When you create a field by entering data in Datasheet view, Access automatically assigns a data type for the field, based on the value that you enter. If no other data type is implied by your input, Access sets the data type to Text. If needed, you can change the data type by using the Ribbon, part of the new Microsoft Office Fluent user interface. Examples of automatic data type detection Table relationships Although each table stores data about a different subject, tables in a database usually store data about subjects that are related to each other. For example, a database might contain: A customers table that lists your company’s customers and their addresses. A products table that lists the products that you sell, including prices and pictures for each item. An orders table that tracks customer orders. Because you store data about different subjects in separate tables, you need some way to tie the data together so that you can easily combine related data from those separate tables. To connect the data stored in different tables, you create relationships. A relationship is a logical connection between two tables that specifies fields that the tables have in common. Keys Fields that are part of a table relationship are called keys. A key usually consists of one field, but may consist of more than one field. There are two kinds of keys: Primary key A table can have only one primary key. A primary key consists of one or more fields that uniquely identify each record that you store in the table. Often, there is a unique identification number, such as an ID number, a serial number, or a code, that serves as a primary key. For example, you might have a Customers table where each customer has a unique customer ID number. The customer ID field is the primary key of the Customers table. When a primary key contains more than one field, it is usually composed of pre- existing fields that, taken together, provide unique values. For example, you might use a combination of last name, first name, and birth date as the primary key for a table about people. Foreign key A table can also have one or more foreign keys. A foreign key contains values that correspond to values in the primary key of another table. For example, you might have an Orders table in which each order has a customer ID number that corresponds to a record in a Customers table. The customer ID field is a foreign key of the Orders table. The correspondence of values between key fields forms the basis of a table relationship. You use a table relationship to combine data from related tables. For example, suppose that you have a Customers table and an Orders table. In your Customers table, each record is identified by the primary key field, ID. To associate each order with a customer, you add a foreign key field to the Orders table that corresponds to the ID field of the Customers table, and then create a relationship between the two keys. When you add a record to the Orders table, you use a value for customer ID that comes from the Customers table. Whenever you want to view any information about an order's customer, you use the relationship to identify which data from the Customers table corresponds to which records in the Orders table.
  • 3. 23/11/2013 Create a table - Access - Office.com office.microsoft.com/en-in/access-help/create-a-table-HA001224251.aspx 3/10 A table relationship, shown in the Relationships window. A primary key, identified by the key icon next to the field name. A foreign key — note the absence of the key icon. Benefits of using relationships Keeping data separated in related tables produces the following benefits: Consistency Because each item of data is recorded only once, in one table, there is less opportunity for ambiguity or inconsistency. For example, you store a customer's name only once, in a table about customers, rather than storing it repeatedly (and potentially inconsistently) in a table that contains order data. Efficiency Recording data in only one place means you use less disk space. Moreover, smaller tables tend to provide data more quickly than larger tables. Finally, if you don't use separate tables for separate subjects, you will introduce null values (the absence of data) and redundancy into your tables, both of which can waste space and impede performance. Comprehensibility The design of a database is easier to understand if the subjects are properly separated into tables. TIP Plan your tables with relationships in mind. You can use the Lookup Wizard to create a foreign key field if the table that contains the corresponding primary key already exists. The Lookup Wizard creates the relationship for you. Before you begin Before you start to create tables in Microsoft Office Access 2007, there are a few differences from earlier versions of Access that you should keep in mind. Table and field templates have replaced the Table Wizard In earlier versions of Access, you used the Table Wizard to create a table quickly by answering a few questions. In Office Access 2007, the Table Wizard has been replaced by table and field templates. Datasheet creation In Office Access 2007, you can create and modify tables and fields while working in Datasheet view. More information about these features is presented in the following section. Create a new table A simple database, such as a contact list, might use only a single table. Many databases, however, use several tables. When you create a new database, you create a new file on your computer that acts as a container for all of the objects in your database, including your tables. TIP In Access 2010, you can use Application Parts to quickly add commonly used tables, forms, and reports to your database. Read an article or try Office 2010! You can create a table by creating a new database, by inserting a table into an existing database, or by importing or linking to a table from another data source — such as a Microsoft Office Excel workbook, a Microsoft Office Word document, a text file, or another database. When you create a new, blank database, a new, empty table is automatically inserted for you. You can then enter data in the table to start defining your fields. What do you want to do? Create a new table in a new database Create a new table in an existing database Use a table template to create a table Import or link to create a table Use a SharePoint site to create a table Set a table's primary key Set a table's properties
  • 4. 23/11/2013 Create a table - Access - Office.com office.microsoft.com/en-in/access-help/create-a-table-HA001224251.aspx 4/10 Create a new table in a new database 1. Click the Microsoft Office Button , and then click New. 2. In the File Name box, type a file name for the new database. 3. To browse to a different location to save the database, click the folder icon. 4. Click Create. The new database opens, and a new table named Table1 is created and opens in Datasheet view. Create a new table in an existing database 1. Click the Microsoft Office Button , and then click Open. 2. In the Open dialog box, select the database that you want to open, and then click Open. 3. On the Create tab, in the Tables group, click Table. A new table is inserted in the database and the table opens in Datasheet view. Top of Section Use a table template to create a table In earlier versions of Access, you used the Table Wizard to quickly create a table from sample tables and fields. In Office Access 2007, you use table templates and field templates instead. A table template is an empty table that you can start using as-is, or modify to suit your needs. Office Access 2007 comes with the following table templates, designed to be compatible with the Windows SharePoint Services 3.0 lists of the same name: Contacts A table for managing business contact information, which includes e-mail addresses, Web page URLs, and attachments, such as a service contract and a photo. Tasks A table for tracking tasks, which includes a field for attachments. Issues A table for tracking issues, which includes a field for attachments and an append-only Memo field that keeps a history of old field values. Events A table for managing events, which includes a rich text Memo field and a field for attachments. Assets A table for managing business assets, which includes two currency fields so that you can track asset depreciation. After you create a table by using a table template, you may want to add fields by using field templates. A field template is a predefined field that you can add to any table in Datasheet view. For more information about using a field template, see the section Add a field by using a field template, later in this article. Create a new table by using a table template 1. Click the Microsoft Office Button , and then click Open. 2. In the Open dialog box, select and open the database in which you wish to create a table. 3. On the Create tab, in the Tables group, click Table Templates and then select one of the available templates from the list. A new table is inserted, based on the table template that you chose. Top of Section Import or link to create a table You can create a table by importing or linking to data that is stored elsewhere. You can import or link to data in an Excel worksheet, a Windows SharePoint Services list, an XML file, another Access database, a Microsoft Office Outlook folder, and more. When you import data, you create a copy of the data in a new table in the current database. Subsequent changes to the source data will have no effect on the imported data, and changes to the imported data do not affect the source data. After you connect to a data source and import its data, you can then use the imported data without connecting to the source. You can change the design of an imported table. When you link to data, you create a linked table in the current database that represents a live link to the existing
  • 5. 23/11/2013 Create a table - Access - Office.com office.microsoft.com/en-in/access-help/create-a-table-HA001224251.aspx 5/10 information that is stored elsewhere. When you change data in a linked table, you are changing it in the source. Whenever data changes in the source, that change is shown in the linked table. You must be able to connect to the data source whenever you use a linked table. You cannot change the design of a linked table. NOTE You cannot edit data in an Excel worksheet by using a linked table. As a workaround, import the source data into an Access database, and then link to the database from Excel. For more information about linking to Access from Excel, search Excel Help, or see the links in the See Also section. Create a new table by importing or linking to external data 1. Click the Microsoft Office Button , and then click Open. 2. In the Open dialog box, select and open the database in which you wish to create a new table. 3. On the External Data tab, in the Import group, click one of the available data sources. 4. Follow the instructions in the dialog boxes that appear at each step. Access creates the new table and displays it in the Navigation Pane. TIP You can also import or link to a SharePoint list by using a command on the Create tab. Top of Section Use a SharePoint site to create a table You can create a table in your database that imports from or links to a SharePoint list. You can also create a new SharePoint list by using a predefined template. The predefined templates in Office Access 2007 include Contacts, Tasks, Issues, and Events. 1. Click the Microsoft Office Button , and then click Open. 2. In the Open dialog box, select the database in which you want to create the new table, and then click Open. 3. On the Create tab, in the Tables group, click SharePoint Lists. 4. Do one of the following: Create a SharePoint list that is based on a template 1. Click either Contacts, Tasks, Issues, or Events. 2. In the Create New List dialog box, type the URL for the SharePoint site where you want to create the list. 3. Enter a name for the new list and its description in the Specify a name for the new list and Description boxes. 4. To open the linked table after it is created, select the Open the list when finished check box (selected by default). Create a new custom list 1. Click Custom. 2. In the Create New List dialog box, type the URL for the SharePoint site where you want to create the list. 3. Enter a name for the new list and its description in the Specify a name for the new list and Description boxes. 4. To open the linked table after it is created, select the Open the list when finished check box (selected by default). Import the data from an existing list 1. Click Existing SharePoint List. 2. In the Get External Data dialog box, type the URL for the SharePoint site that contains the data that you want to import. 3. Click Import the source data into a new table in the current database, and then click Next.
  • 6. 23/11/2013 Create a table - Access - Office.com office.microsoft.com/en-in/access-help/create-a-table-HA001224251.aspx 6/10 4. Select the check box next to each SharePoint list that you want to import. Link to an existing list 1. Click Existing SharePoint List. 2. In the Get External Data - SharePoint Site dialog box, type the URL for the SharePoint site that contains the list to which you want to link. 3. Click Link to the data source by creating a linked table, and then click Next. 4. Select the check box next to each SharePoint list to which you want to link. Top of Section Set a table's primary key Unless you have a specific reason not to, you should specify a primary key for a table. Access automatically creates an index for the primary key, which can help improve database performance. Access also makes sure that every record has a value in the primary key field, and that the value is always unique. Unique values are crucial, because otherwise there is no way to reliably distinguish a particular row from other rows. When you create a new table in Datasheet view, Access automatically creates a primary key for you and assigns it a field name of ID and the AutoNumber data type. In Design view, you can change or remove the primary key, or set the primary key for a table that doesn't already have one. Determine which fields to use as a primary key Sometimes, you might already have data that you want to use as a primary key. For example, you may have existing ID numbers for your employees. If you create a table to track employee information, you might decide to use the existing employee ID as the primary key for the table. Or, perhaps employee ID is only unique in combination with department ID, requiring that you use both fields together as the primary key. A good candidate for the primary key has the following characteristics: Each record has a unique value for the field or combination of fields. The field or combination of fields is never empty or null — there is always a value. The values do not change. If no suitable data exists to use as a primary key, you can create a new field to use as a primary key. When you create a new field to use as a primary key, set the field's data type to AutoNumber to help make sure that it meets the three characteristics in the preceding list. Set or change the primary key 1. Select the table whose primary key you want to set or change. 2. On the Home tab, in the Views group, click View, and then click Design View. 3. In the table design grid, select the field or fields that you want to use as the primary key. To select one field, click the row selector for the field that you want. To select more than one field, hold down CTRL, and then click the row selector for each field. 4. On the Design tab, in the Tools group, click Primary Key. A key indicator appears to the left of the field or fields that you specify as the primary key. Remove the primary key 1. Select the table whose primary key you want to remove. 2. On the Home tab, in the Views group, click View, and then click Design View. 3. Click the row selector for the current primary key. If the primary key consists of multiple fields, hold down CTRL, and then click the row selector for each field. 4. On the Design tab, in the Tools group, click Primary Key. The key indicator is removed from the field or fields that you previously specified as the primary key. NOTE When you save a new table without setting a primary key, Access prompts you to create a new field for the primary key. If you click Yes, Access creates an ID field that uses the AutoNumber data type to provide a
  • 7. 23/11/2013 Create a table - Access - Office.com office.microsoft.com/en-in/access-help/create-a-table-HA001224251.aspx 7/10 unique value for each record. If your table already includes an AutoNumber field, Access uses it as the primary key. If you click No, Access does not add a field, and no primary key is set. Top of Section Set a table's properties In addition to setting properties fields, you can also set properties that apply to an entire table or to entire records. 1. Select the table whose properties you want to set. 2. On the Home tab, in the Views group, click View, and then click Design View. 3. On the Design tab, in the Show/Hide group, click Property Sheet. The table property sheet is shown. 4. On the property sheet, click the General tab. 5. Click the box to the left of the property that you want to set, and then enter a setting for the property. Available table properties TIP To provide more space to enter or edit a setting in the property box, press SHIFT+F2 to display the Zoom box. If you are setting the Validation Rule property to an expression and would like help in building it, click next to the ValidationRule property box to display the Expression Builder. 6. To save your changes, press CTRL+S. Top of Section Add a field to a table You store each piece of data that you want to track in a field. For example, in a contacts table you create fields for Last Name, First Name, Telephone Number, and Address. In a products table you create fields for Product Name, Product ID, and Price. Before you create fields, try to separate data into its smallest useful parts. It is much easier to combine data later than it is to pull it apart. For example, instead of a Full Name field, consider creating separate fields for Last Name and First Name. Then, you can easily search or sort by First Name, Last Name, or both. If you plan to report, sort, search, or calculate on an item of data, put that item in a field by itself. For more information about designing a database and creating fields, see the links in the See Also section. After you create a field, you can also set field properties to control its appearance and behavior. What do you want to do? Add a field by entering data Add a field from an existing table Set field properties Add a field by entering data When you create a new table or open an existing table in Datasheet view, you can add a field to the table by entering data in the Add New Field column of the datasheet. Enter data in the Add New Field column. 1. Create or open a table in Datasheet view. NOTE For more information about creating a table, see the section, Create a new table. 2. In the Add New Field column, enter the name of the field that you want to create. Use a descriptive name so that the field will be easier to identify. 3. Enter data in the new field. Top of Section Add a field by using a field template Sometimes it is easier to choose from a predefined list of fields that fit your needs than to manually create a field.
  • 8. 23/11/2013 Create a table - Access - Office.com office.microsoft.com/en-in/access-help/create-a-table-HA001224251.aspx 8/10 You can use the Field Templates task pane to choose from a list of field templates. A field template is a predefined set of characteristics and properties that describes a field. The field template definition includes a field name, a data type, a setting for the field's Format property, and other field properties. 1. On the Home tab, in the Views group, click View, and then click Datasheet View. 2. On the Datasheet tab, in the Fields & Columns group, click New Field. 3. Select one or more fields in the Field Templates pane, and then drag them to the table where you want to insert the new column. Top of Section Add a field from an existing table If your database already contains tables, you can add a field from one of those tables to your new table by using the Field List pane. The Field List pane lists all the other tables in your database, grouped into two categories: Fields available in related tables and Fields available in other tables. If the table you are adding a field to is in relationships with other tables, the related tables' fields are listed first in the Field List pane. 1. Click the Microsoft Office Button , and then click Open. 2. In the Open dialog box, select and open the database that you want to work with. 3. In the Navigation Pane, double-click the table to which you want to add an existing field. The table opens in Datasheet view. 4. On the Datasheet tab, in the Fields & Columns group, click Add Existing Fields. 5. Click the plus sign (+) next to a table in the Field List pane to display the list of fields in that table. 6. Select the field that you want, and drag it to the table where you want to insert the new column. 7. Follow the instructions in the Lookup Wizard. After you have completed the wizard, the field appears in the table in Datasheet view. NOTE When you add a field from an unrelated table and then complete the Lookup Wizard, a new one-to-many relationship is automatically created between the table in the Field List pane and the table that you have open.
  • 9. 23/11/2013 Create a table - Access - Office.com office.microsoft.com/en-in/access-help/create-a-table-HA001224251.aspx 9/10 Find links to more information about the Lookup Wizard in the See Also section. Top of Section Set field properties After you create a field, you can set field properties to control its appearance and behavior. For example, by setting field properties, you can: Control the appearance of data in a field Help prevent incorrect data entry in a field Specify default values for a field Help speed up searching and sorting on a field You can set some of the available field properties while you work in Datasheet view. To have access to and set the complete list of field properties; however, you must use Design view. Set field properties in Datasheet view You can rename a field, change its data type, change its Format property, and change some of a field's other properties while you work in Datasheet view. Open a table in Datasheet view 1. In the Navigation Pane, right-click the table that you want to open. 2. On the shortcut menu, click Datasheet view. Rename a field When you add a field by entering data in Datasheet view, Access automatically assigns a generic name to the field. Access assigns the name Field1 to the first new field, Field2 to the second new field, and so on. By default, a field's name is used as its label wherever the field is displayed, such as a column heading on a datasheet. Renaming fields so that they have more descriptive names helps make them easier to use when you view or edit records. 1. Right-click the heading of the field that you want to rename (for example, Field1). 2. On the shortcut menu, click Rename Column. 3. Enter the new name in the field heading. Field names can consist of up to 64 characters (letters or numbers), including spaces. Change a field's data type When you create a field by entering data in Datasheet view, Access examines that data to determine the appropriate data type for the field. For example, if you enter 1/1/2006, Access recognizes that data as a date and sets the data type for the field to Date/Time. If Access can't definitively determine the data type, the data type is set to Text by default. The data type of the field determines which other field properties you can set. For example, you can set only the Append Only property for a field that has the Hyperlink data type or the Memo data type. There may be cases where you want to manually change a field's data type. For example, suppose you have room numbers that resemble dates, such as 10/2001. If you enter 10/2001 into a new field in Datasheet view, the automatic data type detection feature selects the Date/Time data type for the field. Because room numbers are labels, and not dates, they should use the Text data type. Use the following procedure to change a field's data type. 1. On the Ribbon, click the Datasheet tab . 2. In the Data Type list, in the Data Type & Formatting group, select the data type that you want. Available data types Change a field's format In addition to determining the data type of a new field, Access may also set the Format property for the field, depending on what you enter. For example, if you enter 10:50 a.m., Access sets the data type to Date/Time and the Format property to Medium Time. To manually change a field's Format property, do the following: 1. On the Ribbon, click the Datasheet tab. 2. In the Format list, in the Data Type & Formatting group, enter the format that you want. NOTE The Format list may be unavailable for some fields (for example, Text), depending on the data type of the field. Set other field properties 1. In Datasheet view, click the field for which you want to set the property.
  • 10. 23/11/2013 Create a table - Access - Office.com office.microsoft.com/en-in/access-help/create-a-table-HA001224251.aspx 10/10 2. On the Datasheet tab, in the Data Type & Formatting group, select the properties that you want. Top of Section Set field properties in Design view You can set any field property while you work with a table in Design view. In Design view, you set a field's data type in the table design grid, and you set other properties in the Field Properties pane. Open a table in Design view 1. In the Navigation Pane, right-click the table. 2. On the shortcut menu, click Design view. Change a field's data type 1. In the table design grid, locate the field for which you want to set the data type. 2. In the Data Type column, choose a data type from the list. Available data types Set other field properties 1. In the table design grid, select the field for which you want to set properties. Access displays the properties for this field in the Field Properties pane. NOTE The data type of the field determines the properties that you can set. 2. In the Field Properties pane, enter the settings that you want for each property, or press F6 and then use the arrow keys to select a property. What field properties are available? 3. To provide more space for entering or editing a property setting in the property box, press SHIFT+F2 to display the Zoom box. TIP If you are entering an input mask or validation expression and would like help in building it, click next to the property box to display the appropriate builder. 4. To save your changes, press CTRL+S. Find links to more information about data types and field properties in the See Also section. Top of Section Save a table After you create or modify a table, you should save its design. When you save a table for the first time, give it a name that describes the data that it contains. You can use up to 64 alphanumeric characters, including spaces. For example, you might name a table Customers, Parts Inventory, or Products. TIP You should decide on a naming convention for the objects in your database, and use it consistently. 1. Click the Microsoft Office Button , and then click Save, or press CTRL+S . 2. If you are saving the table for the first time, type a name for the table, and then click OK. Site Directory Contact Us Submit Feedback Legal Trademarks Privacy and Cookies Accessibility © 2013 Microsoft Corporation. All rights reserved.