

Recomendados
Más contenido relacionado
La actualidad más candente
La actualidad más candente (20)
Similar a Flip Charts
Similar a Flip Charts (20)
Más de Karen Bennett
Más de Karen Bennett (20)
Último
Último (20)
Flip Charts
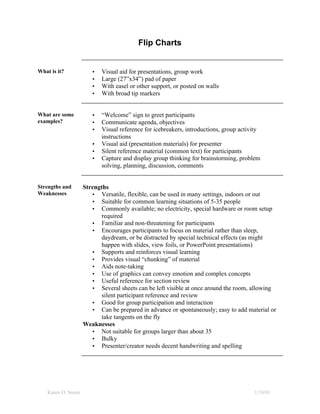
- 1. Flip Charts What is it? • Visual aid for presentations, group work • Large (27”x34”) pad of paper • With easel or other support, or posted on walls • With broad tip markers What are some • “Welcome” sign to greet participants examples? • Communicate agenda, objectives • Visual reference for icebreakers, introductions, group activity instructions • Visual aid (presentation materials) for presenter • Silent reference material (common text) for participants • Capture and display group thinking for brainstorming, problem solving, planning, discussion, comments Strengths and Strengths Weaknesses • Versatile, flexible, can be used in many settings, indoors or out • Suitable for common learning situations of 5-35 people • Commonly available; no electricity, special hardware or room setup required • Familiar and non-threatening for participants • Encourages participants to focus on material rather than sleep, daydream, or be distracted by special technical effects (as might happen with slides, view foils, or PowerPoint presentations) • Supports and reinforces visual learning • Provides visual “chunking” of material • Aids note-taking • Use of graphics can convey emotion and complex concepts • Useful reference for section review • Several sheets can be left visible at once around the room, allowing silent participant reference and review • Good for group participation and interaction • Can be prepared in advance or spontaneously; easy to add material or take tangents on the fly Weaknesses • Not suitable for groups larger than about 35 • Bulky • Presenter/creator needs decent handwriting and spelling Karen O. Storer 1/18/03
- 2. Steps to Success • Use lined or gridded paper to aid keeping text lines straight • Use water-based markers such as Mr. Sketch rather than permanent markers or white board markers • Print (don’t write) neatly using mixed case (not all UPPER case) letters about 2” high • Use two dark markers (blue, black, purple, brown, dark green) on alternate lines of text to visually distinguish separate items/concepts • Use a third, bright marker (red, orange, yellow, pink) for bullets, emphasis (and avoid using them for text as they’re hard to read) • Limit of one topic per page • Leave plenty of white space • Limit words per line and lines per page to 6-8 • Use only top 2/3 of page (line-of-sight to bottom may be blocked for some participants, and it’s difficult for presenter to write there during session) • Stand to the side so you don’t block participants’ view (non-dominant arm closest to chart when facing class) • For smooth delivery, pencil in notes and reminders in margins • If preparing charts in advance, storyboard topics, then work out spacing on 8-1/2”x11” mockup pad before making presentation charts • Leave a blank page between each page of text to prevent markers bleeding through to next page, and next page text showing through • For seemingly spontaneous in-class chart creation, pencil in text and graphics ahead of time • Don’t talk while you write (you’ll have your back to the class and be talking to the easel!); learners can read and absorb while you write • Post key pages around room for easy reference and reinforcement • Use perforated paper if you’ll be tearing sheets off pad • Practice to develop skills and comfort level References • The Big Book of Flip Charts by Robert William Lucas (2000) • Graphics for Presenters by Lynn Kearny (1996) • Beyond Words by Milly Sonneman (1997) • http://www.llrx.com/columns/guide42.htm • http://www.ohscanada.com/Training/flipcharts.asp • http://www.ljlseminars.com/flipchrt.htm • http://www.3m.com/meetingnetwork/readingroom/aa_ae_me_flip_cha rts.html • http://www.usingflipcharts.co.uk/ • http://www.nleta.com/articles/flipchart.htm Karen O. Storer 1/18/03