1. Digital Story with MovieMaker
1. Open MovieMaker. Begin by saving your project. File Save Project As…
2. Capture video, import video, or import the pictures needed for your digital story. For this story we will use
pictures but not video.
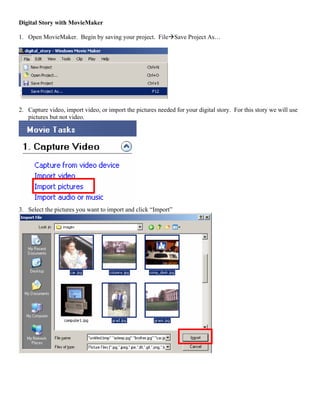
3. Select the pictures you want to import and click “Import”
2. 4. Once you import your pictures, you can see them in the collection pane
5. Click and drag the clips onto the timeline in the video slot or unto the Storyboard (depending on who
MovieMaker is set up).
Timeline view
3. Storyboard view
6. I have added all my clips below
Storyboard View
Timeline View
7. Record or import your story. To record your story, plug in your microphone into your computer. Then
click on the microphone icon
4. If you are in the storyboard view, you will get the following warning that recording can only be done in the
timeline view. Click OK to proceed.
To start recording, click “Start Narration”; to stop recording, click “Stop Narration”
When you are done recording and you click “Stop Narration”, you will be prompted to save the narration. It is
always a good strategy to save your narration into a folder that also has your images, music, and any other
related files. I prefer to set up two folders: one for audio and one for images. (Note: WindowsMaker will by
default save the narration in a folder called “Narration” in your My Videos folder.
Your narration gets automatically added to the timeline
5. To import your narration (if you recorded in another application), click on “Import audio or music” or go to
File Import into Collections
Navigate to your narration (which should be in the same folder as your images) and import it into your
collection. Then click and drag it to the timeline in the audio section.
8. To preview your movie, click on the play button in the Preview Monitor or if you are in the timeline view,
click and drag the blue bar across the timeline
6. 9. Adjust clips as needed
In the timeline view
Click on a clip
10. To add a title, click on “Tools” and then
11. Click on “Add title at the beginning of the movie”. If you want to add a credits page, you will do that here
too.
12. Type your title in the text boxes. You can see how it will look in the Preview Monitor. Click “Done” when
you are finished.
7. 13. To add effects, click on “View video effects”. Then click on the effect you want and drag it a picture on the
timeline (or storyboad). (Note: you can preview an effect by clicking on the effect and then the play button
in the preview monitor) “Ease In” and “Ease Out” are nice subtle effects
14. To add video transitions, click “View video transitions” and then click and drag them to the timeline
8. 15. When you are happy with the story (after previewing the changes you made), you need to export your
digital story (you will then later import the digital story back into MovieMaker and add music) [note: there
might be an easier way to do this but this is how I do it]
Click File Save Movie File… or click “Save to my computer”
Name your movie and choose a place to save your movie and then click “Next >”
9. Adjust your movie settings as needed and click “Next >”
Click “Finish” when the movie is done saving
16. Now it is time to add music. You first need to open a new project and import the movie you just saved. Go
to File New Project. Import the movie you just saved into your collection (refer to steps 2 & 3 for a
refresher).
17. Once the movie is in your collection, drag it to the timeline in the video section
10. 18. Now it is time to add your soundtrack. You need to import it into your collections and then drag it on the
timeline to the “Audio/Music” section of the timeline
19. Preview the movie and adjust the soundtrack as needed. To adjust the soundtrack, click on the soundtrack
in the timeline to select the track and then right click on your mouse and select “Volume”
20. Adjust volume as needed and click “OK”
11. 21. Now it is time to repeat step 15 and save your digital story.