Apidays New York 2024 - The value of a flexible API Management solution for O...
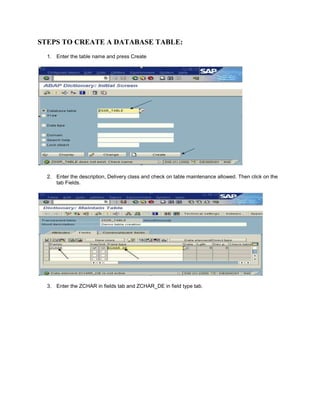
Enter the table name and press create
1. STEPS TO CREATE A DATABASE TABLE:
1. Enter the table name and press Create
2. Enter the description, Delivery class and check on table maintenance allowed. Then click on the
tab Fields.
3. Enter the ZCHAR in fields tab and ZCHAR_DE in field type tab.
2. 4. Double click on ZCHAR_DE. Then it will ask for Save. Press ‘YES”.
5. Save it as a local object on pressing Local object button
6. Now it will ask for the creation of the data element. Press Yes.
7. Click on the Field label tab and enter the lengths and descriptions accordingly.
3. 8. Then press Definition tab and enter the domain.
9. Double click on that zchar_d to create domain, then it will ask for save before going next screen.
Press Yes.
10. Save it as a local object.
11. Now it will ask for domain creation. Press Yes.
12. Give short description for that domain which you are creating. And mention the data type in data
type field and length in no. characters field an press ENTER.
4. 13. Then press Ctrl+F3. It will ask for save before activation. Save it as a local Object.
14. Press Enter and Press on back button.
15. Click on Activate icon to activate it.
16. Press Back button.
17. You will get the following screen.
18. Create one more field ZNUM and give data element name as ZNUM_DE. And double click on
‘ZNUM_DE’
5. 19. Save it by pressing Yes.
20. Now it will ask for the data element creation. Press Yes.
21. Give short description of the data element. And give the lengths and field labels accordingly in
Field label tab.
22. Press on Definition tab and give the domain name in Domain field. Double click on ZNUM_D.
6. 23. It will ask for save. Press Yes.
24. Save it as a local Object.
25. Now it asks for Domain creation. Press Yes.
26. Give short description in short text field. Enter the data type and no. characters, Press Enter.
Then Press on Activate button or Press Ctrl+F3.
27. Save this as a local object.
28. Press enter.
29. Now you will get the following screen. Press Back button.
30. Activate the data element By pressing Activate button or Pressing Ctrl+F3.
31. Press enter and press Back button.
7. 32. Now we created two fields. And Data elements and Domain for these two fields.
Now we have to maintain the technical settings. Press on Technical settings button.
34. Give the data class and size category of the table as per the requirement.
And press the back button.
35. Now activate the table by pressing the activate button or CTRL+F3.
36. Press enter.
37. Now you will get the following screen.
38. Now enter the data into table. Go to Utilities Table contents Create Entries.
39. Now enter the data in the fields and Save it.
8. 40. You will get the following screen after clicking the Reset Button.
41. Enter the data for the second entry into the table.
42. Save it and press reset.
43. Again enter the data for the third entry.
44. Press save, Reset (Optional) and Back button.
45. To see the table contents go to Utilities Table contents Display. Or press
Ctrl+Shift+F10.
46. Press on run button or press F8. Now it will display the table contents.