SlideShare una empresa de Scribd logo
1 de 7
Descargar para leer sin conexión
Adobe Photoshop CS5 Extended                                                                       Project 1 guide


Combining images in Photoshop
In Photoshop, you can use multiple layers to combine images, but there are two other ways to create a single image
from mulitple images.
    •    Create a panoramic image with the Photomerge command. This command combines several photographs
         into one continuous image. Photomerge can assemble photos that are tiled horizontally or vertically.
    •    Create a High Dynamic Range (HDR) image that combines multiple exposures into a single image that
         preserves the full tonal range of a scene.


Creating panoramic images
A panorama is a cinematic, often scenic image that captures a wide field of view, such as the example in Figure 1. In
Adobe Photoshop CS5 you can create panoramas by stitching together a series of photographic images. This guide
shows you how to combine images automatically in Photoshop by using the Photomerge command.

Take pictures for use with Photomerge
Your source photographs play a large role in panoramic compositions. To avoid problems, follow these guidelines
when taking pictures for use with Photomerge:
    •    Overlap images sufficiently. Images should overlap by approximately 40%. If the overlap is less,
         Photomerge may not be able to automatically assemble the panorama. However, keep in mind that the
         images shouldn’t overlap too much. If images overlap by 70% or more, Photomerge may not be able to
         blend the images. Try to keep the individual photos at least somewhat distinct from each other.
    •    Use one focal length. If you use a zoom lens, don’t change the focal length (zoom in or out) while taking
         your pictures.
    •    Keep the camera level. Although Photomerge can process slight rotations between pictures, a tilt of more
         than a few degrees can result in errors when the panorama is assembled. Using a tripod with a rotating head
         helps maintain camera alignment and viewpoint.
    •    Stay in the same position. Try not to change your position as you take a series of photographs, so that the
         pictures are from the same viewpoint. Using the optical viewfinder with the camera held close to the eye
         helps keep the viewpoint consistent. Or try using a tripod to keep the camera in the same place.
    •    Avoid using distortion lenses. Fish-eye and other distortion lenses can interfere with Photomerge.
    •    Maintain the same exposure. Avoid using the flash in some pictures and not in others. The blending
         features in Photomerge help smooth out different exposures, but extreme differences make alignment
         difficult. Some digital cameras change exposure settings automatically as you take pictures, so you may
         need to check your camera settings to be sure that all the images have the same exposure.


                                            Figure 1 A panoramic image


© 2010 Adobe Systems Incorporated                                                       Combining images in Photoshop   1
Project 1 guide                                                              Adobe Photoshop CS5 Extended


    Photomerge and advanced blending
    Advanced blending allows Photomerge to assess a series of images and find the ideal location to create a seam that
    serves as a transition from one image to another. Each image becomes a layer, with a mask applied to the blend seam.
    In Figure 2 you can see how three images are layered with advanced blending masks to stitch together the scene in
    Figure 1.


                              Figure 2 Layered images that comprise the panorama in Figure 1


2   Combining images in Photoshop                                                      © 2010 Adobe Systems Incorporated
Adobe Photoshop CS5 Extended                                                                       Project 1 guide


Creating a panorama by using Photomerge in Photoshop
To create a panorama, you need a series of scenic photographs that overlap slightly.

To create a panorama:
 1. Choose File > Automate > Photomerge.
    The Photomerge dialog box appears (Figure 3).


                                         Figure 3 The Photomerge dialog box

 2. Select a Layout option.
    •    Auto Photoshop chooses a Perspective or Cylindrical layout, depending on which produces a better
         photomerge.
    •    Perspective Creates a consistent composition by designating one of the source images (by default, the
         middle image) as the reference image. The other images are then transformed (repositioned, stretched or
         skewed as necessary) so that overlapping content across layers is matched.
    •    Cylindrical Reduces the “bow-tie” distortion that can occur with the Perspective layout by displaying
         individual images as on an unfolded cylinder. Overlapping content across layers is still matched. The
         reference image is placed at the center. Best suited for creating wide panoramas.
    •    Spherical Similar to the Perspective layout option but creates gradually arcing upper and lower edges of the
         image border.
    •    Collage Choose this option to open the source images in a dialog and position them manually for the best
         result.
    •    Reposition Aligns the layers and matches overlapping content, but does not transform (stretch or skew) any
         of the source layers.
 3. Click Browse, locate and select the files to be merged, and click Open.
    The selected files appear in the Source Files list.
 4. Make sure the Blend Images Together option is selected.
 5. Click OK.


© 2010 Adobe Systems Incorporated                                                       Combining images in Photoshop   3
Project 1 guide                                                                Adobe Photoshop CS5 Extended


        Photomerge automatically combines your images into a panorama by using layers and masking (Figure 4). The
        masking is determined by the advanced blending feature in Photomerge. To turn a layer on or off, click the
        visibility icon in the Layers panel.


                                                   Figure 4 Merged layers

     6. The next step is to crop your panorama to fill a rectangular frame. In the Tools panel, select the Crop tool and
        frame your panorama.
        A Rule of Thirds grid appears with sizing handles (Figure 5).


                                            Figure 5 Framing the final panorama

     7. To crop your selection, press Enter (Windows) or Return (Mac OS).
     8. Save your image.

    Accessing Photomerge from Adobe Bridge
    You can also begin the process of creating a panorama from Adobe Bridge CS5. This is useful if you use Adobe
    Bridge to manage your image collections.

    To access Photomerge from Adobe Bridge:
     1. In Adobe Bridge, select the images that will form a panorama.


4   Combining images in Photoshop                                                        © 2010 Adobe Systems Incorporated
Adobe Photoshop CS5 Extended                                                                            Project 1 guide


 2. In the menu bar, select Tools > Photoshop > Photomerge (Figure 6).
    Photoshop starts and the Photomerge dialog box appears, listing the images you selected in Adobe Bridge.


                                       Figure 6 Photomerge from Adobe Bridge

 3. Continue the process of creating your panorama as described earlier in this guide.


Creating High Dynamic Range (HDR) images
The dynamic range (ratio of dark to bright regions) in the visible world far exceeds what can be displayed on a
monitor or printed. Human eyes can adapt to very different brightness levels, but most cameras and computer
monitors can reproduce only a fixed dynamic range. Photographers, motion picture artists, and others working with
digital images must be selective about what’s important in a scene because they are working with a limited dynamic
range.
High dynamic range (HDR) images open up a world of possibilities because they can represent the entire dynamic
range of the visible world. Because all the luminance values in a real-world scene are represented proportionately and
stored in an HDR image, adjusting the exposure of an HDR image is like adjusting the exposure when photographing
a scene in the real world. This capability lets you create blurs and other real-world lighting effects that look realistic.
Currently, HDR images are used mostly in motion pictures, special effects, 3D work, and some high-end
photography.
You can create an HDR image using multiple photographs, each captured at a different exposure. In Photoshop, the
Merge To HDR Pro command lets you create HDR images from multiple bracketed exposures into a single image
that preserves the full range of light in a scene.

Taking photos for HDR images
Keep the following tips in mind when you take photos to be combined with the Merge To HDR command:
    •    Keep the camera steady. Secure the camera to a tripod.
    •    Capture many exposures. Take enough photos to cover the full dynamic range of the scene. You can try
         taking at least five to seven photos, but you might need to take more exposures depending on the dynamic
         range of the scene. The minimum number of photos should be three.
    •    Vary the shutter speed. Changing the aperture changes the depth of field in each exposure and can produce
         lower-quality results. Changing the ISO or aperture may also cause noise or vignetting in the image.


© 2010 Adobe Systems Incorporated                                                            Combining images in Photoshop    5
Project 1 guide                                                                Adobe Photoshop CS5 Extended


        •    Don’t use auto-bracketting. In general, if you use your camera’s auto-bracket feature, the exposure
             changes are usually too small.
        •    Use a wide range of exposures. The exposure differences between the photos should be one or two EV
             (exposure value) steps apart (equivalent to about one or two f-stops apart).
        •    Use consistent lighting. Don’t vary the lighting; for instance, don’t use a flash in one exposure but not the
             next.
        •    Use only a still life. Make sure that nothing is moving in the scene. Exposure Merge works only with
             differently exposed images of the identical scene.

    To create an HDR image:
     1. Choose File > Automate > Merge To HDR Pro.
     2. In the Merge To HDR Pro dialog box, click Browse,
        browse to select the images, and click Open.
        The images appear in the files list (Figure 7). To remove
        an item, select it in the Merge To HDR dialog box and
        click Remove.
        Note: If you want to add a folder of images or images
        that are open in Photoshop, choose Folder from the Use
        menu or click the Add Open Files button.
     3. (Optional) Select the Attempt To Automatically Align
        Source Images option if you hand held the camera in
        your hands when you photographed the multiple images.         Figure 7 Merge To HDR Pro dialog box
     4. Click OK.
        Photoshop process the images.
        A second Merge To HDR dialog box displays thumbnails
        of the images being used in the merged result, a preview
        of the merged result, a Bit Depth menu, and a slider for
        setting the white point preview (Figure 8).
     5. If necessary, do one of the following to set the view
        options for the merged result preview:
        •    Click the Minus or Plus buttons below the preview
             image to zoom out or zoom in.
        •    Choose a view percentage or mode from the pop-up
             menu below the preview image.
                                                                      Figure 8 Merge to HDR preview with thumbnails
     6. Choose a bit depth for the merged image from the Bit
        Depth menu.
     7. Move the slider below the histogram to preview the
        merged image.
        Moving the slider adjusts the image preview only. All the
        HDR image data remains intact in the merged image file.
        If you’re saving the merged image as 32-bpc, the preview
        adjustment is stored in the HDR image file and applied
        whenever the file is opened in Photoshop. The preview
        adjustment is always accessible and adjustable by
        choosing View > 32-Bit Preview Options.


6   Combining images in Photoshop                                                        © 2010 Adobe Systems Incorporated
Adobe Photoshop CS5 Extended                                                                        Project 1 guide


 8. Click OK to create the merged image (Figure 9).
    Photoshop process the images.
    If you chose to save the merged image as an 8-bits or 16-
    bpc image, the HDR Conversion dialog box opens. Make
    the exposure and contrast corrections to produce an
    image with the dynamic range (tonal range) you want.


                                                                Figure 9 Completed HDR image

Accessing Merge To HDR Pro from Adobe Bridge
You can also begin the process of creating a high dynamic image from Adobe Bridge CS5. This is useful if you use
Adobe Bridge to manage your image collections.

To access Merge To HDR Pro from Adobe Bridge:
 1. In Adobe Bridge, select the images that will form an HDR image.
 2. In the menu bar, select Tools > Photoshop > Merge To HDR Pro (Figure 10).
    Photoshop starts and the Merge To HDR Pro dialog box appears, listing the images you selected in Adobe
    Bridge.


                                    Figure 10 Merge To HDR Pro from Adobe Bridge

 3. Continue the process of creating your HDR image as described earlier in this guide.


© 2010 Adobe Systems Incorporated                                                         Combining images in Photoshop   7

Más contenido relacionado

La actualidad más candente

Semester 1 Review Tutorial
Semester 1 Review TutorialSemester 1 Review Tutorial
Semester 1 Review Tutorial
MrLawler
 
Photography lo2!!
Photography lo2!!Photography lo2!!
Photography lo2!!
AlanSmith96
 
Canon getting started guide
Canon getting started guideCanon getting started guide
Canon getting started guide
Craig Cassidy
 
Graphic Design Workshop 1.3
Graphic Design Workshop   1.3Graphic Design Workshop   1.3
Graphic Design Workshop 1.3
Immanuel Henne
 
Photography terminology powerpoint
Photography terminology powerpointPhotography terminology powerpoint
Photography terminology powerpoint
snailguinproductions
 
Task 2 initial experiments
Task 2 initial experiments Task 2 initial experiments
Task 2 initial experiments
Mel Storey
 
Canon Getting Started Guide (with Improvements)
Canon Getting Started Guide (with Improvements)Canon Getting Started Guide (with Improvements)
Canon Getting Started Guide (with Improvements)
cloestead
 
Experiments evidence template
Experiments evidence templateExperiments evidence template
Experiments evidence template
chamahan
 
Task 2--version 2
Task 2--version 2Task 2--version 2
Task 2--version 2
em-monsey
 
quicktip_scanphotoshop
quicktip_scanphotoshopquicktip_scanphotoshop
quicktip_scanphotoshop
tutorialsruby
 

La actualidad más candente (17)

Semester 1 Review Tutorial
Semester 1 Review TutorialSemester 1 Review Tutorial
Semester 1 Review Tutorial
 
Photoshop Workshop 1 - Fall 2012
Photoshop Workshop 1 - Fall 2012Photoshop Workshop 1 - Fall 2012
Photoshop Workshop 1 - Fall 2012
 
Photography lo2!!
Photography lo2!!Photography lo2!!
Photography lo2!!
 
Canon getting started guide
Canon getting started guideCanon getting started guide
Canon getting started guide
 
Graphic Design Workshop 1.3
Graphic Design Workshop   1.3Graphic Design Workshop   1.3
Graphic Design Workshop 1.3
 
Rules of composition
Rules of compositionRules of composition
Rules of composition
 
Photography terminology powerpoint
Photography terminology powerpointPhotography terminology powerpoint
Photography terminology powerpoint
 
Unit 57 - Photographic terminology
Unit 57 - Photographic terminology Unit 57 - Photographic terminology
Unit 57 - Photographic terminology
 
Task 2 initial experiments
Task 2 initial experiments Task 2 initial experiments
Task 2 initial experiments
 
Canon Getting Started Guide (with Improvements)
Canon Getting Started Guide (with Improvements)Canon Getting Started Guide (with Improvements)
Canon Getting Started Guide (with Improvements)
 
Task 2 b evaluation
Task 2 b   evaluationTask 2 b   evaluation
Task 2 b evaluation
 
Experiments evidence template
Experiments evidence templateExperiments evidence template
Experiments evidence template
 
Task 2--version 2
Task 2--version 2Task 2--version 2
Task 2--version 2
 
Camera functions
Camera functionsCamera functions
Camera functions
 
Photoshop basics
Photoshop basicsPhotoshop basics
Photoshop basics
 
Photographic Composition- Zoom and Crop
Photographic Composition- Zoom and CropPhotographic Composition- Zoom and Crop
Photographic Composition- Zoom and Crop
 
quicktip_scanphotoshop
quicktip_scanphotoshopquicktip_scanphotoshop
quicktip_scanphotoshop
 

Similar a P1 combining images

3. image processing and techniques finished
3. image processing and techniques finished3. image processing and techniques finished
3. image processing and techniques finished
Rebecca Coughlin
 
Adobe Photoshop I Primer
Adobe Photoshop I PrimerAdobe Photoshop I Primer
Adobe Photoshop I Primer
NYCCTfab
 
PhotoshopBeyondBasics
PhotoshopBeyondBasicsPhotoshopBeyondBasics
PhotoshopBeyondBasics
tutorialsruby
 
PhotoshopBeyondBasics
PhotoshopBeyondBasicsPhotoshopBeyondBasics
PhotoshopBeyondBasics
tutorialsruby
 
SFM Lesson 3
SFM Lesson 3SFM Lesson 3
SFM Lesson 3
TonyC445
 

Similar a P1 combining images (20)

Image Processing
Image ProcessingImage Processing
Image Processing
 
Image Processing
Image ProcessingImage Processing
Image Processing
 
How to Sharpen an Image in Photoshop
How to Sharpen an Image in PhotoshopHow to Sharpen an Image in Photoshop
How to Sharpen an Image in Photoshop
 
DAY2_SUPERHERO.pptx
DAY2_SUPERHERO.pptxDAY2_SUPERHERO.pptx
DAY2_SUPERHERO.pptx
 
Cs Pe Create Slide Show
Cs Pe Create Slide ShowCs Pe Create Slide Show
Cs Pe Create Slide Show
 
prod75_019870
prod75_019870prod75_019870
prod75_019870
 
3. image processing and techniques finished
3. image processing and techniques finished3. image processing and techniques finished
3. image processing and techniques finished
 
Adobe Photoshop Black and White Digital Photograph Conversion Using Curves
Adobe Photoshop Black and White Digital Photograph Conversion Using CurvesAdobe Photoshop Black and White Digital Photograph Conversion Using Curves
Adobe Photoshop Black and White Digital Photograph Conversion Using Curves
 
Landscape Focus Stacking for Photography
Landscape Focus Stacking for PhotographyLandscape Focus Stacking for Photography
Landscape Focus Stacking for Photography
 
Adobe Photoshop I Primer
Adobe Photoshop I PrimerAdobe Photoshop I Primer
Adobe Photoshop I Primer
 
6 photo editing tips for website image optimization
6 photo editing tips for website image optimization6 photo editing tips for website image optimization
6 photo editing tips for website image optimization
 
PhotoshopBeyondBasics
PhotoshopBeyondBasicsPhotoshopBeyondBasics
PhotoshopBeyondBasics
 
PhotoshopBeyondBasics
PhotoshopBeyondBasicsPhotoshopBeyondBasics
PhotoshopBeyondBasics
 
Basic tutorials
Basic tutorialsBasic tutorials
Basic tutorials
 
Basic tutorials
Basic tutorialsBasic tutorials
Basic tutorials
 
Image Processing Techniques
Image Processing TechniquesImage Processing Techniques
Image Processing Techniques
 
HDR Tutorial
HDR TutorialHDR Tutorial
HDR Tutorial
 
SFM Lesson 3
SFM Lesson 3SFM Lesson 3
SFM Lesson 3
 
Chap40
Chap40Chap40
Chap40
 
10 tips for using adobe photoshop
10 tips for using adobe photoshop10 tips for using adobe photoshop
10 tips for using adobe photoshop
 

Último

Spellings Wk 3 English CAPS CARES Please Practise
Spellings Wk 3 English CAPS CARES Please PractiseSpellings Wk 3 English CAPS CARES Please Practise
Spellings Wk 3 English CAPS CARES Please Practise
AnaAcapella
 
The basics of sentences session 3pptx.pptx
The basics of sentences session 3pptx.pptxThe basics of sentences session 3pptx.pptx
The basics of sentences session 3pptx.pptx
heathfieldcps1
 

Último (20)

Accessible Digital Futures project (20/03/2024)
Accessible Digital Futures project (20/03/2024)Accessible Digital Futures project (20/03/2024)
Accessible Digital Futures project (20/03/2024)
 
Sociology 101 Demonstration of Learning Exhibit
Sociology 101 Demonstration of Learning ExhibitSociology 101 Demonstration of Learning Exhibit
Sociology 101 Demonstration of Learning Exhibit
 
SKILL OF INTRODUCING THE LESSON MICRO SKILLS.pptx
SKILL OF INTRODUCING THE LESSON MICRO SKILLS.pptxSKILL OF INTRODUCING THE LESSON MICRO SKILLS.pptx
SKILL OF INTRODUCING THE LESSON MICRO SKILLS.pptx
 
Mehran University Newsletter Vol-X, Issue-I, 2024
Mehran University Newsletter Vol-X, Issue-I, 2024Mehran University Newsletter Vol-X, Issue-I, 2024
Mehran University Newsletter Vol-X, Issue-I, 2024
 
Sensory_Experience_and_Emotional_Resonance_in_Gabriel_Okaras_The_Piano_and_Th...
Sensory_Experience_and_Emotional_Resonance_in_Gabriel_Okaras_The_Piano_and_Th...Sensory_Experience_and_Emotional_Resonance_in_Gabriel_Okaras_The_Piano_and_Th...
Sensory_Experience_and_Emotional_Resonance_in_Gabriel_Okaras_The_Piano_and_Th...
 
Wellbeing inclusion and digital dystopias.pptx
Wellbeing inclusion and digital dystopias.pptxWellbeing inclusion and digital dystopias.pptx
Wellbeing inclusion and digital dystopias.pptx
 
Unit-V; Pricing (Pharma Marketing Management).pptx
Unit-V; Pricing (Pharma Marketing Management).pptxUnit-V; Pricing (Pharma Marketing Management).pptx
Unit-V; Pricing (Pharma Marketing Management).pptx
 
How to setup Pycharm environment for Odoo 17.pptx
How to setup Pycharm environment for Odoo 17.pptxHow to setup Pycharm environment for Odoo 17.pptx
How to setup Pycharm environment for Odoo 17.pptx
 
ICT Role in 21st Century Education & its Challenges.pptx
ICT Role in 21st Century Education & its Challenges.pptxICT Role in 21st Century Education & its Challenges.pptx
ICT Role in 21st Century Education & its Challenges.pptx
 
Making communications land - Are they received and understood as intended? we...
Making communications land - Are they received and understood as intended? we...Making communications land - Are they received and understood as intended? we...
Making communications land - Are they received and understood as intended? we...
 
Spellings Wk 3 English CAPS CARES Please Practise
Spellings Wk 3 English CAPS CARES Please PractiseSpellings Wk 3 English CAPS CARES Please Practise
Spellings Wk 3 English CAPS CARES Please Practise
 
Interdisciplinary_Insights_Data_Collection_Methods.pptx
Interdisciplinary_Insights_Data_Collection_Methods.pptxInterdisciplinary_Insights_Data_Collection_Methods.pptx
Interdisciplinary_Insights_Data_Collection_Methods.pptx
 
How to Create and Manage Wizard in Odoo 17
How to Create and Manage Wizard in Odoo 17How to Create and Manage Wizard in Odoo 17
How to Create and Manage Wizard in Odoo 17
 
The basics of sentences session 3pptx.pptx
The basics of sentences session 3pptx.pptxThe basics of sentences session 3pptx.pptx
The basics of sentences session 3pptx.pptx
 
Understanding Accommodations and Modifications
Understanding  Accommodations and ModificationsUnderstanding  Accommodations and Modifications
Understanding Accommodations and Modifications
 
General Principles of Intellectual Property: Concepts of Intellectual Proper...
General Principles of Intellectual Property: Concepts of Intellectual  Proper...General Principles of Intellectual Property: Concepts of Intellectual  Proper...
General Principles of Intellectual Property: Concepts of Intellectual Proper...
 
Key note speaker Neum_Admir Softic_ENG.pdf
Key note speaker Neum_Admir Softic_ENG.pdfKey note speaker Neum_Admir Softic_ENG.pdf
Key note speaker Neum_Admir Softic_ENG.pdf
 
Python Notes for mca i year students osmania university.docx
Python Notes for mca i year students osmania university.docxPython Notes for mca i year students osmania university.docx
Python Notes for mca i year students osmania university.docx
 
Jamworks pilot and AI at Jisc (20/03/2024)
Jamworks pilot and AI at Jisc (20/03/2024)Jamworks pilot and AI at Jisc (20/03/2024)
Jamworks pilot and AI at Jisc (20/03/2024)
 
Introduction to Nonprofit Accounting: The Basics
Introduction to Nonprofit Accounting: The BasicsIntroduction to Nonprofit Accounting: The Basics
Introduction to Nonprofit Accounting: The Basics
 

P1 combining images

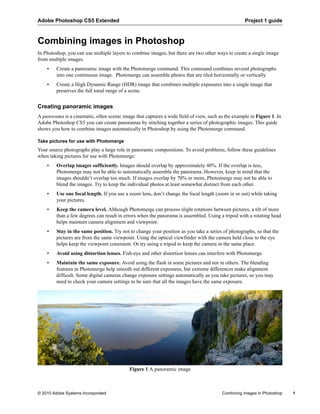
  • 1. Adobe Photoshop CS5 Extended Project 1 guide Combining images in Photoshop In Photoshop, you can use multiple layers to combine images, but there are two other ways to create a single image from mulitple images. • Create a panoramic image with the Photomerge command. This command combines several photographs into one continuous image. Photomerge can assemble photos that are tiled horizontally or vertically. • Create a High Dynamic Range (HDR) image that combines multiple exposures into a single image that preserves the full tonal range of a scene. Creating panoramic images A panorama is a cinematic, often scenic image that captures a wide field of view, such as the example in Figure 1. In Adobe Photoshop CS5 you can create panoramas by stitching together a series of photographic images. This guide shows you how to combine images automatically in Photoshop by using the Photomerge command. Take pictures for use with Photomerge Your source photographs play a large role in panoramic compositions. To avoid problems, follow these guidelines when taking pictures for use with Photomerge: • Overlap images sufficiently. Images should overlap by approximately 40%. If the overlap is less, Photomerge may not be able to automatically assemble the panorama. However, keep in mind that the images shouldn’t overlap too much. If images overlap by 70% or more, Photomerge may not be able to blend the images. Try to keep the individual photos at least somewhat distinct from each other. • Use one focal length. If you use a zoom lens, don’t change the focal length (zoom in or out) while taking your pictures. • Keep the camera level. Although Photomerge can process slight rotations between pictures, a tilt of more than a few degrees can result in errors when the panorama is assembled. Using a tripod with a rotating head helps maintain camera alignment and viewpoint. • Stay in the same position. Try not to change your position as you take a series of photographs, so that the pictures are from the same viewpoint. Using the optical viewfinder with the camera held close to the eye helps keep the viewpoint consistent. Or try using a tripod to keep the camera in the same place. • Avoid using distortion lenses. Fish-eye and other distortion lenses can interfere with Photomerge. • Maintain the same exposure. Avoid using the flash in some pictures and not in others. The blending features in Photomerge help smooth out different exposures, but extreme differences make alignment difficult. Some digital cameras change exposure settings automatically as you take pictures, so you may need to check your camera settings to be sure that all the images have the same exposure. Figure 1 A panoramic image © 2010 Adobe Systems Incorporated Combining images in Photoshop 1
  • 2. Project 1 guide Adobe Photoshop CS5 Extended Photomerge and advanced blending Advanced blending allows Photomerge to assess a series of images and find the ideal location to create a seam that serves as a transition from one image to another. Each image becomes a layer, with a mask applied to the blend seam. In Figure 2 you can see how three images are layered with advanced blending masks to stitch together the scene in Figure 1. Figure 2 Layered images that comprise the panorama in Figure 1 2 Combining images in Photoshop © 2010 Adobe Systems Incorporated
  • 3. Adobe Photoshop CS5 Extended Project 1 guide Creating a panorama by using Photomerge in Photoshop To create a panorama, you need a series of scenic photographs that overlap slightly. To create a panorama: 1. Choose File > Automate > Photomerge. The Photomerge dialog box appears (Figure 3). Figure 3 The Photomerge dialog box 2. Select a Layout option. • Auto Photoshop chooses a Perspective or Cylindrical layout, depending on which produces a better photomerge. • Perspective Creates a consistent composition by designating one of the source images (by default, the middle image) as the reference image. The other images are then transformed (repositioned, stretched or skewed as necessary) so that overlapping content across layers is matched. • Cylindrical Reduces the “bow-tie” distortion that can occur with the Perspective layout by displaying individual images as on an unfolded cylinder. Overlapping content across layers is still matched. The reference image is placed at the center. Best suited for creating wide panoramas. • Spherical Similar to the Perspective layout option but creates gradually arcing upper and lower edges of the image border. • Collage Choose this option to open the source images in a dialog and position them manually for the best result. • Reposition Aligns the layers and matches overlapping content, but does not transform (stretch or skew) any of the source layers. 3. Click Browse, locate and select the files to be merged, and click Open. The selected files appear in the Source Files list. 4. Make sure the Blend Images Together option is selected. 5. Click OK. © 2010 Adobe Systems Incorporated Combining images in Photoshop 3
  • 4. Project 1 guide Adobe Photoshop CS5 Extended Photomerge automatically combines your images into a panorama by using layers and masking (Figure 4). The masking is determined by the advanced blending feature in Photomerge. To turn a layer on or off, click the visibility icon in the Layers panel. Figure 4 Merged layers 6. The next step is to crop your panorama to fill a rectangular frame. In the Tools panel, select the Crop tool and frame your panorama. A Rule of Thirds grid appears with sizing handles (Figure 5). Figure 5 Framing the final panorama 7. To crop your selection, press Enter (Windows) or Return (Mac OS). 8. Save your image. Accessing Photomerge from Adobe Bridge You can also begin the process of creating a panorama from Adobe Bridge CS5. This is useful if you use Adobe Bridge to manage your image collections. To access Photomerge from Adobe Bridge: 1. In Adobe Bridge, select the images that will form a panorama. 4 Combining images in Photoshop © 2010 Adobe Systems Incorporated
  • 5. Adobe Photoshop CS5 Extended Project 1 guide 2. In the menu bar, select Tools > Photoshop > Photomerge (Figure 6). Photoshop starts and the Photomerge dialog box appears, listing the images you selected in Adobe Bridge. Figure 6 Photomerge from Adobe Bridge 3. Continue the process of creating your panorama as described earlier in this guide. Creating High Dynamic Range (HDR) images The dynamic range (ratio of dark to bright regions) in the visible world far exceeds what can be displayed on a monitor or printed. Human eyes can adapt to very different brightness levels, but most cameras and computer monitors can reproduce only a fixed dynamic range. Photographers, motion picture artists, and others working with digital images must be selective about what’s important in a scene because they are working with a limited dynamic range. High dynamic range (HDR) images open up a world of possibilities because they can represent the entire dynamic range of the visible world. Because all the luminance values in a real-world scene are represented proportionately and stored in an HDR image, adjusting the exposure of an HDR image is like adjusting the exposure when photographing a scene in the real world. This capability lets you create blurs and other real-world lighting effects that look realistic. Currently, HDR images are used mostly in motion pictures, special effects, 3D work, and some high-end photography. You can create an HDR image using multiple photographs, each captured at a different exposure. In Photoshop, the Merge To HDR Pro command lets you create HDR images from multiple bracketed exposures into a single image that preserves the full range of light in a scene. Taking photos for HDR images Keep the following tips in mind when you take photos to be combined with the Merge To HDR command: • Keep the camera steady. Secure the camera to a tripod. • Capture many exposures. Take enough photos to cover the full dynamic range of the scene. You can try taking at least five to seven photos, but you might need to take more exposures depending on the dynamic range of the scene. The minimum number of photos should be three. • Vary the shutter speed. Changing the aperture changes the depth of field in each exposure and can produce lower-quality results. Changing the ISO or aperture may also cause noise or vignetting in the image. © 2010 Adobe Systems Incorporated Combining images in Photoshop 5
  • 6. Project 1 guide Adobe Photoshop CS5 Extended • Don’t use auto-bracketting. In general, if you use your camera’s auto-bracket feature, the exposure changes are usually too small. • Use a wide range of exposures. The exposure differences between the photos should be one or two EV (exposure value) steps apart (equivalent to about one or two f-stops apart). • Use consistent lighting. Don’t vary the lighting; for instance, don’t use a flash in one exposure but not the next. • Use only a still life. Make sure that nothing is moving in the scene. Exposure Merge works only with differently exposed images of the identical scene. To create an HDR image: 1. Choose File > Automate > Merge To HDR Pro. 2. In the Merge To HDR Pro dialog box, click Browse, browse to select the images, and click Open. The images appear in the files list (Figure 7). To remove an item, select it in the Merge To HDR dialog box and click Remove. Note: If you want to add a folder of images or images that are open in Photoshop, choose Folder from the Use menu or click the Add Open Files button. 3. (Optional) Select the Attempt To Automatically Align Source Images option if you hand held the camera in your hands when you photographed the multiple images. Figure 7 Merge To HDR Pro dialog box 4. Click OK. Photoshop process the images. A second Merge To HDR dialog box displays thumbnails of the images being used in the merged result, a preview of the merged result, a Bit Depth menu, and a slider for setting the white point preview (Figure 8). 5. If necessary, do one of the following to set the view options for the merged result preview: • Click the Minus or Plus buttons below the preview image to zoom out or zoom in. • Choose a view percentage or mode from the pop-up menu below the preview image. Figure 8 Merge to HDR preview with thumbnails 6. Choose a bit depth for the merged image from the Bit Depth menu. 7. Move the slider below the histogram to preview the merged image. Moving the slider adjusts the image preview only. All the HDR image data remains intact in the merged image file. If you’re saving the merged image as 32-bpc, the preview adjustment is stored in the HDR image file and applied whenever the file is opened in Photoshop. The preview adjustment is always accessible and adjustable by choosing View > 32-Bit Preview Options. 6 Combining images in Photoshop © 2010 Adobe Systems Incorporated
  • 7. Adobe Photoshop CS5 Extended Project 1 guide 8. Click OK to create the merged image (Figure 9). Photoshop process the images. If you chose to save the merged image as an 8-bits or 16- bpc image, the HDR Conversion dialog box opens. Make the exposure and contrast corrections to produce an image with the dynamic range (tonal range) you want. Figure 9 Completed HDR image Accessing Merge To HDR Pro from Adobe Bridge You can also begin the process of creating a high dynamic image from Adobe Bridge CS5. This is useful if you use Adobe Bridge to manage your image collections. To access Merge To HDR Pro from Adobe Bridge: 1. In Adobe Bridge, select the images that will form an HDR image. 2. In the menu bar, select Tools > Photoshop > Merge To HDR Pro (Figure 10). Photoshop starts and the Merge To HDR Pro dialog box appears, listing the images you selected in Adobe Bridge. Figure 10 Merge To HDR Pro from Adobe Bridge 3. Continue the process of creating your HDR image as described earlier in this guide. © 2010 Adobe Systems Incorporated Combining images in Photoshop 7