SlideShare una empresa de Scribd logo
1 de 92
Descargar para leer sin conexión
Defining eAM Parameters
Submitted by Anonymous on Sat, 02/27/2010 - 23:38
Tag:

     •    EAM /


Now that you have established an Enterprise Asset Management enabled organization, you need to set up
specific Enterprise Asset Management parameters that determine organization level defaults for individual
transactions. You will set
up information, such as Maintained Number defaults, Cost defaults, Work Request information, and Work
Order defaults.

To define Enterprise Asset Management parameters:
Navigate to the Enterprise Asset Management Parameters window.

1. Optionally, indicate whether this organization has system generated asset numbers within individual asset
groups. You can specify the starting serial number within the Organization Parameters window, and/or the
Master Item window when defining Asset Groups. If the starting serial number is defined for the Asset
Group, this definition will overwrite the starting serial number within the Organization Parameters.

2.1 The Cost Defaults region represents default cost information for future Work Orders, without defined cost
elements within the Work Order.
Select an Enterprise Asset Management Cost Element to indicate how to capture cost overheads, and any
miscellaneous resource costs. Valid values are Equipment, Labor, and Material.

2.2 Select a Cost Category to use as the default for departments that do not have a cost category defined.
Department costs are then posted to the appropriate cost elements. Valid values are Maintenance,
Operations, Contract, and any other values that you might have added within the extensible lookup table.

3. Enable Implement from horizon start date from preventative maintenance.
4. Select a Request Type from the list of values. The type selected (Work Request or Service Request) is
the request type generated. An organization can utilize either Service Requests or Work Request, but not
both. The Service Request can be associated to a maintenance Work Order within Enterprise Asset
Management. An organization can change from one request type to the other, as long as there are no
existing, open requests.


                            4.1 Indicate whether Work Requests are automatically approved upon creation, or
if every user, with the responsibility assigned to the asset’s current owning department, will get a notification
via Workflow.This notification can be viewed within self service, within the responsibility you use to log in.
If the Auto Approve check box is selected, Work Requests are created with a status of Awaiting Work Order.
If the check box is not selected, Work Requests are created with a status of Open.

4.2 If you choose the Extended Log check box, the system will keep an audit trail of records, when defining
or updating Work Requests.

5. From the list of values, select the WIP Accounting Class default to ensure that Work Orders generated
within Enterprise Asset Management will have an established account code structure assigned, to accept
charges incurred by that Work Order. The WIP accounting class codes available in the list of values will be
of type, Maintenance. If a Maintenance type WIP accounting class does not exist, you can define a new
one .
Note: A Work Request status needs to be Awaiting Work Order before it can be linked to a Work Order. The
Awaiting Work Order status means that the Work Request is approved.
Note: Oracle Cost Management handles maintenance Work Orders as non-standard, expense jobs.

5.1 Optionally, enter a Work Order Prefix. A prefix enables your organization to identify routine Work Orders.

5.2 Optionally, select a Default Department. Oracle recommends that you select a default department. This
department defaults to maintenance Work Orders as they are entered. If a department does not exist on a
Work Order, it cannot be released.

5.3 If you select the Auto Firm On Release check box, the dates on the Work Order cannot be re-scheduled
automatically.

5.4 Indicate whether Material Issue Requests are enabled.

5.5 Indicate whether only billable items are invoiceable.
If the Invoice Billable Items Only check box is selected, only billable items can be invoiced. However, the
item needs to be invoiceable and the Billing Type check box needs to be selected.
If the Invoice Billable Items Only check box is not selected, any item can be invoiced if they are invoiceable
within the Master Item window (Invoiceable Item and Invoice Enabled check boxes selected within the
Master Item window.)the item only needs to be invoiceable

6. Within the Account Defaults region, select a Maintenance Offset account. You can create or break a
Parent/Child (hierarchy) relationship that exists between an Asset Number and a Serialized Rebuildable,
manually using the Configuration History page. This account records what is sent to Inventory when a
Rebuildable is removed from an Asset, and then brought back into Inventory.
For example, if the relationship is broken, the Asset or Rebuildable is sent to either Scrap or Inventory. If the
Rebuildable is sent to Inventory, the accounting is as follows:
Dr. Inventory
Cr. Maintenance Offset


You use Areas to logically sort assets by the zones in which they reside. Areas divide the maintenance plant
or facility into zones, which help to track and account for assets. Areas will later be associated with an asset.

To set up Areas:
1.   Navigate to the Area window.
          2. Using the Add icon from the tool bar, add an area.
          3. Enter a Description for this location.
          4. Save your work.


Defining Departments and Resources
Submitted by Anonymous on Tue, 03/02/2010 - 11:35
Tag:

     •    EAM /

A department represents a crew within your organization. A crew can include people, machines, or
suppliers. Departments are also used to collect costs, apply overhead, and compare load to capacity. You
assign a department to each operation of a routing and assign resources that are available for that
department. The department assigned to each operation of a routing also becomes the assigned department
of the corresponding operation within the Work Order, assuming the Work Order is using the routing.

Resources are defined before departments. When you define a department, you specify available resources.
A resource represents a craft. You can enter multiple resources for each department. For each resource,
you can specify the shifts that the resource is available. For each resource shift, you can also specify
capacity modifications that change the available hours per day, units per day, or workdays.
1. Enter a name for the Department, unique to the Organization.
2. Optionally, select a department Class from the list of values.
3. Select a Location from the list of values. You are required to enter a location for a department if it is the
receiving department following outside processing .
4. Enter a Project Expenditure Organization.
5. Optionally, enter an Inactive On date on which you can no longer assign this department to routing
operations

See the details @
http://www.oracleug.com/user-guide/bills-material/department
http://www.oracleug.com/user-guide/bills-material/resource
http://www.oracleug.com/user-guide/bills-material/set-ups

An instance is a specific employee name or piece of equipment. Choose Instances to add employees or
equipment to the current resource


Category Codes and Sets
Submitted by Anonymous on Tue, 03/02/2010 - 14:38
Tag:

     •    EAM /

Category codes are used as naming conventions for assets by creating classes and subclasses. They are
user defined, and used to logically group assets, simplifying the search for Maintained Numbers.
For example, Cranes can be classified by several different types, such as Overhead Cranes, Jib Cranes,
and Mobile Cranes. You can query using the class CRANE, which will display all assets defined as Cranes
within that organization. If you enter
CRANES.JIB, the system would then narrow the results to just those assets defined as Jib Cranes. With
both queries, you can identify assets based on familiar names, rather than numbers.
Category codes are first defined, then added to the Enterprise Asset Management Category Set. After they
belong to this category set, they can be associated with Maintained Groups, which tie to individual assets.

To set up Category Codes:


1. Navigate to the Find Categories window. You can find existing category codes, or create new ones.
2. Choose New.
3. Select the Asset Management category to create a new Class.Subclass from the Structure Name list of
values.
4. Enter in a new Category, for example TRUCK.FRKLFT.
5. Add a long Description for this category.
6. Optionally, select the Enabled check box to indicate that this category is enabled.
7. Optionally, enter an Inactive On date.
8. Optionally, select the Enabled for iProcurement check box to indicate that this category is enabled for
iProcurement.
9. Optionally, select the Viewable by Supplier check box to indicate that this category can be viewed by the
Supplier.
10. Save your work.
To set up Category Sets:


To associate Category Codes (TRUCK.FRKLFT) with a Maintained Group, you must first define the item
category relationship through the Category Sets menu option.
1. Navigate to the Category Sets window.
2. Select the flashlight icon from the tools menu, then select Enterprise Asset Management from the list of
values.
3. A description is defaulted, but you can optionally change it.
4. Select Asset Management from the Flex Structure list of values.
5. Indicate the Controlled At level. Valid values are Master Level, and Organization Level.
6. Enter a Default Category code for assets that are not associated with Maintained Groups.
7. If you select Allow Multiple Item Category Assignments, you can define a series of categories, such as
Crane.Jib, and Crane.Overhead, that can be associated to a single Asset Group.
8. If you select Enforce List of Valid Categories, you will prevent users from entering incorrect categories
that are not associated with the Asset Group associated with the asset being created.
9. Enter the Category Codes that you want to associate with this category set.
10. Select Assign to display a table enabling you to associate the categories with a Maintained Group.
11. Save your work.

Defining Default Category Sets
When you install Oracle Inventory, you must assign a default category set to each of the following functional
areas: Inventory, Purchasing, Order Management, Costing, Engineering, and Planning. Product Line
Accounting is seeded with the Inventory category set. Inventory makes the default category set mandatory
for all items defined for use by a functional area. If your item is enabled for a particular functional area you
cannot delete the item's corresponding default category set assignment. Default category sets are required
so that each functional area has at least one category set that contains all items in that functional area.


                             You can enable an item for each functional area by using that functional area's
item defining attribute. An item defining attribute identifies the nature of an item. For example, what
designates an item as an "engineering item" is the attribute Engineering Item. If a functional area's item
defining attribute is controlled at the Organization level, then that functional area may only have an
Organization level default category set.

You set the item defining attribute when you define the item. The following table presents item defining
attributes:
When you enable an item for a certain functional area, Oracle Inventory automatically assigns the item to
the default category set of that functional area and the default category of that set. For example, if you set
Inventory Item to Yes, then Inventory automatically assigns the item to the Inventory functional area's default
category set and default category.

You may change a functional area's default category set under certain conditions. You should ensure that
every item within the functional area belongs to the new default category set (which replaces the existing
default category set). If the item defining attribute of the functional area is controlled at the Organization level
then the new default category set should also be controlled at the Organization level.


Maintained Group (Asset Group or Rebuildable Item)
Submitted by Anonymous on Tue, 03/02/2010 - 15:07
Tag:

     •    EAM /

During implementation, Maintained Group (Asset Group or Rebuildable Item) names should be established.
Maintained Groups represent groups of assets that are virtually identical. Generally, a Maintained Group is
defined for each Manufacturer
and Model Number combination. Examples include Acme Model 123 Pump and Ford F150 2002 Truck.

To set up Maintained Groups:
1. Navigate to the Maintained Group (Master Item) window. The Master Item window is used to create
Maintained Groups, Activities, and Rebuildable Items.
2. Enter the Maintained Group name in the Item field.
3. Enter a Description for this Maintained Group, up to 240 characters.
4. Use the @Asset Group template to quickly apply attribute values, and to ensure that the appropriate
attributes are applied.
a. Select TOOLS from the Tools menu. From the drop down list, select COPY FROM.
b. Select the @Asset Group template from the list of values.
The following table presents the necessary attribute values that are applied automatically to the Maintained
Group, when using the template:


5. Access the Inventory Tab. In the Serial region, select Predefined for the Generation value.
6. Define a Starting Prefix and Starting Number for this Maintained Group. When a new asset is created for
this Maintained Group, the system will default the prefix, along with the starting number sequence.
7. Optionally, select the paperclip Attachments icon to attach relevant documents, such as drawings,
standard procedures, and reference guides, to this Maintained Group. You can attach file, URL, and text
attachments.
8. Save your work.

To associate Maintained Groups with multiple organizations:
1. From the Master Item window, select TOOLS from the Tools menu.
2. Select Organization Assignment.
3. Enter additional organizations in the available table.
4. After saving your work, you can create Assets for this Maintained Group.


Setting Up Attributes
Submitted by Anonymous on Tue, 03/02/2010 - 15:52
Tag:

     •    EAM /

You can define common characteristics data specific to Asset Groups, such as Facility Information,
Engineering Specifications, Regulation Requirements, Horsepower, Voltage, and Square Footage, by
creating Attribute Groups using descriptive flexfields. After the Attribute Group is created, you can then
assign it to a Maintained Group. This enables you to define additional characteristics data when defining an
asset associated with the Maintained Group. This provides extensive query capabilities. Attribute groups are
descriptive flexfields, defined by segments and values.

For example, you can define an Attribute Group, Front Loader Nameplate data. This group can then be
associated with the CARS Maintained Group. When defining an asset within the CARS Maintained Group,
you can optionally utilize the attributes to specify nameplate data (specified data such as make, year, and
model)
for the asset. This creates a simplified way of entering specified data related to a specific Maintained Group.

To set up Attributes:


1. Navigate to the Descriptive Flexfield Segments window.
2. Select the flashlight icon from the tool bar. From the list of values, select the Oracle Inventory Application
with the Title, Asset Attributes.
3. Unfreeze the Flexfield Definition by deselecting the Freeze Flexfield Definition check box.
4. In the Context Field Values region, select a row, then click the New icon. A blank row will be added for
you to create an attribute group.
5. Enter the attribute group name in the Code field.
6. Optionally, enter a Description for this attribute group.
7. Select Segments to add attributes to the attribute group you just created.
8. Enter a Number to sequence the data.
9. Define the Name of the specific attribute. The Window Prompt will default to this name.
10. Select a Column value from the list of values.
11. Select a Value Set from the list of values, or optionally, select Value Set to create a new one.
12. If the Displayed check box is selected, this attribute will display to the user
when defining data for an asset within the Maintained Group (for example,CARS) associated with the
attribute group (for example, NAMEPLATE) that this attribute (for example, Make) resides in.
13. Optionally, select the Enabled check box to enable the attribute to be available when defining assets.
14. Save your work, and return to the Descriptive Flexfield Segments window.
15. Select the Freeze Flexfield Definition check box. Failure to do this will prevent you from querying the
segments from the Attribute window.
16. Save your work

To associate the Attribute Group with a Maintained Group:


1. Navigate to the Attributes Assignment window.
In the below example, any asset created within the CARS Maintained Group will have the NAMEPLATE
attribute group available as an option for data entry.
2. Select a Maintained Group from the list of values.
3. Select an Attribute group from the Attribute Group Code list of values. You can have an unlimited number
of Attribute Groups associated with an asset.
4. Save your work.


Defining Asset Numbers (Maintained Numbers)
Submitted by Anonymous on Tue, 03/02/2010 - 16:24


Enterprise Asset Management provides three methods in which you can enter a new asset. You can create
them individually, by copying information from an existing asset, utilize the multiple asset entry method, or
use the Import Asset Number interface.

You must first set up an Maintained Group, before defining Maintained Numbers.The diagram below
illustrates the parent/child (asset hierarchy) relationship that can be created when creating Maintained
Numbers. In this example, the Maintained Group is BUILDING, containing the Maintained Numbers Building
100, Building 200, and Building 300. Those Maintained Numbers have their own child assets, Floor 1 and
Floor 2.
To set up assets individually:
Navigate to the Define Asset Numbers window.

1.1 Select a Maintained Group from the list of values. This Maintained Group will be associated with this
asset.

1.2 Enter a Maintained Number if you do not have them automatically generated, or accept or modify the
default, if you have automatic generation enabled.
After an asset has been saved, it cannot be deleted. The asset can only be deactivated if there are no open
Work Orders for the asset, or if the asset is not part of an asset hierarchy.

1.3 Optionally, enter an Asset Description, up to 240 characters.


                        1.4 Optionally, associate this asset to an Asset Category. This is the Class and
Subclass code, such as CRANE.OVERHEAD or BUILDING.FLOOR.

2.1 Within the Main tabbed region, you can optionally select an Owning Department for this asset from the
list of values. This represents the crew responsible for the asset. Notifications, regarding Work Requests,
are sent to everyone with a responsibility assigned to the Work Request’s associated asset’s
current owning department

2.2 Optionally, select a Criticality code from the list of values, indicating the importance of the asset to the
organization. This field is for information only.

2.3 Optionally, select a WIP Accounting Class from the list of values. This will identify the Expense cost
elements associated with the work performed, such as materials, labor, and resources.
2.4 Optionally, enter the Area where this asset resides. This is a user defined listing
of logical areas of work. For example, North Plant, East Wing, or Area 1.

2.5 Indicate whether this asset is maintainable. If the Maintainable check box is selected, you can create
Work Requests and Work Orders for this asset.
For example, an asset can be created for cost-tracking purposes. We may want to see the cost for all top
level assets in an asset hierarchy, but we do not want to maintain those assets. In this situation, do not
select this check box.

2.6 Enabled Active check box shows that asset is active.

2.7 In the Parent Asset region, optionally enter a Maintained Group. This defines asset hierarchy
information, enabling you to review all cost associated with an asset or asset hierarchal view.

Enter a parent Maintained Number. This defines asset hierarchy information. If a Maintained Group was
created in above step, then this field is mandatory. For example, in the diagram example above, you would
need to enter Building 100 in this field if you were currently defining the Floor 1 asset.

3.1 In the Production Equipment region, optionally enter a Production Organization. The list of values
displays the production inventory organizations maintained by the current asset’s organization.

3.2 Select an Item from the list of values. This is mandatory if you populated the Production Organization
field. Only items that were defined with an equipment template, or with the Equipment item attribute enabled,
will be available.

3.3 Enter a Serial Number. This is mandatory if you populated the Production Organization field. This is the
specific name of the component within the Equipment Type, defined above.

4.1 Optionally, enter the Fixed Asset region information if Oracle Fixed Assets is installed. This is Enterprise
Asset Management’s integration with Fixed Assets. Enter a Category, which is a grouping of fixed assets,
defined within Oracle Fixed Assets. This category is tied to a set of books, and must be the same set of
books that is assigned to the current Enterprise Asset Management
organization.

4.2. Optionally, enter the Number if Oracle Fixed Assets is installed. This represents a fixed Maintained
Number that belongs to a fixed asset category, associated with the asset.

4.3 The Property Management fields, Location Name, and Location Code, will default from a Property
Manager export process (Export Locations to Enterprise Asset Management) if Oracle Property
Management is installed. These fields are not updateable. The Location Code and Maintained Number fields
reflect as the same number, and cannot be changed.

5.1 You can select Resource Usage only if the fields in the Production Equipment region are populated. This
enables you to view production Work Orders using the equipment that corresponds with this Maintained
Number as a resource.

5.2 Optionally, select Attributes to enter attribute values for the asset.
Only existing, enabled Attribute Groups will display. These Attribute Groups are optional; you do not need to
enter values for all existing Attribute Groups. From this window, you cannot generate
Attribute Groups.

5.3 Optionally, select Associate Activity to directly associate this Asset with an Activity.

5.4 Optionally, enter file, URL, or text attachments to this asset by choosing the paperclip Attachments icon.
You can then choose Document Catalog to add asset specific documents


Defining Miscellaneous Documents
Submitted by Anonymous on Tue, 03/02/2010 - 12:30
Tag:

     •    EAM /
You can create text and files, such as spreadsheets, graphics, and OLE objects. You can attach these
documents to a maintenance Work Order, asset, or operation.

To define miscellaneous documents:


1. Navigate to the Miscellaneous Documents window.

2. Select a Data Type from the list of values.


Defining Asset (Number) Routes
Submitted by Anonymous on Tue, 03/02/2010 - 17:50
Tag:

     •    EAM /

You might need to perform an Activity on multiple Maintained Numbers. To eliminate the possibility of
creating multiple Work Orders for the same Activity, you can define Asset Routes. You can define a
Preventive Maintenance schedule for your Asset Route to specify when an Activity should be scheduled for
the Asset Route. Only day interval rules can be defined for Asset Routes.

To define Asset Routes:
1. Navigate to the Define Asset Route window.

2. Select a Maintained Group from the list of values.

3. Enter the name of the Asset Route in the Maintained Number field.

4. Optionally, associate this Asset Route to an Asset Category. This is the Class and Subclass code, such
as CRANE.OVERHEAD or BUILDING.FLOOR.

5. Within the Main tabbed region, you can optionally select an Owning Department for this Asset Route from
the list of values. This represents the crew responsible for the asset. Notifications, regarding Work
Requests, are sent to everyone with a responsibility assigned to the Work Request’s associated asset’s
current owning department.


                         6. Optionally, select a Criticality code from the list of values, indicating the
importance of the Asset Route to the organization. This field is for information only.

7. Optionally, select a WIP Accounting Class from the list of values. This will identify the Expense cost
elements associated with the work performed, such as materials, labor, and resources.

8. Optionally, enter the Area where this Asset Route resides. This is a user defined listing of logical areas of
work. For example, North Plant, East Wing, or Area 1.

9. Indicate whether this Asset Route is maintainable. If the Maintainable check box is selected, you can
create Work Requests and Work Orders for this Asset Route.

10. Choose Asset Route to display the Asset Route window.


Setting Up Asset (Group) Bills of Material
Submitted by Anonymous on Tue, 03/02/2010 - 18:11
Tag:

     •    EAM /

You can identify and select the required items that make up an asset. A bill of material (BOM) can be used
to list all items and components that make up a particular asset, and can be defined for each Maintained
Group. The items defined
on an asset BOM are standard inventory components.
Note: Even if you are not using Project Manufacturing applications, Project Parameters must be defined for
your eAM
enabled organization to successfully create Asset Groups. This is required because an Asset BOM is of type
Model/Unit Effective and this BOM type is currently allowed only if PJM organization parameters are set up
for the eAM enabled organization to which the Asset Group has been assigned. To define Project
Parameters, open the Project Parameters window using Project Manufacturing Super User responsibility
and without entering any data in the window, save the record.

To set up an Asset BOM:


1. Navigate to the Bills of Material window.
2. Select a Maintained Group from the Item field list of values.
3. Within the Main tabbed region, the Item Sequence and an Operation Sequence will default.
4. Enter the inventory Component to make up the Maintained Number.
5. Enter the Quantity of that component necessary for the asset.
6. Select the Serial Effectivity tabbed region.
7. Select the Maintained Number (Maintained Numbers are always serialized) from the list of values that the
inventory items are going to be associated to, in the From and To fields. Only Maintained Numbers
associated with the current Maintained Group are available.
If the Component is installed in all Maintained Numbers within the Maintained Group, enter 0 in the From
field, and leave the To field blank.
8. Save your work.


Defining Asset (Number) Statuses
Submitted by Anonymous on Tue, 03/02/2010 - 18:44
Tag:

     •    EAM /

Shutdown of an asset is sometimes necessary to perform a maintenance Activity. You can create new
shutdown information associated with an asset, or view existing shutdown history information already
recorded to an asset. Shutdown information consists of start and end dates, work order numbers requiring
maintenance on the asset, and specific operation sequences. At the time of completing a Work Order to its
operations, you can view asset shutdown information in the Asset Status window.

All shutdown information entered within the Asset Status window is for informational purposes only.

To view and define shutdown information for an asset:
1. Navigate to the Asset Status window.
2. Select an Asset Number from the list of values.
3. Choose Find. All shutdown information for the current asset appears in the Shutdown Details region.
4. To add new shutdown information for the current asset, Select a Start Date from the list of values.
5. Select an End Date from the list of values.
6. Optionally, associate the shutdown information to a specific work order requiring maintenance on the
current asset. Only work orders created for the current asset are available from the list of values.
7. Optionally, associate shutdown information to the operation level of a work order by choosing a specific
Operation Sequence.
8. Optionally, enter a Shutdown Description.
9. Save your work.


Defining Activities
Submitted by Anonymous on Tue, 03/02/2010 - 18:58
Tag:

     •    EAM /

Activities provide you with a standard template of jobs, which can be applied to Work Orders, such as
Routine or Preventive Maintenance. After these Activity Templates are created, they can be associated with
one or more Asset Numbers or
Rebuildables. They also need to be associated to a maintenance BOM and activity routing, containing the
materials and resources needed for operations, respectively. When Work Orders are created for assets
associated to the Activity, the material and resources associated with the current Activity automatically copy
to the Work Orders created.

There are three methods you can use to create an Activity. You can create an Activity within the Master
Activity (Master Item) window, create Activities from the Activity Workbench, and create Activities from within
a Maintenance Work
Order.

To set up Activities within the Master Activity window:
1. Navigate to the Activity (Master Item) window. The Master Item window is used to create Maintained
Groups, Activities, and rebuildable.
2. Enter the name of the Activity in the Item field.
3. Enter a Description for this Activity, up to 240 characters.
4. Use the @Activity template to quickly apply attribute values, and to ensure that the appropriate attributes
are applied.
a. Select TOOLS from the Tools menu. From the drop down list, select COPY FROM.
b. Select the @Activity template from the list of values.
The following table presents the necessary attribute values that are applied automatically to the Activity,
when using the template:


5. Select the Asset Management tabbed region.
In the Activity Property region, optionally enter an Activity Type to indicate the type of maintenance for this
Activity. It is used when defining a Work Order. It should remain generic, and should not describe in detail
the job to be done. For
example, Inspection, Overhaul, Lubrication, Repair, Servicing, or Cleaning.
6. Optionally, select an Activity Cause from the list of values, to specify what situation caused this work to be
generated. For example, Breakdown, Vandalism, Normal Wear, or Settings.
7. Optionally, select an Activity Source from the list of values. Activity Source codes are reasons activities
need to be executed. For example, Warranty Compliance, OSHA Compliance, or Military Specification
Requirements.
8. Optionally, select a Shutdown Type from the list of values. This indicates whether a shutdown is
necessary to perform this maintenance activity. For example Required, and Not Required. This field is
informational only.
9. Optionally, select the Activity Notification Required field to indicate whether the asset requiring work is
mobile, and needs to be brought into the shop for repairs. This field is for information only.
10. Optionally, select the paperclip Attachments icon to attach relevant documents, such as drawings,
standard procedures, and reference guides, to this Activity. You can attach file, URL, and text attachments.
11. Save your work. After saving your work, this Activity can be associated with an asset
To set up Activities using the Activity Workbench:


                           Navigate to the Activity Workbench window. Choose Launch and to create an
Activity, choose New.
1.1 Enter an Activity Name.
1.2. Enter an Activity Description.
1.3 Choose an activity Template from the list of values. This will automatically bring in the properties
associated with an Activity. The @Activity template is created for you, however you can create your own
Activity Templates, as well.

Activity Properties
2.1 Within the Activity Properties region, optionally select an Activity Type. The value in this field will default
from the Template properties above.

2.2 Within the Activity Properties region, optionally select an Shutdown Type. The value in this field will
default from the Template properties above. This field is informational only until a future release.

2.3 Within the Activity Properties region, optionally select an Activity Cause. The value in this field will
default from the Template properties above.

2.4 Within the Activity Properties region, optionally select an Activity Source. The value in this field will
default from the Template properties above.

2.5 The Activity Notification check box is informational only until a future release.

Copy Option
3.1 Within the Copy Options region, optionally select the entity to copy information from. Valid values are
Activity and Work Order. If you select Activity, the values within the Activity region are relevant, and the
values within the Work Order region are irrelevant. If you select Work Order, the values within the Work
Order region are relevant, and the values within the Activity region are irrelevant.

3.2 Within the Activity region, if Activity is populated in the Copy From field, optionally select an Activity
name.

3.3.1 Within the Activity region, if Activity is populated in the Copy From field, optionally select the BOM
check box to indicate that the Maintenance Bill of Material, associated with the current Activity within the
Activity region, will copy to the new Activity Name.
For example, in the screen shot above, the Maintenance Bill of Material associated with the 3000 Mile Truck
Maint will copy to Oil Change.

3.3.2 Within the Activity region, if Activity is populated in the Copy From field, optionally select the Routing
check box to indicate that routings, associated with the current Activity within the Activity region, will copy to
the new Activity Name.
For example, in the screen shot above, routings associated with the 3000 Mile Truck Maint will copy to Oil
Change.

3.3.3 Within the Activity region, if Activity is populated in the Copy From field, select All or None from the
Association list of values.
■ All: All Asset and Rebuildable associations, associated with the current Activity within the Activity region,
will copy to the new Activity.
■ None: No Asset and Rebuildable associations, associated with the current Activity within the Activity
region, will copy to the new Activity.

3.4.1 Within the Work Order region, if Work Order is populated in the Copy From field, select an existing
maintenance Work Order from the list of values.

3.4.2 Within the Work Order region, if Work Order is populated in the Copy From field, select All or None
from the Operation list of values.
■ All: All operations associated with the current Work Order, populated in the Work Order field, will copy to
the new Activity.
■ None: No operations associated with the current Work Order, populated in the Work Order field, will copy
to the new Activity

3.4.3 Within the Work Order region, if Work Order is populated in the Copy From field, select All, Issued, or
None from the Material list of values.
■ All: All material associated with the current Work Order, populated in the Work Order field, will copy to the
new Activity.
■ Issued: Only material issued to the current Work Order, populated in the Work Order field, will copy to the
new Activity.
■ None: No material associated with the current Work Order, populated in the Work Order field, will copy to
the new Activity.

2.4.4 Within the Work Order region, if Work Order is populated in the Copy From field, select All, Issued, or
None from the Resource list of values.
■ All: All resources associated with the current Work Order will copy to the new Activity.
■ Issued: Only resources issued to the current Work Order will copy to the new Activity.
■ None: No resources associated with the current Work Order will copy to the new Activity.

21. Within the Work Order region, if Work Order is populated in the Copy From field, select None, Current,
or All from the Association list of values.
■ None: No Assets and Rebuildables, associated with the current Work Order, will associate with the new
Activity.
■ Current: An Asset and/or Rebuildable, associated with the current Work Order, will associate with the new
Activity.
■ All: All Assets and/or Rebuildables, associated with the current Work Order’s Activity, will associate with
the new Activity.

22. Save your work. After saving, the new Activity is automatically assigned to the current organization


Activity Association Template
Submitted by Anonymous on Wed, 03/03/2010 - 16:00
Tag:

     •    EAM /

You can streamline the creation of Activity associations using an Activity Association Template. For
example, when you create a Maintained Group, and then Maintained Numbers within that group, you do not
need to utilize the Association
window to associate those Maintained Numbers with an Activity. If you create an Activity Association
Template, the Activity that you associate with the current Maintained Number’s Maintained Group will
automatically determine the Activity
that is associated with the current Maintained Number.
To create activity templates:


1. Navigate to the Activity Association Template window.
2. Select a valid Activity from the Activity list of values. The Activity needs to already have been created
within the Master Item window.
3. Within the Main tabbed region, select an Item Type of Asset or Rebuildable.
4. Select a Maintained Group from the list of values. After this record is saved, this Maintained Group will be
associated with the current Activity. Every Maintained Number created within the current Maintained Group
will automatically be associated with the current Activity.
5. Optionally, select a Priority code from the list of values. This value will default from the Master Activity
information created within the Master Item window.
6. Optionally, enter Effectivity Dates for this Activity Template.
7. Within the Activity tabbed region, you can optionally select an Activity Cause from the list of values. This
value specifies what situation caused this work to be generated. For example, Breakdown, Vandalism,
Normal Wear, or Settings.This value defaults from the Master Activity information created within the Master
Item window.
8. Optionally, select an Activity Type from the list of values. This code indicates the type of maintenance for
this Activity. It is used when defining a Work Order. It should remain generic, and should not describe in
detail the job to be done.
For example, Inspection, Overhaul, Lubrication, Repair, Servicing, or Cleaning. This value defaults from the
Master Activity information created within the Master Item window.
9. Optionally, select the Tagging Required check box to indicate whether tag out procedures are required.
The Area might need to be secured for operations required for carrying out a Work Order. Tags are
generally printed and placed on an asset, warning the plant that the asset is shutdown, and should not be
started. This check box helps the planner isolate those jobs that require a tagout. This is for information
only.
10. Optionally, select an Owning Department from the list of values. This value defaults from the Enterprise
Asset Management Parameters information for the current organization.
11. Optionally, select a Shutdown Type from the list of values. This indicates whether a shutdown is
necessary to perform this maintenance activity. For example Required, and Not Required. This field is
informational only. This value defaults from the Master Activity information that was created within the
Master Item window.
12. Optionally, select a WIP Accounting Class from the list of values. This value defaults from the Enterprise
Asset Management Parameters information for the current organization.
13. Optionally select an Activity Source from the list of values. Activity Source codes are reasons activities
need to be executed. For example, Warranty Compliance, OSHA Compliance, or Military Specification
Requirements. This value will default from the Master Activity information that was created within the Master
Item window.
14. Save your work.


Associate Assets with Activities
Submitted by Anonymous on Wed, 03/03/2010 - 13:00
Tag:
•    EAM /

After you have defined Maintained Groups, Assets, and Activities, you can associate the Activities with
assets and/or rebuildables. However, you can streamline the creation of Activities and associations using an
Activity Association Template. Assets need to be associated with Activities before entering the Activity into a
Preventive Maintenance Schedule.

Note: The Activity Workbench is generally used to streamline your Activity setups, including Maintained
Number/Activity associations. Also, you can streamline the creation of Activity associations using
an Activity Association Template. For example, when you create a Maintained Group, and then Maintained
Numbers within that group, you do not need to utilize the Association window to associate those Maintained
Numbers with an Activity. If you create an Activity Association Template, the Activity that you associate with
the current Maintained Number’s Maintained Group will automatically determine the Activity that is
associated with the current Maintained Number.

To associate Assets with Activities:


Navigate to the Activity Association window and Select an Activity from the list of values.

1.1 Within the Main tabbed region, select Capital/Asset or Rebuildable from the Item Type list of values. This
field works directly with the Maintained Group and Maintained Item fields. If Capital/Asset is selected, the
Maintained Group refers to the Asset Group, and the Maintained Number refers to the Asset Number. If
Rebuildable is selected, the Maintained Group refers to the Rebuildable Item, and the Maintained Number
refers to the specific serial numbers for the current Rebuildable Item.
1.2 Select a Maintained Group from the list of values. If Asset is populated in the Item Type field, Asset
Groups are available in the list of values.
1.2 Select a Maintained Number from the list of values. Only Maintained Numbers associated with the
previously selected Maintained Group will be available.
Maintained Numbers are always serial controlled. If you had selected a Non-serialized Rebuildable in the
Maintained Group field, then the Maintained Number field is not required.
1.3 Optionally, select a Priority Code from the list of values. This field is for information only.
1.4 Optionally, enter Effective Dates. If the Effective From field is left blank, it will default to the system date.
If the Effective To field is left blank, it will default to NULL.

2.1 Within the Activity tabbed region, the Activity Cause will default from the Activity definition, specifying
what
situation caused this work to be generated. For example, Breakdown, Vandalism, Normal Wear, or Settings.
Optionally, you can select an Activity Cause from the list of values to update this field.
2.2 The Activity Type will default from the Activity definition. This code indicates the type of maintenance
activity needed to be done for this Activity. It is used when defining a job or a standard job. This code should
remain generic, and should not describe in detail the job to be done. For example, Inspection, Overhaul,
Lubrication, Repair, Servicing, or Cleaning. Optionally, you can select an Activity Type from the list of values
to update this field.


                            2.3 Optionally, select an Activity Source from the list of values. Activity Source
codes are reasons activities need to be executed. For example, Warranty Compliance, OSHA Compliance,
or Military Specification Requirements. This value will default from the Master Activity information that was
created within the Master Item window.

2.4 Optionally, select a Shutdown Type from the list of values. This indicates whether a shutdown is
necessary to perform this maintenance activity. For example Required, and Not Required. This field is
informational only. This value defaults from the Master Activity information that was created within the
Master Item window.

2.5 Optionally, select the Tagging Required check box to indicate whether tag out procedures are required.
The Area may need to be secured for operations required for carrying out a Work Order. Tags are generally
printed and placed on an asset, warning the plant that the asset is shutdown, and should not be started. This
check box helps the planner isolate those jobs that require a tagout. This is for information only.

2.6 The Owning Department responsible for this activity or asset will default from the Asset Number
definition.
Optionally, you can update this field by selecting an owning department from the list of values. This is
normally a Planner or Supervisor.

2.7 Optionally, select a WIP Accounting Class from the list of values. You can over-write the value that
defaults from the Enterprise Asset Management Parameters information, for the current organization.


Maintenance(Activity) Route
Submitted by Anonymous on Wed, 03/03/2010 - 16:39
Tag:

     •    EAM /

A Maintenance Route is the set of operations or jobs necessary to perform an Activity. When a Work Order
is created
for an Activity, the Maintenance Route corresponding to the Activity explodes to the Work Order; all
operations specified in
the Maintenance Route are copied to the Work Order as its operations.

Maintenance Routes are not Asset Routes. Enterprise Asset Management operations differ from
manufacturing operations
because manufacturing operations must be performed sequentially, whereas eAM operations do not need to
be performed sequentially. In Enterprise Asset Management, operations may not be sequential. You can
specify that one operation
is dependent on another. Also, it is possible that two unrelated operations can happen concurrently. One
operation can be dependent on multiple operations. Multiple operations can be dependent on only one
operation. The dependency may not be totally connected.

To define a maintenance route:
Navigate to the Activity Workbench window and Choose Launch.
1. Within the Activity Workbench pane, select the Activity for which you wish to create the Routing. and
Choose Routing. Select an Activity from the Item list of values.

2.1 Within the Main tabbed region, enter an operation Sequence, or let the system automatically generate it
for you, according to your profile setup.
2.2 To copy or reference standard operations into a routing, use the operation Code list of values. You can
define a new standard operation by selecting Standard Operations from the Tools menu.
If you use a standard operation code, the operation information for that code will be copied into the current
operation. You can then update that information as desired .
2.3 Select a Department from the list of values, where the operation will be performed.
2.4 Select the Referenced check box to indicate that any changes to standard operations will be reflected in
the routing. If the standard operation is selected, this check box is selected by default.
2.5 The Effective date will default to the system date, but you can optionally change this .
2.6 Optionally, enter a Disabled date to indicate the current operation’s expiration.
2.7 Select the Description tabbed region. Enter a Description for the current operation.

3. Optionally, choose Routing Network to view the operation dependencies for the current asset route.

4. Optionally, select an operation, then choose Operation Resources to view the resources associated with
the current department attached to this operation. Optionally, you can modify the resources listed .


Maintenance(Activity) Bills of Material
Submitted by Anonymous on Wed, 03/03/2010 - 17:09
Tag:

     •    EAM /

You can identify and select the required items used by an Activity. A bill of material (BOM) can be used to
list all items needed to perform a particular Activity, and can be defined for each Activity. For example, you
might have an Activity titled, Fork Lift Daily Maintenance. The items necessary to perform this Activity
include water, fork lift lubrication oil, filled propane tanks, and shop rags. As Maintenance BOMs are
created, they are associated to an Activity.

When a Work Order is created for an Activity, the Maintenance BOM corresponding to the Activity explodes
to the Work Order ;all components specified in the Maintenance BOM are copied to the Work Order as
material requirements.
To set up an maintenance BOM:


     1.   Navigate to the Activity Workbench window.
          2. Choose Launch.
          3. Within the Activity Workbench pane, select the Activity for which you wish to define the Bill of
          Material.
          4. Choose BOM.
          5. Select an Activity from the Item field list of values.
          6. Select the Main tabbed region. The Item Sequence will default.
          7. Enter the Operation Sequence that this Component (material item necessary for the operation
          sequence, NOT rebuildable item) is needed for.
          8. Enter necessary Components and their Quantities that are required to perform the Activity. You
          can enter an unlimited number of material items.
          9. Optionally, select the Date Effectivity tabbed region to specify effectivity dates per component.
          10. Save your work.


Defining Rebuildable Items
Submitted by Anonymous on Wed, 03/03/2010 - 17:14
Tag:

     •    EAM /

Items that are installed, removed, and refurbished are referred to as Rebuildable Items. Examples of
Rebuildable Items include motors, control boxes, and computer boards. Rebuildable Items may need to be
removed or refurbished while a parent Asset is maintained. Rebuildable Items are inventory items; you have
the option to serialize them.

To set up rebuild items:
1. Navigate to the Rebuildable Item (Master Item) window. The Master Item window is used to create
Maintained Groups, Activities, and Rebuildable Items.
2. Enter the Rebuildable Item name in the Item field.
3. Enter a Description for this Rebuildable Item, up to 240 characters.
4. Use the @Rebuildable template to quickly apply attribute values, and to ensure that the appropriate
attributes are applied.
a. Select TOOLS from the Tools menu. From the drop down list, select COPY
FROM.
b. Select the @Rebuildable template from the list of values.
The following table presents the necessary attribute values that are applied automatically to the Activity,
when using the template:


5. Optionally, select the paperclip Attachments icon to attach relevant documents, such as drawings,
standard procedures, and reference guides, to this Rebuildable Item. You can attach file, URL, and text
attachments.
6. Optionally, select the Inventory tab to define a Non-Serialized Rebuildable Item. Within the Generation
field, select No Control. If you wish to define a Serialized Rebuildable Item, select one of the other options
available, based on your
business needs. Valid values include No Control, Predefined, At Receipt, and At Sales Order Issue.
7. Save your work.
Rebuildable Serial Numbers
Submitted by Anonymous on Wed, 03/03/2010 - 18:00
Tag:

     •    EAM /

To set up rebuildable serial numbers individually
Navigate to the Define Rebuildable Serial Numbers window.


                           1.1 Select a Maintained Group from the list of values. This is the Maintained
Group (Rebuildable Item) you are associating with the Rebuildable Serial Number you are currently creating.
Note: To create a rubildable serial number the serail number should be enabled else the rebuildable asset
wont be available in rebuildable serial number window.

1.2 Enter a Maintained Number (Rebuildable Serial Number) if you do not have them automatically
generated, or accept or modify the default, if you have automatic generation enabled .

1.3 Optionally, enter a description for the Rebuildable Serial Number of up to 240 characters.

2.1 Within the Main tabbed region, you can optionally select an Owning Department for this Rebuildable
Serial Number from the list of values. This represents the crew responsible for the Rebuildable Serial
Number (Maintained Number). Notifications, regarding Work Requests, are sent to everyone with a
responsibility assigned to the Work Request’s associated Maintained Number’s current owning department.

2.2 Optionally, enter the Area where this Maintained Number resides. This is a user defined listing of logical
areas of work. For example, North Plant, East Wing, or Area 1.

2.3 Optionally, select a Criticality code from the list of values, indicating the importance of the Maintained
Number to the organization. This field is for information only.

2.4 Optionally, select a WIP Accounting Class from the list of values. This will identify the Expense cost
elements associated with the work performed, such as materials, labor, and resources.
2.5 Save your work. Notice that the Current Status is Defined but not used.
To establish a rebuildable serial number in Inventory
3.1 To add this item to a Subinventory, select a Subinventory from the list of values. If the selected
Subinventory has a Locator, you must also enter a Locator.

3.2 Choose Intantiate to automatically activate a Miscellaneous Receipt process.
This process creates inventory for the Maintained Number (Rebuildable Serial Number), in the selected
Subinventory and Locator.
As part of the Instantiate process, if Preventive Maintenance, Activity, and/or Meter Templates are
associated with
the current Maintained Group (Rebuildable Item), an association instance is automatically created for the
current Maintained
Number (Rebuildable Serial Number) and that Activity, and/or Meter and Preventive Maintenance Schedule,
respectively.
The Instantiate process is a one-time-process only. After the process is successful, the Current Status of the
Maintained Number changes to Resides in stores, and the Instantiate option is disabled.

4. Optionally, choose Associate Activity to associate the current Maintained Number (Rebuildable Serial
Number) to an Activity.


Rebuildable BOM
Submitted by Anonymous on Wed, 03/03/2010 - 18:09
Tag:

     •    EAM /


Meter and Meter Templates
Submitted by Anonymous on Wed, 03/03/2010 - 19:13


Preventive Maintenance Setup
eAM can generate Work Orders automatically based on meter readings, runtime and/or calendar days. An
example of meter-based preventive maintenance is your car’s oil changes. Most car manufacturers
recommend that you change your engine oil every 3,000 miles or six months, whichever comes first.

To set up the above scenario, you would first define your car’s odometer as a meter. Next, you would
associate that meter to an asset (your car), using the Asset Meter Association window. After you have
associated the meter to the asset, you can associate the Maintenance Activity (oil change) that should
occur, based on the meters you have defined. This is done via Preventive Maintenance Scheduling
Defining Meter Templates
There are two ways to create meters. You can create them within the Meter Definition window, or create
them using a Meter Template window. If you create Meters using the Meter Definition window , you will need
to associate that meter definition with individual Maintained Numbers manually. If you utilize the Meter
Template definition functionality, you can associate that Meter Template with Maintained Groups. After the
association is created, when a Maintained Number (Asset Numbers or Rebuildable Serial Numbers) is
created within that Maintained Group (Asset Group or Rebuildable Item), the system will automatically
create a new instance of the meter, associated with the specific Maintained Number. This enables you to
streamline your meter setup.

However, the meters are not created retroactively; it applies only to Maintained Numbers created after the
Meter Template was created.

To define Meter Templates:


Navigate to the Meter Template window.

1. Enter a unique meter template Name amd Description of the Meter Template.

2. Select a unit of measure (UOM) from the list of values. After the meter is created, this field cannot be
updated.

3. Select whether the meter readings will be Ascending, Descending, or Fluctuating. If you choose blank
from the drop down list, the meter reading can fluctuate. A fluctuating meter reading is one that can go up
and down, for example, a temperature gauge. As production units pass through meters, meter readings
increment. Another example of an ascending meter is a car odometer. Some liquid dispensers start full and
record decreasing readings as material is used.
Note: If the meter is fluctuating, then it cannot be used in Preventive Maintenance scheduling.

4. If you select the Used in Scheduling check box, the meter will be used in Preventive Maintenance
Scheduling. If there are any scheduling rules associated with this meter, this check box cannot be cleared.
If this is a fluctuating meter, this check box is disabled. If the Used in Scheduling check box is selected, the
Usage Rate (per day) and Use Past Reading fields become mandatory.

5. Enter a usage Rate (per day). This field works in conjunction with the Use Past Readings field to support
historical readings prior to eAM implementation. It supplies the system benchmark data that can be used to
set the occurrence of
scheduled PMs. Rate per day is referred to in the absence of a sufficient value in the Use Past Reading
field.
This field is mandatory only if you have selected the Used in Scheduling check box.

6. Enter a value for the number of past readings. This value designates how many readings prior the
scheduler should go to for calculating the usage rate. If there is an insufficient number of readings (for
example four, instead of the required
five), the system will continue the calculation based on the usage Rate per day entered.
This field is mandatory only if you have selected the Used in Scheduling check box.

7. Optionally, enter an Initial Reading. This is automatically used for the meter, or each new instance of the
meter that is created and associated to a Maintained Number via the Meter Template.

8. Select the meter effectivity dates. If left blank, the meter is effective all of the time, after it is created. If you
select a future date, the meter is disabled until that date. You can disable a meter effective on a specific date
by selecting a To date.

9. Save your work.

Defining Meters
Alternatively, you can create Meters using the Meter Definition window. You will need to manually associate
the meter definition with individual Maintained Numbers. If you utilize the Meter Template definition
functionality, you can associate that Meter Template with Maintained Groups .

To define a meter within the Meter Definition window:
Navigate to the Meters window.


1. Enter a unique meter Name and Description for this meter.

2. Select a unit of measure (UOM), associated with this meter, from the list of values. After the meter is
created, this field cannot be updated.

3. Select whether the meter readings will be Ascending, Descending, or Fluctuating. If you choose blank
from the drop down list, the meter reading can fluctuate. A fluctuating meter reading is one that can go up
and down, for example, a temperature gauge. As production units pass through meters, meter readings
increment. Another example of an ascending meter is a car odometer. Some liquid dispensers start full and
record decreasing readings as material is used.
Note: Fluctuating meters cannot be used in Preventive Maintenance scheduling.
After the meter is created, you cannot update this field.

4. If you select the Used in Scheduling check box, the meter will be used in Preventive Maintenance
Scheduling. If there are any scheduling rules associated with this meter, this check box cannot be cleared. If
this is a fluctuating meter, this check box is disabled. If the Used in Scheduling check
box is selected, the Usage Rate (per day) and Use Past Reading fields become mandatory.

5. Enter a usage Rate (per day). This field works in conjunction with the Use Past Readings field to support
historical readings prior to eAM implementation. It supplies the system benchmark data that can be used to
set the occurrence of scheduled PMs. Rate per day is referred to in the absence of a sufficient value in the
Use Past Reading field.
This field is mandatory only if you have selected the Used in Scheduling check box.

6. Enter a value for the number of past readings. This value designates how many readings prior the
scheduler should go to for calculating the usage rate. If there is an insufficient number of readings (for
example four, instead of the required five), the system will continue the calculation based on the usage Rate
per day entered.
This field is mandatory only if you have selected the Used in Scheduling check
box.

7. Optionally, enter an Initial Reading. This is automatically used for the meter, or each new instance of the
meter that is created and associated to a Maintained Number via the Meter Template.

8. Select the If left blank, the meter is effective all of the time, after it is created. If you select a future date,
the meter is disabled until that date. You can disable a meter effective on a specific date by selecting a To
date.

9. Save your work.


Meter Templates with Maintained Groups and Associate Meters
   with Assets
Submitted by Anonymous on Wed, 03/03/2010 - 19:23
Tag:

     •    EAM /

Associating Meter Templates with Maintained Groups
If you utilize the Meter Template definition functionality, you can associate that Meter Template with
Maintained
Groups. After you create the association, when a new Maintained Number (Asset Numbers or Rebuildable
Serial Numbers) is created within that Maintained Group (Asset Group or Rebuildable Item) a new instance
of the corresponding meter is
automatically created. This enables you to streamline your Meter setup.

To associate Meter Templates with Maintained Groups:
1. Navigate to the Meter Template Association window.
2. Select an Item Type from the list of values. Valid values are Asset or Rebuildable.
3. Select a Maintained Item (Asset Group or Rebuildable Item) from the list of values.
4. Optionally, choose Find to query existing Meter Template/Maintained Group relationships.
5. Within the Meter Template region, select a meter template Name from the list of values.
6. Save your work. After saving, every Maintained Number defined as part of the current Maintained Group
will automatically associate with the Meter Template; you do not need to create this association manually.

Associating Meters with Maintained Numbers
Meter Association creates the relationship between the meter definition and the
Maintained Number.

To associate meters with Maintained Numbers


1. Navigate to the Meter Association window.
2. For optimal performance, select a Maintained Group (Asset Group or Rebuildable Item) from the list of
values before selecting an Maintained Number. Only Maintained Numbers associated with the selected
Maintained Group will be available in the list of values. You can optionally select an Maintained Number
from the list of values first. This triggers the Maintained Group to default.
3. Choose Find to view all Meters associated with the current Maintained Number (Asset Number or
Rebuildable Serial Number).
4. In the Meters region, you can associate existing, defined meters with the current asset.
To associate existing meters with the current Maintained Number, select a meter Name from the list of
values. All remaining fields in the Meters region are view-only.
5. Save your work.


Define PM Schedule Definitions
Submitted by Anonymous on Wed, 03/03/2010 - 19:36
Tag:

     •    EAM /

Defining Set Names
A PM schedule for an Activity and a Maintained Number or Maintained Group must uniquely belong to a Set
Name. Multiple PM Schedules for the same Maintained Number or Maintained Group and Activity
combination can be created across Sets. However, out of those PM Schedules, only one can be identified
as the Default and used for generating Work Orders. Other PM Schedules in other Sets can be used for
simulation purposes only. Every Set Name has an end date. Every PM schedule that belongs to the Set
Name must have its effective-to date before the end date of the PM Schedule’s Set Name. Before assigning
a Set Name to a PM schedule, you need to define Set Names within the Set Name Definition window. If you
do
not want to create Set Names, you can assign PM schedules to set, MAIN; it already exists.
To define Set Names:


1. Navigate to the Set Name window.

2. Enter the name of the Set Name.

3. Optionally, enter an End Date. Every PM schedule that belongs to the Set Name must have its effective-to
date before the End Date of the PM Schedule’s Set
Name. If you leave this field blank, the current Set Name will not expire.

4. Optionally, enter a Description for this Set Name.

5. Optionally, choose Templates to add, change, delete, or view Preventive Maintenance Schedule
Templates, associated with the current Set Name.

6. Optionally, choose Schedules to create PM Schedule Definitions, associated with the current Set Name.

7. Optionally, choose Set Default to identify all schedules within this set as Default. PM Schedules identified
as Default will automatically generate Work Orders, by the PM Scheduler process. PM schedules that are
not identified as Default can only generate Work Order suggestions, by the PM Scheduler process. The
generated suggestions cannot be converted into Work Orders. You can create an unlimited number of Set
Names within this window.


          •       Defining a Preventive Maintenance Template
Defining a Preventive Maintenance Template
Submitted by Anonymous on Wed, 03/03/2010 - 20:00
Tag:

     •    EAM /

An Activity and Maintained Number combination can be associated with Runtime, Day Interval Rules, or a
list of dates, defining when an Activity should be scheduled for an Asset, Serialized and Non-Serialized
Rebuildables, or an Asset Route. Only Day Interval rules and List of Dates rules are supported for Non-
Serialized Rebuildables and Asset Routes. The Preventive Maintenance (PM) Scheduler process creates
suggested Work Order dates based on these rules. A planner can then view these forecasted Work Orders,
and generate them as necessary.

There are two ways to create PM schedule definitions for Serialized Rebuildables and Assets. You can
create them individually within the Preventive Maintenance Schedules window, or streamline the process of
creating them using a PM Template. A PM Template is a schedule, defined for a Maintained Group (Asset
Group or Rebuildable Item)/Activity association. If you utilize the PM Template functionality, a new PM
Schedule is automatically created for a newly created Maintained Number (asset or rebuildable) for the
Maintained Group. All PM Template attributes are copied over to the PM Schedule for the Instance. You can
optionally modify the values of the PM Instances created.


                          Before a PM Template can be created, the following prerequisites need to already
exist:
– Activity Definition
– Activity Association Template
– Meter Template Definition : A Meter Template definition is required only if the PM Template is based on
Runtime Rules.
– Meter Template Association : A Meter Template Association is required only if the PM Template is based
on Runtime Rules.

To create a PM Template:


Navigate to the Find Preventive Maintenance Schedules window. This window enables you to enter
information to narrow your search for query mode. To define a new PM Template, choose New.
1.1. Enter a PM Template name in the Schedule Name field.
1.2 Select an Item Type from the list of values. Valid values are Asset and Rebuildable. If you select Asset,
the Maintained Group fields refer to the Asset Group. If you select Rebuildable, the Maintained Group fields
refer to the Rebuildable Item.
1.3 Enter a Set Name. A PM schedule for an Activity and Maintained Group must uniquely belong to a Set
Name. Every Set Name has an end date. Every PM schedule that belongs to the Set Name must have its
effective-to date before the end date of the PM Set Name. Before assigning a Set Name to a PM schedule,
you need to define Set Names within the Set Name Definition window. If you do not want to create Set
Names, you
can assign PM schedules to set, MAIN; it already exists.
1.4 Select a Maintained Group from the list of values.
1.5 Select an Activity from the list of values. Only Activities associated with Maintained Groups are eligible
for defining a Schedule Template.
1.6. Select a Schedule Type from the list of values. Valid values are Rule Based and List Dates. If you select
Rule Based, the Day Interval Rules and Runtime Rules tabbed regions are enabled to enter information. If
you select List Dates, you
will define information within the List Dates tabbed region.
1.7. Optionally, select the Instantiation check box. If this check box is selected, a new instance of the current
PM schedule template is created for each new Maintained Number (Asset Number or Rebuildable Serial
Number).

2.1 The Effective dates will default from the current Activity, if they exist. Optionally, select or update the
Effective From and Effective To dates.
2.2. Optionally, enter a Lead Time In Days.
Lead time in a Preventive Maintenance Schedule is different than lead time associated with Work Order
creation. The Preventive Maintenance process suggests Work Orders to be created or scheduled, starting
from the last service day of the Asset to the cut-off day you specified while running the process. If a Lead
Time In Days is specified, the Preventive Maintenance process predicts work for those extra days beyond
the cut-off date. This provides the maintenance department advanced visibility for maintenance work that is
typically predicted in the next planning process. The maintenance department can prepare for such work in
the current planning period.
2.3 Optionally, enter a Tolerance In Days to indicate a minimum interval in days that suggested Work
Orders’ dates are spaced from each other.

3.1 In the Scheduling Options region, indicate how the PM Scheduler process calculates Work Order dates.
■ Start to Start: The PM Scheduler process uses the Last Service Start Date, and calculates scheduled start
dates. This is a forward scheduling method.
■ Start to End: The PM Scheduler process uses the Last Service Start Date, and calculates the scheduled
end dates. This is a backward scheduling method.
■ End to Start: The PM Scheduler process uses the Last Service End Date, and calculates the scheduled
start dates. This is a forward scheduling method.
■ End to End: The PM Scheduler process uses the Last Service End Date, and schedules the scheduled
end dates. This is a backward scheduling method.
3.2 In the Schedule Based On region, indicate how the predicted due dates are determined.
■ First Due Date: The due date is set to the first due date of all rules.
■ Last Due Date: The due date is set to the last due date of all rules.
For example, below is a Runtime Rule that includes two meters, Meter1 and Meter2.


If you specify First Due Date in the Scheduling Based On region of the PM Template, between the two
meters, the first meter that hits the due reading triggers the service. In this case, if Meter1’s reading reaches
the interval of 100 first, the service happens before Meter2’s reading reaches its interval of 50.
Conversely, you can choose Last Due Date in the Scheduling Based On region.
In this case, even if Meter1 reaches its due reading, the service will not be scheduled until Meter2 has also
reached its due reading.
This region is disabled if the current PM schedule definition’s Scheduling Type field is populated with List
Dates.

4.1 Optionally, select the Reschedule Manual Work Orders check box. If this check box is selected,
unreleased manual work orders are considered during PM scheduling.

4.2 If the Run To Failure check box is selected, the Preventive Maintenance Scheduler will not automatically
schedule Maintained Numbers within this Maintained Group and Activity association, however manual Work
Orders can still be created. This is relevant for Maintained Numbers that cost more to maintain than the
Maintained Number itself. You might also check this box for forecasting and budgeting reasons. For
example, your asset is a conveyor belt. It is common in maintenance environments to let this asset wear out
completely before replacing it. You estimated that the life of this asset is 18 months, and have set up a
schedule for a replacement Work Order every 18 months. In reality, you found that the belts have ended up
wearing out every 12 months, affecting your cost budget.
You can select this check box and clear it later. For example, you might associate a Maintained Number to
an Activity, but maybe you cannot currently maintain or schedule this Maintained Number. You may have
future plans to maintain this Maintained Number.

If this check box is selected, only PMs created as a copy of this PM Template will generate Work Orders for
the corresponding asset in the Maintenance Workbench

4.3 Optionally, select the Default check box to indicate that the current PM schedule definition will generate
Work Orders. If this check box is not selected, only Work Order suggestions are generated. You can have
only one Default PM for a
Maintained Item/Activity combination.

5.1.1 For Day Interval Rules Optionally, enter Effective From and To dates to specify the rule’s expiration.

5.1.2 Enter an Interval In Days. For example, if you enter the number three, a Work Order suggestion will
be created every three days. You can optionally create variable Day Interval Rules. For example, you would
like Work Order suggestions created every three days in January, and every four days in February. The
window below illustrates this example:

5.2.1 Optionally, within the Runtime Rules tabbed region, select a Meter Name to indicate that Preventive
Maintenance scheduling is based on a Runtime Rule. If you have previously set up a Day Interval Rule, you
can base the scheduling on
a Runtime Rule, as well. Only Meter Templates associated with this Maintained Group, and with the Used in
Scheduling check box selected in the meter template definition, are available in the list of values.

For example, trucks of a specific Make and Model need to be scheduled for an oil change every 30 days, or
every 1000 miles. If only the Runtime Rule is taken into account, the next due date will be February 10, 2002
(January 1 2002 + 40 days), and every 40 days after that. This is calculated as the interval (1000 miles)
divided by the usage rate (25 miles per
day).
The PM Scheduler process compares the above suggested dates from the runtime interval rule, to those of
the day interval rule: Base Date of December 26, 2001 + every 30 days.
The Work Orders ultimately created by the PM Scheduler process are those of the earliest or latest dates,
depending on how the Schedule Based On region is populated. If you selected First Due, the earliest
suggestion is used for Work
Order creation. The opposite is also true.

5.2.2 The Interval and UOM fields work together. For example, for every 2000 miles, this Maintained
Number needs an oil change. The UOM defaults from the Meter Template definition of the current Meter
Template.
You can optionally create multiple Runtime Rules. For example, from zero to 10,000 miles, you would like
your asset serviced every 3,000 miles. From 10,000 to 50,000 miles, you would like your asset serviced
every 2,000 miles.

5.2.3 You cannot enter the Last Service Reading. This field is automatically updated with the meter reading
information recorded at Work Order completion. Note: The Preventive Maintenance Scheduler will
automatically calculate the meter usage rate, based on historical data, which is then used to predict the next
meter due date. Refer to the example below.

5.3.1 If you populated List Dates within the Schedule Type field, select the List Dates tabbed region to define
the specific due dates that Work Orders should transpire.
For example, you want asset, Car1, serviced on May 1 and November 1 every year for the next three years.
In this case, you would create a List Dates type schedule definition, and list all the due dates within this
tabbed region. The PM
Scheduler process creates suggested Work Order dates on those specified dates.

6. Save your work.


eAM Work Management
Submitted by Anonymous on Thu, 12/31/2009 - 10:40
Tag:

     •    EAM /
The Work Order is the foundation of all maintenance organizations. Work orders define what resources and
items are needed to conduct work. They can


     •                               Manually generated as a routine Work Order
     •    Automatically generate through the use of preventive Maintenance Schedules
     •    Issue of an inventoried rebuildable

These Work Orders are then reviewed and shared with Operations to produce an estimated schedule.


Enterprise Asset Management integrates with Oracle Quality. You can use Quality Collection Plans to
predefine required feedback information that must be entered into the Enterprise Asset Management system
upon a Work Order’s completion. For example, data to collect can include inspection points for an
Maintained Number, and Downtime variables. If a variance is recorded into the quality plan, the system
creates a Work Request. You can define quality collection plans directly on the Work Order, or define them
as attributes of an Activity to ultimately default into future Work Orders generated for specific Maintained
Number/Activity combinations.

For each Work Order, the system can aggregate the estimated costs from the associated BOM and
resources(Maintenance or activity BOM and Routing), to develop a costing profile for the current Work
Order. Costing Profiles are then used for future Budgeting and Forecasting.
For each Work Order, the system can aggregate the actual costs during the lifecycle of the Work Order.
These costs are rolled up, based on the hierarchy of the current Work Order’s associated Maintained
Number. You can view these actual costs by period, at a transaction level, or at a summary level.


Routine Work Orders
Submitted by Anonymous on Thu, 03/04/2010 - 19:46
Tag:

     •    EAM /

Routine Work Orders are normally created by a Planner from the Maintenance Workbench, and are also
created using a menu option. Material and resource planning is used at each status of the routine Work
Order.

To manually create a Work Order
Navigate to the Find Work Orders window and Choose New
The header information displays general information about the Maintained Number and the type of work
required.


1.1 The Work Order number is assigned by the system and can be updated.
1.2 Enter a Maintained Number requiring maintenance. The Maintained Group defaults.
1.3 Select an Activity from the list of values. Only Activities associated with this Maintained Number are
available.
Note: If this Work Order was previously created, you can add an Activity, as long as the Work Order is at an
Unreleased or Draft status, or an Activity was not previously defined. If any tasks, material, or resource
requirements exist, these must be deleted before adding an Activity to a pre-existing Work Order After you
select an Activity, the system loads the associated maintenance BOM (material) and maintenance route
(resources) associated with the Activity. After an Activity is saved to a Work Order, you can no longer
change or delete the Activity.
1.4 Enter a WIP accounting Class code to represent the charge (expense) accounts associated with the
Maintained Number. This can default from the Maintained Number and can be updated.
1.5 Enter the Status. For example, Unrelease, Released, On Hold, and Draft. Certain transactions update
this status automatically, including Work Order Completion.
1.6 Optionally, select a Work Order Type from the list of values. Work Order Types enable you to
differentiate Work Orders, for example, Routine, Preventive, Rebuild, Emergency, or Facilities. Maintenance
management can use this information to sort and monitor work activity for reporting and budgeting. Work
Order Types are referenced in the Activity and Work Order.
1.7 The Instance Number field tracks the number of instances the current Work Order has been updated.
This field is disabled.

Scheduled Dates region
2.1 In the Scheduled Dates region, enter the scheduled Start date of the Work Order if it is to be based on a
forward schedule. The scheduling process uses this date as a starting point to calculate the scheduled end
date and duration for
allocated resources and material. If the material/resources are not available by this date, the scheduling
process moves the start date forward.
Note: Actual dates are entered at operation and Work Order completion. Scheduled dates are calculated by
the Enterprise Asset Management scheduler if you have Oracle Manufacturing Scheduling enabled.
Otherwise, the WIP scheduler calculates the dates.
2.2 Enter a scheduled Completion date to be used for backward scheduling. This indicates the requested
end by date of the work. The scheduling process uses this date as a starting point to calculate the scheduled
start date and duration
for allocated resources and material. If the material and resources are not available by that date, the
scheduling process moves the start date backwards to ensure completion by the required end date .

Main Tab
3.1 Optionally, select a Priority Code from the list of values. For example, High, Medium, or Low.
3.2 The Shutdown Type defaults from the Activity. This helps the planner group Work Orders that may
require shutdowns, so that they can be planned together.
3.3 If the Firm check box is checked, planning and scheduling does not adjust the schedule, regardless of
material or resource availability. This check box defaults as checked or cleared, depending on the Auto Firm
On Release check box setting, established in the Enterprise Asset Management Parameters setup for the
current organization. This defaults only after the Work Order is released.
If the check box is selected, the end date is calculated based on the Work Order duration. The scheduler
automatically calculates the duration based upon the operations (resource duration setup) on the Work
Order. This check box is
updateable for a Work Orders at Draft, Released, Unreleased, On-Hold, or Cancel statuses .
3.4 Optionally, select the Tagout Required check box to indicate that the Area needs to be secured for
operations required for carrying out this Work Order. Tags are generally printed and placed on a Maintained
Number, warning the plant that
the Maintained Number is shutdown and should not be started. This check box helps the planner isolate
those jobs that require a tagout.
To store tagout documents using the Attachments feature:
a. Select the paperclip Attachments icon to attach relevant tagout documents. You can attach URL, file, or
text attachments.
3.5 The Planned check box is selected if the current Work Order was created from forecasted Work Orders
3.6 Optionally, select the Enable Material Issue Requests check box to enable eAM to manage material
availability to the current Work Order. Material is physically available to a Work Order via the material
request and verification process.

Activity tab


4.1 Optionally select an Activity Type from the list of values. This code indicates the type of maintenance for
this Activity. It is used when defining a job or a standard job, for example, Inspection, Overhaul, Lubrication,
Repair, Servicing,
or Cleaning. This can default from the Activity.
4.2 Optionally, select an Activity Cause from the list of values to specify what situation caused this work to
be generated, for example, Breakdown, Vandalism, Normal Wear, or Settings. This can default from the
Activity.
4.3 Optionally, select an Activity Source from the list of value to specify reasons Activities need to be
executed, for example, Warranty Compliance, OSHA Compliance, or Military Specification Requirements.
This can default from the
Activity egion. The Owning Department defaults in from the selected Maintained Number . This indicates the
persons or department responsible for this Maintained Number.
Note: Actual dates are entered at operation and Work Order completion. Scheduled dates are calculated by
the Enterprise Asset Management scheduler if you have Oracle Manufacturing Scheduling enabled.
Otherwise, the WIP scheduler calculates the dates.
Note: When viewing a rebuild Work Order, the owning department defaults from the owning department of
its parent
Work Order.

Project TAB
5.1 Optionally, select the Project tab. This tab is enabled only if Project Manufacturing is installed and
enabled.
a. Optionally, select a Project from the list of values.
b. Optionally, select a Task from the list of values.

Rebuild tab
6.1 You can select the Rebuild tab if this Work Order is created for a rebuildable item.

6.2 Optionally, select the Work Request tab to display Work Requests associated with this Work Order. You
can add Work Requests to a Work Order by selecting a Request Number from the list of values. Only Work
Requests at an Awaiting
Work Order status are available in the list of values. You can link multiple Work Requests to a single Work
Order. However, only one Work Order can be associated with a Work Request. You can de-link a Work
Request from a Work Order.
To de-link a Work Request from a Work Order:
a. Highlight the Work Request.
b. Choose Delete.

Service Request tab
7.1 Optionally, select the Service Request tab to display Service Requests associated with this Work Order.
7.2 Select the Bill, Routing tab. This tab enables you to select alternate, predefined BOMs and Routings.
See: Setting Up Maintenance Bills of Material and Defining Maintenance Routes, Oracle Enterprise Asset
Management Implementation Guide.
After the alternate BOM and Routing are selected, the system uses the associated items and assign the
associated resources needed to execute this Work Order.

8.1 Optionally, choose Operations to prepare necessary operations. These operations default from the
maintenance route associated with the current Activity, but can optionally be updated.

8.2 Optionally, choose Materials to view or update the associated Maintained Number’s items list. From the
Material Requirements window, you can optionally choose Select Materials to add this Asset BOM to the
material requirements for the current Work Order.

8.3 Optionally, choose Resources to view or update the resources assigned to each operation.

8.4 Optionally, choose Asset Route to view the Asset Route associated with the current Work Order’s
Maintained Group. You might need to perform one Activity on multiple Maintained Numbers. To eliminate
the possibility of creating multiple Work Orders for the same Activity, you can define Asset Routes.
You can only choose Asset Route if an Asset Route is associated with the current Maintained Number.

8.5 Optionally, choose Costs to view Work Orders falling in the specific accounting periods, specified in the
Accounting Information by Period region. Accounting Periods are defined within Oracle General Ledger.
Actual Costs: This is the accumulation of all cost for material and resource transactions for the Maintained
Number’s associated maintenance Work Orders, based on a specified period.
8.6 Optionally, select a Work Order, then choose Value Summary to view a summary of the actual,
estimated, and variance costs for labor hours, equipment hours, and material against the current Work
Order.
Estimated Costs: A BOM (material parts list) and routing (resources) can be associated with a Work Order.
When you select Estimated Costs type from the list of values, the estimated costs of all material and
resources associated with a Work Order appear, enabling you to budget costs.
Variance Costs: The difference between the actual costs recorded and estimated costs.
Material: All material and material overhead transaction costs appear.
Labor: All employee resource and resource overhead transaction costs appear.
Equipment: All material resource and resource overhead transaction costs appear.

8.7 Optionally, choose Details to view actual, estimated, and variance costs for labor hours, equipment
hours, and material for specific operations of the current Work Order.

Save your work.


Preventive Maintenance Work Orders
Submitted by Anonymous on Sat, 03/06/2010 - 12:21
Tag:

     •    EAM /

Enterprise Asset Management enables you to generate Work Orders automatically based on meter
readings,Day Interval Rule (runtime intervals), and List days (calendar days). Preventive maintenance
Activities reduce the probability of failure or degradation of the assets’ physical conditions. These Activities
are carried out periodically, by usage, or based on the condition of a Maintained Number (asset or
rebuildable item). Meters are entered to measure any Maintained Number that needs to be measured and
periodically serviced, based on the measurement. For example, a pipe may start out at 12 millimeters, but
when it wears to only four millimeters, it needs to be replaced.

Scheduling definitions are defined to create forecasted, scheduled Work Orders, based on meter readings.
You can create a Preventive Maintenance scheduling definition for a Maintained Number/Activity
combination, or an Asset Route. After you have defined Preventive Maintenance scheduling definitions, the
Preventive Maintenance scheduler process can run. You can view these forecasted Work Orders using the
Maintenance Workbench.


                          You can execute the Generate Preventive Maintenance Work Orders process.
When this process runs, the WIP Mass Load process runs in the background, creating forecasted Work
Orders in a status of Unreleased. You can choose the Implement button to change the status of the
Unreleased Work Orders to Released Work Orders.


Easy Work Orders
Submitted by Anonymous on Sat, 03/06/2010 - 15:15
Tag:

     •    EAM /

Easy Work Orders are unplanned Work Orders, and enable you to avoid operation and resource planning.
An Activity does not default into the Work Order, based on the Maintained Number/Activity association as
with planned Work Orders, however, you can add an Activity to an Easy Work Order. These Work Orders
are only created in Maintenance User. After created, the Work Order is automatically at a Released status,
enabling you to execute the Work Order. For example, request material and charge labor.

eAM Work Order Statuses
An Enterprise Asset Management Work Order may progress through several statuses throughout its
lifecycle duration. The diagram below illustrates how Enterprise Asset Management Work Orders may start
at a Draft status, then move to Released, Complete, and finally Closed. These statuses can vary depending
on the type of Work Order created. For example, easy Work Orders are created in a Released status,
completely bypassing the Draft status


                               Multiple Work Orders associated with the same Activity combination cannot be at
a Released status.


Draft : No scheduling of Work Orders at a Draft status can take place.
You cannot charge labor, or request material for Work Orders at this status.

Released : After a Work Order is Released, you can execute a Work Order. You can charge labor, request
material, and scheduling for this Work Order takes place to create the scheduled start or end date. You can
release a Work Order from the Work Orders window, and the Maintenance Workbench.

Unreleased : You can move an Enterprise Asset Management Work Order in Draft or Released status to
Unreleased. Scheduling can take place for these Work Orders but you cannot charge labor or request
material. An Unreleased
Work Order cannot be changed to a Draft status.

Pending Scheduling : If the Constraint Based Scheduler is enabled, the Work Order status changes to
Pending Scheduling, if a status of Released is chosen. After the Scheduler process finishes running, the
status changes back to Released. The Work Order is scheduled, based on the constraint option chosen at
the organization level.

Complete : A Complete status for an Enterprise Asset Management Work Order does not require any
completed operations. When a Work Order is completed, you can still charge labor. You can uncomplete a
Work Order; this transitions it to a Released status.

Uncompletion : is performed within the Work Plans tab.
Complete- No Charges : A Complete - No Charges status for an Enterprise Asset Management Work
Order does not require any completed operations. You cannot charge labor at this status. You can
uncomplete a Work Order; this transitions it to a Released status. Uncompletion is performed within the
Work Plans tab.

Closed : You cannot charge any accounts after an Enterprise Asset Management Work Order is closed. If a
Work Order was at a Released status at the time of closing it, you can unclose the Work Order to bring it
back to a Released status. If a Work Order was at a Complete status at the time of closing it, you can
unclose the Work Order to bring it back to a Complete status.
For all other statuses during Work Order closing, unclosing the Work Order transitions it to an Unreleased
status.

On-Hold : Enterprise Asset Management Work Orders at Released and Unreleased statuses can be put on
hold. You cannot charge labor or request material for a Work Order at this status.

Cancel : You can cancel an Enterprise Asset Management Work Order at any status in its lifecycle


       Rebuild Work Orders
Submitted by Anonymous on Sat, 03/06/2010 - 15:41
Tag:

     •    EAM /

Rebuild Work Orders are created as child Work Orders.
For example, a Work Order was issued for the inspection of a pump. During the pump inspection, you found
that the motor, one of the components of the pump, is problematic. You have two options: You can repair
and then re-install this motor (rebuildable item), or you can replace the rebuildable item by issuing a new
motor rebuildable item from inventory. If you choose to perform a material issue from inventory, the new
motor rebuildable item attaches to the Work Order, automatically creating the child, rebuild Work Order
number associated to the parent Work Order. In this case, the Maintained Number genealogy would
automatically update to identify this new item number.

If you choose to repair and then re-install the problematic motor rebuildable item, you can manually create
the child rebuild Work Order for the old motor (rebuildable item). The instructions below show you the option
of creating a rebuild Work Order
without issuing any new material. The rebuildable item needing to be rebuilt is replaced back into the asset
(motor placed back into the pump, for example), and does not go to a subinventory when the Work Order is
completed. In this case, the Maintained Number genealogy is not updated.
‹ Easy Work Orders up eAM Operations and Tasks ›
eAM Operations and Tasks
Submitted by Anonymous on Sat, 03/06/2010 - 16:05
Tag:

     •    EAM /

Operations on a Work Order are the instructions or tasks to perform a repair. These operations are assigned
resources, for example, trades people, outside service providers, and equipment.
This section includes the following topics:

     1.   Preparing Work Order Operations

     2.   Defining Material Requirements

     3.   Defining Resource Requirements


Defining Material Requirements
Submitted by Anonymous on Sat, 03/06/2010 - 16:59
Tag:

     •    EAM /

When you enter a Work Order for a Maintained Number, the Maintained Number’s associated Activity
attaches the required material and resources to complete its operations. However, you can update, add,
view, and delete material requirements as necessary for a specific Work Order.

To define Work Order material requirements
Navigate to the Select Work Order window, Choose a Work Order from the list of values and Choose
Continue.
Optionally, within the Inventory Items region, you can view or update the current Work Order’s associated
Maintained Number’s item list by placing your cursor in the Material field, or by choosing Select Materials.
When you choose Select Materials, the current Maintained Number’s associated Asset Bill of Material items
are available to add to the required material for the current Work Order.

1.1. Optionally, select the Main tabbed region to change operation sequence and the Date Required.
If you access the Select Materials window via the Operations window, then you cannot change operation
information. If you access the Select Materials window via the Work Order window, you can change
operation information.

1.2. Optionally, select the Quantities tabbed region to update the quantities
Required.

1.3. Optionally, select the Supply tabbed region, to select a supply Type and Subinventory from the lists of
values.

1.4. Optionally, select the Comment tabbed region to enter information for the current Material.

1.5. Optionally, choose the ATP tabbed region to define available to promise information for the current
material. If you select the ATP Allowed check box, available to promise information can be calculated for the
current material.
optionally, choose Check ATP to check available to promise information for the selected material.

2.1 Optionally, choose Direct Item to create requisitions for direct items, and add them to your items list.
Oracle Self Service Purchasing defaults the Work Order Number and Operation Number, as well as the
class code information for correct expensing. Direct Items are one time, non-inventoried items that are
purchased directly from the supplier. After you choose Direct Item, the current Work Order and operation
58528447 oracle-e am

Más contenido relacionado

La actualidad más candente

Oracle Inventory - Difference between Cycle Count and Physical Inventory
Oracle Inventory - Difference between Cycle Count and Physical Inventory Oracle Inventory - Difference between Cycle Count and Physical Inventory
Oracle Inventory - Difference between Cycle Count and Physical Inventory Boopathy CS
 
OEBS R12 Presentation.ppt
OEBS R12 Presentation.pptOEBS R12 Presentation.ppt
OEBS R12 Presentation.pptMohd Haireeen
 
Pick pack and ship confirm process in oracle apps
Pick pack and ship confirm process in oracle appsPick pack and ship confirm process in oracle apps
Pick pack and ship confirm process in oracle appsshravan kumar chelika
 
Oracle R12 inventory Table name details with description
Oracle R12 inventory Table name details with descriptionOracle R12 inventory Table name details with description
Oracle R12 inventory Table name details with descriptionBoopathy CS
 
How to configure LCM After receiving
How to configure LCM After receivingHow to configure LCM After receiving
How to configure LCM After receivingAhmed Elshayeb
 
Oracle Eam Implementation Steps For Oracle E Am Module
Oracle Eam   Implementation Steps For Oracle E Am ModuleOracle Eam   Implementation Steps For Oracle E Am Module
Oracle Eam Implementation Steps For Oracle E Am Moduleapplearn
 
Locator control in oracle inventory
Locator control in oracle inventoryLocator control in oracle inventory
Locator control in oracle inventorysheshito
 
R12 Business Case Process Manufacturing
R12 Business Case Process ManufacturingR12 Business Case Process Manufacturing
R12 Business Case Process ManufacturingVaddadi Anil Srinivas
 
Oracle Process Manufacturing Setup EBS12.2
Oracle Process Manufacturing Setup EBS12.2Oracle Process Manufacturing Setup EBS12.2
Oracle Process Manufacturing Setup EBS12.2Mina Lotfy
 
R12 subinventory transfer and inter org transfers
R12 subinventory transfer and inter org transfersR12 subinventory transfer and inter org transfers
R12 subinventory transfer and inter org transfersshravan kumar chelika
 
Oracle inventory R12 Setup Guide
Oracle inventory R12 Setup GuideOracle inventory R12 Setup Guide
Oracle inventory R12 Setup GuideAhmed Elshayeb
 
Oracle Order Management - Line Level Credit Check
Oracle Order Management - Line Level Credit CheckOracle Order Management - Line Level Credit Check
Oracle Order Management - Line Level Credit CheckBaker Khader Abdallah, PMP
 
Oracle R12 Order Management - Back to Back (B2B) Order Flow:
Oracle R12 Order Management - Back to Back (B2B) Order Flow:Oracle R12 Order Management - Back to Back (B2B) Order Flow:
Oracle R12 Order Management - Back to Back (B2B) Order Flow:Boopathy CS
 
Inventory in Oracle apps
Inventory in Oracle apps Inventory in Oracle apps
Inventory in Oracle apps gbalagee
 

La actualidad más candente (20)

Oracle Inventory - Difference between Cycle Count and Physical Inventory
Oracle Inventory - Difference between Cycle Count and Physical Inventory Oracle Inventory - Difference between Cycle Count and Physical Inventory
Oracle Inventory - Difference between Cycle Count and Physical Inventory
 
OEBS R12 Presentation.ppt
OEBS R12 Presentation.pptOEBS R12 Presentation.ppt
OEBS R12 Presentation.ppt
 
Eam Activity Association Template
Eam Activity Association TemplateEam Activity Association Template
Eam Activity Association Template
 
Pick pack and ship confirm process in oracle apps
Pick pack and ship confirm process in oracle appsPick pack and ship confirm process in oracle apps
Pick pack and ship confirm process in oracle apps
 
Oracle R12 inventory Table name details with description
Oracle R12 inventory Table name details with descriptionOracle R12 inventory Table name details with description
Oracle R12 inventory Table name details with description
 
Order Line Sets in Oracle Order Management
Order Line Sets in Oracle Order ManagementOrder Line Sets in Oracle Order Management
Order Line Sets in Oracle Order Management
 
Accounting in Oracle Inventory
Accounting in Oracle InventoryAccounting in Oracle Inventory
Accounting in Oracle Inventory
 
How to configure LCM After receiving
How to configure LCM After receivingHow to configure LCM After receiving
How to configure LCM After receiving
 
Oracle Eam Implementation Steps For Oracle E Am Module
Oracle Eam   Implementation Steps For Oracle E Am ModuleOracle Eam   Implementation Steps For Oracle E Am Module
Oracle Eam Implementation Steps For Oracle E Am Module
 
Oracle eam configuration guide for chemical industry
Oracle eam configuration guide for chemical industryOracle eam configuration guide for chemical industry
Oracle eam configuration guide for chemical industry
 
Locator control in oracle inventory
Locator control in oracle inventoryLocator control in oracle inventory
Locator control in oracle inventory
 
R12 Business Case Process Manufacturing
R12 Business Case Process ManufacturingR12 Business Case Process Manufacturing
R12 Business Case Process Manufacturing
 
Oracle Process Manufacturing Setup EBS12.2
Oracle Process Manufacturing Setup EBS12.2Oracle Process Manufacturing Setup EBS12.2
Oracle Process Manufacturing Setup EBS12.2
 
R12 subinventory transfer and inter org transfers
R12 subinventory transfer and inter org transfersR12 subinventory transfer and inter org transfers
R12 subinventory transfer and inter org transfers
 
Oracle inventory R12 Setup Guide
Oracle inventory R12 Setup GuideOracle inventory R12 Setup Guide
Oracle inventory R12 Setup Guide
 
eAM 101 slides
eAM 101 slideseAM 101 slides
eAM 101 slides
 
Oracle Order Management - Line Level Credit Check
Oracle Order Management - Line Level Credit CheckOracle Order Management - Line Level Credit Check
Oracle Order Management - Line Level Credit Check
 
Oracle R12 Order Management - Back to Back (B2B) Order Flow:
Oracle R12 Order Management - Back to Back (B2B) Order Flow:Oracle R12 Order Management - Back to Back (B2B) Order Flow:
Oracle R12 Order Management - Back to Back (B2B) Order Flow:
 
Inventory in Oracle apps
Inventory in Oracle apps Inventory in Oracle apps
Inventory in Oracle apps
 
R12 gop
R12 gopR12 gop
R12 gop
 

Destacado

Oracle ebs r12eam part2
Oracle ebs r12eam part2Oracle ebs r12eam part2
Oracle ebs r12eam part2jcvd12
 
Oracle ebs r12 eam module-upk
Oracle ebs r12 eam module-upkOracle ebs r12 eam module-upk
Oracle ebs r12 eam module-upkjcvd12
 
121eamig implementation guide
121eamig implementation guide121eamig implementation guide
121eamig implementation guideRajesh Khatri
 
Workshop INFOR EAM 14th Maintenance Management Conference Dubai, Dec 18/2008
Workshop INFOR EAM 14th Maintenance Management Conference Dubai, Dec 18/2008Workshop INFOR EAM 14th Maintenance Management Conference Dubai, Dec 18/2008
Workshop INFOR EAM 14th Maintenance Management Conference Dubai, Dec 18/2008jcvd12
 
Oracle Inventory Restrict user from update item attribute personalization
Oracle Inventory Restrict user from update item attribute personalizationOracle Inventory Restrict user from update item attribute personalization
Oracle Inventory Restrict user from update item attribute personalizationAhmed Elshayeb
 
Personalization Validate Po Quantity With PR
Personalization Validate Po Quantity With PRPersonalization Validate Po Quantity With PR
Personalization Validate Po Quantity With PRAhmed Elshayeb
 
Oracle R12.1.3 Costing Overview
Oracle R12.1.3 Costing OverviewOracle R12.1.3 Costing Overview
Oracle R12.1.3 Costing OverviewPritesh Mogane
 
user: Roo-user-Ob-PicklistMulti-Value-minimal uploder
  user: Roo-user-Ob-PicklistMulti-Value-minimal uploder  user: Roo-user-Ob-PicklistMulti-Value-minimal uploder
user: Roo-user-Ob-PicklistMulti-Value-minimal uploderRoopa slideshare
 
SCALE11x: 10 Years of FOSS Hosting at the OSUOSL
SCALE11x: 10 Years of FOSS Hosting at the OSUOSLSCALE11x: 10 Years of FOSS Hosting at the OSUOSL
SCALE11x: 10 Years of FOSS Hosting at the OSUOSLLance Albertson
 
Business is fun: Shopping in madrid
Business is fun: Shopping in madridBusiness is fun: Shopping in madrid
Business is fun: Shopping in madridsarasacristan
 
OpenGL ES based UI Development on TI Platforms
OpenGL ES based UI Development on TI PlatformsOpenGL ES based UI Development on TI Platforms
OpenGL ES based UI Development on TI PlatformsPrabindh Sundareson
 
Baiguullaga organition 2012
Baiguullaga organition 2012Baiguullaga organition 2012
Baiguullaga organition 2012oyundariubuns
 

Destacado (19)

Oracle ebs r12eam part2
Oracle ebs r12eam part2Oracle ebs r12eam part2
Oracle ebs r12eam part2
 
Oracle ebs r12 eam module-upk
Oracle ebs r12 eam module-upkOracle ebs r12 eam module-upk
Oracle ebs r12 eam module-upk
 
121eamig implementation guide
121eamig implementation guide121eamig implementation guide
121eamig implementation guide
 
ORACLE
ORACLEORACLE
ORACLE
 
Workshop INFOR EAM 14th Maintenance Management Conference Dubai, Dec 18/2008
Workshop INFOR EAM 14th Maintenance Management Conference Dubai, Dec 18/2008Workshop INFOR EAM 14th Maintenance Management Conference Dubai, Dec 18/2008
Workshop INFOR EAM 14th Maintenance Management Conference Dubai, Dec 18/2008
 
Oracle EAM - Presentation
Oracle EAM - PresentationOracle EAM - Presentation
Oracle EAM - Presentation
 
Oracle Inventory Restrict user from update item attribute personalization
Oracle Inventory Restrict user from update item attribute personalizationOracle Inventory Restrict user from update item attribute personalization
Oracle Inventory Restrict user from update item attribute personalization
 
Personalization Validate Po Quantity With PR
Personalization Validate Po Quantity With PRPersonalization Validate Po Quantity With PR
Personalization Validate Po Quantity With PR
 
Oracle R12.1.3 Costing Overview
Oracle R12.1.3 Costing OverviewOracle R12.1.3 Costing Overview
Oracle R12.1.3 Costing Overview
 
user: Roo-user-Ob-PicklistMulti-Value-minimal uploder
  user: Roo-user-Ob-PicklistMulti-Value-minimal uploder  user: Roo-user-Ob-PicklistMulti-Value-minimal uploder
user: Roo-user-Ob-PicklistMulti-Value-minimal uploder
 
HealthCare BPO
HealthCare BPOHealthCare BPO
HealthCare BPO
 
SCALE11x: 10 Years of FOSS Hosting at the OSUOSL
SCALE11x: 10 Years of FOSS Hosting at the OSUOSLSCALE11x: 10 Years of FOSS Hosting at the OSUOSL
SCALE11x: 10 Years of FOSS Hosting at the OSUOSL
 
sdfghjk
sdfghjksdfghjk
sdfghjk
 
Case study
Case studyCase study
Case study
 
Geohash
GeohashGeohash
Geohash
 
Business is fun: Shopping in madrid
Business is fun: Shopping in madridBusiness is fun: Shopping in madrid
Business is fun: Shopping in madrid
 
OpenGL ES based UI Development on TI Platforms
OpenGL ES based UI Development on TI PlatformsOpenGL ES based UI Development on TI Platforms
OpenGL ES based UI Development on TI Platforms
 
CAMPUSMATE
CAMPUSMATECAMPUSMATE
CAMPUSMATE
 
Baiguullaga organition 2012
Baiguullaga organition 2012Baiguullaga organition 2012
Baiguullaga organition 2012
 

Similar a 58528447 oracle-e am

Elshayeb Oracle R12 Order Management
Elshayeb Oracle R12 Order ManagementElshayeb Oracle R12 Order Management
Elshayeb Oracle R12 Order ManagementAhmed Elshayeb
 
To enter a new assignment
To enter a new assignmentTo enter a new assignment
To enter a new assignmentNamita Kumari
 
Admm crp oracle payroll
Admm crp oracle payrollAdmm crp oracle payroll
Admm crp oracle payrollFeras Ahmad
 
Oracle Purchasing ivas
Oracle Purchasing ivasOracle Purchasing ivas
Oracle Purchasing ivasAli Ibrahim
 
purchasing-setups-in-oracle-r12_compress.pdf
purchasing-setups-in-oracle-r12_compress.pdfpurchasing-setups-in-oracle-r12_compress.pdf
purchasing-setups-in-oracle-r12_compress.pdfHesham Mahdy
 
Oracle HRMS Fast Formula
Oracle HRMS Fast FormulaOracle HRMS Fast Formula
Oracle HRMS Fast Formularunjithrocking
 
Fujcci crp oracle payroll
Fujcci crp oracle payrollFujcci crp oracle payroll
Fujcci crp oracle payrollFeras Ahmad
 
Absence management in oracle HRMS
Absence management in oracle HRMSAbsence management in oracle HRMS
Absence management in oracle HRMSRajiv reddy
 
ASL-Sourcing In Procurement
ASL-Sourcing In ProcurementASL-Sourcing In Procurement
ASL-Sourcing In ProcurementPedro Craggett
 
Oracle EBS R12 Payroll user manual
Oracle EBS R12 Payroll user manualOracle EBS R12 Payroll user manual
Oracle EBS R12 Payroll user manualFeras Ahmad
 
Order to cash flow cycle in order management
Order to cash flow cycle in order managementOrder to cash flow cycle in order management
Order to cash flow cycle in order managementvenkatesh gurusamy
 
SAP MM SD INTEGRATION WITH FICO
SAP MM SD INTEGRATION WITH FICOSAP MM SD INTEGRATION WITH FICO
SAP MM SD INTEGRATION WITH FICOVugile Prasad
 

Similar a 58528447 oracle-e am (20)

R12 Fixed Assets General Questions
R12 Fixed Assets General QuestionsR12 Fixed Assets General Questions
R12 Fixed Assets General Questions
 
Elshayeb Oracle R12 Order Management
Elshayeb Oracle R12 Order ManagementElshayeb Oracle R12 Order Management
Elshayeb Oracle R12 Order Management
 
To enter a new assignment
To enter a new assignmentTo enter a new assignment
To enter a new assignment
 
Valuation & Split valuation in MM
Valuation & Split valuation in MMValuation & Split valuation in MM
Valuation & Split valuation in MM
 
Defining atp
Defining atpDefining atp
Defining atp
 
Admm crp oracle payroll
Admm crp oracle payrollAdmm crp oracle payroll
Admm crp oracle payroll
 
Oracle Purchasing ivas
Oracle Purchasing ivasOracle Purchasing ivas
Oracle Purchasing ivas
 
Proc contracts
Proc contractsProc contracts
Proc contracts
 
Proc contracts part1
Proc contracts part1Proc contracts part1
Proc contracts part1
 
purchasing-setups-in-oracle-r12_compress.pdf
purchasing-setups-in-oracle-r12_compress.pdfpurchasing-setups-in-oracle-r12_compress.pdf
purchasing-setups-in-oracle-r12_compress.pdf
 
Oracle HRMS Fast Formula
Oracle HRMS Fast FormulaOracle HRMS Fast Formula
Oracle HRMS Fast Formula
 
Fujcci crp oracle payroll
Fujcci crp oracle payrollFujcci crp oracle payroll
Fujcci crp oracle payroll
 
Absence management in oracle HRMS
Absence management in oracle HRMSAbsence management in oracle HRMS
Absence management in oracle HRMS
 
ASL-Sourcing In Procurement
ASL-Sourcing In ProcurementASL-Sourcing In Procurement
ASL-Sourcing In Procurement
 
Csd115ig
Csd115igCsd115ig
Csd115ig
 
Oracle EBS R12 Payroll user manual
Oracle EBS R12 Payroll user manualOracle EBS R12 Payroll user manual
Oracle EBS R12 Payroll user manual
 
Summer training
Summer trainingSummer training
Summer training
 
Order to cash flow cycle in order management
Order to cash flow cycle in order managementOrder to cash flow cycle in order management
Order to cash flow cycle in order management
 
BEX.pptx
BEX.pptxBEX.pptx
BEX.pptx
 
SAP MM SD INTEGRATION WITH FICO
SAP MM SD INTEGRATION WITH FICOSAP MM SD INTEGRATION WITH FICO
SAP MM SD INTEGRATION WITH FICO
 

58528447 oracle-e am

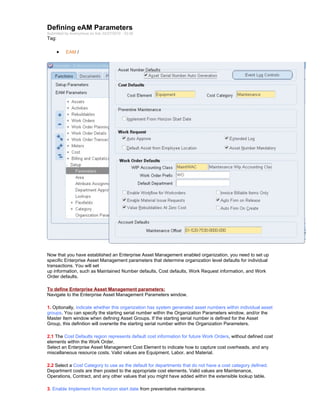
  • 1. Defining eAM Parameters Submitted by Anonymous on Sat, 02/27/2010 - 23:38 Tag: • EAM / Now that you have established an Enterprise Asset Management enabled organization, you need to set up specific Enterprise Asset Management parameters that determine organization level defaults for individual transactions. You will set up information, such as Maintained Number defaults, Cost defaults, Work Request information, and Work Order defaults. To define Enterprise Asset Management parameters: Navigate to the Enterprise Asset Management Parameters window. 1. Optionally, indicate whether this organization has system generated asset numbers within individual asset groups. You can specify the starting serial number within the Organization Parameters window, and/or the Master Item window when defining Asset Groups. If the starting serial number is defined for the Asset Group, this definition will overwrite the starting serial number within the Organization Parameters. 2.1 The Cost Defaults region represents default cost information for future Work Orders, without defined cost elements within the Work Order. Select an Enterprise Asset Management Cost Element to indicate how to capture cost overheads, and any miscellaneous resource costs. Valid values are Equipment, Labor, and Material. 2.2 Select a Cost Category to use as the default for departments that do not have a cost category defined. Department costs are then posted to the appropriate cost elements. Valid values are Maintenance, Operations, Contract, and any other values that you might have added within the extensible lookup table. 3. Enable Implement from horizon start date from preventative maintenance.
  • 2. 4. Select a Request Type from the list of values. The type selected (Work Request or Service Request) is the request type generated. An organization can utilize either Service Requests or Work Request, but not both. The Service Request can be associated to a maintenance Work Order within Enterprise Asset Management. An organization can change from one request type to the other, as long as there are no existing, open requests. 4.1 Indicate whether Work Requests are automatically approved upon creation, or if every user, with the responsibility assigned to the asset’s current owning department, will get a notification via Workflow.This notification can be viewed within self service, within the responsibility you use to log in. If the Auto Approve check box is selected, Work Requests are created with a status of Awaiting Work Order. If the check box is not selected, Work Requests are created with a status of Open. 4.2 If you choose the Extended Log check box, the system will keep an audit trail of records, when defining or updating Work Requests. 5. From the list of values, select the WIP Accounting Class default to ensure that Work Orders generated within Enterprise Asset Management will have an established account code structure assigned, to accept charges incurred by that Work Order. The WIP accounting class codes available in the list of values will be of type, Maintenance. If a Maintenance type WIP accounting class does not exist, you can define a new one . Note: A Work Request status needs to be Awaiting Work Order before it can be linked to a Work Order. The Awaiting Work Order status means that the Work Request is approved. Note: Oracle Cost Management handles maintenance Work Orders as non-standard, expense jobs. 5.1 Optionally, enter a Work Order Prefix. A prefix enables your organization to identify routine Work Orders. 5.2 Optionally, select a Default Department. Oracle recommends that you select a default department. This department defaults to maintenance Work Orders as they are entered. If a department does not exist on a Work Order, it cannot be released. 5.3 If you select the Auto Firm On Release check box, the dates on the Work Order cannot be re-scheduled automatically. 5.4 Indicate whether Material Issue Requests are enabled. 5.5 Indicate whether only billable items are invoiceable. If the Invoice Billable Items Only check box is selected, only billable items can be invoiced. However, the item needs to be invoiceable and the Billing Type check box needs to be selected. If the Invoice Billable Items Only check box is not selected, any item can be invoiced if they are invoiceable within the Master Item window (Invoiceable Item and Invoice Enabled check boxes selected within the Master Item window.)the item only needs to be invoiceable 6. Within the Account Defaults region, select a Maintenance Offset account. You can create or break a Parent/Child (hierarchy) relationship that exists between an Asset Number and a Serialized Rebuildable, manually using the Configuration History page. This account records what is sent to Inventory when a Rebuildable is removed from an Asset, and then brought back into Inventory. For example, if the relationship is broken, the Asset or Rebuildable is sent to either Scrap or Inventory. If the Rebuildable is sent to Inventory, the accounting is as follows: Dr. Inventory Cr. Maintenance Offset You use Areas to logically sort assets by the zones in which they reside. Areas divide the maintenance plant or facility into zones, which help to track and account for assets. Areas will later be associated with an asset. To set up Areas:
  • 3. 1. Navigate to the Area window. 2. Using the Add icon from the tool bar, add an area. 3. Enter a Description for this location. 4. Save your work. Defining Departments and Resources Submitted by Anonymous on Tue, 03/02/2010 - 11:35 Tag: • EAM / A department represents a crew within your organization. A crew can include people, machines, or suppliers. Departments are also used to collect costs, apply overhead, and compare load to capacity. You assign a department to each operation of a routing and assign resources that are available for that department. The department assigned to each operation of a routing also becomes the assigned department of the corresponding operation within the Work Order, assuming the Work Order is using the routing. Resources are defined before departments. When you define a department, you specify available resources. A resource represents a craft. You can enter multiple resources for each department. For each resource, you can specify the shifts that the resource is available. For each resource shift, you can also specify capacity modifications that change the available hours per day, units per day, or workdays.
  • 4. 1. Enter a name for the Department, unique to the Organization. 2. Optionally, select a department Class from the list of values. 3. Select a Location from the list of values. You are required to enter a location for a department if it is the receiving department following outside processing . 4. Enter a Project Expenditure Organization. 5. Optionally, enter an Inactive On date on which you can no longer assign this department to routing operations See the details @ http://www.oracleug.com/user-guide/bills-material/department http://www.oracleug.com/user-guide/bills-material/resource http://www.oracleug.com/user-guide/bills-material/set-ups An instance is a specific employee name or piece of equipment. Choose Instances to add employees or equipment to the current resource Category Codes and Sets Submitted by Anonymous on Tue, 03/02/2010 - 14:38 Tag: • EAM / Category codes are used as naming conventions for assets by creating classes and subclasses. They are user defined, and used to logically group assets, simplifying the search for Maintained Numbers. For example, Cranes can be classified by several different types, such as Overhead Cranes, Jib Cranes, and Mobile Cranes. You can query using the class CRANE, which will display all assets defined as Cranes within that organization. If you enter CRANES.JIB, the system would then narrow the results to just those assets defined as Jib Cranes. With both queries, you can identify assets based on familiar names, rather than numbers.
  • 5. Category codes are first defined, then added to the Enterprise Asset Management Category Set. After they belong to this category set, they can be associated with Maintained Groups, which tie to individual assets. To set up Category Codes: 1. Navigate to the Find Categories window. You can find existing category codes, or create new ones. 2. Choose New. 3. Select the Asset Management category to create a new Class.Subclass from the Structure Name list of values. 4. Enter in a new Category, for example TRUCK.FRKLFT. 5. Add a long Description for this category. 6. Optionally, select the Enabled check box to indicate that this category is enabled. 7. Optionally, enter an Inactive On date. 8. Optionally, select the Enabled for iProcurement check box to indicate that this category is enabled for iProcurement. 9. Optionally, select the Viewable by Supplier check box to indicate that this category can be viewed by the Supplier. 10. Save your work.
  • 6. To set up Category Sets: To associate Category Codes (TRUCK.FRKLFT) with a Maintained Group, you must first define the item category relationship through the Category Sets menu option. 1. Navigate to the Category Sets window. 2. Select the flashlight icon from the tools menu, then select Enterprise Asset Management from the list of values. 3. A description is defaulted, but you can optionally change it. 4. Select Asset Management from the Flex Structure list of values. 5. Indicate the Controlled At level. Valid values are Master Level, and Organization Level. 6. Enter a Default Category code for assets that are not associated with Maintained Groups. 7. If you select Allow Multiple Item Category Assignments, you can define a series of categories, such as Crane.Jib, and Crane.Overhead, that can be associated to a single Asset Group. 8. If you select Enforce List of Valid Categories, you will prevent users from entering incorrect categories that are not associated with the Asset Group associated with the asset being created. 9. Enter the Category Codes that you want to associate with this category set. 10. Select Assign to display a table enabling you to associate the categories with a Maintained Group. 11. Save your work. Defining Default Category Sets
  • 7. When you install Oracle Inventory, you must assign a default category set to each of the following functional areas: Inventory, Purchasing, Order Management, Costing, Engineering, and Planning. Product Line Accounting is seeded with the Inventory category set. Inventory makes the default category set mandatory for all items defined for use by a functional area. If your item is enabled for a particular functional area you cannot delete the item's corresponding default category set assignment. Default category sets are required so that each functional area has at least one category set that contains all items in that functional area. You can enable an item for each functional area by using that functional area's item defining attribute. An item defining attribute identifies the nature of an item. For example, what designates an item as an "engineering item" is the attribute Engineering Item. If a functional area's item defining attribute is controlled at the Organization level, then that functional area may only have an Organization level default category set. You set the item defining attribute when you define the item. The following table presents item defining attributes:
  • 8. When you enable an item for a certain functional area, Oracle Inventory automatically assigns the item to the default category set of that functional area and the default category of that set. For example, if you set Inventory Item to Yes, then Inventory automatically assigns the item to the Inventory functional area's default category set and default category. You may change a functional area's default category set under certain conditions. You should ensure that every item within the functional area belongs to the new default category set (which replaces the existing default category set). If the item defining attribute of the functional area is controlled at the Organization level then the new default category set should also be controlled at the Organization level. Maintained Group (Asset Group or Rebuildable Item) Submitted by Anonymous on Tue, 03/02/2010 - 15:07 Tag: • EAM / During implementation, Maintained Group (Asset Group or Rebuildable Item) names should be established. Maintained Groups represent groups of assets that are virtually identical. Generally, a Maintained Group is defined for each Manufacturer and Model Number combination. Examples include Acme Model 123 Pump and Ford F150 2002 Truck. To set up Maintained Groups:
  • 9. 1. Navigate to the Maintained Group (Master Item) window. The Master Item window is used to create Maintained Groups, Activities, and Rebuildable Items. 2. Enter the Maintained Group name in the Item field. 3. Enter a Description for this Maintained Group, up to 240 characters. 4. Use the @Asset Group template to quickly apply attribute values, and to ensure that the appropriate attributes are applied. a. Select TOOLS from the Tools menu. From the drop down list, select COPY FROM. b. Select the @Asset Group template from the list of values. The following table presents the necessary attribute values that are applied automatically to the Maintained Group, when using the template: 5. Access the Inventory Tab. In the Serial region, select Predefined for the Generation value. 6. Define a Starting Prefix and Starting Number for this Maintained Group. When a new asset is created for this Maintained Group, the system will default the prefix, along with the starting number sequence. 7. Optionally, select the paperclip Attachments icon to attach relevant documents, such as drawings, standard procedures, and reference guides, to this Maintained Group. You can attach file, URL, and text attachments. 8. Save your work. To associate Maintained Groups with multiple organizations: 1. From the Master Item window, select TOOLS from the Tools menu. 2. Select Organization Assignment.
  • 10. 3. Enter additional organizations in the available table. 4. After saving your work, you can create Assets for this Maintained Group. Setting Up Attributes Submitted by Anonymous on Tue, 03/02/2010 - 15:52 Tag: • EAM / You can define common characteristics data specific to Asset Groups, such as Facility Information, Engineering Specifications, Regulation Requirements, Horsepower, Voltage, and Square Footage, by creating Attribute Groups using descriptive flexfields. After the Attribute Group is created, you can then assign it to a Maintained Group. This enables you to define additional characteristics data when defining an asset associated with the Maintained Group. This provides extensive query capabilities. Attribute groups are descriptive flexfields, defined by segments and values. For example, you can define an Attribute Group, Front Loader Nameplate data. This group can then be associated with the CARS Maintained Group. When defining an asset within the CARS Maintained Group, you can optionally utilize the attributes to specify nameplate data (specified data such as make, year, and model) for the asset. This creates a simplified way of entering specified data related to a specific Maintained Group. To set up Attributes: 1. Navigate to the Descriptive Flexfield Segments window. 2. Select the flashlight icon from the tool bar. From the list of values, select the Oracle Inventory Application with the Title, Asset Attributes. 3. Unfreeze the Flexfield Definition by deselecting the Freeze Flexfield Definition check box. 4. In the Context Field Values region, select a row, then click the New icon. A blank row will be added for you to create an attribute group. 5. Enter the attribute group name in the Code field. 6. Optionally, enter a Description for this attribute group. 7. Select Segments to add attributes to the attribute group you just created. 8. Enter a Number to sequence the data. 9. Define the Name of the specific attribute. The Window Prompt will default to this name. 10. Select a Column value from the list of values. 11. Select a Value Set from the list of values, or optionally, select Value Set to create a new one. 12. If the Displayed check box is selected, this attribute will display to the user when defining data for an asset within the Maintained Group (for example,CARS) associated with the
  • 11. attribute group (for example, NAMEPLATE) that this attribute (for example, Make) resides in. 13. Optionally, select the Enabled check box to enable the attribute to be available when defining assets. 14. Save your work, and return to the Descriptive Flexfield Segments window. 15. Select the Freeze Flexfield Definition check box. Failure to do this will prevent you from querying the segments from the Attribute window. 16. Save your work To associate the Attribute Group with a Maintained Group: 1. Navigate to the Attributes Assignment window. In the below example, any asset created within the CARS Maintained Group will have the NAMEPLATE attribute group available as an option for data entry. 2. Select a Maintained Group from the list of values. 3. Select an Attribute group from the Attribute Group Code list of values. You can have an unlimited number of Attribute Groups associated with an asset. 4. Save your work. Defining Asset Numbers (Maintained Numbers) Submitted by Anonymous on Tue, 03/02/2010 - 16:24 Enterprise Asset Management provides three methods in which you can enter a new asset. You can create them individually, by copying information from an existing asset, utilize the multiple asset entry method, or use the Import Asset Number interface. You must first set up an Maintained Group, before defining Maintained Numbers.The diagram below illustrates the parent/child (asset hierarchy) relationship that can be created when creating Maintained Numbers. In this example, the Maintained Group is BUILDING, containing the Maintained Numbers Building 100, Building 200, and Building 300. Those Maintained Numbers have their own child assets, Floor 1 and Floor 2.
  • 12. To set up assets individually:
  • 13. Navigate to the Define Asset Numbers window. 1.1 Select a Maintained Group from the list of values. This Maintained Group will be associated with this asset. 1.2 Enter a Maintained Number if you do not have them automatically generated, or accept or modify the default, if you have automatic generation enabled. After an asset has been saved, it cannot be deleted. The asset can only be deactivated if there are no open Work Orders for the asset, or if the asset is not part of an asset hierarchy. 1.3 Optionally, enter an Asset Description, up to 240 characters. 1.4 Optionally, associate this asset to an Asset Category. This is the Class and Subclass code, such as CRANE.OVERHEAD or BUILDING.FLOOR. 2.1 Within the Main tabbed region, you can optionally select an Owning Department for this asset from the list of values. This represents the crew responsible for the asset. Notifications, regarding Work Requests, are sent to everyone with a responsibility assigned to the Work Request’s associated asset’s current owning department 2.2 Optionally, select a Criticality code from the list of values, indicating the importance of the asset to the organization. This field is for information only. 2.3 Optionally, select a WIP Accounting Class from the list of values. This will identify the Expense cost elements associated with the work performed, such as materials, labor, and resources.
  • 14. 2.4 Optionally, enter the Area where this asset resides. This is a user defined listing of logical areas of work. For example, North Plant, East Wing, or Area 1. 2.5 Indicate whether this asset is maintainable. If the Maintainable check box is selected, you can create Work Requests and Work Orders for this asset. For example, an asset can be created for cost-tracking purposes. We may want to see the cost for all top level assets in an asset hierarchy, but we do not want to maintain those assets. In this situation, do not select this check box. 2.6 Enabled Active check box shows that asset is active. 2.7 In the Parent Asset region, optionally enter a Maintained Group. This defines asset hierarchy information, enabling you to review all cost associated with an asset or asset hierarchal view. Enter a parent Maintained Number. This defines asset hierarchy information. If a Maintained Group was created in above step, then this field is mandatory. For example, in the diagram example above, you would need to enter Building 100 in this field if you were currently defining the Floor 1 asset. 3.1 In the Production Equipment region, optionally enter a Production Organization. The list of values displays the production inventory organizations maintained by the current asset’s organization. 3.2 Select an Item from the list of values. This is mandatory if you populated the Production Organization field. Only items that were defined with an equipment template, or with the Equipment item attribute enabled, will be available. 3.3 Enter a Serial Number. This is mandatory if you populated the Production Organization field. This is the specific name of the component within the Equipment Type, defined above. 4.1 Optionally, enter the Fixed Asset region information if Oracle Fixed Assets is installed. This is Enterprise Asset Management’s integration with Fixed Assets. Enter a Category, which is a grouping of fixed assets, defined within Oracle Fixed Assets. This category is tied to a set of books, and must be the same set of books that is assigned to the current Enterprise Asset Management organization. 4.2. Optionally, enter the Number if Oracle Fixed Assets is installed. This represents a fixed Maintained Number that belongs to a fixed asset category, associated with the asset. 4.3 The Property Management fields, Location Name, and Location Code, will default from a Property Manager export process (Export Locations to Enterprise Asset Management) if Oracle Property Management is installed. These fields are not updateable. The Location Code and Maintained Number fields reflect as the same number, and cannot be changed. 5.1 You can select Resource Usage only if the fields in the Production Equipment region are populated. This enables you to view production Work Orders using the equipment that corresponds with this Maintained Number as a resource. 5.2 Optionally, select Attributes to enter attribute values for the asset. Only existing, enabled Attribute Groups will display. These Attribute Groups are optional; you do not need to enter values for all existing Attribute Groups. From this window, you cannot generate Attribute Groups. 5.3 Optionally, select Associate Activity to directly associate this Asset with an Activity. 5.4 Optionally, enter file, URL, or text attachments to this asset by choosing the paperclip Attachments icon. You can then choose Document Catalog to add asset specific documents Defining Miscellaneous Documents Submitted by Anonymous on Tue, 03/02/2010 - 12:30 Tag: • EAM /
  • 15. You can create text and files, such as spreadsheets, graphics, and OLE objects. You can attach these documents to a maintenance Work Order, asset, or operation. To define miscellaneous documents: 1. Navigate to the Miscellaneous Documents window. 2. Select a Data Type from the list of values. Defining Asset (Number) Routes Submitted by Anonymous on Tue, 03/02/2010 - 17:50 Tag: • EAM / You might need to perform an Activity on multiple Maintained Numbers. To eliminate the possibility of creating multiple Work Orders for the same Activity, you can define Asset Routes. You can define a Preventive Maintenance schedule for your Asset Route to specify when an Activity should be scheduled for the Asset Route. Only day interval rules can be defined for Asset Routes. To define Asset Routes:
  • 16. 1. Navigate to the Define Asset Route window. 2. Select a Maintained Group from the list of values. 3. Enter the name of the Asset Route in the Maintained Number field. 4. Optionally, associate this Asset Route to an Asset Category. This is the Class and Subclass code, such as CRANE.OVERHEAD or BUILDING.FLOOR. 5. Within the Main tabbed region, you can optionally select an Owning Department for this Asset Route from the list of values. This represents the crew responsible for the asset. Notifications, regarding Work Requests, are sent to everyone with a responsibility assigned to the Work Request’s associated asset’s current owning department. 6. Optionally, select a Criticality code from the list of values, indicating the importance of the Asset Route to the organization. This field is for information only. 7. Optionally, select a WIP Accounting Class from the list of values. This will identify the Expense cost elements associated with the work performed, such as materials, labor, and resources. 8. Optionally, enter the Area where this Asset Route resides. This is a user defined listing of logical areas of work. For example, North Plant, East Wing, or Area 1. 9. Indicate whether this Asset Route is maintainable. If the Maintainable check box is selected, you can create Work Requests and Work Orders for this Asset Route. 10. Choose Asset Route to display the Asset Route window. Setting Up Asset (Group) Bills of Material Submitted by Anonymous on Tue, 03/02/2010 - 18:11 Tag: • EAM / You can identify and select the required items that make up an asset. A bill of material (BOM) can be used to list all items and components that make up a particular asset, and can be defined for each Maintained Group. The items defined on an asset BOM are standard inventory components.
  • 17. Note: Even if you are not using Project Manufacturing applications, Project Parameters must be defined for your eAM enabled organization to successfully create Asset Groups. This is required because an Asset BOM is of type Model/Unit Effective and this BOM type is currently allowed only if PJM organization parameters are set up for the eAM enabled organization to which the Asset Group has been assigned. To define Project Parameters, open the Project Parameters window using Project Manufacturing Super User responsibility and without entering any data in the window, save the record. To set up an Asset BOM: 1. Navigate to the Bills of Material window. 2. Select a Maintained Group from the Item field list of values. 3. Within the Main tabbed region, the Item Sequence and an Operation Sequence will default. 4. Enter the inventory Component to make up the Maintained Number. 5. Enter the Quantity of that component necessary for the asset. 6. Select the Serial Effectivity tabbed region. 7. Select the Maintained Number (Maintained Numbers are always serialized) from the list of values that the inventory items are going to be associated to, in the From and To fields. Only Maintained Numbers associated with the current Maintained Group are available. If the Component is installed in all Maintained Numbers within the Maintained Group, enter 0 in the From field, and leave the To field blank. 8. Save your work. Defining Asset (Number) Statuses Submitted by Anonymous on Tue, 03/02/2010 - 18:44 Tag: • EAM / Shutdown of an asset is sometimes necessary to perform a maintenance Activity. You can create new shutdown information associated with an asset, or view existing shutdown history information already recorded to an asset. Shutdown information consists of start and end dates, work order numbers requiring maintenance on the asset, and specific operation sequences. At the time of completing a Work Order to its operations, you can view asset shutdown information in the Asset Status window. All shutdown information entered within the Asset Status window is for informational purposes only. To view and define shutdown information for an asset:
  • 18. 1. Navigate to the Asset Status window. 2. Select an Asset Number from the list of values. 3. Choose Find. All shutdown information for the current asset appears in the Shutdown Details region. 4. To add new shutdown information for the current asset, Select a Start Date from the list of values. 5. Select an End Date from the list of values. 6. Optionally, associate the shutdown information to a specific work order requiring maintenance on the current asset. Only work orders created for the current asset are available from the list of values. 7. Optionally, associate shutdown information to the operation level of a work order by choosing a specific Operation Sequence. 8. Optionally, enter a Shutdown Description. 9. Save your work. Defining Activities Submitted by Anonymous on Tue, 03/02/2010 - 18:58 Tag: • EAM / Activities provide you with a standard template of jobs, which can be applied to Work Orders, such as Routine or Preventive Maintenance. After these Activity Templates are created, they can be associated with one or more Asset Numbers or Rebuildables. They also need to be associated to a maintenance BOM and activity routing, containing the materials and resources needed for operations, respectively. When Work Orders are created for assets associated to the Activity, the material and resources associated with the current Activity automatically copy to the Work Orders created. There are three methods you can use to create an Activity. You can create an Activity within the Master Activity (Master Item) window, create Activities from the Activity Workbench, and create Activities from within a Maintenance Work Order. To set up Activities within the Master Activity window:
  • 19. 1. Navigate to the Activity (Master Item) window. The Master Item window is used to create Maintained Groups, Activities, and rebuildable. 2. Enter the name of the Activity in the Item field. 3. Enter a Description for this Activity, up to 240 characters. 4. Use the @Activity template to quickly apply attribute values, and to ensure that the appropriate attributes are applied. a. Select TOOLS from the Tools menu. From the drop down list, select COPY FROM. b. Select the @Activity template from the list of values. The following table presents the necessary attribute values that are applied automatically to the Activity, when using the template: 5. Select the Asset Management tabbed region. In the Activity Property region, optionally enter an Activity Type to indicate the type of maintenance for this Activity. It is used when defining a Work Order. It should remain generic, and should not describe in detail the job to be done. For example, Inspection, Overhaul, Lubrication, Repair, Servicing, or Cleaning. 6. Optionally, select an Activity Cause from the list of values, to specify what situation caused this work to be generated. For example, Breakdown, Vandalism, Normal Wear, or Settings. 7. Optionally, select an Activity Source from the list of values. Activity Source codes are reasons activities need to be executed. For example, Warranty Compliance, OSHA Compliance, or Military Specification Requirements. 8. Optionally, select a Shutdown Type from the list of values. This indicates whether a shutdown is necessary to perform this maintenance activity. For example Required, and Not Required. This field is informational only. 9. Optionally, select the Activity Notification Required field to indicate whether the asset requiring work is mobile, and needs to be brought into the shop for repairs. This field is for information only. 10. Optionally, select the paperclip Attachments icon to attach relevant documents, such as drawings, standard procedures, and reference guides, to this Activity. You can attach file, URL, and text attachments. 11. Save your work. After saving your work, this Activity can be associated with an asset
  • 20. To set up Activities using the Activity Workbench: Navigate to the Activity Workbench window. Choose Launch and to create an Activity, choose New. 1.1 Enter an Activity Name. 1.2. Enter an Activity Description. 1.3 Choose an activity Template from the list of values. This will automatically bring in the properties associated with an Activity. The @Activity template is created for you, however you can create your own Activity Templates, as well. Activity Properties 2.1 Within the Activity Properties region, optionally select an Activity Type. The value in this field will default from the Template properties above. 2.2 Within the Activity Properties region, optionally select an Shutdown Type. The value in this field will default from the Template properties above. This field is informational only until a future release. 2.3 Within the Activity Properties region, optionally select an Activity Cause. The value in this field will default from the Template properties above. 2.4 Within the Activity Properties region, optionally select an Activity Source. The value in this field will default from the Template properties above. 2.5 The Activity Notification check box is informational only until a future release. Copy Option 3.1 Within the Copy Options region, optionally select the entity to copy information from. Valid values are Activity and Work Order. If you select Activity, the values within the Activity region are relevant, and the values within the Work Order region are irrelevant. If you select Work Order, the values within the Work Order region are relevant, and the values within the Activity region are irrelevant. 3.2 Within the Activity region, if Activity is populated in the Copy From field, optionally select an Activity name. 3.3.1 Within the Activity region, if Activity is populated in the Copy From field, optionally select the BOM check box to indicate that the Maintenance Bill of Material, associated with the current Activity within the
  • 21. Activity region, will copy to the new Activity Name. For example, in the screen shot above, the Maintenance Bill of Material associated with the 3000 Mile Truck Maint will copy to Oil Change. 3.3.2 Within the Activity region, if Activity is populated in the Copy From field, optionally select the Routing check box to indicate that routings, associated with the current Activity within the Activity region, will copy to the new Activity Name. For example, in the screen shot above, routings associated with the 3000 Mile Truck Maint will copy to Oil Change. 3.3.3 Within the Activity region, if Activity is populated in the Copy From field, select All or None from the Association list of values. ■ All: All Asset and Rebuildable associations, associated with the current Activity within the Activity region, will copy to the new Activity. ■ None: No Asset and Rebuildable associations, associated with the current Activity within the Activity region, will copy to the new Activity. 3.4.1 Within the Work Order region, if Work Order is populated in the Copy From field, select an existing maintenance Work Order from the list of values. 3.4.2 Within the Work Order region, if Work Order is populated in the Copy From field, select All or None from the Operation list of values. ■ All: All operations associated with the current Work Order, populated in the Work Order field, will copy to the new Activity. ■ None: No operations associated with the current Work Order, populated in the Work Order field, will copy to the new Activity 3.4.3 Within the Work Order region, if Work Order is populated in the Copy From field, select All, Issued, or None from the Material list of values. ■ All: All material associated with the current Work Order, populated in the Work Order field, will copy to the new Activity. ■ Issued: Only material issued to the current Work Order, populated in the Work Order field, will copy to the new Activity. ■ None: No material associated with the current Work Order, populated in the Work Order field, will copy to the new Activity. 2.4.4 Within the Work Order region, if Work Order is populated in the Copy From field, select All, Issued, or None from the Resource list of values. ■ All: All resources associated with the current Work Order will copy to the new Activity. ■ Issued: Only resources issued to the current Work Order will copy to the new Activity. ■ None: No resources associated with the current Work Order will copy to the new Activity. 21. Within the Work Order region, if Work Order is populated in the Copy From field, select None, Current, or All from the Association list of values. ■ None: No Assets and Rebuildables, associated with the current Work Order, will associate with the new Activity. ■ Current: An Asset and/or Rebuildable, associated with the current Work Order, will associate with the new Activity. ■ All: All Assets and/or Rebuildables, associated with the current Work Order’s Activity, will associate with the new Activity. 22. Save your work. After saving, the new Activity is automatically assigned to the current organization Activity Association Template Submitted by Anonymous on Wed, 03/03/2010 - 16:00 Tag: • EAM / You can streamline the creation of Activity associations using an Activity Association Template. For example, when you create a Maintained Group, and then Maintained Numbers within that group, you do not need to utilize the Association window to associate those Maintained Numbers with an Activity. If you create an Activity Association Template, the Activity that you associate with the current Maintained Number’s Maintained Group will automatically determine the Activity that is associated with the current Maintained Number.
  • 22. To create activity templates: 1. Navigate to the Activity Association Template window. 2. Select a valid Activity from the Activity list of values. The Activity needs to already have been created within the Master Item window. 3. Within the Main tabbed region, select an Item Type of Asset or Rebuildable. 4. Select a Maintained Group from the list of values. After this record is saved, this Maintained Group will be associated with the current Activity. Every Maintained Number created within the current Maintained Group will automatically be associated with the current Activity. 5. Optionally, select a Priority code from the list of values. This value will default from the Master Activity information created within the Master Item window. 6. Optionally, enter Effectivity Dates for this Activity Template. 7. Within the Activity tabbed region, you can optionally select an Activity Cause from the list of values. This value specifies what situation caused this work to be generated. For example, Breakdown, Vandalism, Normal Wear, or Settings.This value defaults from the Master Activity information created within the Master Item window. 8. Optionally, select an Activity Type from the list of values. This code indicates the type of maintenance for this Activity. It is used when defining a Work Order. It should remain generic, and should not describe in detail the job to be done. For example, Inspection, Overhaul, Lubrication, Repair, Servicing, or Cleaning. This value defaults from the Master Activity information created within the Master Item window. 9. Optionally, select the Tagging Required check box to indicate whether tag out procedures are required. The Area might need to be secured for operations required for carrying out a Work Order. Tags are generally printed and placed on an asset, warning the plant that the asset is shutdown, and should not be started. This check box helps the planner isolate those jobs that require a tagout. This is for information only. 10. Optionally, select an Owning Department from the list of values. This value defaults from the Enterprise Asset Management Parameters information for the current organization. 11. Optionally, select a Shutdown Type from the list of values. This indicates whether a shutdown is necessary to perform this maintenance activity. For example Required, and Not Required. This field is informational only. This value defaults from the Master Activity information that was created within the Master Item window. 12. Optionally, select a WIP Accounting Class from the list of values. This value defaults from the Enterprise Asset Management Parameters information for the current organization. 13. Optionally select an Activity Source from the list of values. Activity Source codes are reasons activities need to be executed. For example, Warranty Compliance, OSHA Compliance, or Military Specification Requirements. This value will default from the Master Activity information that was created within the Master Item window. 14. Save your work. Associate Assets with Activities Submitted by Anonymous on Wed, 03/03/2010 - 13:00 Tag:
  • 23. EAM / After you have defined Maintained Groups, Assets, and Activities, you can associate the Activities with assets and/or rebuildables. However, you can streamline the creation of Activities and associations using an Activity Association Template. Assets need to be associated with Activities before entering the Activity into a Preventive Maintenance Schedule. Note: The Activity Workbench is generally used to streamline your Activity setups, including Maintained Number/Activity associations. Also, you can streamline the creation of Activity associations using an Activity Association Template. For example, when you create a Maintained Group, and then Maintained Numbers within that group, you do not need to utilize the Association window to associate those Maintained Numbers with an Activity. If you create an Activity Association Template, the Activity that you associate with the current Maintained Number’s Maintained Group will automatically determine the Activity that is associated with the current Maintained Number. To associate Assets with Activities: Navigate to the Activity Association window and Select an Activity from the list of values. 1.1 Within the Main tabbed region, select Capital/Asset or Rebuildable from the Item Type list of values. This field works directly with the Maintained Group and Maintained Item fields. If Capital/Asset is selected, the Maintained Group refers to the Asset Group, and the Maintained Number refers to the Asset Number. If Rebuildable is selected, the Maintained Group refers to the Rebuildable Item, and the Maintained Number refers to the specific serial numbers for the current Rebuildable Item. 1.2 Select a Maintained Group from the list of values. If Asset is populated in the Item Type field, Asset Groups are available in the list of values. 1.2 Select a Maintained Number from the list of values. Only Maintained Numbers associated with the previously selected Maintained Group will be available. Maintained Numbers are always serial controlled. If you had selected a Non-serialized Rebuildable in the Maintained Group field, then the Maintained Number field is not required. 1.3 Optionally, select a Priority Code from the list of values. This field is for information only. 1.4 Optionally, enter Effective Dates. If the Effective From field is left blank, it will default to the system date. If the Effective To field is left blank, it will default to NULL. 2.1 Within the Activity tabbed region, the Activity Cause will default from the Activity definition, specifying what situation caused this work to be generated. For example, Breakdown, Vandalism, Normal Wear, or Settings. Optionally, you can select an Activity Cause from the list of values to update this field.
  • 24. 2.2 The Activity Type will default from the Activity definition. This code indicates the type of maintenance activity needed to be done for this Activity. It is used when defining a job or a standard job. This code should remain generic, and should not describe in detail the job to be done. For example, Inspection, Overhaul, Lubrication, Repair, Servicing, or Cleaning. Optionally, you can select an Activity Type from the list of values to update this field. 2.3 Optionally, select an Activity Source from the list of values. Activity Source codes are reasons activities need to be executed. For example, Warranty Compliance, OSHA Compliance, or Military Specification Requirements. This value will default from the Master Activity information that was created within the Master Item window. 2.4 Optionally, select a Shutdown Type from the list of values. This indicates whether a shutdown is necessary to perform this maintenance activity. For example Required, and Not Required. This field is informational only. This value defaults from the Master Activity information that was created within the Master Item window. 2.5 Optionally, select the Tagging Required check box to indicate whether tag out procedures are required. The Area may need to be secured for operations required for carrying out a Work Order. Tags are generally printed and placed on an asset, warning the plant that the asset is shutdown, and should not be started. This check box helps the planner isolate those jobs that require a tagout. This is for information only. 2.6 The Owning Department responsible for this activity or asset will default from the Asset Number definition. Optionally, you can update this field by selecting an owning department from the list of values. This is normally a Planner or Supervisor. 2.7 Optionally, select a WIP Accounting Class from the list of values. You can over-write the value that defaults from the Enterprise Asset Management Parameters information, for the current organization. Maintenance(Activity) Route Submitted by Anonymous on Wed, 03/03/2010 - 16:39 Tag: • EAM / A Maintenance Route is the set of operations or jobs necessary to perform an Activity. When a Work Order is created for an Activity, the Maintenance Route corresponding to the Activity explodes to the Work Order; all operations specified in the Maintenance Route are copied to the Work Order as its operations. Maintenance Routes are not Asset Routes. Enterprise Asset Management operations differ from manufacturing operations because manufacturing operations must be performed sequentially, whereas eAM operations do not need to be performed sequentially. In Enterprise Asset Management, operations may not be sequential. You can specify that one operation is dependent on another. Also, it is possible that two unrelated operations can happen concurrently. One operation can be dependent on multiple operations. Multiple operations can be dependent on only one operation. The dependency may not be totally connected. To define a maintenance route:
  • 25. Navigate to the Activity Workbench window and Choose Launch. 1. Within the Activity Workbench pane, select the Activity for which you wish to create the Routing. and Choose Routing. Select an Activity from the Item list of values. 2.1 Within the Main tabbed region, enter an operation Sequence, or let the system automatically generate it for you, according to your profile setup. 2.2 To copy or reference standard operations into a routing, use the operation Code list of values. You can define a new standard operation by selecting Standard Operations from the Tools menu. If you use a standard operation code, the operation information for that code will be copied into the current operation. You can then update that information as desired . 2.3 Select a Department from the list of values, where the operation will be performed. 2.4 Select the Referenced check box to indicate that any changes to standard operations will be reflected in the routing. If the standard operation is selected, this check box is selected by default. 2.5 The Effective date will default to the system date, but you can optionally change this . 2.6 Optionally, enter a Disabled date to indicate the current operation’s expiration. 2.7 Select the Description tabbed region. Enter a Description for the current operation. 3. Optionally, choose Routing Network to view the operation dependencies for the current asset route. 4. Optionally, select an operation, then choose Operation Resources to view the resources associated with the current department attached to this operation. Optionally, you can modify the resources listed . Maintenance(Activity) Bills of Material Submitted by Anonymous on Wed, 03/03/2010 - 17:09 Tag: • EAM / You can identify and select the required items used by an Activity. A bill of material (BOM) can be used to list all items needed to perform a particular Activity, and can be defined for each Activity. For example, you might have an Activity titled, Fork Lift Daily Maintenance. The items necessary to perform this Activity include water, fork lift lubrication oil, filled propane tanks, and shop rags. As Maintenance BOMs are created, they are associated to an Activity. When a Work Order is created for an Activity, the Maintenance BOM corresponding to the Activity explodes to the Work Order ;all components specified in the Maintenance BOM are copied to the Work Order as material requirements.
  • 26. To set up an maintenance BOM: 1. Navigate to the Activity Workbench window. 2. Choose Launch. 3. Within the Activity Workbench pane, select the Activity for which you wish to define the Bill of Material. 4. Choose BOM. 5. Select an Activity from the Item field list of values. 6. Select the Main tabbed region. The Item Sequence will default. 7. Enter the Operation Sequence that this Component (material item necessary for the operation sequence, NOT rebuildable item) is needed for. 8. Enter necessary Components and their Quantities that are required to perform the Activity. You can enter an unlimited number of material items. 9. Optionally, select the Date Effectivity tabbed region to specify effectivity dates per component. 10. Save your work. Defining Rebuildable Items Submitted by Anonymous on Wed, 03/03/2010 - 17:14 Tag: • EAM / Items that are installed, removed, and refurbished are referred to as Rebuildable Items. Examples of Rebuildable Items include motors, control boxes, and computer boards. Rebuildable Items may need to be removed or refurbished while a parent Asset is maintained. Rebuildable Items are inventory items; you have the option to serialize them. To set up rebuild items:
  • 27. 1. Navigate to the Rebuildable Item (Master Item) window. The Master Item window is used to create Maintained Groups, Activities, and Rebuildable Items. 2. Enter the Rebuildable Item name in the Item field. 3. Enter a Description for this Rebuildable Item, up to 240 characters. 4. Use the @Rebuildable template to quickly apply attribute values, and to ensure that the appropriate attributes are applied. a. Select TOOLS from the Tools menu. From the drop down list, select COPY FROM. b. Select the @Rebuildable template from the list of values. The following table presents the necessary attribute values that are applied automatically to the Activity, when using the template: 5. Optionally, select the paperclip Attachments icon to attach relevant documents, such as drawings, standard procedures, and reference guides, to this Rebuildable Item. You can attach file, URL, and text attachments. 6. Optionally, select the Inventory tab to define a Non-Serialized Rebuildable Item. Within the Generation field, select No Control. If you wish to define a Serialized Rebuildable Item, select one of the other options available, based on your business needs. Valid values include No Control, Predefined, At Receipt, and At Sales Order Issue. 7. Save your work.
  • 28. Rebuildable Serial Numbers Submitted by Anonymous on Wed, 03/03/2010 - 18:00 Tag: • EAM / To set up rebuildable serial numbers individually Navigate to the Define Rebuildable Serial Numbers window. 1.1 Select a Maintained Group from the list of values. This is the Maintained Group (Rebuildable Item) you are associating with the Rebuildable Serial Number you are currently creating. Note: To create a rubildable serial number the serail number should be enabled else the rebuildable asset wont be available in rebuildable serial number window. 1.2 Enter a Maintained Number (Rebuildable Serial Number) if you do not have them automatically generated, or accept or modify the default, if you have automatic generation enabled . 1.3 Optionally, enter a description for the Rebuildable Serial Number of up to 240 characters. 2.1 Within the Main tabbed region, you can optionally select an Owning Department for this Rebuildable Serial Number from the list of values. This represents the crew responsible for the Rebuildable Serial Number (Maintained Number). Notifications, regarding Work Requests, are sent to everyone with a responsibility assigned to the Work Request’s associated Maintained Number’s current owning department. 2.2 Optionally, enter the Area where this Maintained Number resides. This is a user defined listing of logical areas of work. For example, North Plant, East Wing, or Area 1. 2.3 Optionally, select a Criticality code from the list of values, indicating the importance of the Maintained Number to the organization. This field is for information only. 2.4 Optionally, select a WIP Accounting Class from the list of values. This will identify the Expense cost elements associated with the work performed, such as materials, labor, and resources. 2.5 Save your work. Notice that the Current Status is Defined but not used.
  • 29. To establish a rebuildable serial number in Inventory 3.1 To add this item to a Subinventory, select a Subinventory from the list of values. If the selected Subinventory has a Locator, you must also enter a Locator. 3.2 Choose Intantiate to automatically activate a Miscellaneous Receipt process. This process creates inventory for the Maintained Number (Rebuildable Serial Number), in the selected Subinventory and Locator. As part of the Instantiate process, if Preventive Maintenance, Activity, and/or Meter Templates are associated with the current Maintained Group (Rebuildable Item), an association instance is automatically created for the current Maintained Number (Rebuildable Serial Number) and that Activity, and/or Meter and Preventive Maintenance Schedule, respectively. The Instantiate process is a one-time-process only. After the process is successful, the Current Status of the Maintained Number changes to Resides in stores, and the Instantiate option is disabled. 4. Optionally, choose Associate Activity to associate the current Maintained Number (Rebuildable Serial Number) to an Activity. Rebuildable BOM Submitted by Anonymous on Wed, 03/03/2010 - 18:09 Tag: • EAM / Meter and Meter Templates Submitted by Anonymous on Wed, 03/03/2010 - 19:13 Preventive Maintenance Setup eAM can generate Work Orders automatically based on meter readings, runtime and/or calendar days. An example of meter-based preventive maintenance is your car’s oil changes. Most car manufacturers recommend that you change your engine oil every 3,000 miles or six months, whichever comes first. To set up the above scenario, you would first define your car’s odometer as a meter. Next, you would associate that meter to an asset (your car), using the Asset Meter Association window. After you have associated the meter to the asset, you can associate the Maintenance Activity (oil change) that should occur, based on the meters you have defined. This is done via Preventive Maintenance Scheduling
  • 30. Defining Meter Templates There are two ways to create meters. You can create them within the Meter Definition window, or create them using a Meter Template window. If you create Meters using the Meter Definition window , you will need to associate that meter definition with individual Maintained Numbers manually. If you utilize the Meter Template definition functionality, you can associate that Meter Template with Maintained Groups. After the association is created, when a Maintained Number (Asset Numbers or Rebuildable Serial Numbers) is created within that Maintained Group (Asset Group or Rebuildable Item), the system will automatically create a new instance of the meter, associated with the specific Maintained Number. This enables you to streamline your meter setup. However, the meters are not created retroactively; it applies only to Maintained Numbers created after the Meter Template was created. To define Meter Templates: Navigate to the Meter Template window. 1. Enter a unique meter template Name amd Description of the Meter Template. 2. Select a unit of measure (UOM) from the list of values. After the meter is created, this field cannot be updated. 3. Select whether the meter readings will be Ascending, Descending, or Fluctuating. If you choose blank from the drop down list, the meter reading can fluctuate. A fluctuating meter reading is one that can go up and down, for example, a temperature gauge. As production units pass through meters, meter readings increment. Another example of an ascending meter is a car odometer. Some liquid dispensers start full and record decreasing readings as material is used. Note: If the meter is fluctuating, then it cannot be used in Preventive Maintenance scheduling. 4. If you select the Used in Scheduling check box, the meter will be used in Preventive Maintenance Scheduling. If there are any scheduling rules associated with this meter, this check box cannot be cleared. If this is a fluctuating meter, this check box is disabled. If the Used in Scheduling check box is selected, the Usage Rate (per day) and Use Past Reading fields become mandatory. 5. Enter a usage Rate (per day). This field works in conjunction with the Use Past Readings field to support historical readings prior to eAM implementation. It supplies the system benchmark data that can be used to set the occurrence of scheduled PMs. Rate per day is referred to in the absence of a sufficient value in the Use Past Reading field. This field is mandatory only if you have selected the Used in Scheduling check box. 6. Enter a value for the number of past readings. This value designates how many readings prior the scheduler should go to for calculating the usage rate. If there is an insufficient number of readings (for example four, instead of the required
  • 31. five), the system will continue the calculation based on the usage Rate per day entered. This field is mandatory only if you have selected the Used in Scheduling check box. 7. Optionally, enter an Initial Reading. This is automatically used for the meter, or each new instance of the meter that is created and associated to a Maintained Number via the Meter Template. 8. Select the meter effectivity dates. If left blank, the meter is effective all of the time, after it is created. If you select a future date, the meter is disabled until that date. You can disable a meter effective on a specific date by selecting a To date. 9. Save your work. Defining Meters Alternatively, you can create Meters using the Meter Definition window. You will need to manually associate the meter definition with individual Maintained Numbers. If you utilize the Meter Template definition functionality, you can associate that Meter Template with Maintained Groups . To define a meter within the Meter Definition window: Navigate to the Meters window. 1. Enter a unique meter Name and Description for this meter. 2. Select a unit of measure (UOM), associated with this meter, from the list of values. After the meter is created, this field cannot be updated. 3. Select whether the meter readings will be Ascending, Descending, or Fluctuating. If you choose blank from the drop down list, the meter reading can fluctuate. A fluctuating meter reading is one that can go up and down, for example, a temperature gauge. As production units pass through meters, meter readings increment. Another example of an ascending meter is a car odometer. Some liquid dispensers start full and record decreasing readings as material is used. Note: Fluctuating meters cannot be used in Preventive Maintenance scheduling. After the meter is created, you cannot update this field. 4. If you select the Used in Scheduling check box, the meter will be used in Preventive Maintenance Scheduling. If there are any scheduling rules associated with this meter, this check box cannot be cleared. If this is a fluctuating meter, this check box is disabled. If the Used in Scheduling check box is selected, the Usage Rate (per day) and Use Past Reading fields become mandatory. 5. Enter a usage Rate (per day). This field works in conjunction with the Use Past Readings field to support historical readings prior to eAM implementation. It supplies the system benchmark data that can be used to set the occurrence of scheduled PMs. Rate per day is referred to in the absence of a sufficient value in the
  • 32. Use Past Reading field. This field is mandatory only if you have selected the Used in Scheduling check box. 6. Enter a value for the number of past readings. This value designates how many readings prior the scheduler should go to for calculating the usage rate. If there is an insufficient number of readings (for example four, instead of the required five), the system will continue the calculation based on the usage Rate per day entered. This field is mandatory only if you have selected the Used in Scheduling check box. 7. Optionally, enter an Initial Reading. This is automatically used for the meter, or each new instance of the meter that is created and associated to a Maintained Number via the Meter Template. 8. Select the If left blank, the meter is effective all of the time, after it is created. If you select a future date, the meter is disabled until that date. You can disable a meter effective on a specific date by selecting a To date. 9. Save your work. Meter Templates with Maintained Groups and Associate Meters with Assets Submitted by Anonymous on Wed, 03/03/2010 - 19:23 Tag: • EAM / Associating Meter Templates with Maintained Groups If you utilize the Meter Template definition functionality, you can associate that Meter Template with Maintained Groups. After you create the association, when a new Maintained Number (Asset Numbers or Rebuildable Serial Numbers) is created within that Maintained Group (Asset Group or Rebuildable Item) a new instance of the corresponding meter is automatically created. This enables you to streamline your Meter setup. To associate Meter Templates with Maintained Groups:
  • 33. 1. Navigate to the Meter Template Association window. 2. Select an Item Type from the list of values. Valid values are Asset or Rebuildable. 3. Select a Maintained Item (Asset Group or Rebuildable Item) from the list of values. 4. Optionally, choose Find to query existing Meter Template/Maintained Group relationships. 5. Within the Meter Template region, select a meter template Name from the list of values. 6. Save your work. After saving, every Maintained Number defined as part of the current Maintained Group will automatically associate with the Meter Template; you do not need to create this association manually. Associating Meters with Maintained Numbers Meter Association creates the relationship between the meter definition and the Maintained Number. To associate meters with Maintained Numbers 1. Navigate to the Meter Association window. 2. For optimal performance, select a Maintained Group (Asset Group or Rebuildable Item) from the list of values before selecting an Maintained Number. Only Maintained Numbers associated with the selected Maintained Group will be available in the list of values. You can optionally select an Maintained Number from the list of values first. This triggers the Maintained Group to default. 3. Choose Find to view all Meters associated with the current Maintained Number (Asset Number or Rebuildable Serial Number). 4. In the Meters region, you can associate existing, defined meters with the current asset. To associate existing meters with the current Maintained Number, select a meter Name from the list of values. All remaining fields in the Meters region are view-only. 5. Save your work. Define PM Schedule Definitions Submitted by Anonymous on Wed, 03/03/2010 - 19:36 Tag: • EAM / Defining Set Names A PM schedule for an Activity and a Maintained Number or Maintained Group must uniquely belong to a Set Name. Multiple PM Schedules for the same Maintained Number or Maintained Group and Activity combination can be created across Sets. However, out of those PM Schedules, only one can be identified as the Default and used for generating Work Orders. Other PM Schedules in other Sets can be used for simulation purposes only. Every Set Name has an end date. Every PM schedule that belongs to the Set Name must have its effective-to date before the end date of the PM Schedule’s Set Name. Before assigning a Set Name to a PM schedule, you need to define Set Names within the Set Name Definition window. If you do not want to create Set Names, you can assign PM schedules to set, MAIN; it already exists.
  • 34. To define Set Names: 1. Navigate to the Set Name window. 2. Enter the name of the Set Name. 3. Optionally, enter an End Date. Every PM schedule that belongs to the Set Name must have its effective-to date before the End Date of the PM Schedule’s Set Name. If you leave this field blank, the current Set Name will not expire. 4. Optionally, enter a Description for this Set Name. 5. Optionally, choose Templates to add, change, delete, or view Preventive Maintenance Schedule Templates, associated with the current Set Name. 6. Optionally, choose Schedules to create PM Schedule Definitions, associated with the current Set Name. 7. Optionally, choose Set Default to identify all schedules within this set as Default. PM Schedules identified as Default will automatically generate Work Orders, by the PM Scheduler process. PM schedules that are not identified as Default can only generate Work Order suggestions, by the PM Scheduler process. The generated suggestions cannot be converted into Work Orders. You can create an unlimited number of Set Names within this window. • Defining a Preventive Maintenance Template
  • 35. Defining a Preventive Maintenance Template Submitted by Anonymous on Wed, 03/03/2010 - 20:00 Tag: • EAM / An Activity and Maintained Number combination can be associated with Runtime, Day Interval Rules, or a list of dates, defining when an Activity should be scheduled for an Asset, Serialized and Non-Serialized Rebuildables, or an Asset Route. Only Day Interval rules and List of Dates rules are supported for Non- Serialized Rebuildables and Asset Routes. The Preventive Maintenance (PM) Scheduler process creates suggested Work Order dates based on these rules. A planner can then view these forecasted Work Orders, and generate them as necessary. There are two ways to create PM schedule definitions for Serialized Rebuildables and Assets. You can create them individually within the Preventive Maintenance Schedules window, or streamline the process of creating them using a PM Template. A PM Template is a schedule, defined for a Maintained Group (Asset Group or Rebuildable Item)/Activity association. If you utilize the PM Template functionality, a new PM Schedule is automatically created for a newly created Maintained Number (asset or rebuildable) for the Maintained Group. All PM Template attributes are copied over to the PM Schedule for the Instance. You can optionally modify the values of the PM Instances created. Before a PM Template can be created, the following prerequisites need to already exist: – Activity Definition – Activity Association Template – Meter Template Definition : A Meter Template definition is required only if the PM Template is based on Runtime Rules. – Meter Template Association : A Meter Template Association is required only if the PM Template is based on Runtime Rules. To create a PM Template: Navigate to the Find Preventive Maintenance Schedules window. This window enables you to enter information to narrow your search for query mode. To define a new PM Template, choose New. 1.1. Enter a PM Template name in the Schedule Name field. 1.2 Select an Item Type from the list of values. Valid values are Asset and Rebuildable. If you select Asset, the Maintained Group fields refer to the Asset Group. If you select Rebuildable, the Maintained Group fields refer to the Rebuildable Item. 1.3 Enter a Set Name. A PM schedule for an Activity and Maintained Group must uniquely belong to a Set Name. Every Set Name has an end date. Every PM schedule that belongs to the Set Name must have its
  • 36. effective-to date before the end date of the PM Set Name. Before assigning a Set Name to a PM schedule, you need to define Set Names within the Set Name Definition window. If you do not want to create Set Names, you can assign PM schedules to set, MAIN; it already exists. 1.4 Select a Maintained Group from the list of values. 1.5 Select an Activity from the list of values. Only Activities associated with Maintained Groups are eligible for defining a Schedule Template. 1.6. Select a Schedule Type from the list of values. Valid values are Rule Based and List Dates. If you select Rule Based, the Day Interval Rules and Runtime Rules tabbed regions are enabled to enter information. If you select List Dates, you will define information within the List Dates tabbed region. 1.7. Optionally, select the Instantiation check box. If this check box is selected, a new instance of the current PM schedule template is created for each new Maintained Number (Asset Number or Rebuildable Serial Number). 2.1 The Effective dates will default from the current Activity, if they exist. Optionally, select or update the Effective From and Effective To dates. 2.2. Optionally, enter a Lead Time In Days. Lead time in a Preventive Maintenance Schedule is different than lead time associated with Work Order creation. The Preventive Maintenance process suggests Work Orders to be created or scheduled, starting from the last service day of the Asset to the cut-off day you specified while running the process. If a Lead Time In Days is specified, the Preventive Maintenance process predicts work for those extra days beyond the cut-off date. This provides the maintenance department advanced visibility for maintenance work that is typically predicted in the next planning process. The maintenance department can prepare for such work in the current planning period. 2.3 Optionally, enter a Tolerance In Days to indicate a minimum interval in days that suggested Work Orders’ dates are spaced from each other. 3.1 In the Scheduling Options region, indicate how the PM Scheduler process calculates Work Order dates. ■ Start to Start: The PM Scheduler process uses the Last Service Start Date, and calculates scheduled start dates. This is a forward scheduling method. ■ Start to End: The PM Scheduler process uses the Last Service Start Date, and calculates the scheduled end dates. This is a backward scheduling method. ■ End to Start: The PM Scheduler process uses the Last Service End Date, and calculates the scheduled start dates. This is a forward scheduling method. ■ End to End: The PM Scheduler process uses the Last Service End Date, and schedules the scheduled end dates. This is a backward scheduling method. 3.2 In the Schedule Based On region, indicate how the predicted due dates are determined. ■ First Due Date: The due date is set to the first due date of all rules. ■ Last Due Date: The due date is set to the last due date of all rules. For example, below is a Runtime Rule that includes two meters, Meter1 and Meter2. If you specify First Due Date in the Scheduling Based On region of the PM Template, between the two meters, the first meter that hits the due reading triggers the service. In this case, if Meter1’s reading reaches the interval of 100 first, the service happens before Meter2’s reading reaches its interval of 50. Conversely, you can choose Last Due Date in the Scheduling Based On region. In this case, even if Meter1 reaches its due reading, the service will not be scheduled until Meter2 has also reached its due reading. This region is disabled if the current PM schedule definition’s Scheduling Type field is populated with List Dates. 4.1 Optionally, select the Reschedule Manual Work Orders check box. If this check box is selected, unreleased manual work orders are considered during PM scheduling. 4.2 If the Run To Failure check box is selected, the Preventive Maintenance Scheduler will not automatically schedule Maintained Numbers within this Maintained Group and Activity association, however manual Work Orders can still be created. This is relevant for Maintained Numbers that cost more to maintain than the Maintained Number itself. You might also check this box for forecasting and budgeting reasons. For example, your asset is a conveyor belt. It is common in maintenance environments to let this asset wear out completely before replacing it. You estimated that the life of this asset is 18 months, and have set up a schedule for a replacement Work Order every 18 months. In reality, you found that the belts have ended up wearing out every 12 months, affecting your cost budget.
  • 37. You can select this check box and clear it later. For example, you might associate a Maintained Number to an Activity, but maybe you cannot currently maintain or schedule this Maintained Number. You may have future plans to maintain this Maintained Number. If this check box is selected, only PMs created as a copy of this PM Template will generate Work Orders for the corresponding asset in the Maintenance Workbench 4.3 Optionally, select the Default check box to indicate that the current PM schedule definition will generate Work Orders. If this check box is not selected, only Work Order suggestions are generated. You can have only one Default PM for a Maintained Item/Activity combination. 5.1.1 For Day Interval Rules Optionally, enter Effective From and To dates to specify the rule’s expiration. 5.1.2 Enter an Interval In Days. For example, if you enter the number three, a Work Order suggestion will be created every three days. You can optionally create variable Day Interval Rules. For example, you would like Work Order suggestions created every three days in January, and every four days in February. The window below illustrates this example: 5.2.1 Optionally, within the Runtime Rules tabbed region, select a Meter Name to indicate that Preventive Maintenance scheduling is based on a Runtime Rule. If you have previously set up a Day Interval Rule, you can base the scheduling on a Runtime Rule, as well. Only Meter Templates associated with this Maintained Group, and with the Used in Scheduling check box selected in the meter template definition, are available in the list of values. For example, trucks of a specific Make and Model need to be scheduled for an oil change every 30 days, or every 1000 miles. If only the Runtime Rule is taken into account, the next due date will be February 10, 2002 (January 1 2002 + 40 days), and every 40 days after that. This is calculated as the interval (1000 miles) divided by the usage rate (25 miles per day). The PM Scheduler process compares the above suggested dates from the runtime interval rule, to those of the day interval rule: Base Date of December 26, 2001 + every 30 days. The Work Orders ultimately created by the PM Scheduler process are those of the earliest or latest dates, depending on how the Schedule Based On region is populated. If you selected First Due, the earliest suggestion is used for Work Order creation. The opposite is also true. 5.2.2 The Interval and UOM fields work together. For example, for every 2000 miles, this Maintained Number needs an oil change. The UOM defaults from the Meter Template definition of the current Meter Template. You can optionally create multiple Runtime Rules. For example, from zero to 10,000 miles, you would like your asset serviced every 3,000 miles. From 10,000 to 50,000 miles, you would like your asset serviced every 2,000 miles. 5.2.3 You cannot enter the Last Service Reading. This field is automatically updated with the meter reading information recorded at Work Order completion. Note: The Preventive Maintenance Scheduler will automatically calculate the meter usage rate, based on historical data, which is then used to predict the next meter due date. Refer to the example below. 5.3.1 If you populated List Dates within the Schedule Type field, select the List Dates tabbed region to define the specific due dates that Work Orders should transpire. For example, you want asset, Car1, serviced on May 1 and November 1 every year for the next three years. In this case, you would create a List Dates type schedule definition, and list all the due dates within this tabbed region. The PM Scheduler process creates suggested Work Order dates on those specified dates. 6. Save your work. eAM Work Management Submitted by Anonymous on Thu, 12/31/2009 - 10:40 Tag: • EAM /
  • 38. The Work Order is the foundation of all maintenance organizations. Work orders define what resources and items are needed to conduct work. They can • Manually generated as a routine Work Order • Automatically generate through the use of preventive Maintenance Schedules • Issue of an inventoried rebuildable These Work Orders are then reviewed and shared with Operations to produce an estimated schedule. Enterprise Asset Management integrates with Oracle Quality. You can use Quality Collection Plans to predefine required feedback information that must be entered into the Enterprise Asset Management system upon a Work Order’s completion. For example, data to collect can include inspection points for an Maintained Number, and Downtime variables. If a variance is recorded into the quality plan, the system creates a Work Request. You can define quality collection plans directly on the Work Order, or define them as attributes of an Activity to ultimately default into future Work Orders generated for specific Maintained Number/Activity combinations. For each Work Order, the system can aggregate the estimated costs from the associated BOM and resources(Maintenance or activity BOM and Routing), to develop a costing profile for the current Work Order. Costing Profiles are then used for future Budgeting and Forecasting. For each Work Order, the system can aggregate the actual costs during the lifecycle of the Work Order. These costs are rolled up, based on the hierarchy of the current Work Order’s associated Maintained Number. You can view these actual costs by period, at a transaction level, or at a summary level. Routine Work Orders Submitted by Anonymous on Thu, 03/04/2010 - 19:46 Tag: • EAM / Routine Work Orders are normally created by a Planner from the Maintenance Workbench, and are also created using a menu option. Material and resource planning is used at each status of the routine Work Order. To manually create a Work Order Navigate to the Find Work Orders window and Choose New
  • 39. The header information displays general information about the Maintained Number and the type of work required. 1.1 The Work Order number is assigned by the system and can be updated. 1.2 Enter a Maintained Number requiring maintenance. The Maintained Group defaults. 1.3 Select an Activity from the list of values. Only Activities associated with this Maintained Number are available. Note: If this Work Order was previously created, you can add an Activity, as long as the Work Order is at an Unreleased or Draft status, or an Activity was not previously defined. If any tasks, material, or resource requirements exist, these must be deleted before adding an Activity to a pre-existing Work Order After you select an Activity, the system loads the associated maintenance BOM (material) and maintenance route (resources) associated with the Activity. After an Activity is saved to a Work Order, you can no longer change or delete the Activity. 1.4 Enter a WIP accounting Class code to represent the charge (expense) accounts associated with the Maintained Number. This can default from the Maintained Number and can be updated. 1.5 Enter the Status. For example, Unrelease, Released, On Hold, and Draft. Certain transactions update this status automatically, including Work Order Completion. 1.6 Optionally, select a Work Order Type from the list of values. Work Order Types enable you to differentiate Work Orders, for example, Routine, Preventive, Rebuild, Emergency, or Facilities. Maintenance management can use this information to sort and monitor work activity for reporting and budgeting. Work Order Types are referenced in the Activity and Work Order. 1.7 The Instance Number field tracks the number of instances the current Work Order has been updated. This field is disabled. Scheduled Dates region 2.1 In the Scheduled Dates region, enter the scheduled Start date of the Work Order if it is to be based on a forward schedule. The scheduling process uses this date as a starting point to calculate the scheduled end date and duration for allocated resources and material. If the material/resources are not available by this date, the scheduling process moves the start date forward. Note: Actual dates are entered at operation and Work Order completion. Scheduled dates are calculated by the Enterprise Asset Management scheduler if you have Oracle Manufacturing Scheduling enabled. Otherwise, the WIP scheduler calculates the dates. 2.2 Enter a scheduled Completion date to be used for backward scheduling. This indicates the requested end by date of the work. The scheduling process uses this date as a starting point to calculate the scheduled start date and duration for allocated resources and material. If the material and resources are not available by that date, the scheduling process moves the start date backwards to ensure completion by the required end date . Main Tab 3.1 Optionally, select a Priority Code from the list of values. For example, High, Medium, or Low.
  • 40. 3.2 The Shutdown Type defaults from the Activity. This helps the planner group Work Orders that may require shutdowns, so that they can be planned together. 3.3 If the Firm check box is checked, planning and scheduling does not adjust the schedule, regardless of material or resource availability. This check box defaults as checked or cleared, depending on the Auto Firm On Release check box setting, established in the Enterprise Asset Management Parameters setup for the current organization. This defaults only after the Work Order is released. If the check box is selected, the end date is calculated based on the Work Order duration. The scheduler automatically calculates the duration based upon the operations (resource duration setup) on the Work Order. This check box is updateable for a Work Orders at Draft, Released, Unreleased, On-Hold, or Cancel statuses . 3.4 Optionally, select the Tagout Required check box to indicate that the Area needs to be secured for operations required for carrying out this Work Order. Tags are generally printed and placed on a Maintained Number, warning the plant that the Maintained Number is shutdown and should not be started. This check box helps the planner isolate those jobs that require a tagout. To store tagout documents using the Attachments feature: a. Select the paperclip Attachments icon to attach relevant tagout documents. You can attach URL, file, or text attachments. 3.5 The Planned check box is selected if the current Work Order was created from forecasted Work Orders 3.6 Optionally, select the Enable Material Issue Requests check box to enable eAM to manage material availability to the current Work Order. Material is physically available to a Work Order via the material request and verification process. Activity tab 4.1 Optionally select an Activity Type from the list of values. This code indicates the type of maintenance for this Activity. It is used when defining a job or a standard job, for example, Inspection, Overhaul, Lubrication, Repair, Servicing, or Cleaning. This can default from the Activity. 4.2 Optionally, select an Activity Cause from the list of values to specify what situation caused this work to be generated, for example, Breakdown, Vandalism, Normal Wear, or Settings. This can default from the Activity. 4.3 Optionally, select an Activity Source from the list of value to specify reasons Activities need to be executed, for example, Warranty Compliance, OSHA Compliance, or Military Specification Requirements. This can default from the Activity egion. The Owning Department defaults in from the selected Maintained Number . This indicates the persons or department responsible for this Maintained Number. Note: Actual dates are entered at operation and Work Order completion. Scheduled dates are calculated by the Enterprise Asset Management scheduler if you have Oracle Manufacturing Scheduling enabled. Otherwise, the WIP scheduler calculates the dates. Note: When viewing a rebuild Work Order, the owning department defaults from the owning department of its parent Work Order. Project TAB
  • 41. 5.1 Optionally, select the Project tab. This tab is enabled only if Project Manufacturing is installed and enabled. a. Optionally, select a Project from the list of values. b. Optionally, select a Task from the list of values. Rebuild tab 6.1 You can select the Rebuild tab if this Work Order is created for a rebuildable item. 6.2 Optionally, select the Work Request tab to display Work Requests associated with this Work Order. You can add Work Requests to a Work Order by selecting a Request Number from the list of values. Only Work Requests at an Awaiting Work Order status are available in the list of values. You can link multiple Work Requests to a single Work Order. However, only one Work Order can be associated with a Work Request. You can de-link a Work Request from a Work Order. To de-link a Work Request from a Work Order: a. Highlight the Work Request. b. Choose Delete. Service Request tab 7.1 Optionally, select the Service Request tab to display Service Requests associated with this Work Order. 7.2 Select the Bill, Routing tab. This tab enables you to select alternate, predefined BOMs and Routings. See: Setting Up Maintenance Bills of Material and Defining Maintenance Routes, Oracle Enterprise Asset Management Implementation Guide. After the alternate BOM and Routing are selected, the system uses the associated items and assign the associated resources needed to execute this Work Order. 8.1 Optionally, choose Operations to prepare necessary operations. These operations default from the maintenance route associated with the current Activity, but can optionally be updated. 8.2 Optionally, choose Materials to view or update the associated Maintained Number’s items list. From the Material Requirements window, you can optionally choose Select Materials to add this Asset BOM to the material requirements for the current Work Order. 8.3 Optionally, choose Resources to view or update the resources assigned to each operation. 8.4 Optionally, choose Asset Route to view the Asset Route associated with the current Work Order’s Maintained Group. You might need to perform one Activity on multiple Maintained Numbers. To eliminate the possibility of creating multiple Work Orders for the same Activity, you can define Asset Routes. You can only choose Asset Route if an Asset Route is associated with the current Maintained Number. 8.5 Optionally, choose Costs to view Work Orders falling in the specific accounting periods, specified in the Accounting Information by Period region. Accounting Periods are defined within Oracle General Ledger. Actual Costs: This is the accumulation of all cost for material and resource transactions for the Maintained Number’s associated maintenance Work Orders, based on a specified period.
  • 42. 8.6 Optionally, select a Work Order, then choose Value Summary to view a summary of the actual, estimated, and variance costs for labor hours, equipment hours, and material against the current Work Order. Estimated Costs: A BOM (material parts list) and routing (resources) can be associated with a Work Order. When you select Estimated Costs type from the list of values, the estimated costs of all material and resources associated with a Work Order appear, enabling you to budget costs. Variance Costs: The difference between the actual costs recorded and estimated costs. Material: All material and material overhead transaction costs appear. Labor: All employee resource and resource overhead transaction costs appear. Equipment: All material resource and resource overhead transaction costs appear. 8.7 Optionally, choose Details to view actual, estimated, and variance costs for labor hours, equipment hours, and material for specific operations of the current Work Order. Save your work. Preventive Maintenance Work Orders Submitted by Anonymous on Sat, 03/06/2010 - 12:21 Tag: • EAM / Enterprise Asset Management enables you to generate Work Orders automatically based on meter readings,Day Interval Rule (runtime intervals), and List days (calendar days). Preventive maintenance Activities reduce the probability of failure or degradation of the assets’ physical conditions. These Activities are carried out periodically, by usage, or based on the condition of a Maintained Number (asset or rebuildable item). Meters are entered to measure any Maintained Number that needs to be measured and periodically serviced, based on the measurement. For example, a pipe may start out at 12 millimeters, but when it wears to only four millimeters, it needs to be replaced. Scheduling definitions are defined to create forecasted, scheduled Work Orders, based on meter readings. You can create a Preventive Maintenance scheduling definition for a Maintained Number/Activity combination, or an Asset Route. After you have defined Preventive Maintenance scheduling definitions, the Preventive Maintenance scheduler process can run. You can view these forecasted Work Orders using the Maintenance Workbench. You can execute the Generate Preventive Maintenance Work Orders process. When this process runs, the WIP Mass Load process runs in the background, creating forecasted Work
  • 43. Orders in a status of Unreleased. You can choose the Implement button to change the status of the Unreleased Work Orders to Released Work Orders. Easy Work Orders Submitted by Anonymous on Sat, 03/06/2010 - 15:15 Tag: • EAM / Easy Work Orders are unplanned Work Orders, and enable you to avoid operation and resource planning. An Activity does not default into the Work Order, based on the Maintained Number/Activity association as with planned Work Orders, however, you can add an Activity to an Easy Work Order. These Work Orders are only created in Maintenance User. After created, the Work Order is automatically at a Released status, enabling you to execute the Work Order. For example, request material and charge labor. eAM Work Order Statuses An Enterprise Asset Management Work Order may progress through several statuses throughout its lifecycle duration. The diagram below illustrates how Enterprise Asset Management Work Orders may start at a Draft status, then move to Released, Complete, and finally Closed. These statuses can vary depending on the type of Work Order created. For example, easy Work Orders are created in a Released status, completely bypassing the Draft status Multiple Work Orders associated with the same Activity combination cannot be at a Released status. Draft : No scheduling of Work Orders at a Draft status can take place. You cannot charge labor, or request material for Work Orders at this status. Released : After a Work Order is Released, you can execute a Work Order. You can charge labor, request material, and scheduling for this Work Order takes place to create the scheduled start or end date. You can release a Work Order from the Work Orders window, and the Maintenance Workbench. Unreleased : You can move an Enterprise Asset Management Work Order in Draft or Released status to Unreleased. Scheduling can take place for these Work Orders but you cannot charge labor or request material. An Unreleased Work Order cannot be changed to a Draft status. Pending Scheduling : If the Constraint Based Scheduler is enabled, the Work Order status changes to Pending Scheduling, if a status of Released is chosen. After the Scheduler process finishes running, the status changes back to Released. The Work Order is scheduled, based on the constraint option chosen at the organization level. Complete : A Complete status for an Enterprise Asset Management Work Order does not require any completed operations. When a Work Order is completed, you can still charge labor. You can uncomplete a Work Order; this transitions it to a Released status. Uncompletion : is performed within the Work Plans tab.
  • 44. Complete- No Charges : A Complete - No Charges status for an Enterprise Asset Management Work Order does not require any completed operations. You cannot charge labor at this status. You can uncomplete a Work Order; this transitions it to a Released status. Uncompletion is performed within the Work Plans tab. Closed : You cannot charge any accounts after an Enterprise Asset Management Work Order is closed. If a Work Order was at a Released status at the time of closing it, you can unclose the Work Order to bring it back to a Released status. If a Work Order was at a Complete status at the time of closing it, you can unclose the Work Order to bring it back to a Complete status. For all other statuses during Work Order closing, unclosing the Work Order transitions it to an Unreleased status. On-Hold : Enterprise Asset Management Work Orders at Released and Unreleased statuses can be put on hold. You cannot charge labor or request material for a Work Order at this status. Cancel : You can cancel an Enterprise Asset Management Work Order at any status in its lifecycle Rebuild Work Orders Submitted by Anonymous on Sat, 03/06/2010 - 15:41 Tag: • EAM / Rebuild Work Orders are created as child Work Orders. For example, a Work Order was issued for the inspection of a pump. During the pump inspection, you found that the motor, one of the components of the pump, is problematic. You have two options: You can repair and then re-install this motor (rebuildable item), or you can replace the rebuildable item by issuing a new motor rebuildable item from inventory. If you choose to perform a material issue from inventory, the new motor rebuildable item attaches to the Work Order, automatically creating the child, rebuild Work Order number associated to the parent Work Order. In this case, the Maintained Number genealogy would automatically update to identify this new item number. If you choose to repair and then re-install the problematic motor rebuildable item, you can manually create the child rebuild Work Order for the old motor (rebuildable item). The instructions below show you the option of creating a rebuild Work Order without issuing any new material. The rebuildable item needing to be rebuilt is replaced back into the asset (motor placed back into the pump, for example), and does not go to a subinventory when the Work Order is completed. In this case, the Maintained Number genealogy is not updated.
  • 45. ‹ Easy Work Orders up eAM Operations and Tasks › eAM Operations and Tasks Submitted by Anonymous on Sat, 03/06/2010 - 16:05 Tag: • EAM / Operations on a Work Order are the instructions or tasks to perform a repair. These operations are assigned resources, for example, trades people, outside service providers, and equipment.
  • 46. This section includes the following topics: 1. Preparing Work Order Operations 2. Defining Material Requirements 3. Defining Resource Requirements Defining Material Requirements Submitted by Anonymous on Sat, 03/06/2010 - 16:59 Tag: • EAM / When you enter a Work Order for a Maintained Number, the Maintained Number’s associated Activity attaches the required material and resources to complete its operations. However, you can update, add, view, and delete material requirements as necessary for a specific Work Order. To define Work Order material requirements
  • 47. Navigate to the Select Work Order window, Choose a Work Order from the list of values and Choose Continue. Optionally, within the Inventory Items region, you can view or update the current Work Order’s associated Maintained Number’s item list by placing your cursor in the Material field, or by choosing Select Materials. When you choose Select Materials, the current Maintained Number’s associated Asset Bill of Material items are available to add to the required material for the current Work Order. 1.1. Optionally, select the Main tabbed region to change operation sequence and the Date Required. If you access the Select Materials window via the Operations window, then you cannot change operation information. If you access the Select Materials window via the Work Order window, you can change operation information. 1.2. Optionally, select the Quantities tabbed region to update the quantities Required. 1.3. Optionally, select the Supply tabbed region, to select a supply Type and Subinventory from the lists of values. 1.4. Optionally, select the Comment tabbed region to enter information for the current Material. 1.5. Optionally, choose the ATP tabbed region to define available to promise information for the current material. If you select the ATP Allowed check box, available to promise information can be calculated for the current material. optionally, choose Check ATP to check available to promise information for the selected material. 2.1 Optionally, choose Direct Item to create requisitions for direct items, and add them to your items list. Oracle Self Service Purchasing defaults the Work Order Number and Operation Number, as well as the class code information for correct expensing. Direct Items are one time, non-inventoried items that are purchased directly from the supplier. After you choose Direct Item, the current Work Order and operation