Procedure checklist
•Descargar como DOCX, PDF•
18 recomendaciones•29,511 vistas

oxygenation, NGT feeding, etc.. procedure checklists

Recomendados
Más contenido relacionado
La actualidad más candente
La actualidad más candente (20)
Similar a Procedure checklist
Similar a Procedure checklist (20)
Más de Sharmaine Florig
Último
Último (20)
Procedure checklist
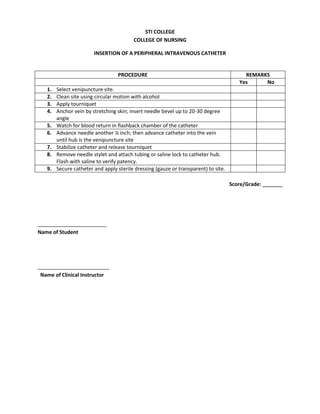
- 1. STI COLLEGE COLLEGE OF NURSING INSERTION OF A PERIPHERAL INTRAVENOUS CATHETER PROCEDURE REMARKS Yes No 1. Select venipuncture site. 2. Clean site using circular motion with alcohol 3. Apply tourniquet 4. Anchor vein by stretching skin; insert needle bevel up to 20-30 degree angle 5. Watch for blood return in flashback chamber of the catheter 6. Advance needle another ¼ inch; then advance catheter into the vein until hub is the venipuncture site 7. Stabilize catheter and release tourniquet 8. Remove needle stylet and attach tubing or saline lock to catheter hub. Flash with saline to verify patency. 9. Secure catheter and apply sterile dressing (gauze or transparent) to site. Score/Grade: _______ ________________________ Name of Student _________________________ Name of Clinical Instructor
- 2. STI COLLEGE COLLEGE OF NURSING OXYGEN ADMINISTRATION PROCEDURE REMARKS Yes No 1. Explain procedure to patient and review safety precaution necessary when oxygen is in use. 2. Perform hand hygiene 3. Connect nasal cannula to oxygen set up with humidification, if one is in use. Adjust to flow rate as ordered by the physician. Check if oxygen is flowing out of prongs. 4. Place the prongs in patient’s nostrils. Adjust according to type of equipment. 5. Use gauze pads at ear beneath tubing as necessary. Adjust nasal cannula as necessary. 6. Encourage patient to breathe through nose with mouth closed 7. Assess and chart patient’s response to therapy 8. Remove and clean cannula and assess nares every 8 hours or according to agency recommendations. 9. Document the amount of oxygen applied,the patient’s respiratory rate, oxygen saturation and lung sounds. Score/Grade: ________ _________________________ Name of Student _________________________ Name of Clinical Instructor
- 3. STI COLLEGE COLLEGE OF NURSING CATHETERIZATION PROCEDURE REMARKS Yes No 1. Assemble equipments and supplies needed. 2. Perform routine perineal care to cleanse the meatus from gross contamination. 3. Explain the procedure to the client. 4. Perform hand hygiene. 5. Provide client privacy. 6. Place the client in the appropriate position and drape all areas except the perineum. Female : supine with knees flexed and externally rotated Male: supine, legs slightly abducted 7. If using a collection bag not contained within the catheterization kit, open the drainage package and place the end of the tubing within reach. 8. Open the catheterization kit. Place a waterproof drape under the buttocks (female) or penis (male) without contaminating the center of the drape with your hands. 9. Don sterile gloves. 10. Organize the remaining supplies: a. Saturate the cleansing balls with the antiseptic solution. b. Open the lubricate package. c. Remove the specimen container and place it nearby, with the lid loosely on the top. 11. Attach the prefilled syringe to the indwelling catheter inflation hub and test the balloon. 12. Lubricate the catheter and place it with the drainage end inside the collection container. 13. Cleanse the meatus. Female a. Use your nondominant hand to spread the labia. Establish a firm but gentle position. b. Pick up a cleansing cotton ball with the forceps in your dominant hand and wipe one side of the labia majora in an anterio-posterior direction. c. Use a new cotton ball for the opposite side. d. Repeat for the labia minora. e. Use the last cotton ball to cleanse directly over the meatus. Male a. Use your nondominant hand to grasp the penis just below the glans. If necessary, retract the foreskin. Hold the penis firmly upright with slight tension. b. Pick up cleansing cotton ball with the forceps in your dominant hand and wipe from center of the meatus in a circular motion around the glans. c. Use a new cotton ball and repeat three more times. 14. Insert the catheter. a. Grasp the catheter firmly 2-3 inches from the tip. Ask the client to take a
- 4. slow deep breath and insert the catheter as the client exhales. b. Advance the catheter 2 inches further after the urine begins to flow through it. 15. Hold the catheter with the nondominant hand. In males, lay the penis down onto the drape, being careful that the catheter does not pull out. a. For an indwelling catheter, inflate the balloon with the designated volume. b. Without releasing the catheter, hold the inflation valve between two fingers of your nondominant hand while you attach the syringe (if not left attached earlier when testing the balloon) and inflate with your dominant hand. c. Pull gently the catheter until resistance if felt. 16. Collect a urine specimen if needed. Allow 20-30 ml to flow into the bottle without touching the catheter. 17. Allow the straight catheter to continue draining. If necessary, attach the drainage end of an indwelling catheter to the collecting tubing and bag. 18. Examine and measure the urine. 19. Remove the straight catheter when the urine flows. a. For an indwelling catheter, secure the catheter tubing to the inner thigh for females, or the upper thigh/abdomen for males with enough slack to allow usual movement. b. Also secure the collecting tubing to bed linens and hang the bag below the level of the bladder. No tubing should fall below the top of thebag. 20. Wipe the perineal area of any remaining antiseptic or lubricant. Return the client to a comfortable position. 21. Discard all supplies in the appropriate receptacles and wash your hands. 22. Document catheterization procedure, including catheter size and results in the client’s record. Score or grade: _________________________ Name of Student _________________________ Name of Clinical Instructor
- 5. STI COLLEGE COLLEGE OF NURSING ADMINISTERING A TUBE FEEDING PROCEDURES REMARKS Yes No 1. Explain procedure to patient. Use a stethoscope to assess bowel sounds. 2. Assemble equipment needed. Check the amount concentration, type, and frequency of tube feeding on patient’s chart. Check expiration date of formula. 3. Perform hand hygiene. Don disposable gloves. 4. Position patient with the head of bed elevated at least 30 degrees or as near normal position for eating as possible. 5. Unpin tube from patient’s gown and check to see that the nasogastric tube is properly located in the stomach. 6. Aspirate gastric contents with syringe and measure. Return immediately through tube, saving small amount to measure gastric pH. Flush tube with 30 mL of sterile water for irrigation. Proceed with feeding if amount of residual does not exceed policy agency or physician’s guideline. 7. When using a large syringe (open system): a. Remove the plunger from 30-60 mL syringe. b. Attach syringe to feeding tube, pour pre-measured amount of tube feeding to enter tube. Regulate the rate by raising or lowering the height of the syringe. Do not push formula with syringe plunger. c. Add 30-60 mL of water for irrigation to syringe when feeding is almost completed and allow to run through the tube. d. When syringe has emptied, hold the syringe high and disconnect from the tube. Clamp the tube and over end with sterile gauze secured with a rubber band or apply cap. 8. Observe patient’s response before and after tube feeding. 9. Have patient remain in upright position for at least 30-60 minutes after feeding. 10. Wash and clean equipment or replace according to agency policy. Remove gloves and perform handhygiene. 11. Record type and amount of feeding, residual amount, verification of placement, and patient’s response. Score or grade: _______________________ Name of Student _________________________ Name of Clinical Instructor
- 7. STI COLLEGE COLLEGE OF NURSING INSERTING A NASIGASTRIC TUBE PROCEDURES REMARKS Yes No 1. Assess the following before the procedure: a. Patency of the nares and intactness of nasal tissues. b. History of nasal surgery or deviated septum. c. Presence of gag reflex. d. Mental status or ability to cooperate with procedure. 2. Determine the size of the tube to be inserted. 3. Assemble needed equipments and supply. 4. Assist the client to a high-fowler’s position if his health condition permits, and support his head on a pillow. 5. Identify the client and explain to him/her what you are going to do, why it is necessary, and how he/she can cooperate. 6. Perform hygiene. 7. Provide for client privacy. 8. Assess the client’s nares. a. Ask the client to hyperextend his head, and using a flashlight, observe the intactness of the tissues of the nostrils, including any irritations or abrasions. b. Examine the nares for any obstructions or deformities by asking the client to breathe through one nostril occluding the other c. Select the nostril that has the greater airflow. 9. Prepare the tube a. If a rubber tube is being used, place it on ice for 5-10 minutes. If a plastic tube is being used, place it in warm water until the tube is softer and more flexible. b. Is a small-bore tube is being used; insert stylet or guide wire into the tube, making sure that it is secured in position. 10. Determine how far to insert the tube. a. Use the tube to mark off the distance from the tip of the client’s nose to the tip of the earlobe and then from the tip of the earlobe to the tip of the xyphoid. b. Mark this length with adhesive tape, if the tube does not have markings. 11. Insert the tube. a. Put on gloves. b. Lubricate the tip of the tube well with water-soluble lubricant or water, to ease insertion. c. Insert the tube, with its natural curve toward the client, into the selected nostril. Ask the client to hyperextend the neck, and gently advance the tube toward the nasopharynx. d. Direct the tube along the floor of the nostril and toward the ear on
- 8. the same side of the nostril e. If the tube meets resistance, withdraw it, relubricate it, and insert it in the other nostril. f. Once the tube reaches the oropharynx (throat), the client will feel the tube in the throat, and may gag and retch. Ask the client to tilt his head forward, and encourage the client to drink and swallow. g. If the client gags stop passing the tube momentarily. Have the client rest, take a few breaths, and take sips of water to calm the gag reflex. h. In cooperation with the client, pass the tube 5-10 cm (2-4 inches) with each swallow, until the indicated length is inserted. i. If the client continues to gag, and the tube des not advance with each swallow, withdraw it slightly, and inspect the throat by looking the mouth. 12. Ascertain the correct placement of the tube. a. Aspirate the stomach contents and check the pH. b. Auscultate air insufflation by placing a stethoscope over the client’s episgastrium and injecting 10-30 mL of air into the tube while listening for a whooshing sound. c. If the signs do not indicate placement in the stomach, advance the tube 5cm (2inches) and repeat the tests. d. If a small-bore tube is used, leave the stylet to guide wire in place until correct position is verified by x-ray. 13. Secure the tube by taping it to the bridge of the client’s nose a. If the patient has oily skin, wipe the nose first with alcohol. b. Cut 7.5 cm (3 inches) of tape, and split it lengthwise at one end, leaving a 2.5 cm (1inch) tab at the end. c. Place the tape over the bridge of the client’s nose, and bring the split ends either under and around the tubing, or under the tubing and back up over the nose. 14. Attach the tube to a suction source or feeding apparatus, as ordered, or clamp the end of the tubing. a. The tube if inserted postoperatively, is usually clamped or plugged, or it may be covered with a gauze square or plastic specimen bag and an elastic band. 15. Secure the tube to the client’s gown by attaching the tube with a piece of adhesive tape 16. Document the insertion of the tube, the means by which correct placement was determined, and client response. Score/Grade: _______ ________________________ Name of Student _________________________ Name of Clinical Instructor
- 9. STI COLLEGE COLLEGE OF NURSING APPLYING STERILE GLOVES (OPEN METHOD) PROCEDURE REMARKS Yes No 1. Perform hand washing. 2. Read the manufacturer’s instructions on the package of the sterile gloves; proceed as directed in removing the outer wrapper from the package, placing the inner wrapper onto a clean, dry surface. Open inner wrapper to expose gloves. 3. Identify and left hand; glove dominant hand first. 4. Grasp the 2 inches (5cm) wide cuff with the thumb and first two fingers of the nondominant hand, touching only the inside of the cuff. 5. Gently pull the glove over the dominant hand, making sure the thumb and fingers as fit into proper spaces of the glove. 6. With the gloved dominant hand, slip your fingers under the cuff of the other glove, gloved thumb abducted, making sure it does not touch any part on your nondominant hand. 7. Gently slip the glove onto your nondominant hand, making sure the fingers slip into the proper spaces. 8. With gloved hands, interlock fingers to fit the gloves onto each finger. If the gloves are soiled, remove by turning them inside out as follows: 9. Slip the gloved fingers of the dominant hand under the cuff of the opposite hand or grasp the outer part of the glove at the wrist allowing only the glove-covered fingers of the hand to touch the soiled glove. 10. Pull the glove down to the fingers, exposing the thumb. 11. Slip the uncovered thumb into thr opposite glove at the wrist allowing only the glove-covered fingers of the hand to touch the soiled glove. 12. Pull the glove down over the dominant hand almost to the fingertips and slip the glove on the other hand. 13. With the dominant hand touching only the inside of the other glove, pull the glove over the dominant hand so that only the inside(clean surface) is exposed. 14. Dispose of soiled gloves according to institutional policy and wash hands. Score/Grade: ________ _________________________ Name of Student _________________________ Name of Clinical Instructor