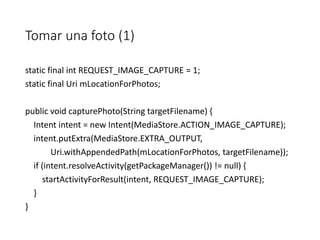
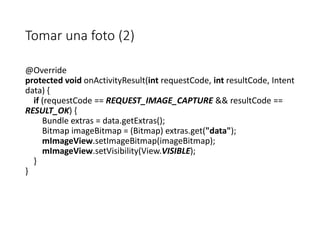
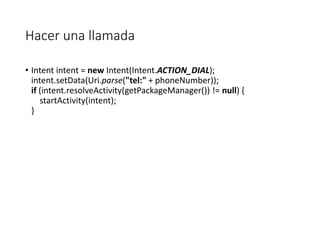
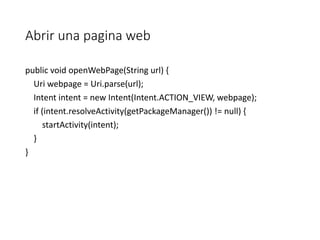
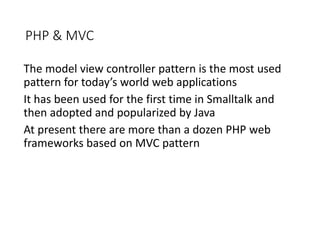
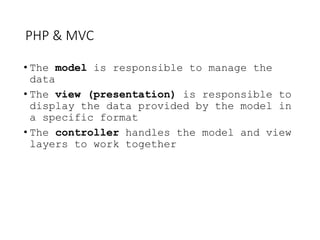
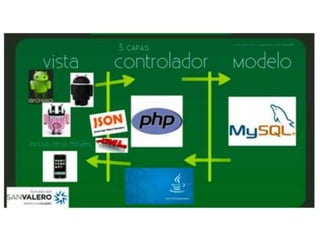
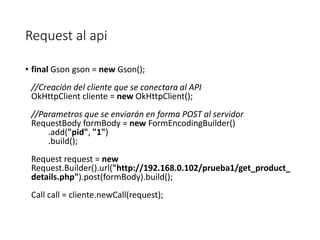
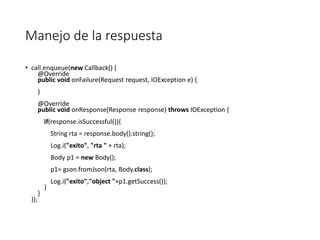
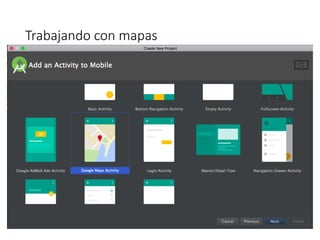
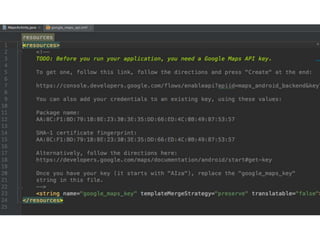
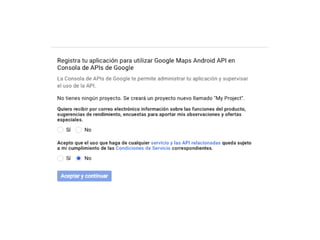
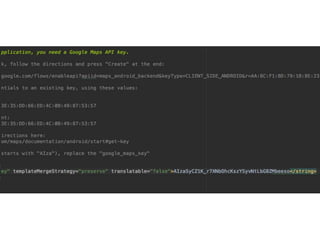
Este documento describe cómo desarrollar aplicaciones móviles que interactúan con mapas de Google Maps y obtienen la ubicación del usuario. Explica cómo agregar marcadores a mapas, ajustar el zoom y la posición de la cámara, y solicitar permisos de ubicación al usuario. También cubre el uso de intents para tomar fotos, hacer llamadas y más funciones. Por último, introduce el desarrollo de una API REST con PHP para conectar una aplicación móvil a una base de datos.


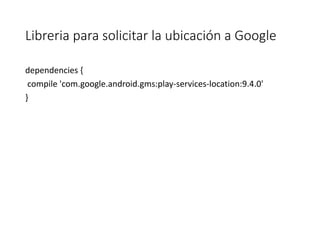


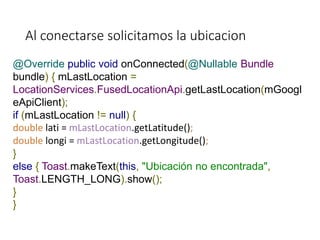

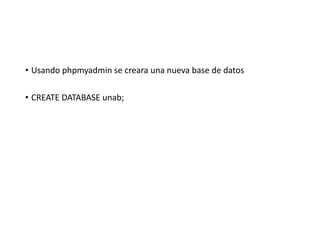
![@Override
public void onConnected(@Nullable Bundle bundle) {
if (ActivityCompat.checkSelfPermission(this, Manifest.permission.ACCESS_FINE_LOCATION)
!= PackageManager.PERMISSION_GRANTED) {
if (ActivityCompat.shouldShowRequestPermissionRationale(this,
Manifest.permission.ACCESS_FINE_LOCATION)) {
// Aquí muestras confirmación explicativa al usuario
// por si rechazó los permisos anteriormente
} else {
ActivityCompat.requestPermissions(
this, new String[]{Manifest.permission.ACCESS_FINE_LOCATION},
REQUEST_LOCATION);
}
} else {
mLastLocation = LocationServices.FusedLocationApi.getLastLocation(mGoogleApiClient);
if (mLastLocation != null) {
double lati = mLastLocation.getLatitude();
double longi = mLastLocation.getLongitude();
} else {
Toast.makeText(this, "Ubicación no encontrada", Toast.LENGTH_LONG).show();
}
}
}](https://image.slidesharecdn.com/segundasesion-180323010800/85/Segunda-sesion-21-320.jpg)
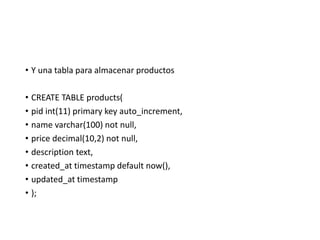
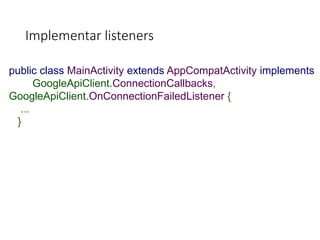
![@Override
public void onRequestPermissionsResult(int requestCode, String[] permissions, int[]
grantResults) {
if (requestCode == REQUEST_LOCATION) {
if (grantResults.length == 1
&& grantResults[0] == PackageManager.PERMISSION_GRANTED) {
if (ActivityCompat.checkSelfPermission(this,
Manifest.permission.ACCESS_FINE_LOCATION) !=
PackageManager.PERMISSION_GRANTED && ActivityCompat.checkSelfPermission(this,
Manifest.permission.ACCESS_COARSE_LOCATION) !=
PackageManager.PERMISSION_GRANTED) {
return;
}
mLastLocation =
LocationServices.FusedLocationApi.getLastLocation(mGoogleApiClient);
if (mLastLocation != null) {
double lati = mLastLocation.getLatitude();
double longi = mLastLocation.getLongitude();
} else {
Toast.makeText(this, "Ubicación no encontrada",
Toast.LENGTH_LONG).show();
}
} else {
Toast.makeText(this, "Permisos no otorgados", Toast.LENGTH_LONG).show();
}](https://image.slidesharecdn.com/segundasesion-180323010800/85/Segunda-sesion-22-320.jpg)
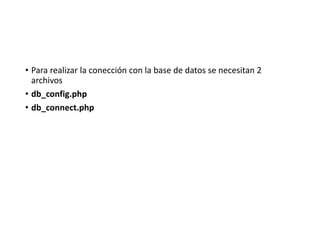
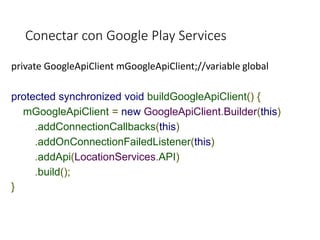
![Enviar un correo
public void composeEmail(String[] addresses, String subject, Uri
attachment) {
Intent intent = new Intent(Intent.ACTION_SEND);
intent.setType("*/*");
intent.putExtra(Intent.EXTRA_EMAIL, addresses);
intent.putExtra(Intent.EXTRA_SUBJECT, subject);
intent.putExtra(Intent.EXTRA_STREAM, attachment);
if (intent.resolveActivity(getPackageManager()) != null) {
startActivity(intent);
}
}](https://image.slidesharecdn.com/segundasesion-180323010800/85/Segunda-sesion-24-320.jpg)