If you want to make DVDs by using photos and songs you like on Mac, iDVD is a good choice. The DVDs you created by using iDVD can be played on any DVD players and on TV with home DVD players. But since that the iDVD was no longer available on Macs with Mac OS X 10.7 or higher. It's time to look for other alternatives.
Ride the Storm: Navigating Through Unstable Periods / Katerina Rudko (Belka G...
Burn slideshow-to-dvd-on-mac
1. If you want to make DVDs by using photos and songs you like on Mac, iDVD is a
good choice. The DVDs you created by using iDVD can be played on any DVD
players and on TV with home DVD players. But since that the iDVD was no longer
available on Macs with Mac OS X 10.7 or higher. It's time to look for other
alternatives.
So here I want to show everyone how to create slideshow DVD on Mac by using
Slideshow DVD Creator.
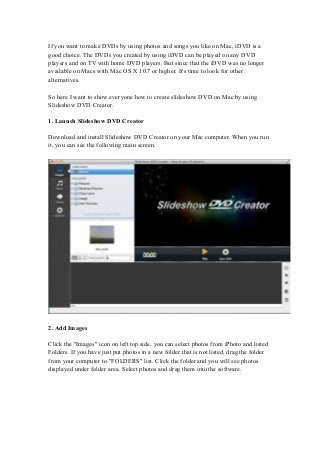
1. Launch Slideshow DVD Creator
Download and install Slideshow DVD Creator on your Mac computer. When you run
it, you can see the following main screen.
2. Add Images
Click the "Images" icon on left top side, you can select photos from iPhoto and listed
Folders. If you have just put photos in a new folder that is not listed, drag the folder
from your computer to "FOLDERS" list. Click the folder and you will see photos
displayed under folder area. Select photos and drag them into the software.
2. 3. Organize photos
Arrange Photo Order: You can arrange photo order by dragging and dropping. Also
you can arrange photos by clicking this icon , and arrange photos in "Arrange Photo
Order" window by dragging. To delete photos, you just need to select them and press
"DEL" key.
3. Delete Photos: You have two ways to delete photos. Way 1, select photos from the
photo list at bottom of the screen, and click the trash can . Way 2, read Arrange
Photo Order guide above to delete photos.
Set Time For Slides and Transitions: The default time for all slides is 4 second, and
2 second for transitions. However, according to needs, you can set different time for
each slide / transition, or set same time for all slides / transitions.
• Set time for each slide / transition: Select the photo / transition that you want
to set time, and double-click the time below. Set time by dragging "Photo
Show Duration" and "Transition Duration" timeline.
• Set time for all slides / transitions: Click "Options" icon, then drag "Time for
each photo" and "Time for transition effect" timeline to set time duration for
all slides and transitions.
4. Add and Organize background music
You can add multiple songs as background music. It allows you to organize music and
sync slideshow to music.
Add Songs: Click the Music icon to add music from iTunes or folders on your
Mac. If the folder that contains songs does not appear in the "FOLDERS" list, you can
drag the folder to "FOLDERS" area. Click the folder name from "FOLDERS" list and
4. drag songs into the software. After adding songs, you can see the music listed at the
bottom of the screen(below photo thumbnails).
Organize Songs: Click the added music name to bring up "Background music"
window. You can play, delete, add and arrange music.
Sync Slideshow To Music: To make slideshow time match music time, you may need
to sync slideshow to music. You have two ways to do this. Way1. Click the "Options",
in "Slideshow Settings" area, Click "Sync Music & Slideshow" button. Way2. Click
the clock icon , then click "Sync Music and Slideshow" button.
5. 5. Choose Themes
The program provides kinds of themes for choosing to customize your slideshow.
Click the "Theme" icon and select a theme for your slideshow. You can also
customize it with a beautiful background image.
6. Change Transitions
6. The software can apply random transitions between slides. However you can change
them. Click the dice icon between two photos and select transition effects. You
can change transitions one by one. Also you can set the same transitions to all slides.
Apply one transition to all slides: Select a transition, check "Apply to All Photos"
and click "Set" button,
7. Add Text
It will be fun to tell your photo stories by adding text. Click "Slideshow -> Add Text"
from the top menu bar, enter text in "Edit Text" window, then you can customize font,
color, size and rotation for text. You just need to click and drag the text to the place
where you want to put it.
7. 8. Design pan & zoom effects
Click "Slideshow -> Add Text" from the top menu bar, you will see Pan & zoom
window. Scale and rotate a photo to set the start and end frame. Preview the effect by
clicking "Play" button.
9. Preview the slideshow
Before outputing the slideshow, you can preview it. Click the "Play" button to
preview the slideshow.
10. Set TV system and DVD Video Aspect
8. You need to select TV system and DVD video aspect before burning a slideshow to
DVD for playing on TV. Click "Options", in "Slideshow Setting" window, select TV
System from NTSC and PAL, and select DVD Video Aspect from 16:9 and 4:3.
11. Burn a slideshow to DVD
Insert a DVD disc into Mac. Click the "Burn DVD" button, in "Burn Disc" window,
click "Burn" button to begin burning the slideshow to DVD. After the burning is
finished, you can play it on TV or DVD player.
12. Output the slideshow to a video file
9. Besides burning slideshow to DVD, you can output it to a mp4 or mov video.
Video Output Setting:To specify video output format and video format, click
"Slideshow DVD Creator" in left top corner of your Mac screen,
Create A Video: Click "Share -> Encode to Movie" from top menu bar, in "Share
Video" window, enter title and description, select Video size(such as 1080p). Finally
click "OK" , the program will begin to encode the slideshow to a video file.
For more information, please go to http://www.slideshowdvdcreator.com
10. Besides burning slideshow to DVD, you can output it to a mp4 or mov video.
Video Output Setting:To specify video output format and video format, click
"Slideshow DVD Creator" in left top corner of your Mac screen,
Create A Video: Click "Share -> Encode to Movie" from top menu bar, in "Share
Video" window, enter title and description, select Video size(such as 1080p). Finally
click "OK" , the program will begin to encode the slideshow to a video file.
For more information, please go to http://www.slideshowdvdcreator.com