
Recomendados
Más contenido relacionado
La actualidad más candente
La actualidad más candente (20)
Similar a DSLR Camera Functions
Similar a DSLR Camera Functions (20)
Más de Sam Georgi
Más de Sam Georgi (20)
Último
Último (20)
DSLR Camera Functions
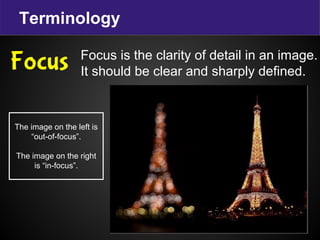
- 1. Terminology Focus is the clarity of detail in an image. It should be clear and sharply defined. Focus The image on the left is “out-of-focus”. The image on the right is “in-focus”.
- 2. Terminology Exposure is the amount of light the image sensor captures when taking a photo. Overexposure Too much light will wash out the color and make it too bright. Exposure Underexposure Not enough light will make it too dark. Exposure control: Aperture ISO speed Shutter speed
- 3. Terminology The shutter speed controls the duration of the exposure, or how long the light will be able to enter the camera. Shutter speed A faster shutter speed will enable a photographer to capture movement.
- 4. Terminology Aperture is the “opening” or “closing” of the lens to control the amount of light entering the camera. Aperture It is the aperture that determines a photo’s “depth of field” (range of distance in which objects appear in sharp focus.) Aperture is measured in f-stop numbers.
- 5. Terminology ISO determines how sensitive the camera is to incoming light. ISO speed A low ISO will produce a higher quality image. The fuzziness is known as “noise”.
- 6. Basic equipment DSLR = Digital Single-Lens Reflex camera DSLR Camera (and lens)
- 7. Basic equipment Tripod Reflector A reflector is used to redirect light onto the subject. A tripod is used to keep the camera steady.
- 8. Parts of the camera Body The body is the main part of a digital camera. This is where the “electronics” are located such as the controls and settings as well as the image-processor and other necessary features. The body does not have a lens, unless it is a “compact” camera (point- and-shoot). TIP: Never, ever, ever touch the mirror. TIP: When changing lenses, minimise the mirror’s exposure to dust or small particles.
- 9. Parts of the camera Interchangeable lens Interchangeable lenses are lenses that can be removed from the camera body. This enables a photographer to choose the lens that is most suitable for their task. Lens cap The lens cap protects the lens from dirt, dust and scratches. The smallest particle or scratch on the lens can ruin a photo. TIP: Never, ever put your finger on the lens. TIP: Only use a lens cloth to clean the lens (even a tissue will damage the lens).
- 10. Parts of the camera Card slot SD cards This is where the external memory card is loaded. Physical size: SD card (blue) Mini-SD (green) Micro-SD (red) Capacity: SDSC (Standard) 1 MB - 2 GB SDHC (High) 2 GB - 32 GB SDXC (eXtended) 32 GB - 1 TB Greater storage capacity will enable you to take more photos using higher quality settings. SD = Secure Digital
- 11. Parts of the camera Flash The flash is used to illuminate (brighten) the subject in poor or dark light. This is very important to use when inside.
- 12. Parts of the camera “On” and “Off” Always turn the camera “off’ when you are not using it. This will enable to battery to last longer. Shutter button When the shutter button is pushed down completely it will take the photo. If the shutter button is pushed halfway down, it will “autofocus” your image.
- 13. Parts of the camera LCD monitor The LCD monitor has three functions: 1. Review photos ○ “Playback” images 2. Display menu settings 3. Live viewfinder The monitor can be turned on or off by pressing the “DISP.” button.
- 14. Parts of the camera Battery compartment The battery compartment is on the bottom of the camera body. Always check that you have a battery and that it is fully charged.
- 15. Parts of the camera Battery charging External charger The battery is charged by connecting the charger to a power outlet. Some camera batteries can be charged without removing them from the camera. A cable can be connected from the camera to a USB port. The LCD will show how much battery power remains.
- 16. Settings: Erasing images 1. Press the “MENU” button. 2. Press the c cross keys to select the tab. 3. Press the cross keys to select the setting “Erase images”. 4. Press the set button. 5. Choose “Select and erase all images”. 6. Select “OK”. 7. Press the Set button. 1 2 How to erase ALL images? 3 4
- 17. Settings: Image quality What is image quality? The image quality refers to the number of pixels recorded in the photo. A pixel is a single point on a graphic image. The more pixels the higher the quality of the image but a bigger file size (less storage).
- 18. Settings: Image quality RAW is an image captured on the camera that has not been processed. It is the “raw” image which enables the photographer complete control over editing. RAW A JPEG will make changes and adjustments to compress the image for storage.
- 19. Settings: Image quality 1. Press the button. 2. Press the set button. 3. Press the cross keys to choose the setting. 4. Press the set button again to confirm the file setting. 1 2 3 How to change the image quality?
- 20. Settings: Shooting modes Mode Dial The mode dial enables you to choose your shooting settings. Settings include: ● Basic zone ● Image zone ● Creative zone ● Movie shooting
- 21. Settings: Shooting modes 1. Press the button. 2. Press the cross keys up or down to choose the setting you want to change. 3. Turn the dial to adjust the settings. 4. When finished adjusting settings, press the <Q> button again. 1 2 3 How to adjust the shooting settings?
- 22. The Mode Dial Full auto / Fully automatic ● The camera does everything for you. ● The camera analyzes the scene and tries to choose settings that produce the best results. No flash ● Same as “full auto” but without the flash. Basic zone
- 23. The Mode Dial Creative auto ● The camera does most things for you. ● Whilst the camera analyzes the scene and tries to choose settings that produce the best results, there is some control over focus, exposure, and color. Image effects Standard Smooth skin tones (People) Vivid blues and greens Nature/ landscapes Monchrome Black-and-white
- 24. The Mode Dial ● Designed to produce softly focussed backgrounds for flattering portraits. ● Same as portrait but combines flash with a slow shutter speed to produce softer lighting and brighter backgrounds. Image zone Portrait Night portrait
- 25. The Mode Dial ● Produces softly focused backgrounds. ● Suitable for close-ups of flowers or other natural subjects. ● Designed to keep both near and distant objects in sharp focus. Close-up Landscape
- 26. The Mode Dial ● Faster shutter speed. ● Captures moving subjects without blurring. Sports/ movement
- 27. The Mode Dial ● Ability to record digital movies. Movie shooting
- 28. The Mode Dial ● Program AE ● Shutter-priority AE ● Aperture-priority AE ● Manual exposure ● Automatic depth-of-field Creative zone These are specialised settings that enable the photographer to have full control over the image they are creating.
- 29. Experiment .. In a team, experiment with the different settings and see how creative you can be as a photographer.
- 30. How to take a photo? 1. Planning … Think about it 2. What is the purpose of the photo? 3. What do you want to achieve? 4. How will you achieve it? Before you begin … Is the battery charged? Always check if the battery is full. Is the lense clean? Always use a lense cloth to avoid scratching the lense. Ensure there is enough light Natural light is best (sunlight) If you’re inside, raise the blinds and open the curtains to let in as much light as possible and, if you can, move your subject near the window. If you’re limited to artificial lighting (anything that uses electricity), you’ll want to make sure you place the lamps in a way that they’re fully lighting your subject because artificial light tends to be uneven.