Af101882555 en us-xl_14_excel 2010 migration guide
•
0 recomendaciones•283 vistas

This document provides guidance for users migrating from Excel 2003 to Excel 2010 by explaining where to find common commands and features in the new interface. Key changes include replacing menus and toolbars with ribbon tabs and groups. It offers tips on exchanging files with other versions, customizing the ribbon, enabling add-ins, and using new features like Print Preview in Backstage view and KeyTips for ribbon navigation. Training resources are recommended to help users learn the new interface.

Recomendados
Más contenido relacionado
La actualidad más candente
La actualidad más candente (20)
Destacado
Destacado (18)
Similar a Af101882555 en us-xl_14_excel 2010 migration guide
Similar a Af101882555 en us-xl_14_excel 2010 migration guide (20)
Último
Último (20)
Af101882555 en us-xl_14_excel 2010 migration guide
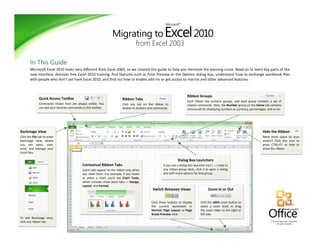
- 1. Migrating to Excel 2001 from Excel 2003 Excel2010 Microsoft® In This Guide Microsoft Excel 2010 looks very different from Excel 2003, so we created this guide to help you minimize the learning curve. Read on to learn key parts of the new interface, discover free Excel 2010 training, find features such as Print Preview or the Options dialog box, understand how to exchange workbook files with people who don’t yet have Excel 2010, and find out how to enable add-ins or get access to macros and other advanced features. © 2010 by Microsoft Corporation. All rights reserved. Quick Access Toolbar Commands shown here are always visible. You can add your favorite commands to this toolbar. Ribbon Groups Each ribbon tab contains groups, and each group contains a set of related commands. Here, the Number group on the Home tab contains commands for displaying numbers as currency, percentages, and so on. Backstage View Click the File tab to enter Backstage view, where you can open, save, print, and manage your Excel files. To exit Backstage view, click any ribbon tab. Hide the Ribbon Need more space on your screen? Click this icon or press CTRL+F1 to hide or show the ribbon. Dialog Box Launchers If you see a dialog box launcher icon ( ) next to any ribbon group label, click it to open a dialog box with more options for that group. Switch Between Views Click these buttons to display the current worksheet in Normal, Page Layout, or Page Break Preview view. Zoom In or Out Click the 100% zoom button to select a zoom level, or drag the zoom slider to the right or left side. Contextual Ribbon Tabs Some tabs appear on the ribbon only when you need them. For example, if you insert or select a chart, you’ll see Chart Tools, which includes three extra tabs — Design, Layout, and Format. Ribbon Tabs Click any tab on the ribbon to display its buttons and commands.
- 2. Migrating to Excel 2001 from Excel 2003 Excel2010 Microsoft® How to get started with Excel 2010 If you’ve been using Microsoft Excel 2003 for a long time, you’ll no doubt have questions about where to find Excel 2003 commands and toolbar buttons in Excel 2010. We have many free resources available to help you learn Excel 2010, including training courses and menu-to-ribbon guides. To find these materials, click the File tab in the main program window, and then click Help. Then, under Support, click Getting Started. Where are my menus and toolbars? In Excel 2010, a wide band spans the top of the main program window. This is the ribbon, and it replaces the old menus and toolbars. Each tab on the ribbon has different buttons and commands that are organized into ribbon groups. When you open Excel 2010, the ribbon’s Home tab is displayed. This tab contains many of the most frequently used commands in Excel. Pay attention to the commands on the far right — for example, those found in the Cells and Editing groups. These can be easy to miss at first glance. In the Cells group, you’ll find commands for inserting, deleting, and formatting sheets, rows, and columns. In the Editing group located right next to it, you’ll find the AutoSum button, plus commands for filling and clearing cells. On the Web page that opens, click the links to the items that interest you. In particular, the interactive menu-to-ribbon guide is a real timesaver. When you click any Excel 2003 command, it shows you exactly where that command is located in Excel 2010. The ribbon adjusts its appearance to fit your computer’s screen size and resolution. On smaller screens, some ribbon groups may display only their group name, not their commands. In that case, simply click the small arrow on the group button to reveal the commands.
- 3. Migrating to Excel 2001 from Excel 2003 Excel2010 Microsoft® Things you might be looking for Look over the table below to find some of the common and familiar things that you might be looking for in Excel 2010. Although this list isn’t comprehensive, it’s a good place to start. To find the full list of Excel 2010 commands, click the File tab, click Help, and then click Getting Started. To... And then look in the...Click… Create, open, save, print, preview, protect, send, or convert files Backstage view (click the links on the left side in this view) Insert, delete, format, or find data in cells, columns, and rows Number, Styles, Cells, and Editing ribbon groups Add PivotTables, Excel tables (formerly lists), charts, sparklines, hyperlinks, or headers and footers Tables, Charts, Sparklines, Links, and Text ribbon groups Set page margins and page breaks, specify print area, or repeat rows Page Setup and Scale to Fit ribbon groups Find functions, define names, or troubleshoot formulas Function Library, Defined Names, and Formula Auditing ribbon groups Import data, connect to a data source, sort data, filter data, validate data, or perform a what-if analysis Get External Data, Connections, Sort & Filter and Data Tools ribbon groups Check spelling, review and revise, or protect a workbook Proofing, Comments, and Changes ribbon groups Switch between worksheet views or active workbooks, arrange windows, freeze panes, or record macros Workbook Views, Window, and Macros ribbon groups
- 4. Migrating to Excel 2001 from Excel 2003 Excel2010 Microsoft® Where is Print Preview? In Excel 2010, Print Preview no longer appears in a separate window. Look for it in Backstage view alongside other useful print-related settings. What happened to Tools | Options? Looking for the Excel program settings that let you control things like how many blank sheets to create in a new workbook or what the default font and font size for worksheets should be? Click the File tab, and then click Options. This opens the Excel Options dialog box, where you can customize your Excel settings and preferences. Click the File tab, and then click Print. The right side of the window shows a preview of how the current worksheet will look when printed. If the worksheet is blank, no preview image appears. You can use the left side of the window to fine-tune your preferences — for example, to make all worksheet columns fit on a single, printed page or to change the orientation from portrait to landscape. If you want to set additional print options, click the Page Setup link under the printing options, or click the Page Layout tab on the ribbon to close Backstage view and display other options. Several settings in the Excel Options dialog box apply only to the open workbook or to a particular worksheet. Other options apply to Excel in general and will affect all workbooks. In addition, some preferences (for example, the color scheme) will apply to all other Microsoft Office 2010 programs that you have installed.
- 5. Migrating to Excel 2001 from Excel 2003 Excel2010 Microsoft® Keep your favorite commands nearby The Quick Access Toolbar in the upper-left corner of the Excel program window provides shortcuts to commands you’ll use often. By adding buttons to this toolbar, you can keep all of your favorite commands visible at all times, even when you switch ribbon tabs. Create ribbon tabs or groups of your own You can customize ribbon commands by putting buttons into ribbon groups where you want them to appear, or by creating custom ribbon tabs of your own. Right-click any ribbon group and then click Customize the Ribbon. In the Excel Options dialog box that appears, you can then add commands to your own tabs or groups. For example, you could create a tab called Quick Format, and then add your favorite formatting commands to a custom group on this tab. If you make a mistake, you can use the Reset button to reset all customizations and go back to the default (“factory”) settings. Not all older Excel commands appear on the ribbon, but they’re still available. If you can’t live without some of these, simply add them to the ribbon or to the Quick Access Toolbar. In the Excel Options dialog box, in the Choose commands from list, select Commands Not in the Ribbon. Next, find the command that you want and add it to a custom ribbon tab or group. Click the drop-down arrow next to the Quick Access Toolbar to turn on or off any of the commands listed on the shortcut menu. If the command you want to add isn’t shown in the list, switch to the ribbon tab where the button appears and then right-click it there. On the shortcut menu that appears, click Add to Quick Access Toolbar.
- 6. Migrating to Excel 2001 from Excel 2003 Excel2010 Microsoft® Introducing KeyTips Excel 2010 provides shortcuts for the ribbon, called KeyTips, so you can quickly perform tasks without using your mouse. Do keyboard shortcuts still work? Keyboard shortcuts from Excel 2003 are still available in Excel 2010. If you know a shortcut sequence, go ahead and type it. For example, CTRL+C still copies selected information to the Clipboard, CTRL+S still opens the Save As dialog box, ALT+F11 still opens the Microsoft Visual Basic for Applications (VBA) editor, and so on. If you begin typing an ALT accelerator key sequence, a box pops up: If you know the entire sequence that you want, go ahead and finish typing it. For example, pressing ALT, T, O in succession opens the Excel Options dialog box (formerly Tools | Options). Similarly, pressing ALT, T, I opens the Add-ins dialog box (formerly Tools | Add-ins), and so on. If you don’t remember (or never learned) any ALT key sequences, press the ESC key to cancel and use KeyTips instead. To see a full list of supported keyboard shortcuts in Excel 2010, press F1 to open Help, and then search for “keyboard shortcuts.” To make KeyTips appear on the ribbon, press the ALT key. Next, to switch to a tab on the ribbon using your keyboard, press the key of the letter displayed under that tab. In the example shown above, you would press N to open the Insert tab, P to open the Page Layout tab, M to open the Formulas tab, and so on. Once you’ve switched to a ribbon tab in this way, all available KeyTips for that tab appear on the screen. You can then finish the sequence by pressing the final key (or keys) for the command you want to use. To go back one level while in a sequence, press the ESC key. Doing so multiple times in a row cancels KeyTips mode.
- 7. Migrating to Excel 2001 from Excel 2003 Excel2010 Microsoft® How to work with people who don’t yet have Excel 2010 Excel 2010 (and Excel 2007) workbooks use a new file format for saving files. If people you work with are using different versions of Excel, don’t worry— you can still open and edit older workbooks in Excel 2010, and share your files with people who don’t yet have Excel 2010. In Excel 2010... What happens? What should I do? You open a workbook that was created with Excel 2003. In the Excel 2010 program window, you’ll see the words [Compatibility Mode] next to the file name on the title bar. This tells you that even though you’re in Excel 2010, you’re still technically working in the earlier file format, and that you won’t be able to use Excel 2010 features like sparklines and larger row and column limits until you convert the file to the 2010 file format. To exit Compatibility Mode and convert the 2003 file to the new Excel 2010 format, click the File tab, click Info, and then click Convert. Before you convert your file, ask yourself if you need to collaborate on your workbook with people who still use Excel 2003 (or an even older version). If the answer is yes, you may want to keep working in Compatibility Mode so that you won’t be tempted to use new features that aren’t supported in the older file format. You save your workbook as an Excel 2010 file. If someone opens the workbook in Excel 2003, a prompt appears with a link to download the free Compatibility Pack (provided that the latest patches and service packs are already installed). The Compatibility Pack is required for Excel 2003 to open and interact with Excel 2010 workbooks. If you’ve used new Excel 2010 features or formatting in your workbook, such as sparklines or new types of conditional formatting icons, Excel 2003 users may see warnings about unsupported features, or the formatting or feature may not appear in the file. If you think that Excel 2003 users may need to interact with your Excel 2010 workbook, you should run the Compatibility Checker tool to make sure the file will work correctly for them. To check for compatibility, click the File tab, click Info, click Check for Issues, and then click Check Compatibility. The tool tells you which new features in Excel 2010 aren’t supported in older versions. You can then decide whether to remove these features to avoid warnings in Excel 2003. You save your workbook as an Excel 2003 file. If someone opens the workbook in Excel 2003, the workbook will open normally — no Compatibility Pack is required. If you’ve used new Excel 2010 features or formatting in your workbook, such as sparklines or new types of conditional formatting icons, Excel 2003 users may see warnings about unsupported features, or the formatting or feature may not appear in the file. You don’t have to do anything, necessarily. When you save your file in the older Excel 2003 file format, the Compatibility Checker will run automatically and warn you about any unsupported features. You can then make any necessary design changes to the file.
- 8. Migrating to Excel 2001 from Excel 2003 Excel2010 Microsoft® Find advanced features If you plan to routinely use Excel 2010 to design macros, forms, and XML or VBA solutions, you can add the Developer tab to the Excel ribbon. Enable Solver and other add-ins Excel 2010 comes with several add-ins — programs that plug into Excel to provide additional functionality. These include an Analysis ToolPak and an updated version of Solver. However, these and other add-ins won’t appear on the ribbon until you enable them. You can manage Excel add-Ins in one of two ways: If you enabled the Developer tab (as described on the left), click it and then locate the Add-Ins group. Next, click Add-ins to open the Add-Ins dialog box. Alternately, click the File tab and then click Options. In the Excel Options dialog box, click Add-Ins. Near the bottom of the screen, look for the Manage box. Make sure Excel Add-ins is selected, and then click Go. Tip If all you want to do is record macros in Excel 2010, you don’t need to add the Developer tab. Just click the View tab, and then look for the Macros group on the right. On the ribbon, click the File tab, and then click Options. In the Excel Options dialog box, click Customize Ribbon, and then select the Developer check box in the list that appears on the right. Click OK to close the Excel Options dialog box. The Developer tab now appears to the right of the View tab on the ribbon. In the Add-ins dialog box, select the Analysis ToolPak and Solver Add-in check boxes (plus any others you want), and then click OK. Once enabled, the Analysis ToolPak and Solver add-ins appear on the Data tab, in the Analysis group.