
Recomendados
Recomendados
Más contenido relacionado
Último
Último (20)
Destacado
Destacado (20)
Flip video-windows-movie-maker
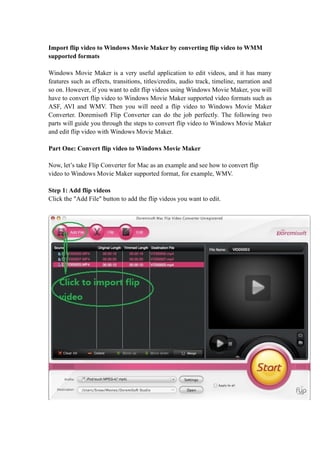
- 1. Import flip video to Windows Movie Maker by converting flip video to WMM supported formats Windows Movie Maker is a very useful application to edit videos, and it has many features such as effects, transitions, titles/credits, audio track, timeline, narration and so on. However, if you want to edit flip videos using Windows Movie Maker, you will have to convert flip video to Windows Movie Maker supported video formats such as ASF, AVI and WMV. Then you will need a flip video to Windows Movie Maker Converter. Doremisoft Flip Converter can do the job perfectly. The following two parts will guide you through the steps to convert flip video to Windows Movie Maker and edit flip video with Windows Movie Maker. Part One: Convert flip video to Windows Movie Maker Now, let’s take Flip Converter for Mac as an example and see how to convert flip video to Windows Movie Maker supported format, for example, WMV. Step 1: Add flip videos Click the "Add File" button to add the flip videos you want to edit.
- 2. Step 2: Select the WMV format from the Profile list as the output format. Click the Profile drop-up list, point to Common Video and scroll down to WMV and click on it. Step 3: Convert flip video to WMV Click the "Start" button on the lower right of the interface to start converting flip video to WMV. Note: The operational steps of the English version Part Two: Edit flip video with Windows Movie Maker If you are using Flip Converter for Mac, you will need to copy the converted files to your Windows machine. If you are using Flip Converter Windows, what you need is just to know where the converted files are saved. Step 1: Click "New Project" from the "File" menu to create a new project. And click "Save Project As" to save this project. Step2: Click "Import Collections" from the "File" menu, locate the folder where the
- 3. converted files (now in WMV format) are save, and add the files you want to edit. Step3: Drag the video files to your Windows Movie Maker storyboard on the bottom of the interface. Step4: Add transitions. Select "View Video Transitions" from the left panel. Drag the transitions you prefer into the middle box of the storyboard. Step5: You can cut some time from a video by clicking and moving the half triangle at the side of the video. Step6: Add music. Go to "Import Audio or Music" and select a song. Then drag the song to the "TimeLine". You can also cut time or make a short sound by clicking and dragging the triangle. Step7: Add title or credits. Select "Make titles or credits" from the Movie Task List, and follow the on screen instructions to add titles or credits to your movie. Step9: Preview the work you have done by clicking the Play button on the left panel. Step10: If you don’t need to reedit your movie, click "Save to my computer" from the "File" menu, and select on options from the provided options how you want to save your movie.