iPad eBook Reader Setup and Features
•Descargar como DOCX, PDF•
1 recomendación•1,760 vistas

This document provides instructions for using an iPad, including: 1) Turning on the iPad, unlocking it, and navigating the home screen and panels using swipes and the home button. 2) Opening apps like Kindle, Nook, and Overdrive to browse, check out, and read eBooks, with options to change font size, brightness, and more. 3) Performing searches, taking notes and highlights, and rotating the screen for different views. 4) Downloading an eBook from the library using Overdrive and transferring it to the iPad using Adobe Digital Editions.

Recomendados
Más contenido relacionado
La actualidad más candente
La actualidad más candente (16)
Similar a iPad eBook Reader Setup and Features
Similar a iPad eBook Reader Setup and Features (20)
Más de Michael Sauers
Más de Michael Sauers (20)
Último
Último (20)
iPad eBook Reader Setup and Features
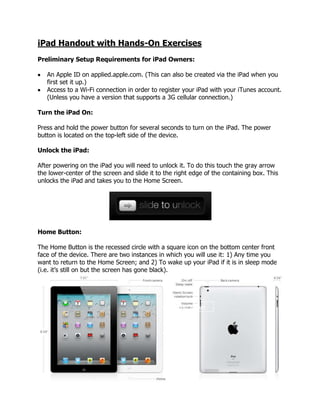
- 1. iPad Handout with Hands-On Exercises Preliminary Setup Requirements for iPad Owners: An Apple ID on applied.apple.com. (This can also be created via the iPad when you first set it up.) Access to a Wi-Fi connection in order to register your iPad with your iTunes account. (Unless you have a version that supports a 3G cellular connection.) Turn the iPad On: Press and hold the power button for several seconds to turn on the iPad. The power button is located on the top-left side of the device. Unlock the iPad: After powering on the iPad you will need to unlock it. To do this touch the gray arrow the lower-center of the screen and slide it to the right edge of the containing box. This unlocks the iPad and takes you to the Home Screen. Home Button: The Home Button is the recessed circle with a square icon on the bottom center front face of the device. There are two instances in which you will use it: 1) Any time you want to return to the Home Screen; and 2) To wake up your iPad if it is in sleep mode (i.e. it’s still on but the screen has gone black). Home Button
- 2. Home Screen: The Home Screen is three panels wide. Identify which panel you are viewing (left, center, or right) by looking at the three small circles (Panel Indicators) at the bottom of the screen. The circle that corresponds to the panel you are viewing will be colored white. The four icons at the bottom of the screen are docked and will not change as you change panels. The panel to the far left is actually a screen on which you can search your device. To move from panel to panel swipe your finger across the screen in the direction you wish to move. Hands On: Swipe your finger to scroll left and right through the home panels to see what we’ve already installed. Next try performing a search for Overdrive. Keyboard: As you’ve probably already noticed, the iPad keyboard only appears when you need it. So, when you tap in the search box on the search panel, the keyboard appeared. One important thing to notice is that despite the keys always displaying upper-case letters, you will be typing in lower-case unless you first single-tap shift (for the next letter) or double-tap shift to initiate a caps-lock. Rotating the screen: To rotate the screen, rotate the device. Hands On: Rotate the screen. Next, rotate the screen while on the search panel to see what happens to the keyboard. Apps: One thing to keep in mind about iPads, and other tablet devices such as those that run the Android OS, is that they are more like desktop computers than dedicated eReaders like the Kindle and the Nook. What determines what you can do with a tablet is what applications (apps) are installed on the device. In the case of the iPad, apps can be downloaded from the App Store. Some apps are free while others can cost a significant amount. Hands On: Open the app store and browse around to see what’s available. Feel free to also perform a search for a type of app you might be interested in. Please avoid actually installing any apps for us.
- 3. Web Browsing: Since this workshop is focusing on using the iPad as an eReader, there are a lot of features that we won’t be covering. However, since the main way that you’ll be locating and retrieving content for the iPad is via the Web, the iPad’s browser, Safari, is something we should cover. You launch Safari by tapping it’s icon on the home screen. In most cases, Safari works just like any other Web browser. It has an address bar, a google search field, and just a few other icons. Let’s cover these: Hands On: Open Safari and surf the web for a few moments. Try going to your library’s Web site to see how it looks and works on the iPad. Also try doing a Google search or two, adding bookmarks, and opening/switching between pages. Reading eBooks: When it comes to reading eBooks on an app-based device the first question you need to ask yourself is, what’s the source of my content? The iPad comes with the iBooks app which allows you to read content that you’ve purchased from tha Apple iTunes store. The Kindle app allows you to read content from Amazon.com and the Nook app allows you to read content from Barnes & Noble. Beyond those examples, there are a number of other eBook apps available (Aldiko, Google Books, and Stanza just to name a few) that either have their own related stores but also allow you to easily download and read many different eBook formats that don’t include DRM. Taking it one step further the Overdrive app allows you to download and read epub books from the Overdrive library services but, since you can also check out a Kindle version of an Overdrive book and read it via the Kindle app. For the purposes of this workshop we’re going to take a look at the Kindle app, the Nook app, and the Overdrive app. If you’re in the first group to play with the iPad much of this will probably be new to you. If you’re the last group, much of this will seem familiar.
- 4. The Kindle App: Launch the Kindle app by finding it on the home screen and tapping it. There you will see the library of currently installed books. At the bottom of the screen you’ll see an Archived Items button which gives you access to books in your Amazon.com account but not currently installed on the device. Clicking on a book in the archive will download it to your device. Next you’ll see the view icons which allow you to switch between cover view and list view. To the right of that is the sort option. Here you can choose to sort by Recent, Title or Author. To the far-right is the refresh button which when tapped with check your Amazon.com account for new content. The Information button will give you access to the app’s settings. Hands On: Open the Kindle app and play around with the views and the sorting options. Also take a look at the archive and transfer one of the books to the device if any are available. To open a book, tap on its cover. To page through a book you can either swipe your finger across the page as if you were turning the page of a paper book, or tap on the left or right sides of the screen to move forward (right) or back (left). To bring up the controls tap on the middle of the screen. Here you’ll find the following options at the top of the screen: Home (top left) Tapping this will take you back to the Kindle app home screen. (Pressing the hardware home button on the iPad will take you back to the iPad home screen.) Bookmark (top right) Tap this to set a bookmark for the current page.
- 5. At the bottom of the screen you’ll see: Back button This will take you back to the previous page you were on. This is used when you jump to another location in the text such as clicking on an endnote or when you’re done searching. Search Tapping this will open a small window in which you can enter your search query. Results will also be shown in this window. Tap a result to be taken to that result within the text. From here you can also search Google and Wikipedia. Go to Tapping this icon will give you the option to jump to the book’s cover, table of contents, beginning of the text, a particular page (equivalent to the printed page numbers), or location (equivalent to the number of screens the iPad is taking to display the whole text). View Options Here you can change the size of the text display, choose the colors being used (white on black, black on white, or sepia) and change the brightness of the screen. Sync to furthest location Lets say you’re reading a Kindle book on the iPad and later you want to pick up where you left of on your phone or desktop. Use this to sync your location to your Amazon.com account and you’ll be able to do just that. Lastly, there is a slider at the bottom of the screen which you can use to quickly jump to a location within the book. This slider also shows you where in the book you currently are along with a percentage and page count.
- 6. Hands On: Open a book, page through it and play with the options available at the bottom of the screen. For example, change the font size, color scheme and brightness that best fits your needs. Try a search or two and see where in the text those words appear. Also try the table of contents for a book. (They generally allow you to jump directly to a chapter.) Lastly, be sure to rotate the iPad to see what the reading experience is like while in landscape mode. In the Kindle app you can also create notes, highlight passages and share passages. To do this first find the first word of the passage you’d like to deal with and long-press on that word. After a second or two a magnifying glass will appear highlighting that word. At this point you can move your finger around to find the correct starting word. Once you lift your finder, that word will be selected and the Note, Highlight, Share menu will appear. You’ll also see the definition of the word at the bottom the screen. To extend the selection, drag the either of the dots at the beginning and/or end of the selection in the appropriate direction. Once you have the passage selected click the Note, Highlight, or Share menu item as needed. If you selected Note, you be given a window into which you can type your note. Choosing Highlight will color the passage and clicking Share will share the passage with either Twitter or Facebook assuming you’ve connected those accounts to the app. (We have not.) Hands On: Find a word and look up its definition. Add a note to one passage and highlight another.
- 7. The Nook App: Open the Nook app by tapping on the Nook icon on the iPad home screen. First you’ll be presented with your library. In the case of the Nook app, new content is not automatically downloaded. If you have purchased a book from the store you’ll see its cover along with a “Download” button. Click the cover to download the title. At the top of the library page you have a help button, and account button (for logging into and out of your Barnes & Noble account) and a library search. Beneath that are the view and sort options. You can choose to view all items, just books, just magazines, just newspapers, and just archived content. (i.e. content available in your B&N account but not currently on the iPad.) For sort options you have by most recent, by title, and by author. Under the search box on the right, you have the sync button which will sync your content with your B&N account. Hands On: Open the Nook app and play around with the views and the sorting options. Also take a look at the archive and transfer one of the books to the device if any are available. To open a book, tap on its cover. To page through a book you can either swipe your finger across the page as if you were turning the page of a paper book, or tap on the left or right margins to move forward (right) or back (left).
- 8. To bring up the controls tap on the text. Here you’ll find the following options at the top of the screen: Back to library Tapping this will take you back to the Nook app home screen. (Pressing the hardware home button on the iPad will take you back to the iPad home screen.) Contents Tapping this will pop up the book’s table of contents. From this window you can also access any bookmarks and annotations you’ve added to the book. Text Display Tapping this will pop up a menu where you can change the font size, font, color scheme, layout, justification, and change all these settings to the publisher defaults. Brightness Tapping this brings up the brightness slider. Search Here you can keyword search the text of the current book. Information This opens an information window about the book. Here you can also send the book to the archive. Bookmark Tap this to set a bookmark for the current page. There is also slider at the bottom of the screen which you can use to quickly jump to a location within the book. This slider also shows you where in the book you currently are along with a page count. Hands On: Open a book, page through it and play with the options available at the bottom of the screen. For example, change the font size, color scheme and brightness that best fits your needs. Try a search or two and see where in the text those words appear. Also try the table of contents for a book. (They generally allow you to jump directly to a chapter.) Lastly, be sure to rotate the iPad to see what the reading experience is like while in landscape mode.
- 9. As with the Kindle app, the Nook app allows you to highlight, add notes, share, and look up definitions. To get started select a single word by long pressing on a word until the word appears highlighted. Lift your finger and the Text Selection Toolbar will appear. However, differently from the Kindle app and the Nook eReader itself, once you have lifted your finger you cannot extend your selection. More in line with how a mouse and desktop work, if you wish to select more than one word, you need to drag your finger from the first word to the last before lifting it up from the screen. After selecting a word or passage, you can use the Text Selection Toolbar to highlight it, write and associate notes with it, share it, or, in the case of a single word, look it up in the dictionary. Hands On: Find a word and look up its definition. Add a note to one passage and highlight another. When everyone’s done this, go find your notes and highlights for this book.
- 10. The Overdrive app: Unlike the other devices we’re working with today, no hardware or software other than the iPad and the Overdrive app are needed to get library books. Hands On: For your final hands-on exercise you will download an eBook from the Nebraska OverDrive Libraries site and transfer it to the iPad using Adobe Digital Editions. Open the Overdrive app. Click on Get Books in the upper right corner. Here you will see your library directory. On this iPad we’ve already added Nebraska Overdrive Libraries to the favorites list. Click on the library name. At this point you are switched over to the Safari Web browser and taken to the mobile version of the Overdrive site. Find the login link (upper right) and sign in using your temporary patron information (library and library card number) Browse the collection for a ePub eBook (not audiobook) to check out. (Don’t worry about finding a title you actually want to read.) Check out the book. Click on the gray Download button to download the eBook to the iPad. At this point you should be switched back to the Overdrive app and your book will start to download. Tap on the book in the library to open it and start reading. Here are a few other things you can do in the Overdrive app: Tap the edit button in the upper-left of the library. This will give you buttons to the left of each title that when tapped will delete the book off the iPad. There is a search bar at the top of the screen with which you can search for titles on your device. There are three sort buttons at the bottom of the screen: Recent, Title, and Expiration. Once you’re reading a book, the Overdrive app offers Brightness and Font controls similar to the Kindle and Nook apps. (See if you can find them.)