Intro in Product Management - Коротко про професію продакт менеджера
HiddenMessageSlider
1. Splitcoaststampers - Tutorial Page 1 of 9
Splitcoaststampers.com
the stamper's community
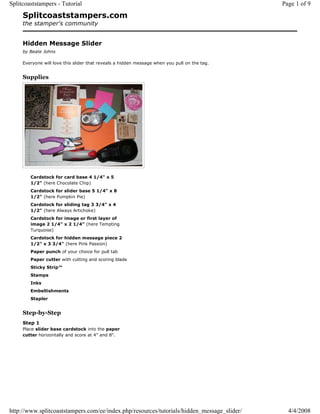
Hidden Message Slider
by Beate Johns
Everyone will love this slider that reveals a hidden message when you pull on the tag.
Supplies
Cardstock for card base 4 1/4" x 5
1/2" (here Chocolate Chip)
Cardstock for slider base 5 1/4" x 8
1/2" (here Pumpkin Pie)
Cardstock for sliding tag 3 3/4" x 4
1/2" (here Always Artichoke)
Cardstock for image or first layer of
image 2 1/4" x 2 1/4" (here Tempting
Turquoise)
Cardstock for hidden message piece 2
1/2" x 3 3/4" (here Pink Passion)
Paper punch of your choice for pull tab
Paper cutter with cutting and scoring blade
Sticky Strip™
Stamps
Inks
Embellishments
Stapler
Step-by-Step
Step 1
Place slider base cardstock into the paper
cutter horizontally and score at 4" and 8".
http://www.splitcoaststampers.com/ee/index.php/resources/tutorials/hidden_message_slider/ 4/4/2008
2. Splitcoaststampers - Tutorial Page 2 of 9
Step 2
Insert the slider base cardstock back into the
paper cutter horizontally with the glue tab (1/2"
strip) facing to the right.
Line it up on the 1 1/4" mark and cut from 3/4"
to 4 1/2" to make the first slit for the slider.
Step 3
Move the cardstock over to the 3 3/4" mark and
make the same cut from 3/4" to 4 1/2".
Step 4
The section with the slits will be the card front.
Stamp this section.
http://www.splitcoaststampers.com/ee/index.php/resources/tutorials/hidden_message_slider/ 4/4/2008
3. Splitcoaststampers - Tutorial Page 3 of 9
Step 5
Pre-fold at all scored lines.
Step 6
Stamp the message on both ends of the hidden
message cardstock.
Only about 1" on each end will be seen when the
card is finished.
http://www.splitcoaststampers.com/ee/index.php/resources/tutorials/hidden_message_slider/ 4/4/2008
4. Splitcoaststampers - Tutorial Page 4 of 9
Step 7
Tape the hidden message piece between the slits
on the front of the slider base.
Step 8
Insert the 3 3/4" x 4 1/2" slider tag
cardstock horizontally into the paper cutter.
Line it up at 2 1/2" and cut from the bottom to 3
1/2".
Step 9
http://www.splitcoaststampers.com/ee/index.php/resources/tutorials/hidden_message_slider/ 4/4/2008
5. Splitcoaststampers - Tutorial Page 5 of 9
Take the card slider base and turn it stamped
side down. Insert slider tag cardstock through
both slits.
Step 10
Staple the slider tag cardstock together where
the cut is.
Step 11
Take a punch and punch a little opening on the
bottom of the slider front. That will make it
easier to pull the slider tag out.
http://www.splitcoaststampers.com/ee/index.php/resources/tutorials/hidden_message_slider/ 4/4/2008
6. Splitcoaststampers - Tutorial Page 6 of 9
Step 12
Decorate the part of the slider tag that shows
between the slits. I added a piece of turquoise
cardstock and then the cut out flower and
leaves.
Step 13
Add Sticky Strip™ to the glue tab and tape the
slider base together.
http://www.splitcoaststampers.com/ee/index.php/resources/tutorials/hidden_message_slider/ 4/4/2008
7. Splitcoaststampers - Tutorial Page 7 of 9
Step 14
Pull the slider tag out and add embellishment
to the pull tab if desired.
I added a turquoise punched circle and some
ribbon.
http://www.splitcoaststampers.com/ee/index.php/resources/tutorials/hidden_message_slider/ 4/4/2008
8. Splitcoaststampers - Tutorial Page 8 of 9
Step 15
Adhere the card to the 4 1/4" x 5 1/2" card
base. Add eyelets or brads to the top of the card
as long as they are above the point where the
slider slits end.
http://www.splitcoaststampers.com/ee/index.php/resources/tutorials/hidden_message_slider/ 4/4/2008