SlideShare una empresa de Scribd logo
1 de 34
Descargar para leer sin conexión
WAREHOUSE MANAGEMENT SYSTEM
Ubdated by UNIBRAVO on September 30, 2017
COMPIERE WAREHOUSE MANAGEMENT SYSTEM DOCUMENTATION
This document about is Compiere WMS (Warehouse Management System) functionality.
The primary purpose of a WMS is to control the movement and storage of materials within a warehouse. The WMS can data
track products during the production process. A warehouse management system, plays a key part in managing the supply chain
and is used to control the movement and storage of materials within a warehouse and process the associated transactions,
including shipping, receiving, putaway, picking, inventory control, etc.
WAREHOUSE MANAGEMENT SYSTEM FUNCTIONAL OVERVIEW
The Compiere WMS helps companies increase visibility into warehouse operations, reduce costs, and improve customer
satisfaction by automating inbound and outbound logistics within the warehouse.
INFRASTRUCTURE AND SETUP
Document Types
First you will need to create the Document Types for Material Pick, Material Putaway, and Material Replenish. To do this, open
the Document Types window from the Main Menu.
Create a new Document Type. Start by entering a name of the new Document Type in the Name field and enter the Print Text
you would like to use for this Document Type in the Print Text field.
Select a GL Category of Manual or None using the drop menu for the GL Category field.
Select the appropriate Document Base Type using the drop menu for the Document Base Type field.
Leave the Sales Transaction check box unselected.
Select the Document is Number Controlled check box if this document is Number controlled.
WWW.UNIBRAVO.COM
You may leave the Print Format field blank and the Document Sequence field blank. The Document Sequence determines the
numbering of documents.
You can leave the Document Copies set to a value of 0.
Click 'Save' and add the additional Document Types using the steps listed above until all Document Types for Warehouse
Management are in place.
Once all document The Verify Document Types process ensures that there is a Document Type for all Document Base Types
and creates the missing Period Controls for each Document Type.
Verify Document Types
Once you have added the Warehouse Management Document Types you must run the Verify Document Types process in
Compiere.
To run the Verify Document Types process, open the Verify Document Types process from the Main Menu and click 'Ok' to
proceed with the verification. Once the process completes Compiere will return the results of the verification.
Calendar Year and Period
If you did not select Auto Period Control, you will need to you to define the Calendars that will be used for Reporting and Period
Control. To do this open the Period for the new Document Types. The Calendar Year and Period window allows you to define
the Calendars that will be used for Reporting and Period Control. Each Tenant has one or more Calendars.
You can access the Calendar Year and Period window from the Main Menu.
Once the correct Calendar Year is open; select the correct period from the periods tab and click the 'Edit' button to view the
appropriate period in Single Record view.
WWW.UNIBRAVO.COM
From this point click the Open/Close all button and select the Open Period action from the Period Action drop menu to open the
period for all document types. Then click 'OK' to proceed.
Compiere will complete the process and return the result of the Period Action update.
To open the period for specific Document Types, select the appropriate Document Type from the Period Control tab.
Print Form
In order to print appropriate Warehouse Management documents you will also need to select the Print formats for
Replenishment Task List, Cluster Pick Task List, Putaway Task List, and Order Pick Task List.
Warehouse and Locators
Currently locators allow up to three segments (Aisle, Bin and Level). This is now expanded to five segments (Aisle, Bay, Row,
Position, and Bin).
WWW.UNIBRAVO.COM
The two new segments namely, Position and Bin are optional. However, if a value for Bin is entered, a value for Position would
be mandatory. In other words, you cannot have a locator with a Bin and not a Position.
There are two new fields available; one to represent the "Picking Sequence" and one to represent the "Putaway Sequence."
These are used to print the pick list and putaway list with pick and putaway tasks in the optimal travel sequence in the
warehouse. Each pick and putaway task is printed in the ascending pick and putaway sequence respectively.
Picking Sequence and Putaway Sequence is defaulted to 0, and must be setup with the appropriate values.
A new check box "Available to promise" has been introduced. If this flag is checked, the quantity of the product in the locator will
be considered as on-hand, and available for reservation to sales orders and other demands.
In addition, there is also another new check box "Available for allocation." If this flag is checked, the quantity of the product in
the locator will be considered as on-hand, and will be available for allocation to sales orders and other demands.
There is now a field available to represent the Stocking UOM (UOM - Unit of Measure). The stocking UOM of a locator is the
UOM in which products will be stored in the locator.
When putaway suggestions are generated, depending on another setting ("Maintain UOM Integrity" set to "Yes") described in a
later section, the system will attempt to match the receipt UOM to the stocking UOM.
There is also a field available to represent the picking UOM. When pick tasks are generated, depending on two other settings
("Maintain UOM Integrity" and "Allow Splitting") described in a later section, the system will either allocate products in multiples
of the picking UOM or in its primary/base UOM. Picking UOM can be different from the stocking UOM. As a general rule, when
setting up picking UOM, it should always be less than or equal to the stocking UOM. Example, if stocking UOM is 6-pack, the
picking UOM should be 6-pack or lower such as Each. Note that if this setup is incorrect, the system will not produce the
desired results.
Two fields representing minimum and maximum stocking quantity are also available. They will be used for non-static locators
(locators that do not have product assigned). The maximum stocking quantity field will represent the maximum quantity (in
stocking UOM of the locator) of any product that can be stored in the locator.
The minimum stocking quantity defined on the locator will not be used in the initial release of WMS. In the future, it will be used
for replenishment of non-static locators.
The minimum stocking quantity and the maximum stocking quantity are defaulted to 0 and must be setup with the appropriate
values.
An option to import locators and allied properties is provided to ensure ease of locator definition and setup.
Product Locator Relationship
Products can be assigned to locators from two windows. First, one or more products can be assigned to a locator from the
product tab in the locator window. Second, a product can be assigned to one or more locators from the locator tab in the
WWW.UNIBRAVO.COM
product window.
Once a product is assigned to a locator, the locator becomes fixed for the product (and is not floating anymore). The minimum
stocking quantity and the maximum stocking quantity can also be defined specifically for the product. The maximum stocking
quantity field will represent the maximum quantity (in stocking UOM of the locator) of the product that can be stored in the
locator. The minimum stocking quantity value will represent the minimum threshold below which the product will be considered
for replenishment. Note that any reference to the term "replenishment" indicates replenishing product(s) from one locator to
another within the warehouse.
If the on-hand quantity falls below the specified minimum, the product in the locator is eligible for replenishment.
The minimum stocking quantity and the maximum stocking quantity are defaulted to 0 and have to be setup with the appropriate
values.
Note: A locator can have only one stocking UOM and it is defined at the locator level. If the minimum and maximum
stocking quantities are not defined at the product level, the system will use the ones defined at the locator level.
Additionally, for WMS transactions the default locator field in the product definition window will be ignored and only those
locators defined in the locator tab will be considered.
The following represents product assignment to locator(s) from the locator window.
The following represents product assignment to locator(s) from the product window.
WWW.UNIBRAVO.COM
Locator Display on different User Interfaces
The display of locators in the Web UI allows you to enter either the locator name or the locator segment combination.
All WMS UIs display the locator segment combination with the delimiter in addition to the locator name.
All WMS UIs allow the selection of locators based on various query criteria shown as follows:
WWW.UNIBRAVO.COM
Once a locator is selected, you can click on the "Locator Detail" button to view the contents of the locator, as well as the list of
products assigned to the locator using the Product Locator Relationship.
The following represents the Locator Detail Information window.
Zones
Zones are a grouping of locators. Compiere now allows you to define zones to achieve various business flows.
The Zone definition is not mandatory unless operations requiring zones need to be performed. This is to ensure that non WMS
users are not impacted.
It is possible to assign locators to zones either manually or through a process. A button, "Add Locator," is available on the Zone
window to allow automated inclusion of locators into the zone.
Appropriate parameters to execute this process may be:
A source zone from which to copy the locators.
A range of locators. Any segment may be used in the range. For example, you can specify a range of rows 1 through 30.
In this case, irrespective of the other segments, all Locators that have a row between 1 and 30 will be included.
If neither a source zone, nor a range of locators is specified, all locators in the warehouse will be included in the zone.
WWW.UNIBRAVO.COM
For all zones, the "Available to promise" check box is available. This can be used to default the values for the locators belonging
to the zone.
For all zones, the "Available for allocation" check box is available. This can be used to default the values for the locators
belonging to the zone.
The button "Synchronize Defaults" is used to default the values of the "Available to promise" and "Available for allocation" to all
the locators in the zone. It is possible to change this setting at the locator level.
A zone can be defined as a Static Zone or a non-Static Zone.
A locator can exist in only one static zone at any point in time. Therefore, once a locator is added to a static zone, it cannot be
added to any other static zone(s), without being deleted from its current static zone. When an attempt is made to add a locator
to a static zone, there is a check to see if the locator is linked to any other static zone.
Static zones are used for replenishment purposes.
Non-static (floating) zones can have overlapping locators with other zones.
The following represents the Zone window with the associated locators.
The following represents the Add Locator process parameters.
WWW.UNIBRAVO.COM
Zone Relationships
Zone relationships can be defined for replenishment purposes. Locators in a zone can be replenished from locators in a
different zone (source zone) when the quantity of a product in a locator falls below its minimum stocking quantity.
A Zone can have multiple source zones that can replenish it. Each zone relationship will have a Replenishment Sequence
Number. When there is insufficient quantity in the first source zone, the next zone will be used as the replenishment source, in
order of the Replenishment Sequence Number.
Note: Only static zones can be used in defining zone relationships. Zone relationships can be defined in the
Replenishment tab of the Zone window.
The Following represents the Zone window.
Product Cross References
Currently in Compiere, you can specify the following fields for any product.
Search Key
Name
UPC/EAN
SKU
Vendor Cross Reference (By Vendor)
Customer Cross Reference (By Customer)
On any window in Compiere, you can select a product by entering any of the above cross references in the same input field.
The order of search will be in the order listed above.
There is a possibility that the same vendor cross reference may be used by two different vendors for two different products. In
such scenarios, all applicable matches will display in order to select the correct product.
The following shows some of the product cross references that can be defined.
WWW.UNIBRAVO.COM
Purchased to Order Products
Some products may not be kept in stock, and may be purchased (special-ordered) only when there is a Sales Order created for
the product.
Once these "Purchased to Order" products are received, they will only be allocated to the Sales Order that is linked to the
Purchase Order. In other words, such products "cannot be stolen" by other Sales Orders created for the same product.
This can be achieved by grouping such products into a product category and checking the "Purchased to Order" flag.
This flag would get defaulted to the Products in this product category, and it can be overridden at the product level if desired.
For "Purchased to Order" products, the allocation algorithm will look for a Purchase Order line that references the Sales Order
line and check if there is any material received against the Purchase Order line.
If there is material received, the Sales Order line will be eligible for allocation.
WWW.UNIBRAVO.COM
If there is no material received, the Sales Order line will not be eligible for allocation.
The existing "Generate PO from Sales Order" process can be used to generate a Purchase Order based on a Sales Order.
The following represents the Product Category window with the Purchased to Order flag.
Note: The Product window also includes the Purchased to Order flag.
The following represents the product window with the Purchased to Order flag.
WWW.UNIBRAVO.COM
Warehouse Management Execution Setup steps
After reading this section, make sure that you read the next three sections that follow prior to using the system so that you get a
full understanding of how warehouse management execution works.
In order to setup putaway and allocation/picking execution algorithms, the following steps have to be followed:
Step 1: Go to the "Warehouse Management Rule" window and setup putaway and allocation/picking rules.
Step 2: Go to the "Warehouse Management Strategy" window and create strategies and place the rules created in step 1 in the
sequence you want them to be executed.
Step 3: Go to the "Warehouse Management Workbench" window and create strategy sets by placing the strategies created in
step 2 in the sequence you want them to be executed (note that each strategy created in step 2 becomes a line within the
strategy set and hence is known as a "strategy set line" within this window). In addition, for each strategy set line, setup the
selection criteria that should be used to select that particular strategy. Finally, make the strategy set active. Note: Although you
may create multiple strategy sets, only one can be active and used at any point in time.
Warehouse Management Rule
You can setup putaway and allocation/picking rules via the "Warehouse Management Rule" window.
A rule is an algorithm that is executed to obtain desired business results.
Example of Putaway: Find a locator in a zone with the same product.
WWW.UNIBRAVO.COM
The following rules are supported for putaway:
Find a fixed locator in the warehouse (sort by zone putaway sequence if exists followed by locator putaway sequence if
exists).
Find a fixed locator in a zone (sort by locator putaway sequence if exists).
Find a non-static locator in the warehouse with the same product (sort by zone putaway sequence if exists followed by
locator putaway sequence if exists).
Find a non-static locator in a zone with the same product (sort by locator putaway sequence if exists).
Find any empty non-static locator in the warehouse (sort by zone putaway sequence if exists followed by locator putaway
sequence if exists).
Find any empty non-static locator in a zone (sort by locator putaway sequence if exists).
Find any locator with available capacity in the warehouse (sort by zone putaway sequence if exists followed by locator
putaway sequence if exists).
Find any locator with available capacity in a zone (sort by locator putaway sequence if exists).
Hook for custom rule: You can create and enter a custom Java class that accepts a product and quantity as input and
returns a list of locators. You can have any custom logic to derive the locators in this class.
For more information, refer to the ExtendingtheWMSRulesEngine chapter of the Technical guide.
Example of allocation/picking: Allocate product from a specific zone in the warehouse.
The following rules are supported for allocation/picking:
Find product in the warehouse (sort by zone picking sequence if exists followed by locator picking sequence if exists).
Find product in a zone (sort by locator picking sequence if exists).
Find product in the warehouse (sort by zone picking sequence followed by locator with the least available quantity of the
product) - "Warehouse Pick to clean."
Find product in a zone (sort by locator with the least available quantity of the product) - "Zone Pick to clean."
WWW.UNIBRAVO.COM
Hook for custom rule.
For more information on custom rules, refer to the ExtendingtheWMSRulesEngine chapter of the Technical guide.
At the rule level, you can select a flag "Maintain UOM Integrity." This controls how you want to handle the Unit of Measure
during putaway and allocation/picking.
Putaway: If Maintain UOM Integrity is checked, the system will ensure that the receipt UOM of the product matches the
stocking UOM of the locator. For example, if the stocking UOM of a locator is 6-pack, and the rule has Maintain UOM integrity
checked, then only product receipts with a UOM of 6-pack can be putaway into that locator. If Maintain UOM integrity is
unchecked, any locator is fair game regardless of the stocking UOM of the locator.
Allocation/Picking: If Maintain UOM Integrity is checked, allocations of product for picking is done in multiples of the picking
UOM on the locator. For example, if the picking UOM of a locator is 6-pack and the required quantity on the sales order is 20
Eaches, and the rule has maintain UOM integrity checked, the system will allocate 3 6-packs from this locator (For the remaining
quantity of 2 Eaches, the system may or may not find other satisfactory locators depending on another setup called "Allow
Splitting" at the strategy level. See the next section for details). If Maintain UOM Integrity is unchecked, the picking UOM of the
locator is disregarded and the system will allocate from any valid locator and the pick task will be generated in the product UOM.
Warehouse Management Strategy
You can setup putaway and allocation/picking strategies via the "Warehouse Management Strategy" window.
A strategy is a collection of rules that are laid out in sequence for execution one after the other. You typically start with the most
restrictive rule and then expand on to the lenient ones.
Example of Putaway Strategy: Rule 1: Putaway to a forward pick zone, Rule 2: Putaway to a stocking zone.
Example of Allocation/Picking strategy: Rule 1: Allocate from a forward picking zone, Rule 2: Allocate from a zone that has
stocked product in UOM of Case, Rule 3: Allocate from a zone that has stocked product in UOM of pallet.
WWW.UNIBRAVO.COM
At the strategy level, you can select a flag "Allow Splitting."
Putaway: If Allow Splitting is checked, in the event that a certain quantity of a product in the receipt UOM cannot be putaway in
its entirety into a single locator with the same stocking UOM, the system will split the quantity of the product in multiples of the
receipt UOM and attempt to find another locator with the same stocking UOM as the receipt UOM. For example, if 5 6-packs of
a product was received and only 4 6-packs can be putaway into a locator with a stocking UOM of 6-pack, the system will
attempt to find another locator with a stocking UOM of 6-pack for the remaining 1 6-pack of this product. If Allow Splitting is
unchecked, the system will attempt to find a single locator that has the same stocking UOM as the receipt UOM that can house
the quantity of the product in its entirety.
Allocation/Picking: If Allow Splitting is checked, in the event that a certain quantity of a product cannot be allocated in its
entirety in the picking UOM setup on the locator, the system will split the quantity up to the quantity available in multiples of the
picking UOM in this locator and then attempt to find another locator for the remaining quantity. For example, if the picking UOM
defined for a locator was 6-pack and 20 Eaches (ideally 3 6-packs and 2 Eaches) of a product existed in it and if the sales order
required 20 Eaches of the product, the system will allocate 3 6-packs (18 Eaches) from this locator and move on to a different
locator to allocate the remaining 2 Eaches. If Allow Splitting is unchecked, the system will attempt to find a single locator from
which the quantity of the product can be allocated in its entirety.
Warehouse Management Workbench
The "Warehouse Management Workbench" window is the user interface where all the strategies (with rules within them) that
have been defined are consolidated for final usage in the WMS execution process. There are two key setups done via this
workbench: 1) Creation of strategy sets and, 2) Setup of strategy selection criteria.
1. Strategy Sets
You would define two types of strategy sets, one for putaway and another for picking/allocation as shown here:
The following represents a putaway strategy.
WWW.UNIBRAVO.COM
The following represents a picking/allocation strategy.
A strategy set is a collection of strategies (each strategy defined earlier is selected as a strategy set line in this UI) that is
executed to get desired results for putaway and allocation/picking. Strategies are added in sequence one after the other within a
strategy set.
A check box called "Evaluate all strategies" is provided in the workbench. If this check box is unchecked, the system will
evaluate one rule after the other within a valid strategy until it finds a rule that can get a putaway locator or allocate product. The
evaluation process terminates with the last rule within the strategy. If the check box is checked, the system will evaluate all rules
within a valid strategy and if all the rules fail or some rules partially succeed to find a result it will move to the next valid strategy
for evaluation until it finds a successful result. It will move on to subsequent valid strategies until it finds a conforming result.
If no valid result is found, it will perform the following:
Picking/Allocation: Partial/No allocation will be performed on the sales order line based on the shipping rule chosen. At a later
time in the business flow (after shipment), the sales order line may be adjusted or left as-is.
Putaway: On the Warehouse Management Workbench, for strategy sets of type "Material putaway," you can define a locator. If
this locator is defined, when all of the putaway strategies and allied rules fail, the system would return this locator as the
putaway locator. This is defined as a fallback option. If this locator is not setup, the system would not return a result if it cannot
find a putaway locator.
2. Strategy (set line) selection criteria
For each strategy, you would define selection criteria that would be used to select one strategy over the other when being
evaluated.
The strategy selection criteria are as follows:
Putaway: Product, product category, source zone, source locator, business partner, business partner group.
Picking/Allocation: Product, product category, destination zone, destination locator, business partner, business partner group.
WWW.UNIBRAVO.COM
Order Type Group
You can group Order types into order type groups. During wave planning (see wave planning section for more details on wave
planning), when an order type group is specified, all order types within this group are retrieved for processing.
Furthermore, you can provide weightage for each Order Type in the group. During wave planning, if the wave sort criteria has
weightage as an option in it, the order lines are sorted by it.
The following represents the Order Type Group window.
Wave Sort Criteria
You can create various combinations of sort criteria for order lines to be processed in a wave.
In the Wave sort criteria window, you would create one or more sort criteria lines, specify which criteria precedes which other
criteria by specifying a sequence and then choose if the criteria should be executed in an ascending or descending order.
The following represents the wave sort criteria window.
WWW.UNIBRAVO.COM
The following shows the list of options available for sorting.
Disallowing Negative Inventory and enabling WMS
You have the option to prevent negative Inventory at the Warehouse level in Compiere.
If this option is checked, it will not be possible to do allocations or shipments of any kind if the on-hand quantity goes to zero.
The "Force" option in the shipping rule will be disabled.
This constraint is enforced at the locator level. It will not be possible for the on-hand quantity in the locator to go negative.
By default, the option will be unchecked thereby allowing negative inventory.
Once there are transactions leading to negative quantities, this option cannot be changed to "Disallow negative inventory"
unless the system is cleared of all negative balances.
In addition, a WMS enabled check box is provided for WMS related transactions. If this check box is checked, you can perform
WMS transaction. If unchecked, you cannot perform WMS transactions.
Note: If the disallow negative inventory flag is unchecked, you will not be able to check the WMS enabled flag and
thereby will be unable to perform WMS transactions.
At the warehouse level, you can also setup default receiving and staging locators. These locators will be displayed in
appropriate inbound and outbound UIs when performing transactions or running processes. It can be overridden at anytime at
WWW.UNIBRAVO.COM
the transaction or the process level.
The following represents the Warehouse and Locator window with the Disallow Negative Inventory flag.
Product Inquiry/Query
A User Interface that can display a normalized view of inventory within or across warehouses is provided.
It displays inventory in its various states such as on-hand and allocated.
Warehouse Tasks/Task List
The WMS can generate three types of tasks. In inbound operations, putaway tasks are generated. In outbound operations
picking tasks are generated are generated. In warehousing operations replenishment tasks are generated. These generated
tasks can be printed out as task lists and handed out to operators for execution.
Each task is basically a move operation with a product, a source locator, a destination locator and the quantity to be moved and
the UOM associated with the quantity.
The document type will indicate whether the task is a putaway task, a pick task or a replenishment task.
The document action "Prepare" will set the task to a status of "In Progress."
The document action "Complete" will actually result in the update of on-hand quantity - depleting the specified quantity from the
source locator, and adding it to the destination locator.
At any time, an operator can be assigned to the task using the "Operator" field.
The Source Locator, Destination Locator, and Quantity fields are populated by the "Generate Putaway", "Release Wave" and
"Generate Replenishment" processes. These fields cannot be updated by the user.
Under normal circumstances, the Actual Source Locator, Actual Destination Locator, and Actual Quantity fields are the same as
the corresponding suggested fields.
In case of exceptions, you can change the Actual From Locator, Actual To Locator and the Actual Quantity to reflect the actual
task performed in the warehouse.
The movement quantity is derived from the actual quantity in the product UOM.
Under some circumstances, the operator may need to split a task. For example, in the case of a putaway task, if the quantity
does not entirely fit into the destination locator, the operator may decide to putaway some quantity in a different locator. In this
case, the task can be split into two tasks by clicking on the "Split task" button. In this case, the target quantity on the original
task remains unchanged, but the target quantity in the new task is set to 0. The actual quantities on both tasks will need to be
updated to the actual quantity moved.
When a task is completed, the quantity entered is depleted from the source locator and added to the destination locator.
WWW.UNIBRAVO.COM
If the quantity entered is less than the actual quantity, then the additional allocated quantity needs to be unallocated.
If there is an open shipment for the order associated with the task, there will be a new line added to it for the order line. If
there is no open shipment for the order, a new one will be created.
Tasks can be grouped into Warehouse Task Lists. Each task list is basically a group of tasks that can be printed and assigned to
an operator.
Warehouse Task lists will be automatically generated as part of the "Generate Putaway", "Release Wave" and "Generate
Replenishment" processes. You can print/re-print these task lists.
The following represents the Warehouse Task List window.
The following represents a single Warehouse Task window:
The following represents a sample Pick List printout for sales order picking.
WWW.UNIBRAVO.COM
The following represents a sample Pick List printout for cluster picking of sales orders.
The following represents a sample Putaway List printout.
The following represents a sample Replenishment List printout.
WWW.UNIBRAVO.COM
Task Management
Once an operator has completed the assigned task list, the warehouse tasks need to be completed in Compiere.
You have the following options to complete the tasks in the task list:
Query up each task in the "Warehouse Task" window, enter any changes and complete the task.
Query up a group of tasks in the "Task Management" window and complete the group.
The "Task Management" screen essentially helps you complete a group of tasks rather than having to complete each individual
task.
The tasks can be queried by entering the Task List No, or by entering some other criteria and clicking on the "Search" button.
The screen will then show the tasks corresponding to the search criteria.
If all the tasks were completed without any exceptions, you can select all tasks and click on the "Process" button to complete
them.
For any exceptions, you can enter the actual values (From Locator, To Locator and quantity) for that particular task before
clicking on the Process button.
The process button can also be used to void a set of chosen tasks. The appropriate document action (Completed or Void) will
be chosen after clicking on the "Process" button.
At a minimum, you will have to enter the task type or the task list number as query criteria. In addition, you can enter other
criteria such as the date range the task list was generated on, and the Order Number.
INBOUND OPERATIONS
Streamlined Receiving with PO/RMA as Starting Point - Quick Receipt
You can enter receipts using a streamlined, efficient window in Compiere.
You also have the ability to enter a receipt with the PO as the starting point. Once the PO is entered, you are able to select from
the list of available products from the PO.
The UOM is defaulted to the UOM on the Purchase Order Line.
If the received quantity exceeds the ordered quantity, an error is displayed.
At any time, you can decide to cancel the entire set of entries.
Once all entries are complete, simply click the "Create Receipt" button. This will create the Material Receipt document.
The expected quantity will not be defaulted. Instead, you will be prompted to enter the quantity received.
As lines are created, the Purchase Order number is copied from the previous line.
The following represents the Quick Receipt window (Single Record view.)
Streamlined Receiving with Product as Starting Point - Product based Receipt
You can enter receipts using a streamlined, efficient window in Compiere.
You also have the ability to enter a receipt with the Product as the starting point. Once the Product is entered, you are able to
select from the list of available POs that contain the product.
The UOM is defaulted to the UOM on the Purchase Order Line.
If the received quantity exceeds the ordered quantity, an error is displayed.
At any time, you can decide to cancel the entire set of entries.
Once all entries are complete, simply click the "Create Receipt" button. This will create the Material Receipt document.
The expected quantity will not be defaulted. Instead, you will be prompted to enter the quantity received.
As lines are created, the Purchase Order number is copied from the previous line.
The following represents the Product based Receipt window (Single Record view.).
WWW.UNIBRAVO.COM
Express Receipt Based on Purchase Order
You can perform a blanket receipt of all products in a purchase order via the Express receipt feature.
When you scan/enter a purchase order number, all of the lines from the purchase order are copied to the receipt (similar to the
Create From functionality on material receipts).
You can complete the receipt by processing all the records at once.
The following represents the Express Receipt window (Single Record view.)
Receipt of products via Cross-Reference
On any window in Compiere, you can select a product by entering any of the cross references mentioned in the 'Product Cross
Reference' section. (Previously, you could only enter key, name, or UPC).
Receipt of products into receiving Locators
It is possible to receive products into receiving locators. When implementing, ensure that receiving locators have "Available to
promise" checked and "Available for allocation" unchecked. In this scenario, the quantity in the receiving locator is available for
soft reservation against Sales Orders. However, they will not be available for allocation (hard reservation).
It is possible to also receive directly into stock locators (available to promise=yes and available for allocation = yes). In this
scenario the product is available for reservation and allocation.
Receiving locators would typically have infinite capacity and hence no capacity constraints apply.
Movement of product between Locators
It is possible to move products between locators.
The availability of the product for reservation and allocation is governed by the corresponding flags on the locators.
It will not be possible to move quantity from an "available" state to an "unavailable" state. In other words, if the goods have
already been moved to a stock locator and are hence available for allocation", it will not be possible to move the goods back to
a receiving locator.
Capture Information about Operator Performing Receipt
For every receipt, you can keep track of the operator performing the receipt.
No special handling required for this - the created by column will keep track of this information.
Disallow product Allocation Prior to Putaway
This functionality can be achieved by setting the "Available for allocation" flag to "No" on the receiving locator.
Exception Handling During Receiving
When you enter a receiving transaction the following discrepancies may occur:
The product entered may not be on the PO (in receipts with PO as the starting point)
WWW.UNIBRAVO.COM
There may be no PO for the product entered (in receipts with product as the starting point)
The quantity entered may exceed the quantity ordered
The following mechanisms have been added to handle the above exceptions:
If the product entered is not on the PO, the operator needs to do one of the following:
Enter a receipt without a PO and later match the receipt to a PO.
Create a PO with the product on it.
Similar steps need to be taken if there is no PO for the product. In both situations, the solution is a manual correction by
the operator.
If the quantity entered is less than quantity ordered, this is not an error condition, the product may arrive in a subsequent
shipment, or may be in a different part of the same shipment (bottom of the same pallet, for example).
If the quantity entered is greater than the quantity ordered, this is an error scenario. An error message will display.
Ability to Generate Putaway Suggestions
As goods are being received at the receiving dock, you can choose to perform a putaway once sufficient goods have been
received.
The "Generate Putaway" process is available for this purpose. The input to this process is a source Receiving locator zone or
locator. In addition, a product or product category can be provided as input.
This process will consider all the products in the source zone/locator, and evaluate the appropriate plan for those products. If a
product or product category is chosen, then only the specified products are considered. It will generate a list of Warehouse
Tasks that are grouped into a Task List (Putaway list). There is a Warehouse Task for each product with the suggested putaway
location.
The tasks are in "Prepared" status, by default. You can choose to even complete the task using the document action parameter.
You can take a print out of the Task List (Putaway list) and perform the putaway.
Once the putaway is completed by the operator, they can make any corrections if necessary using the Task Management
screen. They can then complete the tasks, which will make the necessary adjustments in Inventory.
While generating the warehouse tasks, the Generate Putaway process will look for any open tasks for the product. If there are
any open tasks, it will not regenerate the task. If you want to regenerate Putaway Tasks (for example, if the Putaway rules have
changed since the last time the Putaway list was generated), they will have to void the original tasks using the Task
Management window.
The following refers to the Generate Putaway process.
Exception Handling During Putaway
During putaway, the operator may find two kinds of exceptions.
They had to choose a different locator (for example, if there was insufficient space in the suggested locator).
WWW.UNIBRAVO.COM
The quantity that was putaway is different from the quantity on the putaway list.
In either situation, the operator must update the Warehouse task with the actual locator and quantity before completing it.
OUTBOUND OPERATIONS
Order Selection
You can query demand lines from Sales Orders based on various criteria.
The following selection criteria are seeded in Compiere:
Warehouse: This is the warehouse where the allocation and picking is to be performed.
Order No: This can be used to query a specific Sales Order. This can be used under special circumstances where you
want to pick and ship only a specific Sales Order.
Order Type: This can be used to query a specific Order Type.
Order Type Group: Order type groups can be defined to group a number of order types.
Order Priority: This can be used to query orders based on the priority setup on the Order header.
Customer: This can be used to query all orders for a specific customer
Date Ordered Range: This can be used to query all orders that were entered in a specified date range.
Date Promised Range: This can be used to query all orders that were promised to be delivered in a specified date range.
Freight Carrier: This can be used to query all orders with a specific freight carrier.
Product: This can be used to query all orders for a specific product.
Product Category : This can be used to query all orders for a specific product category
Country: This is the country where the product is being shipped.
More selection criteria can be added by the customer during implementation if they have different query criteria.
Along with the selection criteria, you can specify how to order the results. You can setup wave sort criteria and choose one for
the wave.
The orders are sorted and returned based on the wave sort criteria.
You can then manually select a subset of the rows via individual check boxes, or enter a number of rows to process (using the
"Process rows" field). For the latter option, only the top rows up to the number of rows specified will be processed.
You can optionally check the "Generate Pick List" flag.
If checked, the chosen order lines will not only be checked for availability, but will also be allocated and a pick list will be
generated.
If unchecked, the chosen order lines will only be checked for availability at the warehouse level, and a wave will be
generated containing those lines for which on hand is available. No allocations will be done, and a pick list will not be
generated. This intermediate step will allow you to review the order lines before the allocation is done.
If the generate pick list flag is checked, you can choose between two pick methods:
Order Picking - the resulting tasks will be grouped by the sales order, and there will be one picklist generated per order
Cluster Picking - you can specify the cluster size and the resulting tasks will be grouped into pick lists in groups of the
cluster size. The sort order will be zone picking sequence followed by locator picking sequence.
If a Shipping Rule is selected, it will override the shipping rule at the order level.
If your intention is to process the records and create tasks, you should select a staging locator.
The following represents the Wave Planning (Order Selection) window.
WWW.UNIBRAVO.COM
Release Wave
Once waves have been created, you can query waves via query criteria such as wave number and creation date.
You can use either 1) The summarized UI that will return orders as the resultant set, or 2) the detailed UI that will return order
lines.
You can select the order/order lines that you want and click on the "Process" button. This will create pick tasks and put them in
appropriate pick lists.
Alternatively, instead of selecting individual lines, you can specify the number of lines that will be processed and the system
would allocate those lines and create appropriate pick tasks.
Additionally, you can specify the cluster size and the destination locator (e.g. packing station or staging area).
The following represents the release wave UI - detailed view.
The following represents the release wave UI - summarized window.
WWW.UNIBRAVO.COM
Shipment Consolidation
Sometimes shipments may need to be consolidated. For example, a number of shipments with a common country of destination
may be consolidated on a single palette and then shipped.
You can create a Consolidation Reference to represent such consolidations as shown below.
Once the consolidation reference is created, it can be added to the Business Partner or the Business Partner Group. The setup
at the Business Partner level overrides the setup at Business Partner Group level.
For example, all shipments for Business Partners in Norway may be consolidated using a "Norway" consolidation reference,
and all shipments for Business Partners in Finland may be consolidated using a "Finland" consolidation reference.
The following represents the Business Partner window where the Consolidation Reference can be setup.
After picking tasks are completed, corresponding shipments are automatically created.
After Task Confirmation, you can navigate to the shipment management window to query up shipments and complete them. You
can query based on various criteria such as consolidation reference, shipment number, order, priority, order type, date ordered,
date promised, freight carrier and shipment creation date.
The following represents the shipment management window.
WWW.UNIBRAVO.COM
WAREHOUSING OPERATIONS
Zone Replenishment
You can run a process to replenish zones based on the zone relationship setup. Inputs to this process will be the Warehouse
and optionally, a zone.
If the zone is unspecified, all zones for which a replenishment relationship is defined will be considered. If a zone is specified,
that will be the only zone considered for replenishment.
All the locators in the zone will be considered for replenishment. For any product linked to the locator, if the on-hand quantity is
below the minimum, it will be picked up for replenishment.
Once the products are identified, the source zones defined in the zone relationships window will be considered in the order of
the Replenishment Sequence Number specified. If there is sufficient quantity for replenishment, a warehouse task is created for
the product for the adequate quantity.
The quantity is in the stocking UOM of the destination locator. The quantity is rounded off in the stocking UOM up to the
maximum quantity specified on the destination locator. For example, if the maximum quantity for a locator is specified to be 20
Eachs for the product azalea bush, and the stocking UOM for the locator is 6-pack; then the locator will be replenished with 3 6-
packs.
The following represents the Generate Replenishment process.
Inventory Views
WWW.UNIBRAVO.COM
You can currently query On-hand Quantity, Reserved Quantity and the Ordered Quantity for each storage record using the
Storage Tab in the Warehouse and Locators tab.
The Storage Tab is modified to also show the Quantity Allocated for each storage record.
Aggregated quantities at the Locator or Warehouse level can be viewed by running the Storage Detail Report in the "Show
Totals Only" mode. In addition, you can view this information in the Locator Info window.
The following represents a view of the Storage Detail report layout that shows the On Hand Quantity and allocated quantity.
IMPORT
Locator Import
A new interface table (I_Locator) has been created to enable you to import locators
Similar to other import processes, you will have to create an excel spreadsheet that contains all the data they would like to
import.
You will then have to map the columns in the spreadsheet to the columns in the table by using an Import Format such as the
one below.
WWW.UNIBRAVO.COM
You can run the "Import File Loader" process to import the file and load the interface table.
You can then open the "Import Locator" window and click on the "Import Locator" button to import the records into the locator
table.
The following represents the "Import Locator" window.
REPORTS
Order Monitoring Report
This report provides information about Sales Orders at various stages of the fulfillment cycle in the selected time period.
The following information is shown in this report, for each day in the specified time period:
Lines to Pick : The number of sales order lines for which pick tasks have been created, and goods have been allocated,
and are awaiting pick
Lines to Ship : The number of sales order lines which have been picked, and are awaiting shipment
Lines Shipped : The number of sales order lines which have been shipped
New Lines : The number of new sales order lines entered that day
Lines Outstanding : The number of sales order lines which have not yet been allocated, and are still open.
The following is a sample layout.
WWW.UNIBRAVO.COM
Handler Performance Report
This report provides information about the number of pick, putaway and replenishment tasks completed by the operator
(handler) in the selected time period.
The following information is shown in this report:
Operator : The operator who performed the warehouse task
Trolleys Picked : The number of pick lists containing pick tasks performed by the operator
Orders Picked : The number of Sales Orders for which picks were performed by the operator
Order Lines Picked : The number of Sales Order lines for which picks were performed by the operator
Lines Putaway : The number of putaway tasks performed by the operator
Lines Replenished : The number of replenishment tasks performed by the operator
The following represents the Handler Performance Report.
Warehouse Stock Information Report
This report provides product by product information about stock quantities on-hand, available and allocated. In addition, it
provides consumption information over the past 7 days and the past 30 days. It then shows the days cover based on
consumptions over the last 30 day period.
The following information is shown in this report:
On Hand Qty : The on-hand quantity of the product in the selected warehouse as of the report date
Qty Allocation : The quantity of the product that is currently allocated and is awaiting shipment
Qty Available : The quantity of the product that is not currently reserved, and is in a locator that has the property
"Available to promise" enabled.
Consumed Past 7 Days : The quantity of the product that was consumed in the last 7 days
Consumed Past 30 Days : The quantity of the product that was consumed in the last 30 days
Days Cover : The number of days for which there is sufficient quantity on-hand for fulfilling new orders, based on the rate
of consumption over the last 30 day period.
The following is a sample layout.
WWW.UNIBRAVO.COM
Locator Visits Report
This report provides information about the number of visits a locator has experienced in a given period of time for a given
product.
The following information is shown in this report:
Pick Visits : The number of times the locator was visited for purposes of picking. The pick could be for fulfilling a Sales
Order line, or for replenishing another locator in the warehouse.
Putaway Visits : The number of times the locator was visited for purposes of putaway.
Replenishment Visits : The number of times the locator was visited for purposes of replenishment.
Total Visits : The total number of visits to the locator for purposes of pick, putaway or replenishment.
The following is a sample layout.
Labels None
WWW.UNIBRAVO.COM

Más contenido relacionado

La actualidad más candente

Creating a Data validation and Testing Strategy
Creating a Data validation and Testing StrategyCreating a Data validation and Testing Strategy
Creating a Data validation and Testing StrategyRTTS
 
Big data by Mithlesh sadh
Big data by Mithlesh sadhBig data by Mithlesh sadh
Big data by Mithlesh sadhMithlesh Sadh
 
Melbourne: Certus Data 2.0 Vault Meetup with Snowflake - Data Vault In The Cl...
Melbourne: Certus Data 2.0 Vault Meetup with Snowflake - Data Vault In The Cl...Melbourne: Certus Data 2.0 Vault Meetup with Snowflake - Data Vault In The Cl...
Melbourne: Certus Data 2.0 Vault Meetup with Snowflake - Data Vault In The Cl...Certus Solutions
 
Project Presentation on Data WareHouse
Project Presentation on Data WareHouseProject Presentation on Data WareHouse
Project Presentation on Data WareHouseAbhi Bhardwaj
 
The Path to Data and Analytics Modernization
The Path to Data and Analytics ModernizationThe Path to Data and Analytics Modernization
The Path to Data and Analytics ModernizationAnalytics8
 
Oracle business intelligence enterprise edition 11g
Oracle business intelligence enterprise edition 11gOracle business intelligence enterprise edition 11g
Oracle business intelligence enterprise edition 11guzzal basak
 
Best practice strategies to clean up and maintain your database with Hether G...
Best practice strategies to clean up and maintain your database with Hether G...Best practice strategies to clean up and maintain your database with Hether G...
Best practice strategies to clean up and maintain your database with Hether G...Blackbaud Pacific
 
Software AG’s webMethods Integration Cloud: Integrate Cloud Apps with ease
Software AG’s webMethods Integration Cloud: Integrate Cloud Apps with ease Software AG’s webMethods Integration Cloud: Integrate Cloud Apps with ease
Software AG’s webMethods Integration Cloud: Integrate Cloud Apps with ease Kellton Tech Solutions Ltd
 
ETL VS ELT.pdf
ETL VS ELT.pdfETL VS ELT.pdf
ETL VS ELT.pdfBOSupport
 
Data Quality Dashboards
Data Quality DashboardsData Quality Dashboards
Data Quality DashboardsWilliam Sharp
 
Data quality and bi
Data quality and biData quality and bi
Data quality and bijeffd00
 
Accenture Oracle Business Group: Helping You Become a High Velocity Enterprise
Accenture Oracle Business Group: Helping You Become a High Velocity EnterpriseAccenture Oracle Business Group: Helping You Become a High Velocity Enterprise
Accenture Oracle Business Group: Helping You Become a High Velocity EnterpriseAccenture Technology
 
Driving Business Insights with a Modern Data Architecture AWS Summit SG 2017
Driving Business Insights with a Modern Data Architecture  AWS Summit SG 2017Driving Business Insights with a Modern Data Architecture  AWS Summit SG 2017
Driving Business Insights with a Modern Data Architecture AWS Summit SG 2017Amazon Web Services
 
Data Migration Strategies PowerPoint Presentation Slides
Data Migration Strategies PowerPoint Presentation SlidesData Migration Strategies PowerPoint Presentation Slides
Data Migration Strategies PowerPoint Presentation SlidesSlideTeam
 

La actualidad más candente (20)

Creating a Data validation and Testing Strategy
Creating a Data validation and Testing StrategyCreating a Data validation and Testing Strategy
Creating a Data validation and Testing Strategy
 
Big data by Mithlesh sadh
Big data by Mithlesh sadhBig data by Mithlesh sadh
Big data by Mithlesh sadh
 
SSIS Presentation
SSIS PresentationSSIS Presentation
SSIS Presentation
 
Melbourne: Certus Data 2.0 Vault Meetup with Snowflake - Data Vault In The Cl...
Melbourne: Certus Data 2.0 Vault Meetup with Snowflake - Data Vault In The Cl...Melbourne: Certus Data 2.0 Vault Meetup with Snowflake - Data Vault In The Cl...
Melbourne: Certus Data 2.0 Vault Meetup with Snowflake - Data Vault In The Cl...
 
Project Presentation on Data WareHouse
Project Presentation on Data WareHouseProject Presentation on Data WareHouse
Project Presentation on Data WareHouse
 
The Path to Data and Analytics Modernization
The Path to Data and Analytics ModernizationThe Path to Data and Analytics Modernization
The Path to Data and Analytics Modernization
 
Oracle business intelligence enterprise edition 11g
Oracle business intelligence enterprise edition 11gOracle business intelligence enterprise edition 11g
Oracle business intelligence enterprise edition 11g
 
Best practice strategies to clean up and maintain your database with Hether G...
Best practice strategies to clean up and maintain your database with Hether G...Best practice strategies to clean up and maintain your database with Hether G...
Best practice strategies to clean up and maintain your database with Hether G...
 
Software AG’s webMethods Integration Cloud: Integrate Cloud Apps with ease
Software AG’s webMethods Integration Cloud: Integrate Cloud Apps with ease Software AG’s webMethods Integration Cloud: Integrate Cloud Apps with ease
Software AG’s webMethods Integration Cloud: Integrate Cloud Apps with ease
 
ETL VS ELT.pdf
ETL VS ELT.pdfETL VS ELT.pdf
ETL VS ELT.pdf
 
What is big data?
What is big data?What is big data?
What is big data?
 
Data Quality Dashboards
Data Quality DashboardsData Quality Dashboards
Data Quality Dashboards
 
Big Data
Big DataBig Data
Big Data
 
Data quality and bi
Data quality and biData quality and bi
Data quality and bi
 
Oracle
OracleOracle
Oracle
 
SSIS control flow
SSIS control flowSSIS control flow
SSIS control flow
 
Modern Data Architecture
Modern Data ArchitectureModern Data Architecture
Modern Data Architecture
 
Accenture Oracle Business Group: Helping You Become a High Velocity Enterprise
Accenture Oracle Business Group: Helping You Become a High Velocity EnterpriseAccenture Oracle Business Group: Helping You Become a High Velocity Enterprise
Accenture Oracle Business Group: Helping You Become a High Velocity Enterprise
 
Driving Business Insights with a Modern Data Architecture AWS Summit SG 2017
Driving Business Insights with a Modern Data Architecture  AWS Summit SG 2017Driving Business Insights with a Modern Data Architecture  AWS Summit SG 2017
Driving Business Insights with a Modern Data Architecture AWS Summit SG 2017
 
Data Migration Strategies PowerPoint Presentation Slides
Data Migration Strategies PowerPoint Presentation SlidesData Migration Strategies PowerPoint Presentation Slides
Data Migration Strategies PowerPoint Presentation Slides
 

Similar a Compiere Warehouse Management System Documentation

Openbravo Retail Configuration Guide
Openbravo Retail Configuration GuideOpenbravo Retail Configuration Guide
Openbravo Retail Configuration GuideMehmet Demirel
 
Retail configuration guide openbravo
Retail configuration guide   openbravoRetail configuration guide   openbravo
Retail configuration guide openbravoAbul Khayer
 
Qs2 um en_11_wall_to_wall_accuracy_physical_count
Qs2 um en_11_wall_to_wall_accuracy_physical_countQs2 um en_11_wall_to_wall_accuracy_physical_count
Qs2 um en_11_wall_to_wall_accuracy_physical_countkhayer
 
Warehouse management openbravo
Warehouse management   openbravoWarehouse management   openbravo
Warehouse management openbravoAbul Khayer
 
SAP Material Managament Class 1 Sample
SAP Material Managament  Class 1 SampleSAP Material Managament  Class 1 Sample
SAP Material Managament Class 1 SampleRobert Joyce
 
Manual doc common ob_concepts&processes - openbravo
Manual doc common ob_concepts&processes - openbravoManual doc common ob_concepts&processes - openbravo
Manual doc common ob_concepts&processes - openbravoAbul Khayer
 
dynamics 365 IVR in finance and opertaions.docx
dynamics 365 IVR in finance and opertaions.docxdynamics 365 IVR in finance and opertaions.docx
dynamics 365 IVR in finance and opertaions.docxssuseref06b1
 
Feature list of openbravo for distribution business
Feature list of openbravo for distribution businessFeature list of openbravo for distribution business
Feature list of openbravo for distribution businessAbul Khayer
 
Implementation Training Guide
Implementation Training GuideImplementation Training Guide
Implementation Training Guideboxcarcentral
 
Automated Restaurant System (Command Design Pattern)PROBLEMY.docx
Automated Restaurant System (Command Design Pattern)PROBLEMY.docxAutomated Restaurant System (Command Design Pattern)PROBLEMY.docx
Automated Restaurant System (Command Design Pattern)PROBLEMY.docxrock73
 
Inventory in Oracle apps
Inventory in Oracle apps Inventory in Oracle apps
Inventory in Oracle apps gbalagee
 
Chapter 07-software-using theinstancetool
Chapter 07-software-using theinstancetoolChapter 07-software-using theinstancetool
Chapter 07-software-using theinstancetooljps619
 
Tally.Erp 9 Job Costing Ver 1.0
Tally.Erp 9 Job Costing Ver 1.0Tally.Erp 9 Job Costing Ver 1.0
Tally.Erp 9 Job Costing Ver 1.0ravi78
 
Sap sd question
Sap sd questionSap sd question
Sap sd questionAmit Gupta
 
Sap sd question
Sap sd questionSap sd question
Sap sd questionAmit Gupta
 
Sap Sd Sample Questions
Sap Sd Sample QuestionsSap Sd Sample Questions
Sap Sd Sample Questionsraheemkhan4u
 

Similar a Compiere Warehouse Management System Documentation (20)

Openbravo Retail Configuration Guide
Openbravo Retail Configuration GuideOpenbravo Retail Configuration Guide
Openbravo Retail Configuration Guide
 
Retail configuration guide openbravo
Retail configuration guide   openbravoRetail configuration guide   openbravo
Retail configuration guide openbravo
 
Qs2 um en_11_wall_to_wall_accuracy_physical_count
Qs2 um en_11_wall_to_wall_accuracy_physical_countQs2 um en_11_wall_to_wall_accuracy_physical_count
Qs2 um en_11_wall_to_wall_accuracy_physical_count
 
Warehouse management openbravo
Warehouse management   openbravoWarehouse management   openbravo
Warehouse management openbravo
 
SAP Material Managament Class 1 Sample
SAP Material Managament  Class 1 SampleSAP Material Managament  Class 1 Sample
SAP Material Managament Class 1 Sample
 
Manual doc common ob_concepts&processes - openbravo
Manual doc common ob_concepts&processes - openbravoManual doc common ob_concepts&processes - openbravo
Manual doc common ob_concepts&processes - openbravo
 
PI Training
PI TrainingPI Training
PI Training
 
dynamics 365 IVR in finance and opertaions.docx
dynamics 365 IVR in finance and opertaions.docxdynamics 365 IVR in finance and opertaions.docx
dynamics 365 IVR in finance and opertaions.docx
 
Feature list of openbravo for distribution business
Feature list of openbravo for distribution businessFeature list of openbravo for distribution business
Feature list of openbravo for distribution business
 
Implementation Training Guide
Implementation Training GuideImplementation Training Guide
Implementation Training Guide
 
Automated Restaurant System (Command Design Pattern)PROBLEMY.docx
Automated Restaurant System (Command Design Pattern)PROBLEMY.docxAutomated Restaurant System (Command Design Pattern)PROBLEMY.docx
Automated Restaurant System (Command Design Pattern)PROBLEMY.docx
 
Inventory in Oracle apps
Inventory in Oracle apps Inventory in Oracle apps
Inventory in Oracle apps
 
Practical questions
Practical questionsPractical questions
Practical questions
 
Chapter 07-software-using theinstancetool
Chapter 07-software-using theinstancetoolChapter 07-software-using theinstancetool
Chapter 07-software-using theinstancetool
 
Tally.Erp 9 Job Costing Ver 1.0
Tally.Erp 9 Job Costing Ver 1.0Tally.Erp 9 Job Costing Ver 1.0
Tally.Erp 9 Job Costing Ver 1.0
 
Sap sd question
Sap sd questionSap sd question
Sap sd question
 
Sap sd question
Sap sd questionSap sd question
Sap sd question
 
Getting Started With Valuate by REFM
Getting Started With Valuate by REFMGetting Started With Valuate by REFM
Getting Started With Valuate by REFM
 
Sellers Guide
Sellers GuideSellers Guide
Sellers Guide
 
Sap Sd Sample Questions
Sap Sd Sample QuestionsSap Sd Sample Questions
Sap Sd Sample Questions
 

Último

5 Signs You Need a Fashion PLM Software.pdf
5 Signs You Need a Fashion PLM Software.pdf5 Signs You Need a Fashion PLM Software.pdf
5 Signs You Need a Fashion PLM Software.pdfWave PLM
 
Hand gesture recognition PROJECT PPT.pptx
Hand gesture recognition PROJECT PPT.pptxHand gesture recognition PROJECT PPT.pptx
Hand gesture recognition PROJECT PPT.pptxbodapatigopi8531
 
The Real-World Challenges of Medical Device Cybersecurity- Mitigating Vulnera...
The Real-World Challenges of Medical Device Cybersecurity- Mitigating Vulnera...The Real-World Challenges of Medical Device Cybersecurity- Mitigating Vulnera...
The Real-World Challenges of Medical Device Cybersecurity- Mitigating Vulnera...ICS
 
Unlocking the Future of AI Agents with Large Language Models
Unlocking the Future of AI Agents with Large Language ModelsUnlocking the Future of AI Agents with Large Language Models
Unlocking the Future of AI Agents with Large Language Modelsaagamshah0812
 
W01_panagenda_Navigating-the-Future-with-The-Hitchhikers-Guide-to-Notes-and-D...
W01_panagenda_Navigating-the-Future-with-The-Hitchhikers-Guide-to-Notes-and-D...W01_panagenda_Navigating-the-Future-with-The-Hitchhikers-Guide-to-Notes-and-D...
W01_panagenda_Navigating-the-Future-with-The-Hitchhikers-Guide-to-Notes-and-D...panagenda
 
Active Directory Penetration Testing, cionsystems.com.pdf
Active Directory Penetration Testing, cionsystems.com.pdfActive Directory Penetration Testing, cionsystems.com.pdf
Active Directory Penetration Testing, cionsystems.com.pdfCionsystems
 
Reassessing the Bedrock of Clinical Function Models: An Examination of Large ...
Reassessing the Bedrock of Clinical Function Models: An Examination of Large ...Reassessing the Bedrock of Clinical Function Models: An Examination of Large ...
Reassessing the Bedrock of Clinical Function Models: An Examination of Large ...harshavardhanraghave
 
The Ultimate Test Automation Guide_ Best Practices and Tips.pdf
The Ultimate Test Automation Guide_ Best Practices and Tips.pdfThe Ultimate Test Automation Guide_ Best Practices and Tips.pdf
The Ultimate Test Automation Guide_ Best Practices and Tips.pdfkalichargn70th171
 
Diamond Application Development Crafting Solutions with Precision
Diamond Application Development Crafting Solutions with PrecisionDiamond Application Development Crafting Solutions with Precision
Diamond Application Development Crafting Solutions with PrecisionSolGuruz
 
Tech Tuesday-Harness the Power of Effective Resource Planning with OnePlan’s ...
Tech Tuesday-Harness the Power of Effective Resource Planning with OnePlan’s ...Tech Tuesday-Harness the Power of Effective Resource Planning with OnePlan’s ...
Tech Tuesday-Harness the Power of Effective Resource Planning with OnePlan’s ...OnePlan Solutions
 
HR Software Buyers Guide in 2024 - HRSoftware.com
HR Software Buyers Guide in 2024 - HRSoftware.comHR Software Buyers Guide in 2024 - HRSoftware.com
HR Software Buyers Guide in 2024 - HRSoftware.comFatema Valibhai
 
Unveiling the Tech Salsa of LAMs with Janus in Real-Time Applications
Unveiling the Tech Salsa of LAMs with Janus in Real-Time ApplicationsUnveiling the Tech Salsa of LAMs with Janus in Real-Time Applications
Unveiling the Tech Salsa of LAMs with Janus in Real-Time ApplicationsAlberto González Trastoy
 
Optimizing AI for immediate response in Smart CCTV
Optimizing AI for immediate response in Smart CCTVOptimizing AI for immediate response in Smart CCTV
Optimizing AI for immediate response in Smart CCTVshikhaohhpro
 
How To Use Server-Side Rendering with Nuxt.js
How To Use Server-Side Rendering with Nuxt.jsHow To Use Server-Side Rendering with Nuxt.js
How To Use Server-Side Rendering with Nuxt.jsAndolasoft Inc
 
SyndBuddy AI 2k Review 2024: Revolutionizing Content Syndication with AI
SyndBuddy AI 2k Review 2024: Revolutionizing Content Syndication with AISyndBuddy AI 2k Review 2024: Revolutionizing Content Syndication with AI
SyndBuddy AI 2k Review 2024: Revolutionizing Content Syndication with AIABDERRAOUF MEHENNI
 
How To Troubleshoot Collaboration Apps for the Modern Connected Worker
How To Troubleshoot Collaboration Apps for the Modern Connected WorkerHow To Troubleshoot Collaboration Apps for the Modern Connected Worker
How To Troubleshoot Collaboration Apps for the Modern Connected WorkerThousandEyes
 
DNT_Corporate presentation know about us
DNT_Corporate presentation know about usDNT_Corporate presentation know about us
DNT_Corporate presentation know about usDynamic Netsoft
 

Último (20)

5 Signs You Need a Fashion PLM Software.pdf
5 Signs You Need a Fashion PLM Software.pdf5 Signs You Need a Fashion PLM Software.pdf
5 Signs You Need a Fashion PLM Software.pdf
 
Hand gesture recognition PROJECT PPT.pptx
Hand gesture recognition PROJECT PPT.pptxHand gesture recognition PROJECT PPT.pptx
Hand gesture recognition PROJECT PPT.pptx
 
The Real-World Challenges of Medical Device Cybersecurity- Mitigating Vulnera...
The Real-World Challenges of Medical Device Cybersecurity- Mitigating Vulnera...The Real-World Challenges of Medical Device Cybersecurity- Mitigating Vulnera...
The Real-World Challenges of Medical Device Cybersecurity- Mitigating Vulnera...
 
Unlocking the Future of AI Agents with Large Language Models
Unlocking the Future of AI Agents with Large Language ModelsUnlocking the Future of AI Agents with Large Language Models
Unlocking the Future of AI Agents with Large Language Models
 
W01_panagenda_Navigating-the-Future-with-The-Hitchhikers-Guide-to-Notes-and-D...
W01_panagenda_Navigating-the-Future-with-The-Hitchhikers-Guide-to-Notes-and-D...W01_panagenda_Navigating-the-Future-with-The-Hitchhikers-Guide-to-Notes-and-D...
W01_panagenda_Navigating-the-Future-with-The-Hitchhikers-Guide-to-Notes-and-D...
 
Active Directory Penetration Testing, cionsystems.com.pdf
Active Directory Penetration Testing, cionsystems.com.pdfActive Directory Penetration Testing, cionsystems.com.pdf
Active Directory Penetration Testing, cionsystems.com.pdf
 
Reassessing the Bedrock of Clinical Function Models: An Examination of Large ...
Reassessing the Bedrock of Clinical Function Models: An Examination of Large ...Reassessing the Bedrock of Clinical Function Models: An Examination of Large ...
Reassessing the Bedrock of Clinical Function Models: An Examination of Large ...
 
Vip Call Girls Noida ➡️ Delhi ➡️ 9999965857 No Advance 24HRS Live
Vip Call Girls Noida ➡️ Delhi ➡️ 9999965857 No Advance 24HRS LiveVip Call Girls Noida ➡️ Delhi ➡️ 9999965857 No Advance 24HRS Live
Vip Call Girls Noida ➡️ Delhi ➡️ 9999965857 No Advance 24HRS Live
 
Microsoft AI Transformation Partner Playbook.pdf
Microsoft AI Transformation Partner Playbook.pdfMicrosoft AI Transformation Partner Playbook.pdf
Microsoft AI Transformation Partner Playbook.pdf
 
The Ultimate Test Automation Guide_ Best Practices and Tips.pdf
The Ultimate Test Automation Guide_ Best Practices and Tips.pdfThe Ultimate Test Automation Guide_ Best Practices and Tips.pdf
The Ultimate Test Automation Guide_ Best Practices and Tips.pdf
 
Diamond Application Development Crafting Solutions with Precision
Diamond Application Development Crafting Solutions with PrecisionDiamond Application Development Crafting Solutions with Precision
Diamond Application Development Crafting Solutions with Precision
 
Call Girls In Mukherjee Nagar 📱 9999965857 🤩 Delhi 🫦 HOT AND SEXY VVIP 🍎 SE...
Call Girls In Mukherjee Nagar 📱  9999965857  🤩 Delhi 🫦 HOT AND SEXY VVIP 🍎 SE...Call Girls In Mukherjee Nagar 📱  9999965857  🤩 Delhi 🫦 HOT AND SEXY VVIP 🍎 SE...
Call Girls In Mukherjee Nagar 📱 9999965857 🤩 Delhi 🫦 HOT AND SEXY VVIP 🍎 SE...
 
Tech Tuesday-Harness the Power of Effective Resource Planning with OnePlan’s ...
Tech Tuesday-Harness the Power of Effective Resource Planning with OnePlan’s ...Tech Tuesday-Harness the Power of Effective Resource Planning with OnePlan’s ...
Tech Tuesday-Harness the Power of Effective Resource Planning with OnePlan’s ...
 
HR Software Buyers Guide in 2024 - HRSoftware.com
HR Software Buyers Guide in 2024 - HRSoftware.comHR Software Buyers Guide in 2024 - HRSoftware.com
HR Software Buyers Guide in 2024 - HRSoftware.com
 
Unveiling the Tech Salsa of LAMs with Janus in Real-Time Applications
Unveiling the Tech Salsa of LAMs with Janus in Real-Time ApplicationsUnveiling the Tech Salsa of LAMs with Janus in Real-Time Applications
Unveiling the Tech Salsa of LAMs with Janus in Real-Time Applications
 
Optimizing AI for immediate response in Smart CCTV
Optimizing AI for immediate response in Smart CCTVOptimizing AI for immediate response in Smart CCTV
Optimizing AI for immediate response in Smart CCTV
 
How To Use Server-Side Rendering with Nuxt.js
How To Use Server-Side Rendering with Nuxt.jsHow To Use Server-Side Rendering with Nuxt.js
How To Use Server-Side Rendering with Nuxt.js
 
SyndBuddy AI 2k Review 2024: Revolutionizing Content Syndication with AI
SyndBuddy AI 2k Review 2024: Revolutionizing Content Syndication with AISyndBuddy AI 2k Review 2024: Revolutionizing Content Syndication with AI
SyndBuddy AI 2k Review 2024: Revolutionizing Content Syndication with AI
 
How To Troubleshoot Collaboration Apps for the Modern Connected Worker
How To Troubleshoot Collaboration Apps for the Modern Connected WorkerHow To Troubleshoot Collaboration Apps for the Modern Connected Worker
How To Troubleshoot Collaboration Apps for the Modern Connected Worker
 
DNT_Corporate presentation know about us
DNT_Corporate presentation know about usDNT_Corporate presentation know about us
DNT_Corporate presentation know about us
 

Compiere Warehouse Management System Documentation

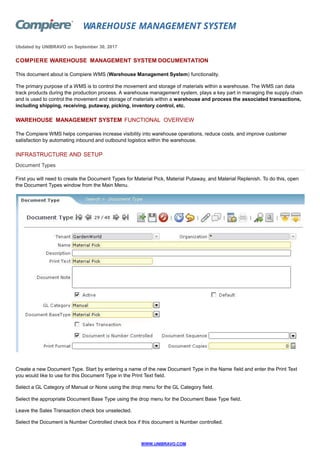
  • 1. WAREHOUSE MANAGEMENT SYSTEM Ubdated by UNIBRAVO on September 30, 2017 COMPIERE WAREHOUSE MANAGEMENT SYSTEM DOCUMENTATION This document about is Compiere WMS (Warehouse Management System) functionality. The primary purpose of a WMS is to control the movement and storage of materials within a warehouse. The WMS can data track products during the production process. A warehouse management system, plays a key part in managing the supply chain and is used to control the movement and storage of materials within a warehouse and process the associated transactions, including shipping, receiving, putaway, picking, inventory control, etc. WAREHOUSE MANAGEMENT SYSTEM FUNCTIONAL OVERVIEW The Compiere WMS helps companies increase visibility into warehouse operations, reduce costs, and improve customer satisfaction by automating inbound and outbound logistics within the warehouse. INFRASTRUCTURE AND SETUP Document Types First you will need to create the Document Types for Material Pick, Material Putaway, and Material Replenish. To do this, open the Document Types window from the Main Menu. Create a new Document Type. Start by entering a name of the new Document Type in the Name field and enter the Print Text you would like to use for this Document Type in the Print Text field. Select a GL Category of Manual or None using the drop menu for the GL Category field. Select the appropriate Document Base Type using the drop menu for the Document Base Type field. Leave the Sales Transaction check box unselected. Select the Document is Number Controlled check box if this document is Number controlled. WWW.UNIBRAVO.COM
  • 2. You may leave the Print Format field blank and the Document Sequence field blank. The Document Sequence determines the numbering of documents. You can leave the Document Copies set to a value of 0. Click 'Save' and add the additional Document Types using the steps listed above until all Document Types for Warehouse Management are in place. Once all document The Verify Document Types process ensures that there is a Document Type for all Document Base Types and creates the missing Period Controls for each Document Type. Verify Document Types Once you have added the Warehouse Management Document Types you must run the Verify Document Types process in Compiere. To run the Verify Document Types process, open the Verify Document Types process from the Main Menu and click 'Ok' to proceed with the verification. Once the process completes Compiere will return the results of the verification. Calendar Year and Period If you did not select Auto Period Control, you will need to you to define the Calendars that will be used for Reporting and Period Control. To do this open the Period for the new Document Types. The Calendar Year and Period window allows you to define the Calendars that will be used for Reporting and Period Control. Each Tenant has one or more Calendars. You can access the Calendar Year and Period window from the Main Menu. Once the correct Calendar Year is open; select the correct period from the periods tab and click the 'Edit' button to view the appropriate period in Single Record view. WWW.UNIBRAVO.COM
  • 3. From this point click the Open/Close all button and select the Open Period action from the Period Action drop menu to open the period for all document types. Then click 'OK' to proceed. Compiere will complete the process and return the result of the Period Action update. To open the period for specific Document Types, select the appropriate Document Type from the Period Control tab. Print Form In order to print appropriate Warehouse Management documents you will also need to select the Print formats for Replenishment Task List, Cluster Pick Task List, Putaway Task List, and Order Pick Task List. Warehouse and Locators Currently locators allow up to three segments (Aisle, Bin and Level). This is now expanded to five segments (Aisle, Bay, Row, Position, and Bin). WWW.UNIBRAVO.COM
  • 4. The two new segments namely, Position and Bin are optional. However, if a value for Bin is entered, a value for Position would be mandatory. In other words, you cannot have a locator with a Bin and not a Position. There are two new fields available; one to represent the "Picking Sequence" and one to represent the "Putaway Sequence." These are used to print the pick list and putaway list with pick and putaway tasks in the optimal travel sequence in the warehouse. Each pick and putaway task is printed in the ascending pick and putaway sequence respectively. Picking Sequence and Putaway Sequence is defaulted to 0, and must be setup with the appropriate values. A new check box "Available to promise" has been introduced. If this flag is checked, the quantity of the product in the locator will be considered as on-hand, and available for reservation to sales orders and other demands. In addition, there is also another new check box "Available for allocation." If this flag is checked, the quantity of the product in the locator will be considered as on-hand, and will be available for allocation to sales orders and other demands. There is now a field available to represent the Stocking UOM (UOM - Unit of Measure). The stocking UOM of a locator is the UOM in which products will be stored in the locator. When putaway suggestions are generated, depending on another setting ("Maintain UOM Integrity" set to "Yes") described in a later section, the system will attempt to match the receipt UOM to the stocking UOM. There is also a field available to represent the picking UOM. When pick tasks are generated, depending on two other settings ("Maintain UOM Integrity" and "Allow Splitting") described in a later section, the system will either allocate products in multiples of the picking UOM or in its primary/base UOM. Picking UOM can be different from the stocking UOM. As a general rule, when setting up picking UOM, it should always be less than or equal to the stocking UOM. Example, if stocking UOM is 6-pack, the picking UOM should be 6-pack or lower such as Each. Note that if this setup is incorrect, the system will not produce the desired results. Two fields representing minimum and maximum stocking quantity are also available. They will be used for non-static locators (locators that do not have product assigned). The maximum stocking quantity field will represent the maximum quantity (in stocking UOM of the locator) of any product that can be stored in the locator. The minimum stocking quantity defined on the locator will not be used in the initial release of WMS. In the future, it will be used for replenishment of non-static locators. The minimum stocking quantity and the maximum stocking quantity are defaulted to 0 and must be setup with the appropriate values. An option to import locators and allied properties is provided to ensure ease of locator definition and setup. Product Locator Relationship Products can be assigned to locators from two windows. First, one or more products can be assigned to a locator from the product tab in the locator window. Second, a product can be assigned to one or more locators from the locator tab in the WWW.UNIBRAVO.COM
  • 5. product window. Once a product is assigned to a locator, the locator becomes fixed for the product (and is not floating anymore). The minimum stocking quantity and the maximum stocking quantity can also be defined specifically for the product. The maximum stocking quantity field will represent the maximum quantity (in stocking UOM of the locator) of the product that can be stored in the locator. The minimum stocking quantity value will represent the minimum threshold below which the product will be considered for replenishment. Note that any reference to the term "replenishment" indicates replenishing product(s) from one locator to another within the warehouse. If the on-hand quantity falls below the specified minimum, the product in the locator is eligible for replenishment. The minimum stocking quantity and the maximum stocking quantity are defaulted to 0 and have to be setup with the appropriate values. Note: A locator can have only one stocking UOM and it is defined at the locator level. If the minimum and maximum stocking quantities are not defined at the product level, the system will use the ones defined at the locator level. Additionally, for WMS transactions the default locator field in the product definition window will be ignored and only those locators defined in the locator tab will be considered. The following represents product assignment to locator(s) from the locator window. The following represents product assignment to locator(s) from the product window. WWW.UNIBRAVO.COM
  • 6. Locator Display on different User Interfaces The display of locators in the Web UI allows you to enter either the locator name or the locator segment combination. All WMS UIs display the locator segment combination with the delimiter in addition to the locator name. All WMS UIs allow the selection of locators based on various query criteria shown as follows: WWW.UNIBRAVO.COM
  • 7. Once a locator is selected, you can click on the "Locator Detail" button to view the contents of the locator, as well as the list of products assigned to the locator using the Product Locator Relationship. The following represents the Locator Detail Information window. Zones Zones are a grouping of locators. Compiere now allows you to define zones to achieve various business flows. The Zone definition is not mandatory unless operations requiring zones need to be performed. This is to ensure that non WMS users are not impacted. It is possible to assign locators to zones either manually or through a process. A button, "Add Locator," is available on the Zone window to allow automated inclusion of locators into the zone. Appropriate parameters to execute this process may be: A source zone from which to copy the locators. A range of locators. Any segment may be used in the range. For example, you can specify a range of rows 1 through 30. In this case, irrespective of the other segments, all Locators that have a row between 1 and 30 will be included. If neither a source zone, nor a range of locators is specified, all locators in the warehouse will be included in the zone. WWW.UNIBRAVO.COM
  • 8. For all zones, the "Available to promise" check box is available. This can be used to default the values for the locators belonging to the zone. For all zones, the "Available for allocation" check box is available. This can be used to default the values for the locators belonging to the zone. The button "Synchronize Defaults" is used to default the values of the "Available to promise" and "Available for allocation" to all the locators in the zone. It is possible to change this setting at the locator level. A zone can be defined as a Static Zone or a non-Static Zone. A locator can exist in only one static zone at any point in time. Therefore, once a locator is added to a static zone, it cannot be added to any other static zone(s), without being deleted from its current static zone. When an attempt is made to add a locator to a static zone, there is a check to see if the locator is linked to any other static zone. Static zones are used for replenishment purposes. Non-static (floating) zones can have overlapping locators with other zones. The following represents the Zone window with the associated locators. The following represents the Add Locator process parameters. WWW.UNIBRAVO.COM
  • 9. Zone Relationships Zone relationships can be defined for replenishment purposes. Locators in a zone can be replenished from locators in a different zone (source zone) when the quantity of a product in a locator falls below its minimum stocking quantity. A Zone can have multiple source zones that can replenish it. Each zone relationship will have a Replenishment Sequence Number. When there is insufficient quantity in the first source zone, the next zone will be used as the replenishment source, in order of the Replenishment Sequence Number. Note: Only static zones can be used in defining zone relationships. Zone relationships can be defined in the Replenishment tab of the Zone window. The Following represents the Zone window. Product Cross References Currently in Compiere, you can specify the following fields for any product. Search Key Name UPC/EAN SKU Vendor Cross Reference (By Vendor) Customer Cross Reference (By Customer) On any window in Compiere, you can select a product by entering any of the above cross references in the same input field. The order of search will be in the order listed above. There is a possibility that the same vendor cross reference may be used by two different vendors for two different products. In such scenarios, all applicable matches will display in order to select the correct product. The following shows some of the product cross references that can be defined. WWW.UNIBRAVO.COM
  • 10. Purchased to Order Products Some products may not be kept in stock, and may be purchased (special-ordered) only when there is a Sales Order created for the product. Once these "Purchased to Order" products are received, they will only be allocated to the Sales Order that is linked to the Purchase Order. In other words, such products "cannot be stolen" by other Sales Orders created for the same product. This can be achieved by grouping such products into a product category and checking the "Purchased to Order" flag. This flag would get defaulted to the Products in this product category, and it can be overridden at the product level if desired. For "Purchased to Order" products, the allocation algorithm will look for a Purchase Order line that references the Sales Order line and check if there is any material received against the Purchase Order line. If there is material received, the Sales Order line will be eligible for allocation. WWW.UNIBRAVO.COM
  • 11. If there is no material received, the Sales Order line will not be eligible for allocation. The existing "Generate PO from Sales Order" process can be used to generate a Purchase Order based on a Sales Order. The following represents the Product Category window with the Purchased to Order flag. Note: The Product window also includes the Purchased to Order flag. The following represents the product window with the Purchased to Order flag. WWW.UNIBRAVO.COM
  • 12. Warehouse Management Execution Setup steps After reading this section, make sure that you read the next three sections that follow prior to using the system so that you get a full understanding of how warehouse management execution works. In order to setup putaway and allocation/picking execution algorithms, the following steps have to be followed: Step 1: Go to the "Warehouse Management Rule" window and setup putaway and allocation/picking rules. Step 2: Go to the "Warehouse Management Strategy" window and create strategies and place the rules created in step 1 in the sequence you want them to be executed. Step 3: Go to the "Warehouse Management Workbench" window and create strategy sets by placing the strategies created in step 2 in the sequence you want them to be executed (note that each strategy created in step 2 becomes a line within the strategy set and hence is known as a "strategy set line" within this window). In addition, for each strategy set line, setup the selection criteria that should be used to select that particular strategy. Finally, make the strategy set active. Note: Although you may create multiple strategy sets, only one can be active and used at any point in time. Warehouse Management Rule You can setup putaway and allocation/picking rules via the "Warehouse Management Rule" window. A rule is an algorithm that is executed to obtain desired business results. Example of Putaway: Find a locator in a zone with the same product. WWW.UNIBRAVO.COM
  • 13. The following rules are supported for putaway: Find a fixed locator in the warehouse (sort by zone putaway sequence if exists followed by locator putaway sequence if exists). Find a fixed locator in a zone (sort by locator putaway sequence if exists). Find a non-static locator in the warehouse with the same product (sort by zone putaway sequence if exists followed by locator putaway sequence if exists). Find a non-static locator in a zone with the same product (sort by locator putaway sequence if exists). Find any empty non-static locator in the warehouse (sort by zone putaway sequence if exists followed by locator putaway sequence if exists). Find any empty non-static locator in a zone (sort by locator putaway sequence if exists). Find any locator with available capacity in the warehouse (sort by zone putaway sequence if exists followed by locator putaway sequence if exists). Find any locator with available capacity in a zone (sort by locator putaway sequence if exists). Hook for custom rule: You can create and enter a custom Java class that accepts a product and quantity as input and returns a list of locators. You can have any custom logic to derive the locators in this class. For more information, refer to the ExtendingtheWMSRulesEngine chapter of the Technical guide. Example of allocation/picking: Allocate product from a specific zone in the warehouse. The following rules are supported for allocation/picking: Find product in the warehouse (sort by zone picking sequence if exists followed by locator picking sequence if exists). Find product in a zone (sort by locator picking sequence if exists). Find product in the warehouse (sort by zone picking sequence followed by locator with the least available quantity of the product) - "Warehouse Pick to clean." Find product in a zone (sort by locator with the least available quantity of the product) - "Zone Pick to clean." WWW.UNIBRAVO.COM
  • 14. Hook for custom rule. For more information on custom rules, refer to the ExtendingtheWMSRulesEngine chapter of the Technical guide. At the rule level, you can select a flag "Maintain UOM Integrity." This controls how you want to handle the Unit of Measure during putaway and allocation/picking. Putaway: If Maintain UOM Integrity is checked, the system will ensure that the receipt UOM of the product matches the stocking UOM of the locator. For example, if the stocking UOM of a locator is 6-pack, and the rule has Maintain UOM integrity checked, then only product receipts with a UOM of 6-pack can be putaway into that locator. If Maintain UOM integrity is unchecked, any locator is fair game regardless of the stocking UOM of the locator. Allocation/Picking: If Maintain UOM Integrity is checked, allocations of product for picking is done in multiples of the picking UOM on the locator. For example, if the picking UOM of a locator is 6-pack and the required quantity on the sales order is 20 Eaches, and the rule has maintain UOM integrity checked, the system will allocate 3 6-packs from this locator (For the remaining quantity of 2 Eaches, the system may or may not find other satisfactory locators depending on another setup called "Allow Splitting" at the strategy level. See the next section for details). If Maintain UOM Integrity is unchecked, the picking UOM of the locator is disregarded and the system will allocate from any valid locator and the pick task will be generated in the product UOM. Warehouse Management Strategy You can setup putaway and allocation/picking strategies via the "Warehouse Management Strategy" window. A strategy is a collection of rules that are laid out in sequence for execution one after the other. You typically start with the most restrictive rule and then expand on to the lenient ones. Example of Putaway Strategy: Rule 1: Putaway to a forward pick zone, Rule 2: Putaway to a stocking zone. Example of Allocation/Picking strategy: Rule 1: Allocate from a forward picking zone, Rule 2: Allocate from a zone that has stocked product in UOM of Case, Rule 3: Allocate from a zone that has stocked product in UOM of pallet. WWW.UNIBRAVO.COM
  • 15. At the strategy level, you can select a flag "Allow Splitting." Putaway: If Allow Splitting is checked, in the event that a certain quantity of a product in the receipt UOM cannot be putaway in its entirety into a single locator with the same stocking UOM, the system will split the quantity of the product in multiples of the receipt UOM and attempt to find another locator with the same stocking UOM as the receipt UOM. For example, if 5 6-packs of a product was received and only 4 6-packs can be putaway into a locator with a stocking UOM of 6-pack, the system will attempt to find another locator with a stocking UOM of 6-pack for the remaining 1 6-pack of this product. If Allow Splitting is unchecked, the system will attempt to find a single locator that has the same stocking UOM as the receipt UOM that can house the quantity of the product in its entirety. Allocation/Picking: If Allow Splitting is checked, in the event that a certain quantity of a product cannot be allocated in its entirety in the picking UOM setup on the locator, the system will split the quantity up to the quantity available in multiples of the picking UOM in this locator and then attempt to find another locator for the remaining quantity. For example, if the picking UOM defined for a locator was 6-pack and 20 Eaches (ideally 3 6-packs and 2 Eaches) of a product existed in it and if the sales order required 20 Eaches of the product, the system will allocate 3 6-packs (18 Eaches) from this locator and move on to a different locator to allocate the remaining 2 Eaches. If Allow Splitting is unchecked, the system will attempt to find a single locator from which the quantity of the product can be allocated in its entirety. Warehouse Management Workbench The "Warehouse Management Workbench" window is the user interface where all the strategies (with rules within them) that have been defined are consolidated for final usage in the WMS execution process. There are two key setups done via this workbench: 1) Creation of strategy sets and, 2) Setup of strategy selection criteria. 1. Strategy Sets You would define two types of strategy sets, one for putaway and another for picking/allocation as shown here: The following represents a putaway strategy. WWW.UNIBRAVO.COM
  • 16. The following represents a picking/allocation strategy. A strategy set is a collection of strategies (each strategy defined earlier is selected as a strategy set line in this UI) that is executed to get desired results for putaway and allocation/picking. Strategies are added in sequence one after the other within a strategy set. A check box called "Evaluate all strategies" is provided in the workbench. If this check box is unchecked, the system will evaluate one rule after the other within a valid strategy until it finds a rule that can get a putaway locator or allocate product. The evaluation process terminates with the last rule within the strategy. If the check box is checked, the system will evaluate all rules within a valid strategy and if all the rules fail or some rules partially succeed to find a result it will move to the next valid strategy for evaluation until it finds a successful result. It will move on to subsequent valid strategies until it finds a conforming result. If no valid result is found, it will perform the following: Picking/Allocation: Partial/No allocation will be performed on the sales order line based on the shipping rule chosen. At a later time in the business flow (after shipment), the sales order line may be adjusted or left as-is. Putaway: On the Warehouse Management Workbench, for strategy sets of type "Material putaway," you can define a locator. If this locator is defined, when all of the putaway strategies and allied rules fail, the system would return this locator as the putaway locator. This is defined as a fallback option. If this locator is not setup, the system would not return a result if it cannot find a putaway locator. 2. Strategy (set line) selection criteria For each strategy, you would define selection criteria that would be used to select one strategy over the other when being evaluated. The strategy selection criteria are as follows: Putaway: Product, product category, source zone, source locator, business partner, business partner group. Picking/Allocation: Product, product category, destination zone, destination locator, business partner, business partner group. WWW.UNIBRAVO.COM
  • 17. Order Type Group You can group Order types into order type groups. During wave planning (see wave planning section for more details on wave planning), when an order type group is specified, all order types within this group are retrieved for processing. Furthermore, you can provide weightage for each Order Type in the group. During wave planning, if the wave sort criteria has weightage as an option in it, the order lines are sorted by it. The following represents the Order Type Group window. Wave Sort Criteria You can create various combinations of sort criteria for order lines to be processed in a wave. In the Wave sort criteria window, you would create one or more sort criteria lines, specify which criteria precedes which other criteria by specifying a sequence and then choose if the criteria should be executed in an ascending or descending order. The following represents the wave sort criteria window. WWW.UNIBRAVO.COM
  • 18. The following shows the list of options available for sorting. Disallowing Negative Inventory and enabling WMS You have the option to prevent negative Inventory at the Warehouse level in Compiere. If this option is checked, it will not be possible to do allocations or shipments of any kind if the on-hand quantity goes to zero. The "Force" option in the shipping rule will be disabled. This constraint is enforced at the locator level. It will not be possible for the on-hand quantity in the locator to go negative. By default, the option will be unchecked thereby allowing negative inventory. Once there are transactions leading to negative quantities, this option cannot be changed to "Disallow negative inventory" unless the system is cleared of all negative balances. In addition, a WMS enabled check box is provided for WMS related transactions. If this check box is checked, you can perform WMS transaction. If unchecked, you cannot perform WMS transactions. Note: If the disallow negative inventory flag is unchecked, you will not be able to check the WMS enabled flag and thereby will be unable to perform WMS transactions. At the warehouse level, you can also setup default receiving and staging locators. These locators will be displayed in appropriate inbound and outbound UIs when performing transactions or running processes. It can be overridden at anytime at WWW.UNIBRAVO.COM
  • 19. the transaction or the process level. The following represents the Warehouse and Locator window with the Disallow Negative Inventory flag. Product Inquiry/Query A User Interface that can display a normalized view of inventory within or across warehouses is provided. It displays inventory in its various states such as on-hand and allocated. Warehouse Tasks/Task List The WMS can generate three types of tasks. In inbound operations, putaway tasks are generated. In outbound operations picking tasks are generated are generated. In warehousing operations replenishment tasks are generated. These generated tasks can be printed out as task lists and handed out to operators for execution. Each task is basically a move operation with a product, a source locator, a destination locator and the quantity to be moved and the UOM associated with the quantity. The document type will indicate whether the task is a putaway task, a pick task or a replenishment task. The document action "Prepare" will set the task to a status of "In Progress." The document action "Complete" will actually result in the update of on-hand quantity - depleting the specified quantity from the source locator, and adding it to the destination locator. At any time, an operator can be assigned to the task using the "Operator" field. The Source Locator, Destination Locator, and Quantity fields are populated by the "Generate Putaway", "Release Wave" and "Generate Replenishment" processes. These fields cannot be updated by the user. Under normal circumstances, the Actual Source Locator, Actual Destination Locator, and Actual Quantity fields are the same as the corresponding suggested fields. In case of exceptions, you can change the Actual From Locator, Actual To Locator and the Actual Quantity to reflect the actual task performed in the warehouse. The movement quantity is derived from the actual quantity in the product UOM. Under some circumstances, the operator may need to split a task. For example, in the case of a putaway task, if the quantity does not entirely fit into the destination locator, the operator may decide to putaway some quantity in a different locator. In this case, the task can be split into two tasks by clicking on the "Split task" button. In this case, the target quantity on the original task remains unchanged, but the target quantity in the new task is set to 0. The actual quantities on both tasks will need to be updated to the actual quantity moved. When a task is completed, the quantity entered is depleted from the source locator and added to the destination locator. WWW.UNIBRAVO.COM
  • 20. If the quantity entered is less than the actual quantity, then the additional allocated quantity needs to be unallocated. If there is an open shipment for the order associated with the task, there will be a new line added to it for the order line. If there is no open shipment for the order, a new one will be created. Tasks can be grouped into Warehouse Task Lists. Each task list is basically a group of tasks that can be printed and assigned to an operator. Warehouse Task lists will be automatically generated as part of the "Generate Putaway", "Release Wave" and "Generate Replenishment" processes. You can print/re-print these task lists. The following represents the Warehouse Task List window. The following represents a single Warehouse Task window: The following represents a sample Pick List printout for sales order picking. WWW.UNIBRAVO.COM
  • 21. The following represents a sample Pick List printout for cluster picking of sales orders. The following represents a sample Putaway List printout. The following represents a sample Replenishment List printout. WWW.UNIBRAVO.COM
  • 22. Task Management Once an operator has completed the assigned task list, the warehouse tasks need to be completed in Compiere. You have the following options to complete the tasks in the task list: Query up each task in the "Warehouse Task" window, enter any changes and complete the task. Query up a group of tasks in the "Task Management" window and complete the group. The "Task Management" screen essentially helps you complete a group of tasks rather than having to complete each individual task. The tasks can be queried by entering the Task List No, or by entering some other criteria and clicking on the "Search" button. The screen will then show the tasks corresponding to the search criteria. If all the tasks were completed without any exceptions, you can select all tasks and click on the "Process" button to complete them. For any exceptions, you can enter the actual values (From Locator, To Locator and quantity) for that particular task before clicking on the Process button. The process button can also be used to void a set of chosen tasks. The appropriate document action (Completed or Void) will be chosen after clicking on the "Process" button. At a minimum, you will have to enter the task type or the task list number as query criteria. In addition, you can enter other criteria such as the date range the task list was generated on, and the Order Number. INBOUND OPERATIONS Streamlined Receiving with PO/RMA as Starting Point - Quick Receipt You can enter receipts using a streamlined, efficient window in Compiere. You also have the ability to enter a receipt with the PO as the starting point. Once the PO is entered, you are able to select from the list of available products from the PO. The UOM is defaulted to the UOM on the Purchase Order Line. If the received quantity exceeds the ordered quantity, an error is displayed.
  • 23. At any time, you can decide to cancel the entire set of entries. Once all entries are complete, simply click the "Create Receipt" button. This will create the Material Receipt document. The expected quantity will not be defaulted. Instead, you will be prompted to enter the quantity received. As lines are created, the Purchase Order number is copied from the previous line. The following represents the Quick Receipt window (Single Record view.) Streamlined Receiving with Product as Starting Point - Product based Receipt You can enter receipts using a streamlined, efficient window in Compiere. You also have the ability to enter a receipt with the Product as the starting point. Once the Product is entered, you are able to select from the list of available POs that contain the product. The UOM is defaulted to the UOM on the Purchase Order Line. If the received quantity exceeds the ordered quantity, an error is displayed. At any time, you can decide to cancel the entire set of entries. Once all entries are complete, simply click the "Create Receipt" button. This will create the Material Receipt document. The expected quantity will not be defaulted. Instead, you will be prompted to enter the quantity received. As lines are created, the Purchase Order number is copied from the previous line. The following represents the Product based Receipt window (Single Record view.). WWW.UNIBRAVO.COM
  • 24. Express Receipt Based on Purchase Order You can perform a blanket receipt of all products in a purchase order via the Express receipt feature. When you scan/enter a purchase order number, all of the lines from the purchase order are copied to the receipt (similar to the Create From functionality on material receipts). You can complete the receipt by processing all the records at once. The following represents the Express Receipt window (Single Record view.) Receipt of products via Cross-Reference On any window in Compiere, you can select a product by entering any of the cross references mentioned in the 'Product Cross Reference' section. (Previously, you could only enter key, name, or UPC). Receipt of products into receiving Locators It is possible to receive products into receiving locators. When implementing, ensure that receiving locators have "Available to promise" checked and "Available for allocation" unchecked. In this scenario, the quantity in the receiving locator is available for soft reservation against Sales Orders. However, they will not be available for allocation (hard reservation). It is possible to also receive directly into stock locators (available to promise=yes and available for allocation = yes). In this scenario the product is available for reservation and allocation. Receiving locators would typically have infinite capacity and hence no capacity constraints apply. Movement of product between Locators It is possible to move products between locators. The availability of the product for reservation and allocation is governed by the corresponding flags on the locators. It will not be possible to move quantity from an "available" state to an "unavailable" state. In other words, if the goods have already been moved to a stock locator and are hence available for allocation", it will not be possible to move the goods back to a receiving locator. Capture Information about Operator Performing Receipt For every receipt, you can keep track of the operator performing the receipt. No special handling required for this - the created by column will keep track of this information. Disallow product Allocation Prior to Putaway This functionality can be achieved by setting the "Available for allocation" flag to "No" on the receiving locator. Exception Handling During Receiving When you enter a receiving transaction the following discrepancies may occur: The product entered may not be on the PO (in receipts with PO as the starting point) WWW.UNIBRAVO.COM
  • 25. There may be no PO for the product entered (in receipts with product as the starting point) The quantity entered may exceed the quantity ordered The following mechanisms have been added to handle the above exceptions: If the product entered is not on the PO, the operator needs to do one of the following: Enter a receipt without a PO and later match the receipt to a PO. Create a PO with the product on it. Similar steps need to be taken if there is no PO for the product. In both situations, the solution is a manual correction by the operator. If the quantity entered is less than quantity ordered, this is not an error condition, the product may arrive in a subsequent shipment, or may be in a different part of the same shipment (bottom of the same pallet, for example). If the quantity entered is greater than the quantity ordered, this is an error scenario. An error message will display. Ability to Generate Putaway Suggestions As goods are being received at the receiving dock, you can choose to perform a putaway once sufficient goods have been received. The "Generate Putaway" process is available for this purpose. The input to this process is a source Receiving locator zone or locator. In addition, a product or product category can be provided as input. This process will consider all the products in the source zone/locator, and evaluate the appropriate plan for those products. If a product or product category is chosen, then only the specified products are considered. It will generate a list of Warehouse Tasks that are grouped into a Task List (Putaway list). There is a Warehouse Task for each product with the suggested putaway location. The tasks are in "Prepared" status, by default. You can choose to even complete the task using the document action parameter. You can take a print out of the Task List (Putaway list) and perform the putaway. Once the putaway is completed by the operator, they can make any corrections if necessary using the Task Management screen. They can then complete the tasks, which will make the necessary adjustments in Inventory. While generating the warehouse tasks, the Generate Putaway process will look for any open tasks for the product. If there are any open tasks, it will not regenerate the task. If you want to regenerate Putaway Tasks (for example, if the Putaway rules have changed since the last time the Putaway list was generated), they will have to void the original tasks using the Task Management window. The following refers to the Generate Putaway process. Exception Handling During Putaway During putaway, the operator may find two kinds of exceptions. They had to choose a different locator (for example, if there was insufficient space in the suggested locator). WWW.UNIBRAVO.COM
  • 26. The quantity that was putaway is different from the quantity on the putaway list. In either situation, the operator must update the Warehouse task with the actual locator and quantity before completing it. OUTBOUND OPERATIONS Order Selection You can query demand lines from Sales Orders based on various criteria. The following selection criteria are seeded in Compiere: Warehouse: This is the warehouse where the allocation and picking is to be performed. Order No: This can be used to query a specific Sales Order. This can be used under special circumstances where you want to pick and ship only a specific Sales Order. Order Type: This can be used to query a specific Order Type. Order Type Group: Order type groups can be defined to group a number of order types. Order Priority: This can be used to query orders based on the priority setup on the Order header. Customer: This can be used to query all orders for a specific customer Date Ordered Range: This can be used to query all orders that were entered in a specified date range. Date Promised Range: This can be used to query all orders that were promised to be delivered in a specified date range. Freight Carrier: This can be used to query all orders with a specific freight carrier. Product: This can be used to query all orders for a specific product. Product Category : This can be used to query all orders for a specific product category Country: This is the country where the product is being shipped. More selection criteria can be added by the customer during implementation if they have different query criteria. Along with the selection criteria, you can specify how to order the results. You can setup wave sort criteria and choose one for the wave. The orders are sorted and returned based on the wave sort criteria. You can then manually select a subset of the rows via individual check boxes, or enter a number of rows to process (using the "Process rows" field). For the latter option, only the top rows up to the number of rows specified will be processed. You can optionally check the "Generate Pick List" flag. If checked, the chosen order lines will not only be checked for availability, but will also be allocated and a pick list will be generated. If unchecked, the chosen order lines will only be checked for availability at the warehouse level, and a wave will be generated containing those lines for which on hand is available. No allocations will be done, and a pick list will not be generated. This intermediate step will allow you to review the order lines before the allocation is done. If the generate pick list flag is checked, you can choose between two pick methods: Order Picking - the resulting tasks will be grouped by the sales order, and there will be one picklist generated per order Cluster Picking - you can specify the cluster size and the resulting tasks will be grouped into pick lists in groups of the cluster size. The sort order will be zone picking sequence followed by locator picking sequence. If a Shipping Rule is selected, it will override the shipping rule at the order level. If your intention is to process the records and create tasks, you should select a staging locator. The following represents the Wave Planning (Order Selection) window. WWW.UNIBRAVO.COM
  • 27. Release Wave Once waves have been created, you can query waves via query criteria such as wave number and creation date. You can use either 1) The summarized UI that will return orders as the resultant set, or 2) the detailed UI that will return order lines. You can select the order/order lines that you want and click on the "Process" button. This will create pick tasks and put them in appropriate pick lists. Alternatively, instead of selecting individual lines, you can specify the number of lines that will be processed and the system would allocate those lines and create appropriate pick tasks. Additionally, you can specify the cluster size and the destination locator (e.g. packing station or staging area). The following represents the release wave UI - detailed view. The following represents the release wave UI - summarized window. WWW.UNIBRAVO.COM
  • 28. Shipment Consolidation Sometimes shipments may need to be consolidated. For example, a number of shipments with a common country of destination may be consolidated on a single palette and then shipped. You can create a Consolidation Reference to represent such consolidations as shown below. Once the consolidation reference is created, it can be added to the Business Partner or the Business Partner Group. The setup at the Business Partner level overrides the setup at Business Partner Group level. For example, all shipments for Business Partners in Norway may be consolidated using a "Norway" consolidation reference, and all shipments for Business Partners in Finland may be consolidated using a "Finland" consolidation reference. The following represents the Business Partner window where the Consolidation Reference can be setup. After picking tasks are completed, corresponding shipments are automatically created. After Task Confirmation, you can navigate to the shipment management window to query up shipments and complete them. You can query based on various criteria such as consolidation reference, shipment number, order, priority, order type, date ordered, date promised, freight carrier and shipment creation date. The following represents the shipment management window. WWW.UNIBRAVO.COM
  • 29. WAREHOUSING OPERATIONS Zone Replenishment You can run a process to replenish zones based on the zone relationship setup. Inputs to this process will be the Warehouse and optionally, a zone. If the zone is unspecified, all zones for which a replenishment relationship is defined will be considered. If a zone is specified, that will be the only zone considered for replenishment. All the locators in the zone will be considered for replenishment. For any product linked to the locator, if the on-hand quantity is below the minimum, it will be picked up for replenishment. Once the products are identified, the source zones defined in the zone relationships window will be considered in the order of the Replenishment Sequence Number specified. If there is sufficient quantity for replenishment, a warehouse task is created for the product for the adequate quantity. The quantity is in the stocking UOM of the destination locator. The quantity is rounded off in the stocking UOM up to the maximum quantity specified on the destination locator. For example, if the maximum quantity for a locator is specified to be 20 Eachs for the product azalea bush, and the stocking UOM for the locator is 6-pack; then the locator will be replenished with 3 6- packs. The following represents the Generate Replenishment process. Inventory Views WWW.UNIBRAVO.COM
  • 30. You can currently query On-hand Quantity, Reserved Quantity and the Ordered Quantity for each storage record using the Storage Tab in the Warehouse and Locators tab. The Storage Tab is modified to also show the Quantity Allocated for each storage record. Aggregated quantities at the Locator or Warehouse level can be viewed by running the Storage Detail Report in the "Show Totals Only" mode. In addition, you can view this information in the Locator Info window. The following represents a view of the Storage Detail report layout that shows the On Hand Quantity and allocated quantity. IMPORT Locator Import A new interface table (I_Locator) has been created to enable you to import locators Similar to other import processes, you will have to create an excel spreadsheet that contains all the data they would like to import. You will then have to map the columns in the spreadsheet to the columns in the table by using an Import Format such as the one below. WWW.UNIBRAVO.COM
  • 31. You can run the "Import File Loader" process to import the file and load the interface table. You can then open the "Import Locator" window and click on the "Import Locator" button to import the records into the locator table. The following represents the "Import Locator" window.
  • 32. REPORTS Order Monitoring Report This report provides information about Sales Orders at various stages of the fulfillment cycle in the selected time period. The following information is shown in this report, for each day in the specified time period: Lines to Pick : The number of sales order lines for which pick tasks have been created, and goods have been allocated, and are awaiting pick Lines to Ship : The number of sales order lines which have been picked, and are awaiting shipment Lines Shipped : The number of sales order lines which have been shipped New Lines : The number of new sales order lines entered that day Lines Outstanding : The number of sales order lines which have not yet been allocated, and are still open. The following is a sample layout. WWW.UNIBRAVO.COM
  • 33. Handler Performance Report This report provides information about the number of pick, putaway and replenishment tasks completed by the operator (handler) in the selected time period. The following information is shown in this report: Operator : The operator who performed the warehouse task Trolleys Picked : The number of pick lists containing pick tasks performed by the operator Orders Picked : The number of Sales Orders for which picks were performed by the operator Order Lines Picked : The number of Sales Order lines for which picks were performed by the operator Lines Putaway : The number of putaway tasks performed by the operator Lines Replenished : The number of replenishment tasks performed by the operator The following represents the Handler Performance Report. Warehouse Stock Information Report This report provides product by product information about stock quantities on-hand, available and allocated. In addition, it provides consumption information over the past 7 days and the past 30 days. It then shows the days cover based on consumptions over the last 30 day period. The following information is shown in this report: On Hand Qty : The on-hand quantity of the product in the selected warehouse as of the report date Qty Allocation : The quantity of the product that is currently allocated and is awaiting shipment Qty Available : The quantity of the product that is not currently reserved, and is in a locator that has the property "Available to promise" enabled. Consumed Past 7 Days : The quantity of the product that was consumed in the last 7 days Consumed Past 30 Days : The quantity of the product that was consumed in the last 30 days Days Cover : The number of days for which there is sufficient quantity on-hand for fulfilling new orders, based on the rate of consumption over the last 30 day period. The following is a sample layout. WWW.UNIBRAVO.COM
  • 34. Locator Visits Report This report provides information about the number of visits a locator has experienced in a given period of time for a given product. The following information is shown in this report: Pick Visits : The number of times the locator was visited for purposes of picking. The pick could be for fulfilling a Sales Order line, or for replenishing another locator in the warehouse. Putaway Visits : The number of times the locator was visited for purposes of putaway. Replenishment Visits : The number of times the locator was visited for purposes of replenishment. Total Visits : The total number of visits to the locator for purposes of pick, putaway or replenishment. The following is a sample layout. Labels None WWW.UNIBRAVO.COM