SlideShare una empresa de Scribd logo
1 de 9
Descargar para leer sin conexión
Quick Guide to Photoshop CS6 - 1
Quick Guide to Photoshop CS6
This lesson will introduce fundamental tools and techniques for modifying images in Photoshop.
Opening and Re-sizing an Image
To bring an image into Photoshop for editing, go to the File menu and select Open.
Re-sizing Images:
Sometimes it may be necessary to create a smaller version of an image for use on a print
document or on the web.
It's best to start with a large, high-quality image and re-size it smaller to fit your needs.
Manipulating a low-quality image or increasing the size of a small image will reduce the overall
quality of your final image, which is especially noticable in print and at larger sizes.
To re-size an image, go to the Image menu and select Image Size.
In the "Pixel Dimensions" area, you may enter a different pixel amount for the width or height and
the other will proportionally adjust by default. If you do not want the proportions to automatically
adjust the other measurement, uncheck "Constrain Proportions".
Tip: If you don't know or don't require a specific pixel measurement, change the "pixels" dropdown
to "percent" and type in a percent smaller than 100% to make the image smaller. Remember,
always resize smaller!
Quick Guide to Photoshop CS6 - 2
Apply Adjustments to your Image
The Adjustments panel has a wide selection of image editing options. If you do not see the
Adjustments panel, go to the Window menu and click Adjustments.
Hover your cursor over each box to see the name of the effect. By using the following adjustments,
you can customize the intensity of the effects.
Row 1: Brightness and Contrast, Levels, Curves, Exposure, Vibrance
Row 2: Hue/Saturation, Color Balance, Black & White, Photo Filter, Channel Mixer, Color Lookup
Row 3: Invert, Posturize, Threshold, Gradient Map, Selective Color
Based on your choice of adjustment, the panel will display any options available for fine-tuning the
effect. Click on the top right icon of the panel to close this window.
Tip: How do I make my image sepia-toned, like an antique photograph?
1. Click on the Black and White icon from the Adjustments panel.
2. Check the "Tint" box.
3. Click the "Auto" button.
Quick Guide to Photoshop CS6 - 3
Working with Layers
As you add adjustments to your image, you'll notice that information is saved and stacked on top of
your original image in the Layers Panel. The order of your layers matter; each layer changes the
appearance of every layer underneath.
To show or hide layers, click the eye icons next to each layer.
To remove a layer from your image, select the layer and click the trash can icon.
Go Back in Time with the History Panel
To undo the most recent change to your image, go to the Edit menu and click "Undo" or "Step
Backward".
For more control of what steps you undo, including a list of all the changes you have made to the
image this session, use the History panel.
To display your History, go to the Window menu and choose "History".
Removing changes:
1. Select the edit you wish to undo in the list in the History panel.
2. Click the trash can icon.
3. In the pop-up dialog box "Delete state...?" select Yes.
Please note: any effects created after the effect you removed will also be undone as well!
Quick Guide to Photoshop CS6 - 4
Basic Photoshop Tools
The following are some basic tools for modifying your image in Photoshop:
Crop: Cuts the image down to a selected portion of the image, removing the unselected area.
Eraser: Remove parts of the image manually by clicking and dragging over the image. Be aware
of which layer you are in prior to using this tool, or you may be erasing part of the image you meant
to keep. If there are no layers beneath the one you are erasing, the background color will be
revealed.
Quick Guide to Photoshop CS6 - 5
Foreground and Background Colors: Change the colors by double-clicking on one of the boxes.
Switch the order of colors by clicking on the bent double-sided arrow.
Quick Mask: see the "Quick Mask Mode" section of this document for instructions on this feature.
Extracting the Subject of an Image
If your subject is a simple shape of straight lines, or if the subject has high contrast from the
background, try the easy-to-use Quick Selection Tool or Polygonal Lasso Tool to select your
subject.
While there are several methods for removing a intricate subject from an image with a complex
background, the following process is fast to learn and do even though it requires some patience.
Use the Magnetic Lasso Tool to trace the border of the subject to draw a custom selection.
1. Click and hold the Lasso Tool icon until a list of other lasso tools appears. Choose Magnetic
Lasso Tool from the list.
2. Check to make sure you have the correct layer selected - the one that contains your subject.
Zoom in if necessary to see the finer edges of your subject better.
3. Using the tail end of the lasso icon, click once where the edge of your subject meets the
background.
4. Slowly click and drag your cursor around the border of your image, tracing your way all around
the subject.
5. When you come to the first click point place you started, move the cursor so that you see a small
circle appear next to the cursor. When you see the circle, click once more. This completes the
selection.
Tip: If you using the lasso tool and mess up, click until a selection is made, then deselect. You can
deselect by using Command or Control + D or by going to Select > Deselect.
Quick Guide to Photoshop CS6 - 6
Quick Mask Mode
While you may have done your best to patiently manuver around the subject, you may have
accidently missed parts of the subject or selected a portion of the background. You can clean up
your lasso work using the Quick Mask tool.
1. Go to the Select menu and choose Inverse to change your selection to your background.
2. Click on the Quick Mask Mode tool. Notice how your subject turns red.
3. Use the Paintbrush tool to paint over the parts of the subject you missed. The paintbrushing
will add that area to your original selection. You may need to change your brush settings in
the top left menu bar to adjust the size and shape of your brush head.
4. Use the Eraser tool to erase the red that bleeds over into the background (the parts of the
background you accidently selected).
5. When you're done, click the Quick Mask icon again to leave this mode. Notice your selection
looks much better now!
Going the Extra Mile: Go to Select > Refine Edge for more advanced options for managing your
selection.
Try the following settings for a softer edge to your selection, or play with it on your own: Radius:
1.0; Smooth: 2; Feather: 1.0; Contrast: 0
Removing the Background
With your selection around the background of your image:
1. Double-click your Background layer and rename it. This removes the lock icon from the layer
and now we can remove the background. (Alternately, right-click the Background layer and
Quick Guide to Photoshop CS6 - 7
choose "Duplicate Layer..." to make a copy. We will remove the background from the copy and
hide the original image by clicking on the eye icon.)
2. With the correct layer selected, go the the Edit menu and choose Clear. The gray and white
checkered boxes indicate that the background is transparent.
3. To return your selection around your subject, Select > Inverse again.
Creating a new Image
Now that we've finished extracting our subject from its background, let's say that we want to create
a new image that includes our cut-out subject:
1. With your subject selected, go to the Edit menu and choose Copy, or Command or Control + C.
2. Go to the FIle menu, then choose New.
3. In the "New" dialog box, name your new image and specify a width and height by entering them
manually or choosing from a custom preset size. If you do not specify a size, it will be the size of
your copied subject by default.
4. Change the "Background Contents" drop-down to "transparent". The grey and white
checkered boxes indicate that the background is transparent.
5. Click OK.
6. Go to the Edit menu and choose Paste, or Command or Control + V.
Now you're ready to save this file.
Quick Guide to Photoshop CS6 - 8
Saving your Image
Go to File and choose Save As... to save your new image. Pay special attention to the file type you
select.
Tips:
• To ensure your file maintains its transparent background, save the file as a .gif or a .png
(PNG-24).
• Save multiple versions of your images to avoid overwriting your original.
Saving for the Web
Is your image for the web (or screen use) only? Use the Save for Web option:
1. Go to the File menu and choose Save for Web...
2. Choose your preferred file type from the drop-down and click the Save button.
Learn more about the Save for Web feature:
http://sixrevisions.com/web_design/comprehensive-guide-saving-images-for-web
Getting Help
Photoshop Workshops at St. Edward's University, sponsored by Instructional Technology:
Want more, in-depth training? We offer monthly Photoshop workshops and one-on-one training
sessions.
• Adobe Photoshop I - Selections and Layers: An introduction to the established standard in
digital photo editing, Adobe Photoshop. Learn about the interface and basic features as well
as a wide variety of options for selecting portions of an image. Also learn about the interaction
Quick Guide to Photoshop CS6 - 9
of layers and text.
• Adobe Photoshop II - Image Adjustment & Correction: Learn how to make digital prints look
their best using powerful image adjustment tools and restore photos with corrective tools.
• Web Graphics in Adobe Photoshop: Learn how to create and edit web-safe images for your
website.
• Photoshop Advanced Techniques: Learn how to deal with common problems such as
knocking out complex backgrounds and adjusting back-lit photos
• Photoshop Black & White Techniques: Learn how to use Photoshop to make black and white
photos look their best. This includes effective conversion from color to B&W. Also, learn about
restoring old photos.
Register online today at: http://frc.stedwards.edu/workshop
Need time to work on your projects with assistance from a Trainer? Come by the training room
during Innovation Creation Lounge hours.
Online Help from Adobe:
AdobeTV's "Getting Started with Photoshop CS6" videos:
http://tv.adobe.com/show/learn-photoshop-cs6
Adobe's Photoshop Help and Tutorials:
http://helpx.adobe.com/content/help/en/photoshop/topics.html
St. Edward's University Instructional Technology Training
http://think.stedwards.edu/computerhelp/training | training@stedwards.edu
Watch our screencasts online: http://www.youtube.com/StEdwardsITtraining
Image Credit: "An open pink lotus - some rain drops evident" by C. Frank Starmer
http://frank.itlab.us/photo_essays/wrapper.php?jan_30_2011_SBG.html
Available under Creative Commons BY-NC-SA 3.0 license:
creativecommons.org/licenses/by-nc-sa/3.0

Más contenido relacionado

La actualidad más candente

Introduction- The Basics of Photoshop CS6
Introduction- The Basics of Photoshop CS6Introduction- The Basics of Photoshop CS6
Introduction- The Basics of Photoshop CS6Crest TechnoSoft
 
Lesson 1 • Introduction to Photoshop
Lesson 1 • Introduction to PhotoshopLesson 1 • Introduction to Photoshop
Lesson 1 • Introduction to PhotoshopMarcio Sargento
 
Introduction to Corel Draw
Introduction to Corel DrawIntroduction to Corel Draw
Introduction to Corel DrawANUSUYA T K
 
Introduction to Adobe Illustrator
Introduction to Adobe IllustratorIntroduction to Adobe Illustrator
Introduction to Adobe IllustratorJin Castor
 
Introduction to visual basic programming
Introduction to visual basic programmingIntroduction to visual basic programming
Introduction to visual basic programmingRoger Argarin
 
Ms Paint Tutorial
Ms Paint TutorialMs Paint Tutorial
Ms Paint TutorialZ M
 
Introduction to figma
Introduction to figmaIntroduction to figma
Introduction to figmaHuyPhmNht2
 
Presentation on adobe photoshop® tools
Presentation on adobe photoshop® toolsPresentation on adobe photoshop® tools
Presentation on adobe photoshop® toolsHarshit Dave
 
Adobe illustrator 1
Adobe illustrator 1Adobe illustrator 1
Adobe illustrator 1ilaazmil2
 
Chapter1 c programming data types, variables and constants
Chapter1 c programming   data types, variables and constantsChapter1 c programming   data types, variables and constants
Chapter1 c programming data types, variables and constantsvinay arora
 
CREATING A NEW PUBLICATION IN PAGEMAKER
CREATING A NEW PUBLICATION IN PAGEMAKERCREATING A NEW PUBLICATION IN PAGEMAKER
CREATING A NEW PUBLICATION IN PAGEMAKERVENNILAV6
 
Session 2.2 photoshop interface
Session 2.2   photoshop interfaceSession 2.2   photoshop interface
Session 2.2 photoshop interfaceJohn Josef Jimenez
 
Basic computer skills
Basic computer skillsBasic computer skills
Basic computer skillsTHickox
 
Adobe photoshop cc keyboard shortcut
Adobe photoshop cc keyboard shortcutAdobe photoshop cc keyboard shortcut
Adobe photoshop cc keyboard shortcutJubair Ahmed Junjun
 
Basic computer maintenance
Basic computer maintenanceBasic computer maintenance
Basic computer maintenancegeepatty
 
Microsoft word basics ppt
Microsoft word basics pptMicrosoft word basics ppt
Microsoft word basics pptjdbutler13
 
Computer Troubleshooting
Computer TroubleshootingComputer Troubleshooting
Computer TroubleshootingLisa Hartman
 

La actualidad más candente (20)

Introduction- The Basics of Photoshop CS6
Introduction- The Basics of Photoshop CS6Introduction- The Basics of Photoshop CS6
Introduction- The Basics of Photoshop CS6
 
Lesson 1 • Introduction to Photoshop
Lesson 1 • Introduction to PhotoshopLesson 1 • Introduction to Photoshop
Lesson 1 • Introduction to Photoshop
 
Introduction to Corel Draw
Introduction to Corel DrawIntroduction to Corel Draw
Introduction to Corel Draw
 
Introduction to Adobe Illustrator
Introduction to Adobe IllustratorIntroduction to Adobe Illustrator
Introduction to Adobe Illustrator
 
Introduction to visual basic programming
Introduction to visual basic programmingIntroduction to visual basic programming
Introduction to visual basic programming
 
Ms Paint Tutorial
Ms Paint TutorialMs Paint Tutorial
Ms Paint Tutorial
 
Introduction to figma
Introduction to figmaIntroduction to figma
Introduction to figma
 
Presentation on adobe photoshop® tools
Presentation on adobe photoshop® toolsPresentation on adobe photoshop® tools
Presentation on adobe photoshop® tools
 
Adobe illustrator 1
Adobe illustrator 1Adobe illustrator 1
Adobe illustrator 1
 
Chapter1 c programming data types, variables and constants
Chapter1 c programming   data types, variables and constantsChapter1 c programming   data types, variables and constants
Chapter1 c programming data types, variables and constants
 
CREATING A NEW PUBLICATION IN PAGEMAKER
CREATING A NEW PUBLICATION IN PAGEMAKERCREATING A NEW PUBLICATION IN PAGEMAKER
CREATING A NEW PUBLICATION IN PAGEMAKER
 
Autocad
AutocadAutocad
Autocad
 
Basic Computer Training
Basic Computer TrainingBasic Computer Training
Basic Computer Training
 
Session 2.2 photoshop interface
Session 2.2   photoshop interfaceSession 2.2   photoshop interface
Session 2.2 photoshop interface
 
Basic computer skills
Basic computer skillsBasic computer skills
Basic computer skills
 
Basics of Photoshop Tutorial
Basics of Photoshop TutorialBasics of Photoshop Tutorial
Basics of Photoshop Tutorial
 
Adobe photoshop cc keyboard shortcut
Adobe photoshop cc keyboard shortcutAdobe photoshop cc keyboard shortcut
Adobe photoshop cc keyboard shortcut
 
Basic computer maintenance
Basic computer maintenanceBasic computer maintenance
Basic computer maintenance
 
Microsoft word basics ppt
Microsoft word basics pptMicrosoft word basics ppt
Microsoft word basics ppt
 
Computer Troubleshooting
Computer TroubleshootingComputer Troubleshooting
Computer Troubleshooting
 

Similar a 217 quick guide to photoshop cs6

adobephotoshop_frerking
adobephotoshop_frerking adobephotoshop_frerking
adobephotoshop_frerking Agung Yuwono
 
How To Cut Out An Image In Photoshop 2024
How To Cut Out An Image In Photoshop 2024How To Cut Out An Image In Photoshop 2024
How To Cut Out An Image In Photoshop 2024Zenith Clipping
 
Digital work station intro
Digital work station introDigital work station intro
Digital work station introWhitney Brooks
 
ETECH_WEEK7-Image-Manipulation-Techniques-1.pdf
ETECH_WEEK7-Image-Manipulation-Techniques-1.pdfETECH_WEEK7-Image-Manipulation-Techniques-1.pdf
ETECH_WEEK7-Image-Manipulation-Techniques-1.pdfbongsantiago96
 
Adobe photoshop cs6
Adobe photoshop cs6Adobe photoshop cs6
Adobe photoshop cs6Ila Azmil
 
Adobe photoshop cs6
Adobe photoshop cs6Adobe photoshop cs6
Adobe photoshop cs6ilaazmil2
 
Adobe photoshop cs6 tutorial
Adobe photoshop cs6 tutorialAdobe photoshop cs6 tutorial
Adobe photoshop cs6 tutorialAgung Yuwono
 
Menggunakan Radial blur
Menggunakan Radial blurMenggunakan Radial blur
Menggunakan Radial blurasyarifaisal
 
Image editing basics using PIXLR Editor
Image editing basics using PIXLR EditorImage editing basics using PIXLR Editor
Image editing basics using PIXLR EditorJohn Allan
 
Paths, Masks And Blend Modes
Paths, Masks And Blend ModesPaths, Masks And Blend Modes
Paths, Masks And Blend ModesShan
 

Similar a 217 quick guide to photoshop cs6 (20)

Photoshop basics
Photoshop basicsPhotoshop basics
Photoshop basics
 
Computer Science.pptx
Computer Science.pptxComputer Science.pptx
Computer Science.pptx
 
adobephotoshop_frerking
adobephotoshop_frerking adobephotoshop_frerking
adobephotoshop_frerking
 
Basic tutorials
Basic tutorialsBasic tutorials
Basic tutorials
 
Basic tutorials
Basic tutorialsBasic tutorials
Basic tutorials
 
How To Cut Out An Image In Photoshop 2024
How To Cut Out An Image In Photoshop 2024How To Cut Out An Image In Photoshop 2024
How To Cut Out An Image In Photoshop 2024
 
Writing ED material
Writing ED materialWriting ED material
Writing ED material
 
Cours photoshop
Cours photoshopCours photoshop
Cours photoshop
 
Digital work station intro
Digital work station introDigital work station intro
Digital work station intro
 
ETECH_WEEK7-Image-Manipulation-Techniques-1.pdf
ETECH_WEEK7-Image-Manipulation-Techniques-1.pdfETECH_WEEK7-Image-Manipulation-Techniques-1.pdf
ETECH_WEEK7-Image-Manipulation-Techniques-1.pdf
 
Photoshop
PhotoshopPhotoshop
Photoshop
 
Adobe photoshop cs6
Adobe photoshop cs6Adobe photoshop cs6
Adobe photoshop cs6
 
Adobe photoshop cs6
Adobe photoshop cs6Adobe photoshop cs6
Adobe photoshop cs6
 
Adobe photoshop cs6 tutorial
Adobe photoshop cs6 tutorialAdobe photoshop cs6 tutorial
Adobe photoshop cs6 tutorial
 
Menggunakan Radial blur
Menggunakan Radial blurMenggunakan Radial blur
Menggunakan Radial blur
 
Image editing basics using PIXLR Editor
Image editing basics using PIXLR EditorImage editing basics using PIXLR Editor
Image editing basics using PIXLR Editor
 
Tools
ToolsTools
Tools
 
GIMP BASICS by Aedam Ampongan
GIMP BASICS by Aedam AmponganGIMP BASICS by Aedam Ampongan
GIMP BASICS by Aedam Ampongan
 
Paths, Masks And Blend Modes
Paths, Masks And Blend ModesPaths, Masks And Blend Modes
Paths, Masks And Blend Modes
 
Photoshop basics
Photoshop basicsPhotoshop basics
Photoshop basics
 

Último

(PRIYA) Rajgurunagar Call Girls Just Call 7001035870 [ Cash on Delivery ] Pun...
(PRIYA) Rajgurunagar Call Girls Just Call 7001035870 [ Cash on Delivery ] Pun...(PRIYA) Rajgurunagar Call Girls Just Call 7001035870 [ Cash on Delivery ] Pun...
(PRIYA) Rajgurunagar Call Girls Just Call 7001035870 [ Cash on Delivery ] Pun...ranjana rawat
 
VIP Call Girls Service Hitech City Hyderabad Call +91-8250192130
VIP Call Girls Service Hitech City Hyderabad Call +91-8250192130VIP Call Girls Service Hitech City Hyderabad Call +91-8250192130
VIP Call Girls Service Hitech City Hyderabad Call +91-8250192130Suhani Kapoor
 
Introduction and different types of Ethernet.pptx
Introduction and different types of Ethernet.pptxIntroduction and different types of Ethernet.pptx
Introduction and different types of Ethernet.pptxupamatechverse
 
IMPLICATIONS OF THE ABOVE HOLISTIC UNDERSTANDING OF HARMONY ON PROFESSIONAL E...
IMPLICATIONS OF THE ABOVE HOLISTIC UNDERSTANDING OF HARMONY ON PROFESSIONAL E...IMPLICATIONS OF THE ABOVE HOLISTIC UNDERSTANDING OF HARMONY ON PROFESSIONAL E...
IMPLICATIONS OF THE ABOVE HOLISTIC UNDERSTANDING OF HARMONY ON PROFESSIONAL E...RajaP95
 
247267395-1-Symmetric-and-distributed-shared-memory-architectures-ppt (1).ppt
247267395-1-Symmetric-and-distributed-shared-memory-architectures-ppt (1).ppt247267395-1-Symmetric-and-distributed-shared-memory-architectures-ppt (1).ppt
247267395-1-Symmetric-and-distributed-shared-memory-architectures-ppt (1).pptssuser5c9d4b1
 
Software Development Life Cycle By Team Orange (Dept. of Pharmacy)
Software Development Life Cycle By  Team Orange (Dept. of Pharmacy)Software Development Life Cycle By  Team Orange (Dept. of Pharmacy)
Software Development Life Cycle By Team Orange (Dept. of Pharmacy)Suman Mia
 
OSVC_Meta-Data based Simulation Automation to overcome Verification Challenge...
OSVC_Meta-Data based Simulation Automation to overcome Verification Challenge...OSVC_Meta-Data based Simulation Automation to overcome Verification Challenge...
OSVC_Meta-Data based Simulation Automation to overcome Verification Challenge...Soham Mondal
 
(SHREYA) Chakan Call Girls Just Call 7001035870 [ Cash on Delivery ] Pune Esc...
(SHREYA) Chakan Call Girls Just Call 7001035870 [ Cash on Delivery ] Pune Esc...(SHREYA) Chakan Call Girls Just Call 7001035870 [ Cash on Delivery ] Pune Esc...
(SHREYA) Chakan Call Girls Just Call 7001035870 [ Cash on Delivery ] Pune Esc...ranjana rawat
 
UNIT-II FMM-Flow Through Circular Conduits
UNIT-II FMM-Flow Through Circular ConduitsUNIT-II FMM-Flow Through Circular Conduits
UNIT-II FMM-Flow Through Circular Conduitsrknatarajan
 
Call Girls Service Nashik Vaishnavi 7001305949 Independent Escort Service Nashik
Call Girls Service Nashik Vaishnavi 7001305949 Independent Escort Service NashikCall Girls Service Nashik Vaishnavi 7001305949 Independent Escort Service Nashik
Call Girls Service Nashik Vaishnavi 7001305949 Independent Escort Service NashikCall Girls in Nagpur High Profile
 
CCS335 _ Neural Networks and Deep Learning Laboratory_Lab Complete Record
CCS335 _ Neural Networks and Deep Learning Laboratory_Lab Complete RecordCCS335 _ Neural Networks and Deep Learning Laboratory_Lab Complete Record
CCS335 _ Neural Networks and Deep Learning Laboratory_Lab Complete RecordAsst.prof M.Gokilavani
 
(RIA) Call Girls Bhosari ( 7001035870 ) HI-Fi Pune Escorts Service
(RIA) Call Girls Bhosari ( 7001035870 ) HI-Fi Pune Escorts Service(RIA) Call Girls Bhosari ( 7001035870 ) HI-Fi Pune Escorts Service
(RIA) Call Girls Bhosari ( 7001035870 ) HI-Fi Pune Escorts Serviceranjana rawat
 
(ANVI) Koregaon Park Call Girls Just Call 7001035870 [ Cash on Delivery ] Pun...
(ANVI) Koregaon Park Call Girls Just Call 7001035870 [ Cash on Delivery ] Pun...(ANVI) Koregaon Park Call Girls Just Call 7001035870 [ Cash on Delivery ] Pun...
(ANVI) Koregaon Park Call Girls Just Call 7001035870 [ Cash on Delivery ] Pun...ranjana rawat
 
Porous Ceramics seminar and technical writing
Porous Ceramics seminar and technical writingPorous Ceramics seminar and technical writing
Porous Ceramics seminar and technical writingrakeshbaidya232001
 
Call for Papers - Educational Administration: Theory and Practice, E-ISSN: 21...
Call for Papers - Educational Administration: Theory and Practice, E-ISSN: 21...Call for Papers - Educational Administration: Theory and Practice, E-ISSN: 21...
Call for Papers - Educational Administration: Theory and Practice, E-ISSN: 21...Christo Ananth
 
Top Rated Pune Call Girls Budhwar Peth ⟟ 6297143586 ⟟ Call Me For Genuine Se...
Top Rated  Pune Call Girls Budhwar Peth ⟟ 6297143586 ⟟ Call Me For Genuine Se...Top Rated  Pune Call Girls Budhwar Peth ⟟ 6297143586 ⟟ Call Me For Genuine Se...
Top Rated Pune Call Girls Budhwar Peth ⟟ 6297143586 ⟟ Call Me For Genuine Se...Call Girls in Nagpur High Profile
 
UNIT-III FMM. DIMENSIONAL ANALYSIS
UNIT-III FMM.        DIMENSIONAL ANALYSISUNIT-III FMM.        DIMENSIONAL ANALYSIS
UNIT-III FMM. DIMENSIONAL ANALYSISrknatarajan
 
Call Girls in Nagpur Suman Call 7001035870 Meet With Nagpur Escorts
Call Girls in Nagpur Suman Call 7001035870 Meet With Nagpur EscortsCall Girls in Nagpur Suman Call 7001035870 Meet With Nagpur Escorts
Call Girls in Nagpur Suman Call 7001035870 Meet With Nagpur EscortsCall Girls in Nagpur High Profile
 
Processing & Properties of Floor and Wall Tiles.pptx
Processing & Properties of Floor and Wall Tiles.pptxProcessing & Properties of Floor and Wall Tiles.pptx
Processing & Properties of Floor and Wall Tiles.pptxpranjaldaimarysona
 

Último (20)

(PRIYA) Rajgurunagar Call Girls Just Call 7001035870 [ Cash on Delivery ] Pun...
(PRIYA) Rajgurunagar Call Girls Just Call 7001035870 [ Cash on Delivery ] Pun...(PRIYA) Rajgurunagar Call Girls Just Call 7001035870 [ Cash on Delivery ] Pun...
(PRIYA) Rajgurunagar Call Girls Just Call 7001035870 [ Cash on Delivery ] Pun...
 
Roadmap to Membership of RICS - Pathways and Routes
Roadmap to Membership of RICS - Pathways and RoutesRoadmap to Membership of RICS - Pathways and Routes
Roadmap to Membership of RICS - Pathways and Routes
 
VIP Call Girls Service Hitech City Hyderabad Call +91-8250192130
VIP Call Girls Service Hitech City Hyderabad Call +91-8250192130VIP Call Girls Service Hitech City Hyderabad Call +91-8250192130
VIP Call Girls Service Hitech City Hyderabad Call +91-8250192130
 
Introduction and different types of Ethernet.pptx
Introduction and different types of Ethernet.pptxIntroduction and different types of Ethernet.pptx
Introduction and different types of Ethernet.pptx
 
IMPLICATIONS OF THE ABOVE HOLISTIC UNDERSTANDING OF HARMONY ON PROFESSIONAL E...
IMPLICATIONS OF THE ABOVE HOLISTIC UNDERSTANDING OF HARMONY ON PROFESSIONAL E...IMPLICATIONS OF THE ABOVE HOLISTIC UNDERSTANDING OF HARMONY ON PROFESSIONAL E...
IMPLICATIONS OF THE ABOVE HOLISTIC UNDERSTANDING OF HARMONY ON PROFESSIONAL E...
 
247267395-1-Symmetric-and-distributed-shared-memory-architectures-ppt (1).ppt
247267395-1-Symmetric-and-distributed-shared-memory-architectures-ppt (1).ppt247267395-1-Symmetric-and-distributed-shared-memory-architectures-ppt (1).ppt
247267395-1-Symmetric-and-distributed-shared-memory-architectures-ppt (1).ppt
 
Software Development Life Cycle By Team Orange (Dept. of Pharmacy)
Software Development Life Cycle By  Team Orange (Dept. of Pharmacy)Software Development Life Cycle By  Team Orange (Dept. of Pharmacy)
Software Development Life Cycle By Team Orange (Dept. of Pharmacy)
 
OSVC_Meta-Data based Simulation Automation to overcome Verification Challenge...
OSVC_Meta-Data based Simulation Automation to overcome Verification Challenge...OSVC_Meta-Data based Simulation Automation to overcome Verification Challenge...
OSVC_Meta-Data based Simulation Automation to overcome Verification Challenge...
 
(SHREYA) Chakan Call Girls Just Call 7001035870 [ Cash on Delivery ] Pune Esc...
(SHREYA) Chakan Call Girls Just Call 7001035870 [ Cash on Delivery ] Pune Esc...(SHREYA) Chakan Call Girls Just Call 7001035870 [ Cash on Delivery ] Pune Esc...
(SHREYA) Chakan Call Girls Just Call 7001035870 [ Cash on Delivery ] Pune Esc...
 
UNIT-II FMM-Flow Through Circular Conduits
UNIT-II FMM-Flow Through Circular ConduitsUNIT-II FMM-Flow Through Circular Conduits
UNIT-II FMM-Flow Through Circular Conduits
 
Call Girls Service Nashik Vaishnavi 7001305949 Independent Escort Service Nashik
Call Girls Service Nashik Vaishnavi 7001305949 Independent Escort Service NashikCall Girls Service Nashik Vaishnavi 7001305949 Independent Escort Service Nashik
Call Girls Service Nashik Vaishnavi 7001305949 Independent Escort Service Nashik
 
CCS335 _ Neural Networks and Deep Learning Laboratory_Lab Complete Record
CCS335 _ Neural Networks and Deep Learning Laboratory_Lab Complete RecordCCS335 _ Neural Networks and Deep Learning Laboratory_Lab Complete Record
CCS335 _ Neural Networks and Deep Learning Laboratory_Lab Complete Record
 
(RIA) Call Girls Bhosari ( 7001035870 ) HI-Fi Pune Escorts Service
(RIA) Call Girls Bhosari ( 7001035870 ) HI-Fi Pune Escorts Service(RIA) Call Girls Bhosari ( 7001035870 ) HI-Fi Pune Escorts Service
(RIA) Call Girls Bhosari ( 7001035870 ) HI-Fi Pune Escorts Service
 
(ANVI) Koregaon Park Call Girls Just Call 7001035870 [ Cash on Delivery ] Pun...
(ANVI) Koregaon Park Call Girls Just Call 7001035870 [ Cash on Delivery ] Pun...(ANVI) Koregaon Park Call Girls Just Call 7001035870 [ Cash on Delivery ] Pun...
(ANVI) Koregaon Park Call Girls Just Call 7001035870 [ Cash on Delivery ] Pun...
 
Porous Ceramics seminar and technical writing
Porous Ceramics seminar and technical writingPorous Ceramics seminar and technical writing
Porous Ceramics seminar and technical writing
 
Call for Papers - Educational Administration: Theory and Practice, E-ISSN: 21...
Call for Papers - Educational Administration: Theory and Practice, E-ISSN: 21...Call for Papers - Educational Administration: Theory and Practice, E-ISSN: 21...
Call for Papers - Educational Administration: Theory and Practice, E-ISSN: 21...
 
Top Rated Pune Call Girls Budhwar Peth ⟟ 6297143586 ⟟ Call Me For Genuine Se...
Top Rated  Pune Call Girls Budhwar Peth ⟟ 6297143586 ⟟ Call Me For Genuine Se...Top Rated  Pune Call Girls Budhwar Peth ⟟ 6297143586 ⟟ Call Me For Genuine Se...
Top Rated Pune Call Girls Budhwar Peth ⟟ 6297143586 ⟟ Call Me For Genuine Se...
 
UNIT-III FMM. DIMENSIONAL ANALYSIS
UNIT-III FMM.        DIMENSIONAL ANALYSISUNIT-III FMM.        DIMENSIONAL ANALYSIS
UNIT-III FMM. DIMENSIONAL ANALYSIS
 
Call Girls in Nagpur Suman Call 7001035870 Meet With Nagpur Escorts
Call Girls in Nagpur Suman Call 7001035870 Meet With Nagpur EscortsCall Girls in Nagpur Suman Call 7001035870 Meet With Nagpur Escorts
Call Girls in Nagpur Suman Call 7001035870 Meet With Nagpur Escorts
 
Processing & Properties of Floor and Wall Tiles.pptx
Processing & Properties of Floor and Wall Tiles.pptxProcessing & Properties of Floor and Wall Tiles.pptx
Processing & Properties of Floor and Wall Tiles.pptx
 

217 quick guide to photoshop cs6

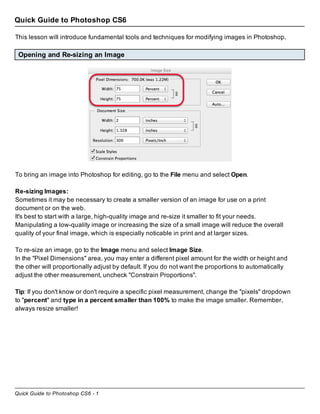
  • 1. Quick Guide to Photoshop CS6 - 1 Quick Guide to Photoshop CS6 This lesson will introduce fundamental tools and techniques for modifying images in Photoshop. Opening and Re-sizing an Image To bring an image into Photoshop for editing, go to the File menu and select Open. Re-sizing Images: Sometimes it may be necessary to create a smaller version of an image for use on a print document or on the web. It's best to start with a large, high-quality image and re-size it smaller to fit your needs. Manipulating a low-quality image or increasing the size of a small image will reduce the overall quality of your final image, which is especially noticable in print and at larger sizes. To re-size an image, go to the Image menu and select Image Size. In the "Pixel Dimensions" area, you may enter a different pixel amount for the width or height and the other will proportionally adjust by default. If you do not want the proportions to automatically adjust the other measurement, uncheck "Constrain Proportions". Tip: If you don't know or don't require a specific pixel measurement, change the "pixels" dropdown to "percent" and type in a percent smaller than 100% to make the image smaller. Remember, always resize smaller!
  • 2. Quick Guide to Photoshop CS6 - 2 Apply Adjustments to your Image The Adjustments panel has a wide selection of image editing options. If you do not see the Adjustments panel, go to the Window menu and click Adjustments. Hover your cursor over each box to see the name of the effect. By using the following adjustments, you can customize the intensity of the effects. Row 1: Brightness and Contrast, Levels, Curves, Exposure, Vibrance Row 2: Hue/Saturation, Color Balance, Black & White, Photo Filter, Channel Mixer, Color Lookup Row 3: Invert, Posturize, Threshold, Gradient Map, Selective Color Based on your choice of adjustment, the panel will display any options available for fine-tuning the effect. Click on the top right icon of the panel to close this window. Tip: How do I make my image sepia-toned, like an antique photograph? 1. Click on the Black and White icon from the Adjustments panel. 2. Check the "Tint" box. 3. Click the "Auto" button.
  • 3. Quick Guide to Photoshop CS6 - 3 Working with Layers As you add adjustments to your image, you'll notice that information is saved and stacked on top of your original image in the Layers Panel. The order of your layers matter; each layer changes the appearance of every layer underneath. To show or hide layers, click the eye icons next to each layer. To remove a layer from your image, select the layer and click the trash can icon. Go Back in Time with the History Panel To undo the most recent change to your image, go to the Edit menu and click "Undo" or "Step Backward". For more control of what steps you undo, including a list of all the changes you have made to the image this session, use the History panel. To display your History, go to the Window menu and choose "History". Removing changes: 1. Select the edit you wish to undo in the list in the History panel. 2. Click the trash can icon. 3. In the pop-up dialog box "Delete state...?" select Yes. Please note: any effects created after the effect you removed will also be undone as well!
  • 4. Quick Guide to Photoshop CS6 - 4 Basic Photoshop Tools The following are some basic tools for modifying your image in Photoshop: Crop: Cuts the image down to a selected portion of the image, removing the unselected area. Eraser: Remove parts of the image manually by clicking and dragging over the image. Be aware of which layer you are in prior to using this tool, or you may be erasing part of the image you meant to keep. If there are no layers beneath the one you are erasing, the background color will be revealed.
  • 5. Quick Guide to Photoshop CS6 - 5 Foreground and Background Colors: Change the colors by double-clicking on one of the boxes. Switch the order of colors by clicking on the bent double-sided arrow. Quick Mask: see the "Quick Mask Mode" section of this document for instructions on this feature. Extracting the Subject of an Image If your subject is a simple shape of straight lines, or if the subject has high contrast from the background, try the easy-to-use Quick Selection Tool or Polygonal Lasso Tool to select your subject. While there are several methods for removing a intricate subject from an image with a complex background, the following process is fast to learn and do even though it requires some patience. Use the Magnetic Lasso Tool to trace the border of the subject to draw a custom selection. 1. Click and hold the Lasso Tool icon until a list of other lasso tools appears. Choose Magnetic Lasso Tool from the list. 2. Check to make sure you have the correct layer selected - the one that contains your subject. Zoom in if necessary to see the finer edges of your subject better. 3. Using the tail end of the lasso icon, click once where the edge of your subject meets the background. 4. Slowly click and drag your cursor around the border of your image, tracing your way all around the subject. 5. When you come to the first click point place you started, move the cursor so that you see a small circle appear next to the cursor. When you see the circle, click once more. This completes the selection. Tip: If you using the lasso tool and mess up, click until a selection is made, then deselect. You can deselect by using Command or Control + D or by going to Select > Deselect.
  • 6. Quick Guide to Photoshop CS6 - 6 Quick Mask Mode While you may have done your best to patiently manuver around the subject, you may have accidently missed parts of the subject or selected a portion of the background. You can clean up your lasso work using the Quick Mask tool. 1. Go to the Select menu and choose Inverse to change your selection to your background. 2. Click on the Quick Mask Mode tool. Notice how your subject turns red. 3. Use the Paintbrush tool to paint over the parts of the subject you missed. The paintbrushing will add that area to your original selection. You may need to change your brush settings in the top left menu bar to adjust the size and shape of your brush head. 4. Use the Eraser tool to erase the red that bleeds over into the background (the parts of the background you accidently selected). 5. When you're done, click the Quick Mask icon again to leave this mode. Notice your selection looks much better now! Going the Extra Mile: Go to Select > Refine Edge for more advanced options for managing your selection. Try the following settings for a softer edge to your selection, or play with it on your own: Radius: 1.0; Smooth: 2; Feather: 1.0; Contrast: 0 Removing the Background With your selection around the background of your image: 1. Double-click your Background layer and rename it. This removes the lock icon from the layer and now we can remove the background. (Alternately, right-click the Background layer and
  • 7. Quick Guide to Photoshop CS6 - 7 choose "Duplicate Layer..." to make a copy. We will remove the background from the copy and hide the original image by clicking on the eye icon.) 2. With the correct layer selected, go the the Edit menu and choose Clear. The gray and white checkered boxes indicate that the background is transparent. 3. To return your selection around your subject, Select > Inverse again. Creating a new Image Now that we've finished extracting our subject from its background, let's say that we want to create a new image that includes our cut-out subject: 1. With your subject selected, go to the Edit menu and choose Copy, or Command or Control + C. 2. Go to the FIle menu, then choose New. 3. In the "New" dialog box, name your new image and specify a width and height by entering them manually or choosing from a custom preset size. If you do not specify a size, it will be the size of your copied subject by default. 4. Change the "Background Contents" drop-down to "transparent". The grey and white checkered boxes indicate that the background is transparent. 5. Click OK. 6. Go to the Edit menu and choose Paste, or Command or Control + V. Now you're ready to save this file.
  • 8. Quick Guide to Photoshop CS6 - 8 Saving your Image Go to File and choose Save As... to save your new image. Pay special attention to the file type you select. Tips: • To ensure your file maintains its transparent background, save the file as a .gif or a .png (PNG-24). • Save multiple versions of your images to avoid overwriting your original. Saving for the Web Is your image for the web (or screen use) only? Use the Save for Web option: 1. Go to the File menu and choose Save for Web... 2. Choose your preferred file type from the drop-down and click the Save button. Learn more about the Save for Web feature: http://sixrevisions.com/web_design/comprehensive-guide-saving-images-for-web Getting Help Photoshop Workshops at St. Edward's University, sponsored by Instructional Technology: Want more, in-depth training? We offer monthly Photoshop workshops and one-on-one training sessions. • Adobe Photoshop I - Selections and Layers: An introduction to the established standard in digital photo editing, Adobe Photoshop. Learn about the interface and basic features as well as a wide variety of options for selecting portions of an image. Also learn about the interaction
  • 9. Quick Guide to Photoshop CS6 - 9 of layers and text. • Adobe Photoshop II - Image Adjustment & Correction: Learn how to make digital prints look their best using powerful image adjustment tools and restore photos with corrective tools. • Web Graphics in Adobe Photoshop: Learn how to create and edit web-safe images for your website. • Photoshop Advanced Techniques: Learn how to deal with common problems such as knocking out complex backgrounds and adjusting back-lit photos • Photoshop Black & White Techniques: Learn how to use Photoshop to make black and white photos look their best. This includes effective conversion from color to B&W. Also, learn about restoring old photos. Register online today at: http://frc.stedwards.edu/workshop Need time to work on your projects with assistance from a Trainer? Come by the training room during Innovation Creation Lounge hours. Online Help from Adobe: AdobeTV's "Getting Started with Photoshop CS6" videos: http://tv.adobe.com/show/learn-photoshop-cs6 Adobe's Photoshop Help and Tutorials: http://helpx.adobe.com/content/help/en/photoshop/topics.html St. Edward's University Instructional Technology Training http://think.stedwards.edu/computerhelp/training | training@stedwards.edu Watch our screencasts online: http://www.youtube.com/StEdwardsITtraining Image Credit: "An open pink lotus - some rain drops evident" by C. Frank Starmer http://frank.itlab.us/photo_essays/wrapper.php?jan_30_2011_SBG.html Available under Creative Commons BY-NC-SA 3.0 license: creativecommons.org/licenses/by-nc-sa/3.0