Equivalents Project Summary Powerpoint
•Descargar como PPTX, PDF•
0 recomendaciones•295 vistas

This is my Equivalents Project Summary which involved me in evaluating my own performance in many different ways, looking at Visual Language, Annotation, Time Management and many other aspects.

Recomendados
Más contenido relacionado
La actualidad más candente
La actualidad más candente (20)
Destacado
Similar a Equivalents Project Summary Powerpoint
Similar a Equivalents Project Summary Powerpoint (20)
Más de Courtney Grant
Más de Courtney Grant (10)
Último
Último (20)
Equivalents Project Summary Powerpoint
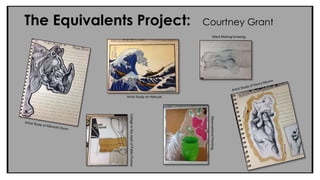
- 1. The Equivalents Project: Courtney Grant Artist Study on Hokusai. Collage in the style of Pablo Picasso. Mark Making Drawing. Observational Painting.
- 2. Primary Sources: Secondary Sources: Primary Source: a document or physical object which was written or created during the time under study. Above are examples of some of the Primary Sources that I used while completing the Equivalents Project, they are photographs of the Still Life that I studies when drawing in different types of media for example pencil, charcoal and black ink. The three images above include the Still Life I observed when painting with acrylic paint (the Material), the pegs I studies when I was drawing with fine liner and finally the log I used to draw many of my observations for example my measured drawing and mark making drawing. These Primary Sources were very useful when completing the Equivalents project because without them I would not have been able to create detailed studies from them, I would not have been able to draw and first hand observations. Secondary Source: information that was created later by someone who did not experience first-hand or participate in the events or conditions you’re researching. For example text books, collages or artist studies. To the left is an example of Secondary Source that I created while completing the Equivalents Project. It is an Artist Study on Albrecht Durer, he specialised in painting and engraving. To create the artist study I used black colouring pencil as I think it is the easiest media to complete an observational copy because you can add tone by pressing hard or lightly, black colouring pencil also enables you as the artist to add interesting textures to the drawing for example in this drawing I used many Mark Making techniques because this is what Durer used, for example lots of lines and dots were used to create texture. I used many examples of visual language in this study because it made the drawing look more interesting and that was exactly what Albrecht Durer did, examples of the visual language used is tone, lines, form and shape. To the right is another example of Secondary Source that I used in the Equivalents Project, it is a collage that I did in the style of Pablo Picasso. When creating this collage I kept on looking back at Picassos work to make sure that I kept my work in the style of Picasso. In the collage I used similar colours that Picasso used because it adds to the collage being in the style of Picasso, I also tried to keep the collage to a minimum because Picasso’s work is not crowded, it is very spaced out and had a lot of Negative Space. To the left is another example of Primary Resource that I created while completing the Equivalents Project, it is a study of the Still Life, it consisted of me observing the log and translating it onto paper by drawing exactly what I saw, every mark and shadow had to be drawn. I used HB Pencil to create this study because it is an easy media as you can rub the mistakes you made out, enabling you to improve your drawing.
- 3. Formal Elements in my work: To the left is an example where Formal Elements was used in the Equivalents Project. For this piece of work I used a range of drawing pencils, for example I used HB Pencil for the basic outline and some of the shading because it comes out lightly compared to other pencils and it is easy to use and rub out. I also used a 2B and 4B Pencil to get the really dark tones and to create some of the mark making. Firstly I drew the basic outline of the log with a HB Pencil because if you make a mistake it is really easy to rub out and correct it to make the drawing look more precise and correct. I then started lightly shading in the light and dark tones with a plain HB Pencil, thereafter I went over some of the darker shades with a 2B or 4B Pencil to get really dark tones to show where the shadows are. To add the Mark making techniques I used a HB Pencil and a 2B Pencil because they are light, however can also create very dark shades if you press hard. I used many Mark making techniques, for example clumps of dots that create the texture of the wood, also I used cross hatching to show where some of the dark tones are because it is an effective way to use Mark Making techniques to create a drawing. I also used many lines to create the texture of the log, showing the wood grain which made the drawing look more realistic and professional. I used many Formal Elements in this Observational Drawing for example I used tone, to make the drawing look 3D, shape to make the drawing actually look like a log, I used line to draw the basic shape and in the mark making to create a wood kind of texture. I also used the formal element of pattern and texture in this drawing to make it look more realistic and to create a unique finish to the drawing. To the right is another example of a piece of work that I completed during the Equivalents Project that used many Formal Elements. This painting was created by studying the still life structures that were right in front of me when I was painting. I created this painting firstly by putting a wash of colour onto the white paper, I chose to do a burnt brown colour because I thought that it was boring and dull so when I painted different objects onto the was of burnt brown the colours would stand out more. Secondly, I started painting the basic outlines of the 3 different objects I was going to paint, I did the outlines in light colours because this meant that I could paint over it in bold and bright colours without the outline showing through. I painted block colours and then started adding darker tones to create a 3D effect for the anointing. I used many Formal Elements in this painting, for example I used colour especially as the anointing was from observation so I tried to get the true colours to the real life objects, I used swatches to test the colours out to make sure I had the correct colour. I also used texture in this painting in the feather, I used light and dark paint strokes to create a fluffy kind of texture to symbolise the feather, I also used different shades of grey to show the change in tone of the feather. I used shape in this painting to show the different parts of the different objects I decided to paint, for example the cup includes two different shapes, the piece of material also has many different shapes in it to create a pattern.
- 4. Visual Language in my work: Visual Language: A visual language is a system of communication using visual elements. To the right is an example where Visual Language was used in the Equivalents Project. In this piece of work I was instructed to create a collage in the style of Pablo Picasso, however also taking into consideration the Still Life. I decided to use the log again as the basic shape because I think that the log provides me with an interesting shape that can be used in many different ways. In this collage I used the log as my main focus, I used coffee stained paper because it showed an interesting colour, In this collage I also used newspaper, black paper, HB Pencil and Black Felt Tip. This piece of work that I have created has been influenced by Pablo Picasso in the way that I was told to create a collage in the Style of Pablo Picasso, for example I have used similar materials to Picasso, like I have used worded text which he uses in his collages, I think this is effective because it is a different way of using newspaper, it gives the collage a different meaning. Someone could see the text as telling a story, another person could just see it as an interesting piece of material incorporated into a collage. I have also used smudges pencil lines, as Picasso does around my log like shape because It makes the log look more bold. I have used solid black lines like Picasso in the background of the collage because they are daring and catch the audiences eye, however I have used a different colour paper for the log (brown coffee stained paper) because the log is the main feature of the collage, it is the first object a person sees when they look at the collage. To make my collage look more in the style of Picasso I have used newspaper wording ‘Great Friend’ as Picasso used words to create a meaning for his collage. I have used the words ‘Great Friend’ because I had been studying and observing the log for a few weeks, it had become familiar, just like a great friend. To the right is another example of how Visual Language was used in the Equivalents Project. This involved me studying 3 Artists and the way they take pictures, the different effects they use and why. These 3 images on the left are images that I have taken and edited in the style of the three Photography artists. I chose to look at Man Ray, Martin Parr and Imogen Cunningham because I thought their work was interesting and very eye-catching. These images of my sculpture have been influenced by the artists I chose because I tried to make them look similar, in the way that I tried to get the lighting right, for example to make my image look like Man Ray’s I made the light come from the back and shine through the object because that is what Ray has done, it creates an interesting effect, I also made one of my images I the style of Martin Parr, in the way that in most of his images he has enhanced some aspects of the colour, normally orange or blue, for this reason I have made the burnt brown/orange colour in my edit look ore bold and prominent.
- 5. Techniques and Mixed Media: Mixed Media: a variety of media (materials, techniques) used in an entertainment or work of art. To the left is my final design for my Collograph Plate, I came up with this design taking into consideration all the different shapes, objects and textures I explored in my sketchbook, for example I got the log shape from the observational drawing I did at the beginning of the project and I got the squared from the negative space in the netting from the Still Life. I made this plate using a variety of different materials. Some of them include fabric from a Fabric Book which involved many different shapes and texture, for example I thought the stripy fabric perfectly portrayed the wood grain texture of the log. Another example of material I used is masking tape as the background, masking tape is an adhesive tape used in art to cover areas on which paint is not wanted, however I used masking tape because I thought that it would create an interesting background for my plate, it is better than having a plain background with no shape or texture. I also used cardboard that I ripped up because I thought that it would create a really interesting pattern for part of the log. I ripped some of the cardboard off, leaving a serrated surface that would create an fascinating wood grain effect. Lastly, I used Sand Paper which is paper with sand or another abrasive stuck to it, used for smoothing or polishing woodwork or other surfaces. I used this material because I though t that it would leave a pattern of lots of tiny dots which would symbolise that marks on the log that I studied. To the right is another example of a piece of work that involved me using Mixed Media, in this piece of work I used newspaper, brown paper, black paper, white paper, beige paper, ink, charcoal, HB Pencil and Graphite. This piece of work involved me working on a large scale with the brown paper being about A1 sized. Firstly I drew the outline of the basic shapes with a HB Pencil and then I used black and white paper to cut out the shapes I needed, for example I has to cut out the negative space in black to represent the negative space around the actual shape of the log which is shown in white. I then used the letters and text in newspaper to create the shape of the fabric that was above the log. I used black and white squared of paper to represent the netting that fell on top of the fabric and log in the Still Life. Lastly, I used a range of different media to show the texture of the log on a crisp white piece of A4 Paper, I used ink which is a coloured fluid used for writing, drawing or painting to show the really dark shades, I used charcoal to give the log a background colour and graphite to show the texture of the log, using mark making techniques.
- 6. Health and Safety: Health and Safety: regulations and procedures intended to prevent accident or injury in workplaces or public environments. Health and Safety is very important in the Workshop as there are many machines that can harm you. I have created a spread of the Workshop Machines with pictures and an explanation of what the machine does and the Health and Safety procedures that you have to follow when using certain machines. An example of a machine that is in the Workshop is the Band Saw which is a saw with an endless steel belt that rotated fast with a serrated edge. The Band Saw is very dangerous because it can cut anything in its path. When using the Band Saw you have to be wearing an overall and gloves, you also need to make sure that your hair is tied back as if it gets caught the machine will pull you towards the blade. While using the Band Saw you also need to make sure that you do not have headphones in because they stop you being able to hear instructions from the teacher, for this reason you might miss instruction or commands which would be useful to you. You always need to follow the procedures of the Workshop or you could get hurt. Health and Safety in my work: To the left is my Initial Designs for my sculpture. This piece of work included me sketching a few ideas for a sculpture that was inspired by my Collograph Print. I did these sketches using a HB Pencil because they are easy to use and you are able to rub them out, meaning that you can improve your sketches and make4 changes to them if they are in need of any changes. I made a paper model of one of my ideas for a sculpture and it turned out like this: To create this paper model I used plain brown paper, scissors and a glue stick. Some of the Health and Safety issues I had to think about were the sharpness of the scissors. Below is an image that I have taken of my finished sculpture made of thick grey board, brown paper that has been cut and a mini cube that I made from brown paper. I developed this idea from one of my initial ideas and added a few more characteristics to make it more interesting. While making the sculpture to the left I had to take into consideration many aspects of Health and Safety, for example while cutting out the frame of the cube I had to think about using a steel ruler instead of a plastic ruler so it is less likely to slip and cut you, I also had to use a cutting/drawing mat to cut on so the craft knife did not cut the table. Also while making this sculpture I used a glue gun. I had to be very careful while using the glue gun because the glue is extremely hot and will burn your skin. When I made the little cube, I had to take into consideration that scissors are sharp and could cut you.
- 7. Evaluation Summary: • The Project was quite fast pace and involved completing work to a high standard in a short period of time, I feel that I could have used all the time in lessons effectively and done as much as I could. • I think that I could have improved on my Time Management in terms of the homework tasks, for example I could have completed every aspect of the homework task on time and to a high standard. • The Equivalents Project involves a lot of research into artists and the way they work, I feel that I could have researched more into the ways that the artists used the materials and media they used, this would enable me to understand their work more and make it more clear. • The Development of my Collograph Plate went very well because I knew exactly what I was doing as I planned it before, for example I had chose all the different materials I was going to use and what I was going to use the for. • If I was to do this project again I would keep up to date will all the work and complete all the tasks needed to in lessons. I would also spend more time researching into the different ways of drawing the Still Life, for example I would look into the different media that could be used, like fine liner, graphite, chalk, black pen and pencil, this would make my work more interesting and unique. • I have learned many different skills in the project, for example I feel that I have experienced many different aspects of art that I have never tried out before, like I had never before worked in charcoal to complete an observational drawing, however in this project I was taught how to use charcoal, however I found it quite hard to control. I also think that I have gained confidence in my drawing skills throughout the Equivalents Project. These are a few examples of my work mentioned: